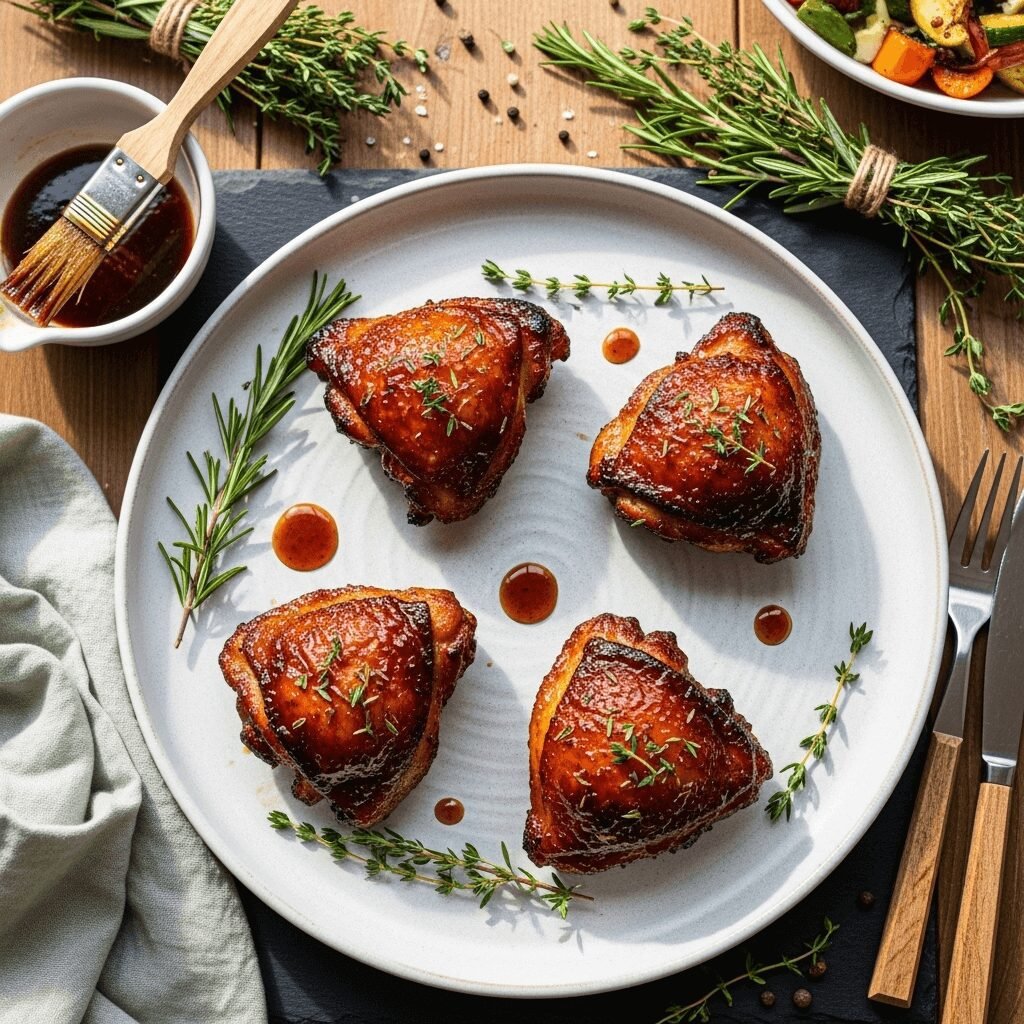

Get ready to fall head over heels for these Sweet Maple Glazed Chicken Thighs – a recipe that transforms humble chicken thighs into sticky, caramelized perfection with just a handful of ingredients. Imagine juicy, tender chicken with crispy, golden-brown skin coated in a glossy maple glaze that’s the perfect balance of sweet, savory, and slightly tangy. Each bite delivers that irresistible combination of sticky-sweet exterior and succulent, flavorful meat that will have everyone reaching for seconds.
This recipe is an absolute game-changer for busy weeknights when you want something that tastes special without requiring culinary school skills or hours in the kitchen. The maple glaze creates a beautiful lacquered finish that looks like you spent all day in the kitchen, but the reality is that most of the cooking is hands-off time in the oven. It’s fancy enough to serve for Sunday dinner with the family or special enough for a casual dinner party, yet simple enough to make on a random Tuesday when you just want something delicious.
What makes this recipe particularly brilliant is its versatility. The sweet maple glaze pairs beautifully with roasted vegetables, creamy mashed potatoes, fluffy rice, or even a crisp salad. It’s the kind of dinner that appeals to both kids and adults – the sweet glaze wins over picky eaters while the depth of flavor from the soy sauce and garlic keeps adult palates interested. Whether you’re meal prepping for the week, feeding a hungry family, or looking to impress without stress, these maple glazed chicken thighs are about to become your new favorite go-to recipe.
History / Background
Maple-glazed proteins have deep roots in North American cuisine, particularly in regions where maple syrup production has been a cultural tradition for centuries. Native Americans were the first to discover maple syrup, teaching European settlers how to tap maple trees and boil the sap down into the sweet, amber syrup we know today. Vermont, Quebec, and other northeastern regions have been producing maple syrup for over 300 years, making it one of North America’s most iconic ingredients.
The tradition of glazing meats with sweet syrups dates back to colonial times when cooks would brush ham and poultry with maple syrup, molasses, or honey before roasting. This technique served multiple purposes – it created an appealing caramelized crust, helped preserve the meat, and added precious sweetness to meals when refined sugar was expensive and hard to come by. Maple-glazed ham became a holiday staple, particularly around Easter and Thanksgiving, showcasing the ingredient’s ability to elevate simple proteins into something celebratory.
The specific combination of maple syrup with soy sauce represents a more modern fusion, blending traditional North American sweetness with Asian umami flavors. This east-meets-west approach gained popularity in the 1980s and 1990s as American home cooks became more adventurous with global flavors. The salty-sweet profile created by maple and soy sauce mirrors popular Asian glazes like teriyaki while maintaining a distinctly American character through the maple syrup.
Chicken thighs, once considered a less desirable cut compared to breasts, have experienced a renaissance in recent years as home cooks and chefs have come to appreciate their superior flavor, juiciness, and forgiving nature. They’re harder to overcook than chicken breasts and their higher fat content makes them perfect for glazing – the extra fat helps the glaze caramelize beautifully while keeping the meat incredibly tender. This recipe represents the perfect marriage of North American maple tradition with modern cooking techniques and global flavor influences.
Why You’ll Love This Recipe
These Sweet Maple Glazed Chicken Thighs strike that magical balance between impressive and effortless. The glaze creates a stunning presentation with its glossy, mahogany finish that makes the chicken look like it came from a restaurant kitchen. Yet the actual technique is incredibly straightforward – mix a few ingredients, brush on chicken, and let the oven work its magic.
Here’s why this recipe deserves a permanent spot in your dinner rotation:
- Foolproof and Forgiving: Chicken thighs are nearly impossible to overcook, making this perfect for beginner cooks or busy parents who might get distracted
- Minimal Ingredients: Uses pantry staples you likely already have on hand – no specialty ingredients or trips to multiple stores required
- Hands-Off Cooking: Most of the cooking time is passive, giving you freedom to prep sides or help with homework while dinner cooks itself
- Budget-Friendly: Chicken thighs are one of the most affordable cuts of poultry, making this an economical option for families
- Kid-Approved: The sweet glaze appeals to even the pickiest eaters, helping you get protein into reluctant diners
- Naturally Gluten-Free: With one simple substitution (tamari for soy sauce), this recipe accommodates gluten-free diets easily
- Meal Prep Champion: Makes excellent leftovers and reheats beautifully, perfect for weekly meal planning
- Visually Stunning: The glossy, caramelized finish makes this Instagram-worthy and Pinterest-perfect
- Flavor Complexity: Despite simple ingredients, you get layers of flavor – sweet, salty, tangy, and savory all in one bite
- Versatile: Works for casual family dinners, meal prep, potlucks, or entertaining guests
Ingredient Notes
Understanding your ingredients helps you shop smarter and make successful substitutions when needed. Here’s the inside scoop on each component:
Chicken Thighs: Bone-in, skin-on chicken thighs are the star here. The bone helps conduct heat for even cooking and adds flavor, while the skin crisps up beautifully under the broiler and provides richness. Look for thighs that are similar in size (about 4-6 ounces each) for even cooking. If you prefer boneless, skinless thighs, you can use them – just reduce cooking time by about 10 minutes and note that you won’t get that crispy skin texture.
Pure Maple Syrup: Use real maple syrup, not pancake syrup or maple-flavored corn syrup. Real maple syrup has complex flavor notes and natural sugars that caramelize beautifully. Grade A Dark Amber or Grade A Very Dark offer the most robust maple flavor, which stands up well to the other ingredients. While it’s pricier than imitation syrup, the flavor difference is substantial and worth the investment.
Soy Sauce: Provides the essential salty, umami backbone that balances the maple’s sweetness. Regular soy sauce works perfectly, but low-sodium versions give you better control over the salt level. For gluten-free needs, substitute with tamari or coconut aminos. Dark soy sauce can be used for a deeper color and slightly richer flavor.
Garlic: Fresh minced garlic adds aromatic depth and savory notes that round out the sweet-salty profile. Four cloves provide robust flavor without overwhelming the maple. Garlic powder can substitute in a pinch (use 1 teaspoon), but fresh garlic delivers superior flavor.
Dijon Mustard: This is the secret ingredient that elevates the glaze from good to extraordinary. It adds tanginess that cuts through the sweetness and helps emulsify the glaze so it coats the chicken evenly. Yellow mustard can substitute, but Dijon’s sophisticated flavor is worth seeking out.
Apple Cider Vinegar: Provides brightness and acidity that balances the rich sweetness. This small amount makes a big impact, preventing the glaze from being cloying. Rice vinegar or white wine vinegar work as substitutes.
Black Pepper and Optional Red Pepper Flakes: Black pepper adds warmth and depth, while red pepper flakes provide a subtle heat that contrasts beautifully with the sweetness. Both are optional but recommended for a more complex flavor profile.
Olive Oil: Used to coat the chicken before baking, helping the skin crisp and preventing sticking. Avocado oil or vegetable oil work equally well.
Equipment Needed
Having the right tools makes this recipe even easier to execute. Here’s what you’ll need:
- Large Baking Dish or Sheet Pan (9×13-inch or larger): Needs to hold all chicken thighs in a single layer without crowding. A rimmed sheet pan works beautifully, especially if lined with foil for easy cleanup. Glass, ceramic, or metal all work well.
- Small Mixing Bowl: For combining glaze ingredients. A 2-cup measuring cup with a spout also works great and makes pouring easier.
- Whisk or Fork: To thoroughly combine the glaze ingredients into a smooth mixture.
- Basting Brush or Silicone Brush: Essential for applying the glaze evenly across the chicken. Silicone brushes are easier to clean than natural bristle brushes.
- Meat Thermometer: Takes the guesswork out of doneness – you’re looking for 165°F in the thickest part of the thigh.
- Tongs: For flipping chicken and removing it from the hot pan safely.
- Aluminum Foil (optional): For lining the pan, which makes cleanup significantly easier.
- Measuring Cups and Spoons: For accurate ingredient proportions.
- Paper Towels: For patting chicken dry before cooking – a crucial step for crispy skin.
Sweet Maple Glazed Chicken Thighs Recipe
- Total Time: 55 minutes
- Yield: 6 servings 1x
- Diet: Gluten Free
Description
Juicy, tender chicken thighs glazed with a sticky-sweet maple sauce that caramelizes into perfection. This easy baked chicken recipe delivers restaurant-quality results with minimal effort and just 10 minutes of prep time.
Ingredients
For the Chicken:
- 6 bone-in, skin-on chicken thighs (about 2.5-3 lbs total)
- 1 tablespoon olive oil
- 1 teaspoon salt
- ½ teaspoon black pepper
- ½ teaspoon garlic powder
For the Maple Glaze:
- ⅓ cup pure maple syrup
- 3 tablespoons soy sauce (or tamari for gluten-free)
- 4 cloves garlic, minced
- 1 tablespoon Dijon mustard
- 1 tablespoon apple cider vinegar
- ½ teaspoon black pepper
- ¼ teaspoon red pepper flakes (optional)
- Fresh thyme or rosemary for garnish (optional)
Instructions
- Preheat and Prep: Preheat your oven to 400°F (200°C). Line a large baking dish or rimmed sheet pan with aluminum foil for easy cleanup, then lightly grease with cooking spray or oil. Pat the chicken thighs completely dry with paper towels – this is crucial for crispy skin.
- Season the Chicken: Place chicken thighs skin-side up in the prepared baking dish, arranging them in a single layer with a bit of space between each piece. Drizzle with olive oil, then season generously with salt, pepper, and garlic powder. Rub the seasonings into the skin to ensure even coverage.
- Make the Maple Glaze: In a small bowl, whisk together maple syrup, soy sauce, minced garlic, Dijon mustard, apple cider vinegar, black pepper, and red pepper flakes if using. Whisk vigorously for 30-45 seconds until the mixture is smooth and well combined.
- First Glaze Application: Using a basting brush, generously brush about half of the maple glaze over the chicken thighs, making sure to coat each piece thoroughly. Reserve the remaining glaze for later.
- Bake: Place the baking dish in the preheated oven and bake for 35 minutes. The chicken will start to brown and the glaze will begin caramelizing.
- Second Glaze Application: After 35 minutes, remove the pan from the oven and brush the chicken with the remaining glaze. The first layer will have caramelized beautifully, and this second application adds extra flavor and creates that signature glossy finish.
- Final Baking: Return the pan to the oven and continue baking for another 10-15 minutes, until the internal temperature reaches 165°F in the thickest part of the thigh and the skin is deeply golden and crispy.
- Optional Broiler Step: For an extra-crispy, caramelized finish, turn on the broiler for the last 2-3 minutes of cooking. Watch carefully to prevent burning – you want deep golden brown, not charred. The glaze will bubble and caramelize into a gorgeous, lacquered coating.
- Rest and Serve: Remove from the oven and let the chicken rest for 5 minutes. This allows the juices to redistribute throughout the meat. Garnish with fresh thyme or rosemary if desired, and drizzle any pan juices over the top before serving.
Notes
- The chicken is done when it reaches an internal temperature of 165°F. Dark meat is forgiving and actually tastes better when cooked slightly beyond this temperature (up to 175°F), so don’t worry if you go a bit over.
- Don’t skip patting the chicken dry – this step is essential for achieving crispy skin.
- If your glaze is browning too quickly, tent the pan loosely with foil for the remainder of cooking time.
- For extra flavor, marinate the chicken in the glaze for 2-4 hours before cooking, then proceed with the recipe as written.
- Save the pan drippings! They’re packed with flavor and can be spooned over rice or vegetables.
- Prep Time: 10 minutes
- Cook Time: 45 minutes
- Category: Dinner
- Method: Baking
- Cuisine: American
Nutrition
- Serving Size: 1 chicken thigh with glaze
- Calories: 385
- Sugar: 10g
- Sodium: 650mg
- Fat: 22g
- Saturated Fat: 6g
- Unsaturated Fat: 14g
- Trans Fat: 0g
- Carbohydrates: 12g
- Fiber: 0g
- Protein: 32g
- Cholesterol: 165mg
Nutrition information is approximate and will vary based on specific brands used and portion sizes.
Tips & Variations
This versatile recipe adapts beautifully to different tastes and dietary needs. Here are some delicious ways to make it your own:
Make It Spicy: Add sriracha or hot sauce to the glaze (start with 1-2 teaspoons), increase red pepper flakes to 1 teaspoon, or brush with chili oil before serving. The sweetness of the maple pairs beautifully with heat.
Asian-Inspired Variation: Add 1 teaspoon fresh grated ginger and 1 teaspoon sesame oil to the glaze. Garnish with sliced green onions and sesame seeds. Serve over rice with steamed bok choy for a complete Asian-fusion meal.
Herb-Infused: Add 1 tablespoon fresh chopped rosemary or thyme to the glaze, or tuck fresh herb sprigs under the chicken skin before baking. Dried herbs work too – use 1 teaspoon.
Citrus Twist: Add the zest and juice of one orange to the glaze for a bright, citrusy variation. Orange and maple are magical together. Lemon or lime also work beautifully.
Smoky Version: Add 1 teaspoon smoked paprika and ½ teaspoon liquid smoke to the glaze for a barbecue-inspired flavor profile.
Lower Sugar: Reduce maple syrup to ¼ cup and add 2 tablespoons of water or chicken broth to thin the glaze. You’ll still get great flavor with less sweetness.
Boneless Skinless Option: Use boneless, skinless thighs and reduce cooking time to 25-30 minutes total. You’ll sacrifice the crispy skin, but the flavor will still be excellent.
Grilling Variation: These thighs are fantastic on the grill. Grill over medium heat for 6-7 minutes per side, basting frequently with the glaze during the last 5 minutes of cooking.
Weeknight Shortcut: Use pre-minced garlic from a jar to save a couple minutes of prep time.
Pro Chef Tips
These professional techniques will take your chicken from great to absolutely phenomenal:
Dry, Dry, Dry the Skin: This bears repeating because it’s so crucial. Moisture is the enemy of crispy chicken skin. Use paper towels to pat the chicken completely dry, then let it sit uncovered in the refrigerator for 30 minutes to an hour if you have time. This air-drying technique removes even more surface moisture, resulting in incredibly crispy skin.
Room Temperature Chicken: Take chicken out of the refrigerator 20-30 minutes before cooking. Room temperature chicken cooks more evenly than cold chicken straight from the fridge. The interior reaches proper temperature at the same time the exterior caramelizes, preventing overcooked exteriors and undercooked interiors.
Don’t Crowd the Pan: Leave space between each chicken thigh – they should not be touching. Crowding creates steam, which prevents proper browning and crisping. If necessary, use two pans or cook in batches.
Reserve Some Glaze for Finishing: Don’t use all your glaze during cooking. Reserve a few tablespoons of the raw glaze in a separate container. After cooking, warm it briefly and drizzle over the finished chicken for a fresh burst of flavor and extra glossiness.
Score the Skin: For extra-crispy results, use a sharp knife to score the chicken skin in a crosshatch pattern, being careful not to cut into the meat. This allows fat to render more effectively and creates more surface area for crisping.
Low and Slow, Then High Heat: For the most tender meat with crispy skin, some chefs prefer starting at 375°F for 30 minutes, then increasing to 425°F for the last 15 minutes. This gentle initial cooking ensures tender meat, while the high finish crisps the skin.
Use the Pan Drippings: The mixture of rendered chicken fat, caramelized glaze, and juices at the bottom of the pan is liquid gold. Don’t waste it! Spoon it over rice, vegetables, or the chicken itself for extra flavor.
Temperature Check in Multiple Spots: Check temperature in the thickest part of several thighs, not just one. Pieces vary in size, and you want to ensure everything is cooked properly.
Common Mistakes to Avoid
Even simple recipes can go wrong if you’re not aware of potential pitfalls. Here’s what to watch out for:
Using Imitation Maple Syrup: Pancake syrup or maple-flavored corn syrup will not give you the same results. These products contain additives and artificial flavors that don’t caramelize properly and can even burn. Real maple syrup is essential for the authentic flavor and proper texture of this glaze. While it costs more upfront, you only need ⅓ cup, and the difference in taste is dramatic enough to justify the expense.
Not Patting the Chicken Dry: Wet chicken skin will steam rather than crisp in the oven, resulting in rubbery, unappetizing skin. The few seconds it takes to thoroughly dry each piece with paper towels makes an enormous difference in the final texture. If you skip this step, you’ll end up with soggy skin no matter how long you cook it.
Opening the Oven Door Too Often: Every time you open the oven, you release heat and extend cooking time. Resist the urge to check on the chicken constantly. Trust your timer and only open the door when it’s time to apply the second glaze coating. If you have an oven light, use that to peek instead.
Glazing Too Early or Too Often: Applying glaze too early in the cooking process can cause it to burn before the chicken is cooked through. The two-stage glazing approach in this recipe is intentional – the first application happens partway through cooking, and the second near the end. This timing ensures the glaze caramelizes without burning.
Skipping the Resting Time: Cutting into chicken immediately after it comes out of the oven causes all the juices to run out onto your cutting board instead of staying in the meat. Just five minutes of resting makes the chicken noticeably more juicy and tender. Cover it loosely with foil if you’re worried about it getting cold, though properly cooked chicken will retain heat well for several minutes.
Storage & Meal Prep
This recipe is a meal prepper’s dream and makes fantastic leftovers that actually improve overnight as flavors continue to develop.
Refrigerator Storage: Store leftover chicken thighs in an airtight container in the refrigerator for up to 4 days. The glaze will firm up slightly when cold but will loosen again when reheated. For best results, store the chicken with any remaining pan drippings, which will keep it extra moist.
Reheating Methods: The best way to reheat while maintaining crispy skin is in a 350°F oven for 10-15 minutes until warmed through. Place thighs on a baking sheet and tent loosely with foil to prevent over-browning. For quicker reheating, microwave works fine for 1-2 minutes, though you’ll sacrifice the crispy skin – the meat will still be delicious and juicy. You can also reheat in a covered skillet over medium-low heat for 5-7 minutes, adding a splash of water or chicken broth to prevent drying out.
Meal Prep Strategy: These chicken thighs are perfect for Sunday meal prep. Cook the full batch, let cool completely, then divide into individual containers with your chosen sides. They make excellent work lunches or quick weeknight dinners. The flavors actually intensify after a day in the refrigerator, making leftovers taste even better than the original meal.
Repurposing Leftovers: Shred leftover chicken and use it in salads, grain bowls, tacos, quesadillas, or sandwiches. The maple glaze adds amazing flavor to any dish. You can also chop it and toss with pasta and vegetables for a quick noodle bowl.
Make-Ahead & Freezer Notes
Planning ahead makes weeknight cooking even simpler. Here’s how to prep this recipe in advance:
Marinating Ahead: For maximum flavor, place raw chicken thighs and half the glaze in a large zip-top bag. Marinate in the refrigerator for 2-4 hours or up to overnight. When ready to cook, remove chicken from the marinade (discard the used marinade), pat dry, and proceed with the recipe using fresh glaze for basting. This infuses the meat with flavor throughout.
Glaze Make-Ahead: Prepare the maple glaze up to 3 days in advance and store in a sealed container in the refrigerator. The flavors will meld and deepen, actually improving with time. Bring to room temperature before using, whisking to recombine if it has separated.
Freezing Raw Marinated Chicken: Combine raw chicken and glaze in a freezer bag, press out air, seal, and freeze for up to 3 months. When ready to cook, thaw overnight in the refrigerator, then proceed with the recipe. This is an excellent prep-ahead strategy for stocking your freezer with ready-to-cook meals.
Freezing Cooked Chicken: Fully cooked chicken thighs freeze beautifully for up to 3 months. Let them cool completely, then wrap individually in plastic wrap and place in a freezer-safe container or bag. This allows you to thaw individual portions as needed rather than defrosting the entire batch.
Best Thawing Method: For food safety and best texture, always thaw frozen chicken in the refrigerator overnight. Plan ahead by moving it from freezer to fridge the night before you want to serve it. In a pinch, you can use the defrost function on your microwave, but this may cause some loss of texture.
Reheating from Frozen: You can reheat frozen cooked chicken directly from the freezer. Place frozen thighs in a baking dish, cover with foil, and bake at 350°F for 25-30 minutes until heated through. Remove foil for the last 5 minutes to recrisp the skin slightly.
Serving Suggestions
These sweet maple glazed chicken thighs pair beautifully with a wide variety of sides and accompaniments. Here are some delicious serving ideas:
Starch Sides: Serve over fluffy white rice, brown rice, or wild rice pilaf to soak up the delicious pan juices. Creamy mashed potatoes are another excellent choice – the sweet glaze and buttery potatoes are a match made in heaven. For something different, try sweet potato mash, roasted fingerling potatoes, or buttery egg noodles.
Vegetable Pairings: Roasted Brussels sprouts with bacon, maple-roasted carrots, green beans almondine, or roasted asparagus complement the sweet flavors beautifully. Sautéed green beans with garlic offer a simple, fresh contrast. For heartier fare, try roasted root vegetables like parsnips, turnips, and beets.
Salads: A crisp, fresh salad balances the rich chicken perfectly. Try an autumn-inspired salad with mixed greens, dried cranberries, candied pecans, and apple slices with balsamic vinaigrette. A simple Caesar salad or spinach salad with warm bacon dressing also works wonderfully.
Grains and Bowls: Create a power bowl with quinoa, roasted vegetables, and sliced maple chicken. Farro or barley pilaf with dried fruits and nuts echoes the sweet-savory theme. Cauliflower rice works for low-carb eaters.
Complete Meal Ideas: For a classic American dinner, serve with mashed potatoes, roasted green beans, and dinner rolls. For a fall-inspired meal, pair with butternut squash, wild rice, and cranberry sauce. For a lighter option, serve atop a big salad with roasted vegetables and crusty bread on the side.
Bread Options: Crusty artisan bread, buttery biscuits, or cornbread are perfect for soaking up extra glaze and pan juices.
Beverage Pairings: For wine lovers, a Riesling or Gewürztraminer complements the sweet-savory profile beautifully. Pinot Noir or a light red blend works well for red wine drinkers. For non-alcoholic options, try sparkling apple cider or iced tea with lemon.
FAQs Section
Can I use chicken breasts instead of thighs?
While you can substitute chicken breasts, they won’t be as tender or flavorful as thighs since they’re much leaner. If using breasts, reduce cooking time to 25-30 minutes total and watch carefully to avoid overcooking, which happens easily with white meat. Boneless, skinless breasts work but will lack the crispy skin. The glaze will still taste delicious, but expect a different texture – less succulent and more prone to dryness.
Can I make this recipe without the skin?
Absolutely! Boneless, skinless chicken thighs work well with this glaze. The cooking time will be shorter – about 25-30 minutes total at 400°F. You’ll miss out on the crispy skin texture, but the meat will still absorb the glaze beautifully and be tender and flavorful. You can also remove the skin from bone-in thighs if you prefer, though you’ll lose some of the visual appeal and textural contrast.
Is there a substitute for maple syrup?
While nothing perfectly replicates maple’s unique flavor, honey is the closest substitute and works well in this recipe. Use the same amount. Brown sugar mixed with a bit of water (⅓ cup brown sugar + 2 tablespoons water) also works in a pinch, though it lacks maple’s complexity. Agave nectar can be used but is sweeter, so you might want to reduce it slightly and add a touch more vinegar for balance.
How do I know when the chicken is done?
The most reliable method is using a meat thermometer inserted into the thickest part of the thigh without touching bone. You’re looking for 165°F minimum, though dark meat actually benefits from cooking to 175°F for optimal texture. Visually, the juices should run clear when pierced, and the meat should no longer be pink near the bone. If you don’t have a thermometer, cut into the thickest part of one thigh to check – the meat should be opaque throughout.
Can I double this recipe?
Yes! This recipe doubles beautifully for feeding a crowd or meal prep. Use two large baking dishes or sheet pans to ensure chicken pieces aren’t crowded. You may need to rotate the pans halfway through cooking for even browning. Double all ingredients including the glaze – you might even want to make extra glaze for drizzling at serving time.
Why is my glaze burning?
If your glaze is burning before the chicken is cooked through, your oven temperature may be running hot or you’re applying glaze too early. Try reducing temperature to 375°F and tenting the chicken loosely with foil if it’s browning too quickly. Make sure you’re using real maple syrup, not pancake syrup, which contains additives that burn easily. Apply the first glaze coating after 30 minutes of cooking rather than at the beginning.
Can I make this in a slow cooker?
While you can cook chicken thighs in a slow cooker with the glaze, you won’t achieve the caramelized, crispy exterior that makes this recipe special. If using a slow cooker, cook on low for 4-5 hours or high for 2-3 hours, then transfer thighs to a baking sheet and broil for 3-4 minutes to caramelize the glaze and crisp the skin. This two-step method gives you tender meat with a better finish.
Conclusion
These Sweet Maple Glazed Chicken Thighs prove that simple ingredients can create absolutely spectacular results when prepared with care. The sticky-sweet glaze, crispy golden skin, and incredibly juicy meat make this recipe worthy of special occasions, yet it’s easy and affordable enough for regular weeknight rotation. Whether you’re feeding a family, meal prepping for the week, or looking to impress dinner guests without spending hours in the kitchen, this recipe delivers on all fronts.
The beautiful thing about this dish is how forgiving it is – chicken thighs are nearly impossible to overcook, the glaze is simple to prepare, and the results always look and taste impressive. Once you master this basic technique, you can adapt it endlessly with different flavors and seasonings, making it a true workhorse recipe that will serve you well for years to come.
I’d absolutely love to hear how these maple glazed chicken thighs turn out for you! Did you try any of the variations? What sides did you serve alongside? Leave a comment below sharing your experience, rate the recipe, and let me know if you have any questions. If you loved this recipe as much as my family does, please save it to your Pinterest boards so you can find it again and share the deliciousness with other home cooks looking for their next favorite chicken dinner. Happy cooking!

