
There’s something absolutely magical about biting into a perfectly crispy chicken wing coated in a glossy, sweet honey garlic sauce that strikes the perfect balance between savory and sweet. These Sweet Honey Garlic Chicken Wings are the kind of recipe that turns a regular weeknight into something special, transforms game day spreads into legendary feasts, and makes you the MVP of every potluck and party.
Whether you’re hosting a Super Bowl gathering, planning a casual family dinner, or just craving restaurant-quality wings at home, this recipe delivers every single time. The wings get incredibly crispy in the oven (no deep fryer needed!), then get tossed in a sticky, finger-licking honey garlic sauce that’s so good, you’ll want to drizzle it on everything. The best part? This recipe is surprisingly simple and uses ingredients you probably already have in your pantry. No complicated techniques, no fancy equipment – just straightforward steps that lead to absolutely delicious results.
These wings are perfect for serving at birthday parties, holiday gatherings, tailgating events, or those cozy movie nights when you want something a little more exciting than pizza. They’re also incredibly kid-friendly (what child doesn’t love the combination of honey and garlic?), making them a fantastic option for feeding a crowd of all ages. Trust me, once you make these wings, they’ll become a regular rotation in your recipe collection.
History / Background
Chicken wings, believe it or not, weren’t always the superstar appetizer we know and love today. For decades, wings were considered an undesirable part of the chicken, often discarded or used only for making stock. The transformation of chicken wings into a celebrated dish happened in Buffalo, New York, in 1964, when Teressa Bellissimo at the Anchor Bar allegedly invented Buffalo wings by deep-frying leftover wings and tossing them in hot sauce to feed her son and his friends.
This revolutionary moment sparked a culinary phenomenon that spread across America and eventually the world. As chicken wings grew in popularity throughout the 1970s and 1980s, creative cooks began experimenting with different flavor profiles beyond the traditional spicy Buffalo sauce. Asian-inspired sweet and savory sauces started appearing in American kitchens, influenced by the growing popularity of Chinese-American and Korean-American cuisine.
The honey garlic flavor combination specifically draws inspiration from Asian cooking traditions where the balance of sweet and savory (often achieved through soy sauce, honey, and garlic) is a fundamental principle. In Chinese cuisine, this flavor profile appears in dishes like honey garlic pork and stir-fried vegetables. Korean cuisine also features similar combinations in their beloved fried chicken varieties, known as “chikin,” which often includes sweet and sticky glazes.
The Sweet Honey Garlic Chicken Wings we enjoy today represent a beautiful fusion of American cooking techniques (oven-baking or frying wings until crispy) with Asian-inspired flavor profiles. They’ve become a staple at sports bars, restaurants, and home kitchens across the United States, proving that sometimes the best recipes come from blending culinary traditions. This recipe has evolved to become a crowd-pleaser that appeals to people who might find traditional Buffalo wings too spicy, offering a more universally loved flavor that’s both comforting and exciting.
Why You’ll Love This Recipe
These Sweet Honey Garlic Chicken Wings are about to become your new go-to recipe for any occasion. The combination of crispy exterior and tender, juicy meat inside, all coated in that incredible sticky-sweet sauce, creates a taste and texture experience that’s absolutely irresistible. Unlike wings that can be one-note spicy or overly greasy, these offer a complex flavor profile that keeps you reaching for just one more.
Here’s what makes this recipe absolutely amazing:
- Oven-Baked Perfection – No deep fryer required! These wings get incredibly crispy in the oven using a simple baking powder technique that transforms the skin into a crackling, golden exterior.
- Family-Friendly Flavor – The sweet honey balances the savory garlic beautifully, making these wings perfect for both kids and adults. They’re flavorful without being spicy.
- Budget-Friendly – Chicken wings are affordable, and the sauce uses pantry staples like honey, soy sauce, and garlic. You can feed a crowd without breaking the bank.
- Make-Ahead Friendly – You can prep these wings in advance, making them perfect for party planning when you want to minimize last-minute stress.
- Customizable Heat Level – While the base recipe is mild, you can easily add red pepper flakes, sriracha, or gochugaru (Korean chili flakes) if you want some heat.
- Guaranteed Crispy Wings – The technique used in this recipe ensures restaurant-quality crispiness every single time, no guesswork involved.
- Sticky, Glossy Sauce – The honey garlic sauce creates that picture-perfect glossy coating that looks as amazing as it tastes – perfect for Pinterest-worthy photos!
- Quick Prep Time – Active prep time is minimal, and while the wings bake, you can prepare side dishes or just relax.
- Crowd-Pleaser Guarantee – I’ve never served these wings without getting requests for the recipe. They disappear fast at every gathering!
Ingredient Notes
Let’s talk about the stars of this recipe and why each ingredient plays such an important role in creating these incredible wings. Understanding your ingredients helps you make smart substitutions and adjustments when needed.
Chicken Wings: Look for whole chicken wings (sometimes called “party wings”) or you can buy them already separated into drumettes and flats (wingettes). Fresh or frozen both work beautifully – just make sure frozen wings are completely thawed and thoroughly patted dry before baking. The drier the wings, the crispier they’ll become.
Baking Powder: This is the secret weapon for ultra-crispy wings! Baking powder raises the pH of the chicken skin, allowing it to brown and crisp up faster and more effectively. Make sure you use baking powder, not baking soda – they’re not interchangeable. Use aluminum-free baking powder if you’re sensitive to metallic tastes.
Salt and Pepper: Simple seasoning that enhances the chicken’s natural flavor. Don’t skimp on the salt – it helps draw out moisture and contributes to crispiness.
Honey: The sweet backbone of your sauce. Use good quality honey for the best flavor. Clover honey works perfectly, but you can experiment with other varieties like wildflower or orange blossom for subtle flavor variations.
Soy Sauce: Adds that essential umami depth and saltiness that balances the honey’s sweetness. Regular soy sauce works great, or use low-sodium if you’re watching your salt intake. For a gluten-free version, substitute with tamari or coconut aminos.
Fresh Garlic: Absolutely essential for that bold, aromatic garlic flavor. Fresh garlic is infinitely better than garlic powder for this recipe. You’ll need about 5-6 large cloves, minced finely. The garlic mellows as it cooks in the sauce, becoming sweet and fragrant rather than harsh.
Butter: Adds richness and helps create a silky, glossy sauce that clings beautifully to the wings. Use unsalted butter so you can control the salt level in your sauce.
Rice Vinegar: Provides a subtle tanginess that cuts through the richness and prevents the sauce from being cloyingly sweet. Apple cider vinegar can substitute in a pinch, though rice vinegar has a milder, slightly sweeter acidity.
Cornstarch: This thickens the sauce to that perfect sticky, coating consistency. It also gives the sauce that gorgeous glossy sheen that makes your wings look professionally made.
Sesame Seeds and Green Onions: Optional garnishes, but they add visual appeal and a nice textural contrast. Sesame seeds provide a subtle nutty flavor, while green onions add freshness and a mild onion bite.
Equipment Needed
You don’t need a lot of fancy kitchen gadgets to make these wings – just a few basic tools that most home cooks already have:
- Large Baking Sheet – A rimmed baking sheet (also called a sheet pan) that’s about 18×13 inches works perfectly. You’ll want one with sides to catch any rendered fat.
- Wire Cooling Rack – This is optional but highly recommended. Placing the rack inside your baking sheet elevates the wings, allowing air to circulate underneath for maximum crispiness. If you don’t have one, you can bake directly on parchment paper, but the results won’t be quite as crispy.
- Large Mixing Bowl – For tossing the wings with baking powder and seasonings before baking.
- Medium Saucepan – For making the honey garlic sauce on the stovetop.
- Whisk – To combine the cornstarch slurry and ensure your sauce is smooth and lump-free.
- Measuring Cups and Spoons – Accurate measurements ensure consistent results every time.
- Tongs – Essential for flipping the wings halfway through baking and for tossing them in the sauce.
- Paper Towels – For patting the chicken wings completely dry before seasoning – this step is crucial for crispiness!
- Small Bowl – For mixing the cornstarch with water to create the slurry that thickens your sauce.
- Cutting Board and Sharp Knife – For mincing garlic and chopping green onion garnish.

Sweet Honey Garlic Chicken Wings Recipe
- Total Time: 1 hour 5 minutes
- Yield: 4-6 servings (about 24 wing pieces) 1x
- Diet: Gluten Free
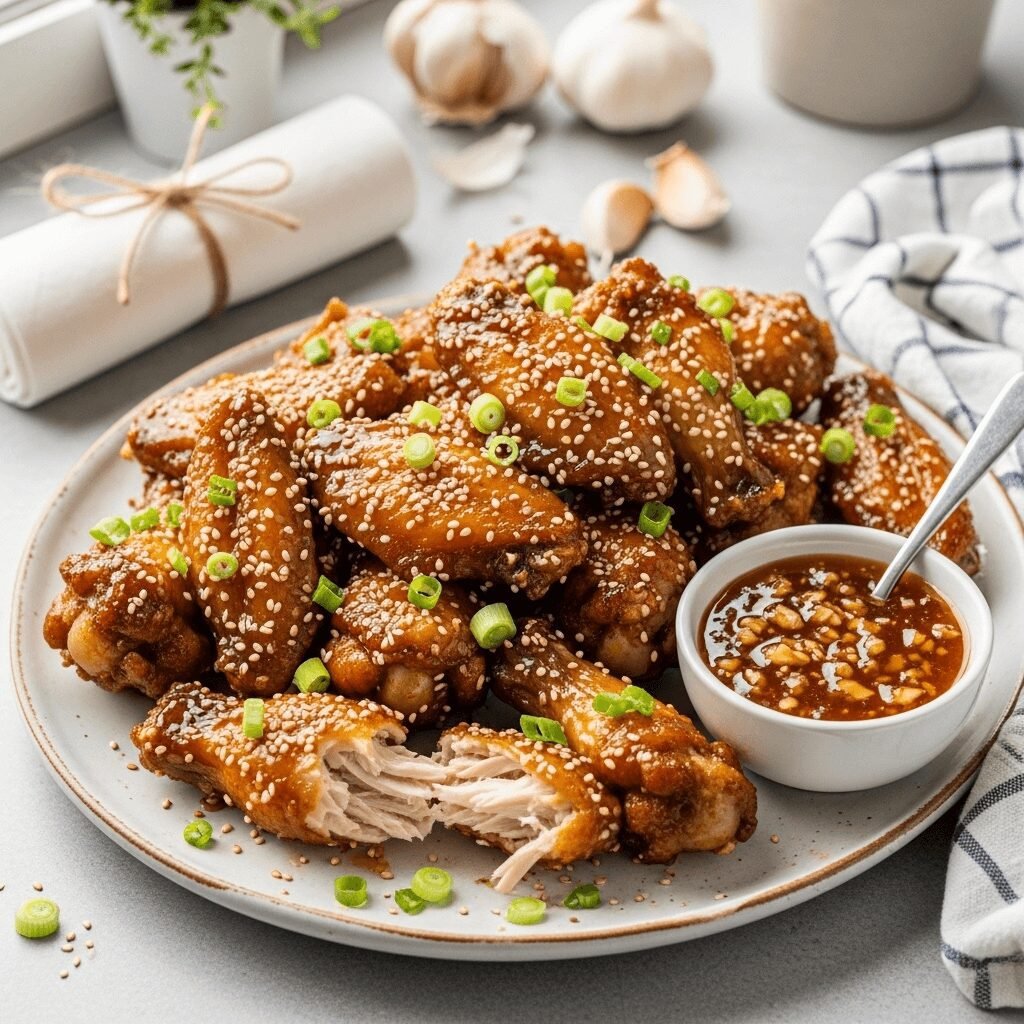
Description
These Crispy Sweet Honey Garlic Chicken Wings are baked to golden perfection and coated in a sticky, finger-licking sauce that balances sweet honey with savory garlic. Perfect for game day, parties, or weeknight dinners, these restaurant-quality wings are easy to make at home with simple pantry ingredients. No deep fryer needed – just an oven and a craving for the most delicious wings you’ve ever tasted!
Ingredients
For the Chicken Wings:
- 3 pounds chicken wings (separated into drumettes and flats, about 24 pieces)
- 1 tablespoon baking powder (aluminum-free recommended)
- 1 teaspoon kosher salt
- ½ teaspoon black pepper
- ½ teaspoon garlic powder
For the Honey Garlic Sauce:
- ⅔ cup honey
- ⅓ cup soy sauce (or tamari for gluten-free)
- 5-6 large garlic cloves, minced (about 2 tablespoons)
- 3 tablespoons unsalted butter
- 2 tablespoons rice vinegar
- 1 tablespoon cornstarch
- 2 tablespoons cold water
- ¼ teaspoon red pepper flakes (optional, for heat)
For Garnish (optional):
- 1 tablespoon sesame seeds
- 2-3 green onions, thinly sliced
Instructions
Step 1: Prepare the Chicken Wings
Pat the chicken wings completely dry using paper towels – this is crucial for achieving crispy skin. Place the dried wings in a large mixing bowl. In a small bowl, combine baking powder, salt, black pepper, and garlic powder. Sprinkle this mixture evenly over the wings and toss thoroughly until every piece is well coated. The baking powder coating should look like a light dusting covering all surfaces.
Step 2: Arrange on Baking Sheet
Preheat your oven to 250°F (120°C). If using a wire rack, place it inside a large rimmed baking sheet and spray lightly with cooking spray. Arrange the wings on the rack in a single layer, making sure they don’t touch or overlap – this ensures even cooking and maximum crispiness. If not using a rack, line your baking sheet with parchment paper and arrange wings with space between each piece.
Step 3: Low-Temperature Bake
Bake the wings at 250°F for 30 minutes. This initial low-temperature baking renders out the fat and begins drying the skin, which is the foundation for crispiness. Don’t worry if they don’t look impressive yet – this step is essential!
Step 4: High-Temperature Crisp
After 30 minutes, increase the oven temperature to 425°F (220°C). Continue baking for 20 minutes. Flip the wings using tongs and bake for an additional 20-25 minutes until the wings are deeply golden brown and crispy. The total baking time at high heat is about 40-45 minutes. The wings should be crackling crispy and an internal temperature of 165°F.
Step 5: Make the Honey Garlic Sauce
While the wings finish their final baking stage, prepare your sauce. In a medium saucepan over medium heat, melt the butter. Add the minced garlic and sauté for 1-2 minutes until fragrant but not browned (burnt garlic is bitter). Pour in the honey, soy sauce, and rice vinegar. Stir well and bring to a gentle simmer.
Step 6: Thicken the Sauce
In a small bowl, whisk together the cornstarch and cold water until completely smooth with no lumps. Pour this slurry into the simmering sauce while whisking constantly. Continue cooking and stirring for 2-3 minutes until the sauce thickens noticeably and becomes glossy. It should coat the back of a spoon. Remove from heat and stir in red pepper flakes if using.
Step 7: Toss Wings in Sauce
Remove the crispy wings from the oven and let them rest for 2-3 minutes. Transfer the wings to a large clean bowl. Pour about two-thirds of the honey garlic sauce over the wings and toss thoroughly using tongs until every wing is beautifully coated and glistening. Reserve the remaining sauce for drizzling or dipping.
Step 8: Garnish and Serve
Transfer the sauced wings to a serving platter. Sprinkle with sesame seeds and sliced green onions if desired. Serve immediately while hot and crispy, with the reserved sauce on the side for extra dipping. Have plenty of napkins ready – these are gloriously messy in the best possible way!
Notes
- For Extra Crispy Wings: Make sure wings are completely dry before seasoning. Any moisture will steam the skin rather than crisp it.
- Sauce Consistency: If your sauce is too thick, thin it with a tablespoon of water. If it’s too thin, simmer for an additional minute or two.
- Spice Level: This recipe is mild and family-friendly. Add sriracha, gochugaru, or cayenne pepper to the sauce for heat.
- Timing Tip: Sauce the wings right before serving. If sauced too early, the coating can make the crispy skin soften.
- Doubling the Recipe: You can double this recipe, but you’ll need two baking sheets and may need to rotate them halfway through baking for even cooking.
- Air Fryer Option: Cook at 400°F for 25-30 minutes, flipping halfway, then toss in sauce.
4 wing pieces (about 4 ounces)
- Prep Time: 15 minutes
- Cook Time: 50 minutes
- Category: Appetizer, Main Course
- Method: Baking
- Cuisine: Asian-American Fusion
Nutrition
- Serving Size: 4 wing pieces (about 4 ounces)
- Calories: 385
- Sugar: 24g
- Sodium: 680mg
- Fat: 21g
- Saturated Fat: 7g
- Unsaturated Fat: 12g
- Trans Fat: 0g
- Carbohydrates: 28g
- Fiber: 0.2g
- Protein: 22g
- Cholesterol: 95mg
Note: Nutrition information is approximate and calculated per serving based on 6 servings total. Actual values may vary depending on specific ingredients used and portion sizes.
Tips & Variations
One of the best things about this recipe is how easily it adapts to different tastes and dietary needs. Here are some fantastic ways to customize these wings:
Spicy Honey Garlic Wings: Add 1-2 tablespoons of sriracha, gochugaru (Korean chili flakes), or your favorite hot sauce to the honey garlic sauce. You can also add ½ teaspoon cayenne pepper to the dry rub before baking.
Ginger Honey Garlic Wings: Add 1 tablespoon of freshly grated ginger to the sauce along with the garlic for a zingy, aromatic twist that pairs beautifully with the honey.
Extra Garlicky Version: If you’re a serious garlic lover, increase the garlic to 8-10 cloves. You can also add ½ teaspoon of garlic powder to the sauce for even more garlic intensity.
Sesame Honey Garlic Wings: Add 1-2 teaspoons of toasted sesame oil to the finished sauce for a nutty depth. Increase the sesame seed garnish and serve with extra sesame seeds on the side.
Orange Honey Garlic Wings: Add 2 tablespoons of fresh orange juice and 1 teaspoon of orange zest to the sauce for a bright citrus note that cuts through the richness.
Bourbon Honey Garlic Wings: Add 2 tablespoons of bourbon to the sauce for a sophisticated, slightly smoky sweetness that’s perfect for adult gatherings.
Healthier Version: Use boneless skinless chicken thighs cut into chunks instead of wings. Reduce the honey to ½ cup and increase the rice vinegar to 3 tablespoons for a lighter sauce with less sugar.
BBQ Honey Garlic Wings: Mix 2 tablespoons of your favorite BBQ sauce into the honey garlic sauce for a sweet and smoky flavor combination.
Sticky Asian-Style Wings: Add 1 tablespoon of hoisin sauce and 1 teaspoon of five-spice powder to the sauce for a more complex Asian flavor profile.
Pro Chef Tips
Want to take these wings from great to absolutely extraordinary? Here are professional techniques that’ll elevate your wing game:
The Dry Wing Principle: Professional chefs know that moisture is the enemy of crispiness. After patting wings dry with paper towels, place them uncovered on a wire rack set over a baking sheet in the refrigerator for 2-8 hours. This air-drying step removes even more moisture from the skin, resulting in exceptionally crispy wings. If you have the time, this technique is absolutely worth it.
Temperature Control Matters: Use an instant-read thermometer to check that your wings reach an internal temperature of 165°F. This ensures they’re fully cooked while remaining juicy inside. The meat should easily pull away from the bone.
Sauce Timing is Everything: Toss the wings in sauce immediately before serving, not earlier. The longer sauced wings sit, the more the coating softens the crispy skin. For parties, keep wings warm in a 200°F oven and sauce them in small batches as needed.
The Double-Coat Method: For an extra-thick, restaurant-style sauce coating, toss wings in half the sauce, let them rest for 2-3 minutes to set, then toss in the remaining sauce. This builds up a gorgeous, glossy coating that photographs beautifully.
Garlic Technique: Don’t let your garlic burn when making the sauce. Burnt garlic tastes bitter and acrid. Cook it over medium heat just until fragrant (1-2 minutes maximum). If it starts to brown, immediately add the liquids to stop the cooking.
Cornstarch Slurry Secrets: Always mix cornstarch with cold water, never hot liquid, to prevent lumps. Add the slurry gradually while whisking constantly, and don’t add too much – you can always add more if needed, but you can’t fix an over-thickened sauce.
Space Creates Crispiness: Overcrowding your baking sheet creates steam, which means soggy wings. Give each wing its own space – they shouldn’t be touching. Use two baking sheets if necessary rather than cramming everything onto one.
Resting is Required: Let wings rest for 2-3 minutes after removing them from the oven before saucing. This brief rest allows the exterior to set and become even crispier, plus it’s safer to handle them.
Common Mistakes to Avoid
Even simple recipes can go wrong if you skip important steps. Here are the most common pitfalls and how to avoid them:
Mistake #1: Skipping the Paper Towel Dry
Wet wings will steam in the oven instead of crisping up. Take the extra minute to thoroughly pat every single wing dry before seasoning. If using frozen wings, thaw them completely and drain any excess water before drying.
Mistake #2: Using Baking Soda Instead of Baking Powder
These are NOT interchangeable. Baking soda will give your wings a metallic, soapy taste. Always use baking powder (the double-acting kind), which has the perfect pH-raising properties for crispy skin without off-flavors.
Mistake #3: Saucing Too Early
The moment you coat crispy wings in sauce, the sauce begins softening the crispy exterior. For the crispiest experience, sauce wings immediately before serving. If preparing for a party, keep wings warm and unsauced, then toss in sauce right before guests arrive or in small batches throughout the event.
Mistake #4: Overcrowding the Pan
When wings are touching or overlapping, they steam rather than roast, resulting in rubbery, pale skin instead of golden, crispy perfection. Use two baking sheets if necessary. The extra dish to wash is worth it for properly crispy wings.
Mistake #5: Not Flipping the Wings
Flipping ensures even cooking and crispiness on both sides. Don’t skip this step! Set a timer so you don’t forget to flip them halfway through the high-temperature baking stage.
Mistake #6: Making the Sauce Too Thick
An overly thick sauce won’t coat evenly and can taste pasty. The honey garlic sauce should be the consistency of maple syrup – thick enough to cling but thin enough to flow. If you’ve over-thickened it, simply whisk in water one tablespoon at a time until you reach the right consistency.
Mistake #7: Not Preheating the Oven
Starting wings in a cold oven throws off the entire cooking timeline and affects texture. Always preheat your oven fully before adding the wings for consistent, reliable results.
Storage & Meal Prep
These wings are fantastic for meal prep and actually reheat beautifully when done correctly. Here’s everything you need to know about storing and reheating your honey garlic wings:
Refrigerator Storage: Store cooled wings in an airtight container in the refrigerator for up to 4 days. If possible, store the wings and sauce separately – keep unsauced wings in one container and the sauce in another, then toss together when reheating. This helps maintain some crispiness.
Reheating Instructions: The best way to reheat wings is in the oven at 375°F for 10-15 minutes on a wire rack. This re-crisps the exterior beautifully. You can also use an air fryer at 375°F for 5-7 minutes. Avoid the microwave if possible, as it makes the coating soggy and the skin rubbery. If you must use the microwave, reheat in 30-second intervals and finish under the broiler for 1-2 minutes to crisp up the exterior.
Sauce Storage: Store leftover honey garlic sauce in an airtight container in the refrigerator for up to 1 week. The sauce will thicken when cold. Reheat gently on the stovetop or in the microwave, whisking in a tablespoon of water if needed to thin it back to the right consistency.
Batch Cooking: These wings are perfect for meal prep! Bake a large batch of unsauced wings, let them cool completely, then store them in the refrigerator. The sauce can be made ahead and stored separately. When you’re ready to eat, reheat the wings until crispy, warm the sauce, and toss together. This approach gives you restaurant-quality wings any night of the week with minimal effort.
Keeping Wings Warm for Parties: If serving at a party, you can keep sauced wings warm in a slow cooker set to the “warm” setting for up to 2 hours. Be aware that the coating will soften over time. For best results, keep crispy wings warm in a 200°F oven and sauce them in small batches as guests arrive.
Make-Ahead & Freezer Notes
Planning ahead? These wings are incredibly freezer-friendly and can be partially or fully prepared in advance!
Freezing Uncooked Wings: Season raw wings with the baking powder mixture, arrange on a baking sheet, and freeze until solid (about 2 hours). Transfer frozen wings to a freezer-safe bag or container. They’ll keep for up to 3 months. When ready to cook, bake from frozen, adding an extra 5-10 minutes to the cooking time. No need to thaw!
Freezing Cooked Wings: Let cooked wings cool completely after baking but before saucing. Arrange in a single layer on a baking sheet and freeze until solid, then transfer to freezer bags. Freeze for up to 3 months. To reheat, bake from frozen at 375°F for 15-20 minutes until heated through and crispy. Then toss in freshly made sauce.
Freezing the Sauce: The honey garlic sauce freezes beautifully! Pour cooled sauce into ice cube trays or small freezer containers. Freeze for up to 3 months. Thaw overnight in the refrigerator or gently reheat from frozen in a saucepan, adding a splash of water if needed.
Make-Ahead Timeline:
- 2 Days Ahead: Prepare and bake the wings completely. Store unsauced in the refrigerator.
- 1 Day Ahead: Make the honey garlic sauce and refrigerate. Sauce will keep perfectly for up to 5 days.
- Day Of: Reheat wings in a 375°F oven until crispy (10-15 minutes), warm the sauce, toss together, and serve.
Best Reheating Method for Frozen Wings: Thaw overnight in the refrigerator for best results, then reheat at 375°F for 12-15 minutes. If cooking from frozen, increase time to 20-25 minutes, checking for an internal temperature of 165°F.
Serving Suggestions
While these honey garlic wings are absolutely spectacular on their own, pairing them with the right sides and accompaniments creates a complete, satisfying meal that’ll have everyone asking for seconds. Here are my favorite serving suggestions:
Classic Side Dishes:
- Crispy French Fries or Sweet Potato Fries – The perfect vehicle for soaking up extra honey garlic sauce
- Creamy Coleslaw – The cool, crunchy texture provides a refreshing contrast to the sticky, rich wings
- Mac and Cheese – Because who doesn’t love the ultimate comfort food combo?
- Potato Wedges or Tater Tots – Crispy, golden, and perfect for game day spreads
- Corn on the Cob – Brushed with butter and sprinkled with salt, it’s a summery pairing that works beautifully
Fresh & Light Options:
- Cucumber Salad – A cool, crisp Asian-style cucumber salad with rice vinegar dressing cuts through the richness perfectly
- Garden Salad – Keep it simple with mixed greens, cherry tomatoes, and a light vinaigrette
- Watermelon Wedges – The sweet, juicy fruit is surprisingly perfect with these wings
- Vegetable Sticks with Ranch – Celery, carrots, and bell peppers with ranch or blue cheese dip
- Asian Slaw – Shredded cabbage with sesame oil, rice vinegar, and a touch of honey
Rice & Grain Options:
- Steamed White or Brown Rice – Perfect for soaking up the extra sauce
- Fried Rice – Make it a complete Asian-inspired meal
- Coconut Rice – The subtle sweetness complements the honey garlic flavor
- Quinoa Salad – A healthier, protein-packed option with fresh vegetables
Beverages:
- Ice-Cold Beer – A light lager or pilsner pairs beautifully
- Sweet Tea or Lemonade – Classic, refreshing, and perfect for balancing the rich wings
- Sparkling Water with Lime – Keeps things light and refreshing
- Iced Green Tea – Complements the Asian-inspired flavors
- Ginger Beer or Ginger Ale – The spicy-sweet ginger works wonderfully with the honey garlic
For Parties: Create a “wing bar” with these honey garlic wings alongside other flavors (Buffalo, BBQ, Dry Rub) and an array of dipping sauces like ranch, blue cheese, extra honey garlic sauce, and sriracha mayo. Add plenty of wet wipes, napkins, and small plates!
FAQs Section
Q: Can I use chicken drumsticks or thighs instead of wings?
A: Absolutely! This recipe works beautifully with drumsticks, thighs, or even boneless chicken pieces. For drumsticks, increase the baking time by about 10-15 minutes and ensure they reach an internal temperature of 165°F. Boneless thighs will cook faster (about 30-35 minutes total), so adjust accordingly. The honey garlic sauce works with any cut of chicken!
Q: My sauce is too thin/too thick. How do I fix it?
A: If your sauce is too thin, make an additional cornstarch slurry (½ tablespoon cornstarch mixed with 1 tablespoon cold water) and whisk it into the simmering sauce. Cook for another 1-2 minutes until it thickens. If it’s too thick, simply whisk in water, one tablespoon at a time, until you reach your desired consistency. The sauce should be similar to maple syrup – thick enough to cling to wings but fluid enough to coat evenly.
Q: Can I make these wings in an air fryer?
A: Yes! Pat wings dry and season with the baking powder mixture as directed. Air fry at 400°F for 25-30 minutes, shaking the basket or flipping halfway through. Wings should be golden and crispy. Toss in the honey garlic sauce immediately before serving. The air fryer produces exceptionally crispy wings with even less oil!
Q: Why aren’t my wings getting crispy?
A: The most common culprits are: (1) Wings weren’t dried thoroughly before baking, (2) Wings were crowded on the pan causing steaming instead of roasting, (3) Baking powder wasn’t used or baking soda was used instead, or (4) Oven temperature was too low. Make sure to pat wings completely dry, give them space on the baking sheet, use baking powder (not soda), and ensure your oven is fully preheated to the correct temperature.
Q: Is this recipe gluten-free?
A: It can be! Replace regular soy sauce with tamari (which is naturally gluten-free) or coconut aminos. Everything else in the recipe is naturally gluten-free. Just double-check your baking powder label to ensure it doesn’t contain any gluten-containing additives, though most brands are gluten-free.
Q: Can I use boneless chicken instead of wings?
A: Yes! Use boneless, skinless chicken thighs cut into 2-inch pieces, or chicken tenders. Reduce the baking time to about 25-30 minutes total at 425°F. Without the skin, they won’t get quite as crispy, but they’ll still be delicious when tossed in the honey garlic sauce.
Q: How do I prevent the garlic from burning in the sauce?
A: Keep the heat at medium, not high, when sautéing the garlic in butter. Watch it closely and cook only until fragrant (1-2 minutes maximum). As soon as you smell that amazing garlic aroma, immediately add the honey, soy sauce, and vinegar to stop the garlic from cooking further. Burnt garlic tastes bitter and will ruin your sauce.
Q: Can I double this recipe for a party?
A: Definitely! Double all ingredients and use two large baking sheets with wire racks. You may need to rotate the pans halfway through baking to ensure even cooking. Keep in mind you’ll need a larger bowl for tossing the wings in sauce. This recipe scales beautifully for crowds!
Conclusion
There you have it – the ultimate Sweet Honey Garlic Chicken Wings recipe that’ll make you the hero of every gathering! These crispy, sticky, absolutely irresistible wings prove that restaurant-quality results are totally achievable in your home kitchen. From the perfectly crispy exterior (thanks to that baking powder trick!) to the glossy, finger-licking honey garlic sauce, every bite delivers pure deliciousness.
Whether you’re feeding your family on a busy weeknight, preparing for the big game, or hosting a party, these wings are guaranteed to disappear fast. The best part? They’re surprisingly easy to make, use simple pantry ingredients, and can be customized to suit any taste preference. Plus, they’re make-ahead friendly and freeze beautifully, which means you can always have amazing wings ready to go!
I’d love to hear how your honey garlic wings turn out! Did you add a spicy kick? Serve them with a special side dish? Take an amazing photo? Drop a comment below and share your experience. Don’t forget to rate this recipe if you loved it – your feedback helps other home cooks find these amazing wings!