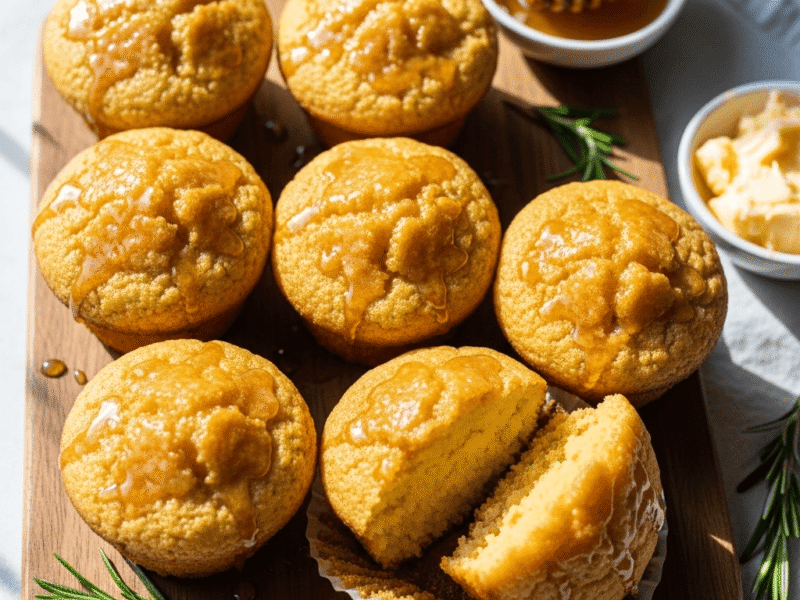
There’s something truly magical about pulling a pan of golden, fluffy biscuits from the oven, their tops glistening with sweet honey butter that melts into every flaky layer. These Sweet Honey Butter Biscuits are the perfect combination of savory and sweet – tender, buttery biscuits brushed generously with a luscious honey butter glaze that creates an irresistible caramelized finish.
Whether you’re serving them alongside fried chicken for Sunday dinner, pairing them with your morning coffee, or bringing them to a potluck where you want to be the star, these biscuits deliver every single time. They’re incredibly versatile, working beautifully as a breakfast treat, dinner side, or even a dessert-like indulgence. The best part? They come together in about 30 minutes from start to finish, making them perfect for both busy weeknights and special occasions.
These aren’t your average biscuits – the honey butter takes them to a whole new level of deliciousness. As the biscuits bake, the honey butter seeps into the layers, creating pockets of sweetness that complement the buttery, flaky texture. Every bite is a perfect balance of rich, comforting flavors that will have everyone reaching for seconds (and thirds!).
History / Background
Biscuits have been a cornerstone of Southern American cooking for generations, with roots tracing back to the early settlers who adapted European baking techniques to the ingredients available in the American South. Traditional Southern biscuits were made with simple pantry staples – flour, fat (usually lard or butter), and buttermilk – creating a quick bread that could accompany any meal.
The art of biscuit-making became a point of pride among Southern cooks, with techniques and recipes passed down through families like treasured heirlooms. The key to perfect biscuits – keeping everything cold, handling the dough minimally, and achieving those signature flaky layers – became kitchen wisdom shared from grandmother to granddaughter.
Honey butter biscuits specifically rose to popularity in the American South during the mid-20th century, when restaurants began glazing their biscuits with sweetened butter to create a signature dish. The combination was revolutionary – the natural sweetness of honey enhanced the rich, buttery flavor of the biscuits without overwhelming them. This technique created a beautiful golden glaze and added moisture that kept the biscuits tender for hours.
Today, honey butter biscuits have become a beloved staple at Southern-style restaurants across the country, with many establishments building their reputation on their secret recipes. Home cooks have embraced this tradition, finding that the addition of honey butter transforms ordinary biscuits into something extraordinary that guests remember long after the meal is over.
Why You’ll Love This Recipe
These Sweet Honey Butter Biscuits strike the perfect balance between homemade quality and easy preparation. Unlike fussy recipes that require special techniques or hard-to-find ingredients, this one delivers bakery-worthy results using straightforward methods and pantry staples you probably already have on hand.
Here’s why this recipe will become your new favorite:
- Incredibly easy to make – Even beginner bakers can achieve perfect, fluffy biscuits with this foolproof recipe
- Ready in 30 minutes – From mixing bowl to dinner table in half an hour, perfect for last-minute meal planning
- Minimal cleanup – Just one bowl, a baking sheet, and basic tools needed
- Budget-friendly – Uses affordable, everyday ingredients that won’t break the bank
- Crowd-pleaser guaranteed – The sweet-savory combination appeals to kids and adults alike
- Versatile serving options – Works for breakfast, brunch, dinner sides, or even dessert
- Make-ahead friendly – Dough can be prepared in advance and biscuits reheat beautifully
- Customizable – Easy to adjust sweetness level or add your own flavor twists
- Impressive presentation – The golden, glossy finish looks like you spent hours in the kitchen
- Freezer-friendly – Double the batch and freeze extras for quick future meals
Ingredient Notes
All-Purpose Flour – The foundation of your biscuits. All-purpose flour provides the right protein content for tender, flaky layers. Make sure to measure correctly by spooning flour into your measuring cup and leveling it off – packing it in can lead to dense, tough biscuits.
Baking Powder – This is your leavening agent that creates those beautiful, fluffy layers. Make sure yours is fresh (test it by adding a spoonful to hot water – it should bubble vigorously). Old baking powder won’t give you the rise you need.
Salt – Enhances all the flavors and balances the sweetness. Don’t skip it, even though these are sweet biscuits.
Cold Butter (Unsalted) – The secret to flaky biscuits is cold butter cut into the flour. As the biscuits bake, the butter creates steam pockets that form those signature layers. Keep it refrigerated until the moment you need it. Substitution: You can use shortening for extra flakiness, but you’ll lose some of that rich butter flavor.
Buttermilk – The acidity tenderizes the gluten in the flour and reacts with the baking powder for extra lift. It also adds a subtle tanginess that complements the honey butter. Substitution: Make your own by adding 1 tablespoon of lemon juice or white vinegar to 1 cup of regular milk and letting it sit for 5 minutes.
Honey – Use good-quality honey for the best flavor. Lighter honeys (like clover or wildflower) provide subtle sweetness, while darker varieties (like buckwheat) offer more robust, complex flavors. Avoid artificial honey-flavored syrup.
Melted Butter (for honey butter) – This combines with the honey to create that irresistible glaze. Using melted butter ensures it mixes smoothly and brushes on easily.
Equipment Needed
- Large mixing bowl – For combining dry ingredients
- Pastry cutter or fork – To cut cold butter into flour (you can also use your hands, but work quickly to keep butter cold)
- Rolling pin – For gently rolling out the dough to even thickness
- Round biscuit cutter (2.5 to 3 inches) – For cutting uniform biscuits (a drinking glass works in a pinch)
- Baking sheet – A standard half-sheet pan works perfectly
- Parchment paper or silicone baking mat – Prevents sticking and makes cleanup easier
- Small bowl – For mixing the honey butter glaze
- Pastry brush – For applying honey butter before and after baking
- Measuring cups and spoons – For accurate ingredient measurements
- Cooling rack – Optional but helpful for cooling biscuits evenly

Sweet Honey Butter Biscuits Recipe
- Total Time: 30 minutes
- Yield: 10-12 biscuits 1x
- Diet: Vegetarian
Description
These tender, fluffy Sweet Honey Butter Biscuits feature layers of buttery goodness with a golden honey butter glaze. Perfect for breakfast, dinner sides, or anytime you need a comforting homemade treat. The combination of flaky texture and sweet honey creates an irresistible biscuit that’s better than any restaurant version.
Ingredients
For the Biscuits:
- 2 ½ cups all-purpose flour, plus extra for dusting
- 2 tablespoons granulated sugar
- 1 tablespoon baking powder
- 1 teaspoon salt
- ½ cup (1 stick) cold unsalted butter, cut into small cubes
- 1 cup cold buttermilk
For the Honey Butter:
- ¼ cup unsalted butter, melted
- 3 tablespoons honey (adjust to taste)
- Pinch of salt (optional)
Instructions
- Preheat and Prepare: Preheat your oven to 425°F (220°C). Line a baking sheet with parchment paper or a silicone baking mat. This high temperature is crucial for creating steam that makes biscuits rise and develop flaky layers.
- Mix Dry Ingredients: In a large mixing bowl, whisk together the flour, sugar, baking powder, and salt until well combined. Whisking aerates the flour and ensures even distribution of the leavening agents.
- Cut in the Butter: Add the cold butter cubes to the flour mixture. Using a pastry cutter, two forks, or your fingertips, work the butter into the flour until the mixture resembles coarse crumbs with some pea-sized butter pieces remaining. These butter pieces are essential for creating flaky layers, so don’t over-mix. The process should take about 3-4 minutes.
- Add Buttermilk: Make a well in the center of the flour mixture and pour in the cold buttermilk all at once. Using a wooden spoon or spatula, gently stir until the dough just comes together. The dough will look shaggy and slightly sticky – this is perfect. Do not overmix, as this develops gluten and creates tough biscuits.
- Knead Gently: Turn the dough out onto a lightly floured surface. With floured hands, gently pat and fold the dough over itself 4-5 times. This creates layers without overworking the dough. Be gentle and work quickly to keep everything cold.
- Roll and Cut: Pat or roll the dough into a rectangle about ¾ to 1 inch thick. Using a floured biscuit cutter, press straight down without twisting (twisting seals the edges and prevents proper rising). Cut biscuits as close together as possible to minimize scraps. Gather scraps gently, pat together, and cut additional biscuits.
- Arrange on Baking Sheet: Place biscuits on the prepared baking sheet with sides touching (this helps them rise higher) or about 1 inch apart (for crispier edges). Both methods work beautifully depending on your preference.
- First Honey Butter Brush: In a small bowl, whisk together the melted butter and honey until well combined. Generously brush the tops of the unbaked biscuits with about half of the honey butter mixture. This creates the initial glaze layer.
- Bake: Bake in the preheated oven for 12-15 minutes, until the biscuits are golden brown on top and have risen beautifully. The tops should feel firm when gently touched, and a toothpick inserted in the center should come out clean.
- Final Glaze: Remove biscuits from the oven and immediately brush with the remaining honey butter while they’re still hot. The heat will help the glaze soak into the biscuits, creating maximum flavor. Let cool for 2-3 minutes before serving warm.
Notes
- Cold ingredients are crucial – Keep butter and buttermilk refrigerated until the moment you use them. Some bakers even chill their flour and mixing bowl for extra insurance.
- Don’t twist the cutter – Press straight down and pull straight up to allow biscuits to rise evenly.
- Placement matters – For taller biscuits with soft sides, place them touching on the baking sheet. For biscuits with crispy edges all around, space them 1 inch apart.
- Work quickly – The faster you work, the colder the butter stays, which means flakier biscuits.
- Honey butter consistency – If your honey butter seems too thick, warm it slightly. If it’s too thin, add a bit more honey.
- Leftover honey butter – Any extra honey butter can be stored in the refrigerator and used on toast, pancakes, or waffles.
- Prep Time: 15 minutes
- Cook Time: 12-15 minutes
- Category: Bread, Side Dish, Breakfast
- Method: Baking
- Cuisine: American, Southern
Nutrition
- Serving Size: 1 biscuit (based on 12 biscuits)
- Calories: 220
- Sugar: 6g
- Sodium: 285mg
- Fat: 11g
- Saturated Fat: 7g
- Unsaturated Fat: 3g
- Trans Fat: 0g
- Carbohydrates: 27g
- Fiber: 1g
- Protein: 4g
- Cholesterol: 30mg
Note: Nutrition information is approximate and may vary based on specific ingredients used and portion sizes.
Tips & Variations
Cinnamon Honey Butter Biscuits: Add ½ teaspoon of ground cinnamon to the honey butter for a warm, spiced variation that’s perfect for fall and winter mornings.
Herb & Honey Biscuits: Mix 1 tablespoon of fresh chopped rosemary, thyme, or chives into the dough for a savory-sweet combination that pairs beautifully with roasted meats.
Whole Wheat Version: Substitute up to half of the all-purpose flour with whole wheat flour for a heartier, nuttier flavor. You may need to add 1-2 tablespoons more buttermilk as whole wheat flour absorbs more liquid.
Cheddar Honey Biscuits: Fold in ¾ cup of shredded sharp cheddar cheese to the dough before adding the buttermilk for a savory twist.
Spicy-Sweet Biscuits: Add a pinch of cayenne pepper to the honey butter for a sweet-heat combination that’s unexpectedly delicious.
Maple Version: Replace half the honey with pure maple syrup for a different flavor profile that’s equally delicious.
Gluten-Free Option: Use a 1:1 gluten-free flour blend designed for baking. Results may vary slightly in texture, but they’ll still be delicious.
Pro Chef Tips
Freeze Your Butter: For the ultimate flaky texture, grate frozen butter directly into the flour using a box grater. This distributes the butter more evenly and keeps it colder longer.
The Fold Technique: When you fold the dough over itself 4-5 times, you’re creating distinct layers of butter and dough that separate during baking, creating incredible flakiness. Each fold doubles the number of layers.
Temperature Control: If your kitchen is very warm, chill the mixing bowl and even the flour in the refrigerator for 15 minutes before starting. This extra step pays off in flakier biscuits.
Brush Between Layers: For extra decadence, split cooled biscuits and brush the inside layers with additional honey butter before serving.
The Touch Test: Biscuits are done when the tops spring back lightly when touched. If your finger leaves an impression, they need another minute or two.
Steam Creates Rise: That initial burst of high heat (425°F) creates steam from the cold butter and buttermilk, which is what makes biscuits rise dramatically. Don’t open the oven door for the first 10 minutes.
Honey Quality Matters: Use raw, unfiltered honey for the best flavor complexity. You’ll taste the difference compared to highly processed honey.
Common Mistakes to Avoid
Overworking the Dough: This is the number one biscuit killer. When you mix too much or knead too long, you develop gluten, which makes biscuits tough and dense instead of tender and flaky. Mix just until combined and handle the dough as little as possible.
Using Warm Ingredients: Room temperature butter won’t create the steam pockets needed for flaky layers. Always use cold butter and cold buttermilk straight from the refrigerator. If your kitchen is hot, work even faster or chill your ingredients extra cold.
Twisting the Biscuit Cutter: When you twist as you cut, you seal the edges of the dough, preventing the biscuits from rising properly. Press straight down with firm, even pressure, then lift straight up.
Incorrect Oven Temperature: An oven that’s too cool won’t create the rapid rise and golden-brown tops you want. Use an oven thermometer to verify your oven’s actual temperature – many home ovens run 25°F cooler or hotter than the dial indicates.
Skipping the Honey Butter Before Baking: Brushing honey butter on before baking isn’t just for flavor – it helps create that beautiful golden color and starts the caramelization process. The second brush after baking adds moisture and extra sweetness.
Storage & Meal Prep
Room Temperature Storage: Store completely cooled biscuits in an airtight container at room temperature for up to 2 days. Place a paper towel in the bottom of the container to absorb any excess moisture and keep biscuits from becoming soggy.
Refrigerator Storage: For longer storage, keep biscuits in an airtight container in the refrigerator for up to 5 days. The honey butter helps keep them moist even when chilled.
Reheating Instructions:
- Oven method (best): Wrap biscuits in aluminum foil and warm in a 350°F oven for 8-10 minutes until heated through. This restores the flaky texture beautifully.
- Microwave method (quick): Place a biscuit on a microwave-safe plate, cover with a damp paper towel, and microwave for 15-20 seconds. Be careful not to overheat, as this makes them tough.
- Toaster oven method: Split biscuits in half and toast cut-side up for 3-4 minutes for crispy edges and a warm center.
Refreshing Day-Old Biscuits: Brush cooled biscuits with a little more honey butter and warm in the oven for 5 minutes to restore their just-baked quality.
Make-Ahead & Freezer Notes
Make-Ahead Dough: You can prepare the dough through step 6 (after cutting the biscuits), then place unbaked biscuits on a parchment-lined baking sheet and freeze until solid (about 2 hours). Transfer frozen biscuits to a freezer bag and store for up to 3 months. Bake from frozen, adding 3-5 minutes to the baking time.
Freezing Baked Biscuits: Cool baked biscuits completely, then freeze in a single layer on a baking sheet. Once frozen solid, transfer to a freezer-safe container or bag with parchment paper between layers. Store for up to 2 months.
Reheating Frozen Baked Biscuits: No need to thaw – wrap frozen biscuits in foil and reheat in a 350°F oven for 15-20 minutes. Brush with fresh honey butter after warming for best results.
Freezing Honey Butter: The honey butter mixture freezes beautifully. Make a double or triple batch, freeze in ice cube trays, then transfer cubes to a freezer bag. Pop out a cube whenever you need honey butter for toast, pancakes, or reheating biscuits.
Best Quality Timeline: While frozen biscuits are safe indefinitely, they taste best when used within the recommended timeframes above. Beyond that, they’re still edible but may develop freezer burn or lose some of their fresh-baked magic.
Serving Suggestions
These Sweet Honey Butter Biscuits are incredibly versatile and pair beautifully with countless dishes. Here are some favorite serving ideas:
For Breakfast:
- Serve alongside scrambled eggs, crispy bacon, and fresh fruit for a classic Southern breakfast
- Split and fill with fried eggs and cheese for a breakfast sandwich
- Pair with sausage gravy for a true Southern comfort food experience
- Serve with jam, preserves, or additional honey butter for a simple morning treat
For Dinner:
- The perfect accompaniment to fried chicken, either homemade or takeout
- Serve with BBQ pulled pork, coleslaw, and baked beans
- Pair with hearty soups and stews – they’re excellent for soaking up broth
- Accompany roasted meats like beef, pork tenderloin, or turkey
- Serve alongside chili for a sweet-savory contrast
For Gatherings:
- Include in a bread basket with various butter spreads for parties
- Serve at brunch with multiple honey butter flavors (cinnamon, vanilla, orange zest)
- Perfect for holiday meals alongside turkey, ham, or prime rib
- Great for picnics and potlucks – they travel well and serve at room temperature
Creative Serving Ideas:
- Make mini sliders with ham, turkey, or chicken salad
- Turn them into dessert by serving with whipped cream and fresh berries
- Create a biscuit bar with various toppings: jams, honey, flavored butters, and spreads
- Pair with hot coffee, sweet tea, or cold milk
FAQs Section
Q: Can I make these biscuits without buttermilk?
A: Absolutely! Make a buttermilk substitute by adding 1 tablespoon of white vinegar or lemon juice to 1 cup of regular milk. Stir and let sit for 5 minutes before using. You can also use plain yogurt thinned with a little milk to pouring consistency. The acidity is important for both flavor and texture, so don’t skip this step.
Q: Why didn’t my biscuits rise properly?
A: The most common reasons are: (1) old or expired baking powder that’s lost its effectiveness, (2) overmixing the dough, which develops too much gluten, (3) warm ingredients that don’t create enough steam, or (4) twisting the biscuit cutter when cutting. Make sure your baking powder is fresh, work quickly with cold ingredients, and press straight down when cutting.
Q: Can I use salted butter instead of unsalted?
A: Yes, but reduce the added salt in the recipe by half. Using unsalted butter gives you better control over the final salt level, but salted butter works in a pinch. Just be mindful that the biscuits may taste slightly saltier.
Q: How do I know when the biscuits are done baking?
A: Look for golden-brown tops and a firm feel when you gently touch the top center. The biscuits should have risen significantly and the edges should be lightly browned. If you insert a toothpick into the center, it should come out clean or with just a few crumbs. They typically take 12-15 minutes at 425°F, but oven times can vary.
Q: Can I make these biscuits dairy-free?
A: Yes, with some substitutions. Use vegan butter or coconut oil (chilled solid) in place of dairy butter, and use a dairy-free milk (like oat milk or almond milk) with a tablespoon of lemon juice added to mimic buttermilk. The texture may be slightly different, but they’ll still be delicious.
Q: My honey butter is too runny. What should I do?
A: If your honey butter isn’t thick enough, try adding more honey or letting it cool for a few minutes – it will thicken as the butter begins to solidify slightly. You can also add a tiny pinch of powdered sugar to help it thicken. If it’s too thick, warm it briefly or add a small amount more melted butter.
Q: Can I add other flavors to these biscuits?
A: Definitely! These biscuits are a wonderful canvas for experimentation. Try adding vanilla extract to the honey butter, mixing in fresh herbs like rosemary or thyme, folding in shredded cheese, or adding cinnamon and a touch of vanilla to the dough itself. Just be careful not to add too many mix-ins, which can affect the structure and rise of the biscuits.
Conclusion
There’s truly nothing quite like the aroma of freshly baked biscuits filling your kitchen, and these Sweet Honey Butter Biscuits take that experience to the next level. With their tender, flaky layers and that gorgeous golden honey butter glaze, they’re guaranteed to become a family favorite that you’ll make again and again.
What makes this recipe so special is how it combines simplicity with impressive results. You don’t need fancy equipment or professional training – just quality ingredients, a little attention to technique, and about 30 minutes of your time. Whether you’re a seasoned baker or just starting your cooking journey, these biscuits will make you feel like a kitchen superstar.
The beautiful thing about mastering a good biscuit recipe is how it opens up so many mealtime possibilities. Once you’ve got this recipe down, you’ll find yourself making these biscuits for weekend breakfasts, holiday dinners, weeknight sides, and everything in between. They’re that good and that versatile.
So go ahead and give this recipe a try! Your kitchen will smell amazing, your family will be thrilled, and you’ll have a new signature dish to be proud of. Don’t forget to brush on that extra honey butter while the biscuits are hot – that’s where the magic really happens.
Ready to bake? Pin this recipe for later, try it this week, and let me know how your biscuits turn out in the comments below! I love hearing about your baking adventures and any creative twists you add to make this recipe your own. Happy baking!