If you’re looking for a crowd-pleasing dinner that’s crispy on the outside, tender on the inside, and coated in the most delicious sweet and savory glaze, these Sweet Glazed Chicken Tenders are about to become your new favorite recipe! This dish combines perfectly seasoned chicken tenderloins with a sticky, glossy glaze that’s a beautiful balance of honey, soy sauce, and a hint of garlic.
Whether you’re cooking for picky eaters, meal prepping for the week, or need a quick weeknight dinner that tastes like you spent hours in the kitchen, these sweet glazed chicken tenders deliver every single time. They’re incredibly versatile – serve them over rice, toss them in a salad, stuff them in a wrap, or let them shine as the star of your dinner plate alongside roasted vegetables. The best part? From start to finish, you’ll have a restaurant-quality meal on your table in under 30 minutes. No deep fryer needed, no complicated techniques – just simple ingredients and straightforward cooking that yields incredibly delicious results.
History / Background
Glazed chicken dishes have deep roots in both Asian and American cuisine, creating a beautiful fusion that’s become a staple in home kitchens across the United States. The technique of glazing proteins dates back centuries in Chinese cooking, where honey and soy-based sauces were used to create that signature sweet-savory balance that makes your taste buds sing. In Japanese cuisine, teriyaki chicken follows a similar philosophy, combining sweetness with umami-rich soy sauce.
When these cooking methods made their way to America in the mid-20th century, home cooks began adapting the recipes to suit readily available ingredients and American palates. Chicken tenders – those perfectly portion-sized strips of breast meat – became increasingly popular in the 1980s and 1990s, initially as breaded and fried kids’ menu items. But creative cooks soon realized these tender, quick-cooking pieces of chicken were the perfect canvas for all kinds of flavor combinations.
Sweet glazed chicken tenders represent the best of both worlds: the convenience and appeal of chicken tenders with the sophisticated, complex flavors of Asian-inspired glazes. This recipe has evolved into a true American family favorite, showing up at dinner tables, potlucks, and meal prep containers across the country. It’s comfort food that feels special, weeknight cooking that tastes like weekend indulgence.
Why You’ll Love This Recipe
These Sweet Glazed Chicken Tenders aren’t just another chicken recipe – they’re the answer to “What’s for dinner?” that everyone will actually get excited about. The chicken gets beautifully golden and slightly crispy on the edges, while the glaze caramelizes into a sticky, glossy coating that clings to every bite. The flavor is complex but not overwhelming, with that perfect sweet-savory balance that keeps you reaching for just one more piece.
Here’s why this recipe is a total winner:
- Super quick – Ready in just 25 minutes from start to finish, perfect for busy weeknights
- Kid-approved – Even picky eaters love the slightly sweet flavor and tender texture
- Budget-friendly – Uses affordable chicken tenders and pantry staple ingredients
- Minimal cleanup – One pan cooking means less time scrubbing dishes
- Meal prep friendly – Makes excellent leftovers that reheat beautifully
- Customizable – Easy to adjust sweetness, add heat, or modify to your taste preferences
- No special equipment – Just a skillet and basic kitchen tools you already own
- Healthier than takeout – You control the ingredients and skip the deep fryer
- Impressive presentation – Looks gorgeous plated up for guests or photographed for your Instagram
- Versatile serving options – Serve as a main dish, appetizer, or protein addition to any meal
Ingredient Notes
Chicken Tenders – These are the strip of meat found on the underside of chicken breasts. They’re naturally tender (hence the name!), cook quickly, and are perfectly portioned. You can substitute with chicken breast cut into strips if needed, though cooking time may vary slightly. Look for tenders that are similar in size so they cook evenly.
Honey – The sweetness base of our glaze. Honey adds more complexity than regular sugar, with floral notes that complement the savory elements beautifully. Use regular clover honey for best results, though wildflower honey works wonderfully too. If you need a substitute, maple syrup or agave nectar can work, though the flavor will be slightly different.
Soy Sauce – This brings the essential umami and saltiness that balances the honey’s sweetness. Use regular or low-sodium soy sauce depending on your preference. Tamari works great for gluten-free needs, or coconut aminos for a soy-free option (though it will be slightly sweeter).
Garlic – Fresh garlic adds aromatic depth to the glaze. Don’t skip it! Minced garlic from a jar can work in a pinch, but fresh tastes noticeably better in this recipe.
Rice Vinegar – Adds brightness and acidity to cut through the richness. Apple cider vinegar can substitute if needed, though rice vinegar has a gentler flavor.
Cornstarch – This is the secret to getting that thick, glossy, restaurant-style glaze that clings to the chicken. It also helps create a light coating on the chicken that gets wonderfully crispy. No cornstarch? Arrowroot powder works as a substitute.
Sesame Oil – Just a small amount adds incredible nutty, toasted flavor. This is optional but highly recommended for authentic taste. Find it in the Asian foods section of your grocery store.
Red Pepper Flakes – Optional but adds a gentle heat that complements the sweetness. Adjust to your spice preference.
Salt and Pepper – Essential for seasoning the chicken before cooking.
Olive Oil – For cooking the chicken. Use a neutral oil with a high smoke point like vegetable, canola, or avocado oil.
Equipment Needed
- Large skillet or frying pan (12-inch works great) – preferably with a lid
- Small saucepan or mixing bowl for the glaze
- Whisk – for mixing the glaze ingredients smoothly
- Measuring cups and spoons
- Tongs or spatula – for flipping the chicken
- Sharp knife and cutting board – for mincing garlic and preparing ingredients
- Small bowl – for the cornstarch coating
- Meat thermometer (optional but helpful) – to ensure chicken reaches 165°F

Sweet Glazed Chicken Tenders Recipe
- Total Time: 25 minutes
- Yield: 4 servings 1x
Description
Crispy, tender chicken tenders coated in a sticky sweet and savory glaze that’s absolutely irresistible! This quick and easy recipe delivers restaurant-quality flavor in just 25 minutes with simple pantry ingredients. Perfect for weeknight dinners, meal prep, or anytime you need a crowd-pleasing chicken dish.
Ingredients
For the Chicken:
- 1½ pounds chicken tenders (about 8-10 pieces)
- 3 tablespoons cornstarch
- ½ teaspoon salt
- ¼ teaspoon black pepper
- 2 tablespoons olive oil or vegetable oil
For the Sweet Glaze:
- ⅓ cup honey
- ¼ cup soy sauce (or tamari for gluten-free)
- 3 cloves garlic, minced
- 2 tablespoons rice vinegar
- 1 tablespoon water
- 1 tablespoon cornstarch
- 1 teaspoon sesame oil (optional but recommended)
- ¼ teaspoon red pepper flakes (optional)
For Garnish:
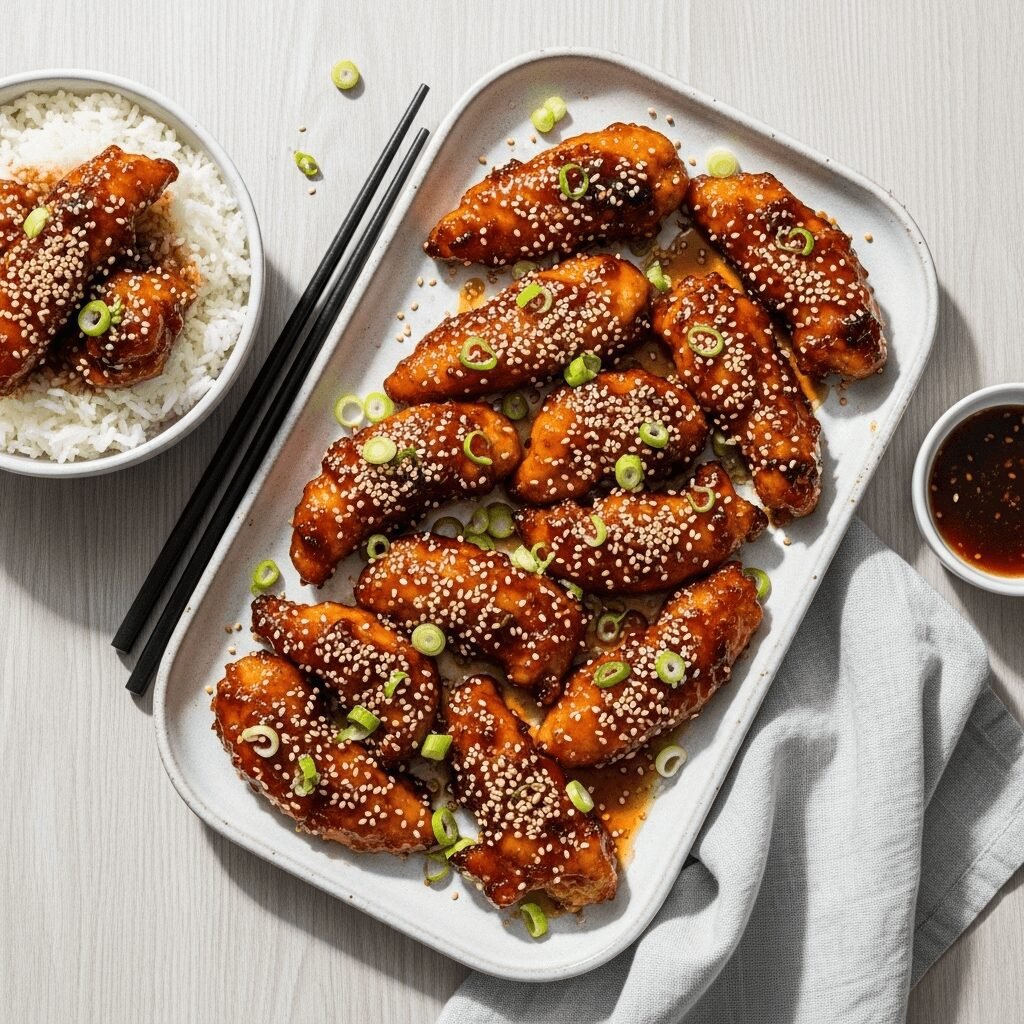
- Sesame seeds
- Sliced green onions
- Fresh parsley or cilantro
Instructions
- Prepare the chicken: Pat chicken tenders completely dry with paper towels – this is crucial for getting them crispy. In a shallow bowl, mix together 3 tablespoons cornstarch, salt, and pepper. Lightly coat each chicken tender in the cornstarch mixture, shaking off any excess. Set aside on a plate.
- Make the glaze: In a small saucepan or bowl, whisk together honey, soy sauce, minced garlic, rice vinegar, water, 1 tablespoon cornstarch, sesame oil, and red pepper flakes (if using) until the cornstarch is completely dissolved and no lumps remain. Set aside.
- Cook the chicken: Heat olive oil in a large skillet over medium-high heat. Once the oil is shimmering and hot, add the chicken tenders in a single layer (work in batches if needed to avoid overcrowding). Cook for 3-4 minutes on the first side without moving them – this helps them develop a golden crust.
- Flip and finish: Flip the chicken tenders and cook for another 3-4 minutes on the second side until golden brown and the internal temperature reaches 165°F. The chicken should be cooked through and no longer pink in the center.
- Add the glaze: Reduce heat to medium-low. Give your glaze mixture a quick stir (the cornstarch may have settled), then pour it over the chicken in the skillet. The glaze will start bubbling immediately – this is perfect!
- Coat and thicken: Gently turn the chicken tenders to coat them in the glaze. Let everything simmer together for 2-3 minutes, turning the chicken occasionally. The glaze will thicken and become glossy, coating the chicken beautifully. If the glaze becomes too thick, add a tablespoon of water.
- Garnish and serve: Remove from heat and transfer to a serving platter. Sprinkle with sesame seeds and sliced green onions. Serve immediately while hot and the glaze is still sticky!
Notes
- Don’t skip drying the chicken – Moisture prevents the cornstarch from adhering and the chicken from getting crispy.
- Cornstarch coating is key – This creates texture and helps the glaze stick beautifully to the chicken.
- Watch the heat – If your glaze is cooking too fast and becoming too thick, lower the heat and add a splash of water.
- Glaze consistency – The glaze should coat the back of a spoon but still be pourable. It will thicken more as it cools.
- Make it spicier – Add sriracha, increase red pepper flakes, or add fresh ginger for a kick.
- Low-sodium option – Use low-sodium soy sauce and reduce the honey slightly to balance the sweetness.
- Prep Time: 10 minutes
- Cook Time: 15 minutes
- Category: Dinner
- Method: Stovetop
- Cuisine: Asian-American Fusion
Nutrition
- Serving Size: 3-4 chicken tenders (about 6 oz)
- Calories: 385
- Sugar: 21g
- Sodium: 720mg
- Fat: 9g
- Saturated Fat: 1.5g
- Unsaturated Fat: 7g
- Trans Fat: 0g
- Carbohydrates: 32g
- Fiber: 0.5g
- Protein: 42g
- Cholesterol: 125mg
Nutrition information is approximate and based on standard ingredient measurements. Values may vary based on specific ingredients used.
Tips & Variations
Spicy Sweet Chicken Tenders: Add 1-2 tablespoons of sriracha or hot sauce to the glaze mixture for a spicy kick. You can also add fresh grated ginger (1 teaspoon) for extra heat and zing.
Honey Garlic Version: Double the garlic (use 6 cloves) and add an extra tablespoon of honey for an even sweeter, more garlicky profile.
Baked Option: For a hands-off approach, coat the chicken tenders in cornstarch, place on a lined baking sheet, and bake at 425°F for 15-18 minutes, flipping halfway. Heat the glaze separately in a saucepan until thickened, then toss the baked chicken in the glaze.
Air Fryer Method: Coat tenders in cornstarch mixture, spray with cooking spray, and air fry at 400°F for 12-15 minutes, flipping halfway. Prepare glaze on the stovetop and toss cooked tenders in the glaze.
Keto-Friendly: Replace honey with a low-carb sweetener like monk fruit sweetener or erythritol (use about ¼ cup) and omit the cornstarch coating. The chicken won’t be as crispy, but it will still be delicious.
Add Vegetables: Toss in bell peppers, snap peas, or broccoli florets during the last few minutes of cooking for a complete one-pan meal.
Orange Glaze Twist: Add 2 tablespoons of fresh orange juice and ½ teaspoon of orange zest to the glaze for a citrusy variation.
Teriyaki Style: Add 1 tablespoon of brown sugar and 1 teaspoon of fresh grated ginger to the glaze for a teriyaki-inspired flavor.
Pro Chef Tips
Temperature control is everything: Start with high heat to get that initial sear and golden color on the chicken, then reduce to medium-low when adding the glaze. This prevents the honey from burning while allowing it to caramelize beautifully.
Toast your sesame seeds: For extra flavor, toast sesame seeds in a dry skillet for 2-3 minutes before using as garnish. This brings out their nutty flavor and adds a professional touch.
Use a splatter screen: When cooking the chicken at high heat, a splatter screen keeps your stovetop clean while allowing steam to escape so the chicken stays crispy.
Let the chicken rest: If you have time, let the coated chicken sit for 5 minutes before cooking. This helps the cornstarch coating adhere better and creates an even crispier crust.
Glaze thickness trick: If your glaze gets too thick, whisk in water or chicken broth one teaspoon at a time. If it’s too thin, simmer uncovered for an extra minute or two to reduce and thicken.
Marinate for deeper flavor: For even more flavor, marinate the chicken tenders in half the glaze mixture (without the cornstarch thickener) for 30 minutes to 2 hours before cooking.
Fresh garlic is non-negotiable: Jarred minced garlic works in a pinch, but fresh garlic that’s been minced right before cooking provides so much more aromatic punch to this glaze.
Common Mistakes to Avoid
Overcrowding the pan: This is the number one mistake that prevents crispy chicken. If the tenders are touching or overlapping, they’ll steam instead of sear. Cook in batches if necessary – it only takes a few extra minutes and the results are worth it.
Adding the glaze too early: If you add the glaze before the chicken is fully cooked, the sugars can burn before the chicken is done. Always wait until the chicken is golden and nearly cooked through before introducing the sweet glaze.
Not dissolving the cornstarch: Lumpy glaze is disappointing! Make sure you whisk the cornstarch thoroughly into the liquid ingredients before adding to the pan. If you see lumps, strain the mixture before using.
Using wet chicken: Moisture is the enemy of crispiness. Always pat the chicken completely dry with paper towels before coating. Even a little surface moisture will prevent the cornstarch from adhering properly and create a soggy coating.
Cooking on too low heat initially: The chicken needs high enough heat to develop color and texture. Medium-high heat for the initial sear is essential – just be ready to reduce it when the glaze goes in.
Storage & Meal Prep
Refrigerator Storage: Store leftover sweet glazed chicken tenders in an airtight container in the refrigerator for up to 4 days. The glaze may thicken when cold, but it will loosen again when reheated. For best results, store the chicken and any extra glaze in the same container so the flavors continue to develop.
Reheating Instructions: For the best texture, reheat in a skillet over medium heat with a splash of water or chicken broth to loosen the glaze (about 2-3 minutes per side). You can also microwave on 50% power in 30-second intervals, though the chicken won’t be as crispy. The oven works well too – reheat at 350°F for 8-10 minutes.
Meal Prep Tips: These chicken tenders are fantastic for meal prep! Cook a double batch and portion into containers with rice and steamed vegetables for grab-and-go lunches. The flavors actually improve after a day in the fridge as the chicken absorbs more of that delicious glaze.
Make-Ahead & Freezer Notes
Make-Ahead Options: You can prepare the glaze up to 3 days in advance and store it in an airtight container in the refrigerator. You can also coat the raw chicken in the cornstarch mixture up to 2 hours ahead – just keep it refrigerated until you’re ready to cook.
Freezing Cooked Chicken: Yes, these freeze beautifully! Let the cooked chicken cool completely, then arrange in a single layer on a baking sheet and freeze until solid (about 2 hours). Transfer to a freezer-safe bag or container, removing as much air as possible. Freeze for up to 3 months. Label with the date and reheating instructions.
Freezing Uncooked: You can also freeze the raw chicken tenders that have been coated in cornstarch. Freeze them in a single layer, then transfer to a freezer bag. Cook from frozen, adding 2-3 extra minutes to the cooking time.
Thawing and Reheating: Thaw frozen cooked chicken tenders overnight in the refrigerator. Reheat in a skillet over medium heat with a splash of water or broth until heated through (about 5-7 minutes), or in the oven at 350°F for 12-15 minutes. The glaze may need a quick refresh – you can make a fresh batch of glaze and toss the reheated chicken in it for that just-made taste.
Serving Suggestions
These Sweet Glazed Chicken Tenders pair beautifully with so many sides and accompaniments! Here are some delicious serving ideas:
Rice and Grains: Serve over fluffy white rice, brown rice, jasmine rice, or cauliflower rice for a low-carb option. Fried rice or coconut rice also complement the sweet glaze perfectly. The glaze creates the most amazing sauce when it mingles with the rice!
Noodles: Toss with lo mein noodles, rice noodles, or even spaghetti for a fusion twist. The sticky glaze coats the noodles beautifully.
Vegetables: Pair with steamed broccoli, roasted green beans, sautéed snap peas, stir-fried bok choy, or roasted Brussels sprouts. Grilled or roasted asparagus also works wonderfully.
Salads: Slice the chicken and serve over a crisp Asian-inspired salad with cabbage, carrots, mandarin oranges, and a sesame ginger dressing.
Wraps and Tacos: Dice the chicken and stuff into lettuce wraps, flour tortillas, or slider buns. Top with coleslaw and extra drizzles of glaze.
Appetizer Style: Cut into bite-sized pieces and serve with toothpicks as a party appetizer. Serve alongside the extra glaze as a dipping sauce.
Complete Meal Ideas: Create a bowl with rice, edamame, cucumber, avocado, and the glazed chicken. Or serve with egg rolls, wontons, and sweet and sour sauce for a takeout-style feast at home.
Beverage Pairings: This dish pairs well with iced green tea, sparkling water with lime, or a crisp white wine like Riesling or Pinot Grigio for adults.
FAQs Section
Q: Can I use chicken breasts instead of tenders?
A: Absolutely! Cut boneless, skinless chicken breasts into strips about ½-inch thick and 3-4 inches long to mimic the size of tenders. The cooking time should be similar, but always check that the internal temperature reaches 165°F.
Q: Why is my glaze too thin or too thick?
A: Glaze consistency depends on cornstarch activation and cooking time. If too thin, let it simmer a bit longer – it thickens as it reduces. If too thick, whisk in water or chicken broth one teaspoon at a time until you reach the desired consistency. Remember, it will thicken more as it cools.
Q: Can I make this recipe gluten-free?
A: Yes! Simply substitute tamari or coconut aminos for the soy sauce, and ensure your cornstarch is certified gluten-free. All other ingredients in this recipe are naturally gluten-free.
Q: How do I know when the chicken is fully cooked?
A: The safest way is to use an instant-read meat thermometer – chicken should reach an internal temperature of 165°F. Visually, the chicken should be golden brown on the outside with no pink remaining in the center, and the juices should run clear.
Q: Can I double this recipe?
A: Definitely! This recipe doubles beautifully. You may need to cook the chicken in multiple batches to avoid overcrowding the pan, which is essential for getting that crispy exterior. The glaze amount doubles perfectly as well.
Q: What if I don’t have rice vinegar?
A: Apple cider vinegar or white wine vinegar can substitute. Use slightly less than the recipe calls for and taste as you go – both have a stronger flavor than rice vinegar. In a pinch, fresh lemon juice also works!
Q: My honey crystallized – can I still use it?
A: Yes! Crystallized honey works just fine in this recipe since it will melt when heated. If you prefer, you can gently warm the honey in the microwave for 15-20 seconds to liquify it before using.
Conclusion
There you have it – the ultimate Sweet Glazed Chicken Tenders recipe that’s destined to become a regular in your dinner rotation! This recipe proves that you don’t need complicated techniques or hard-to-find ingredients to create something truly special. With just a handful of pantry staples and less than 30 minutes, you can serve up tender, juicy chicken with a glaze so good you’ll want to drizzle it on everything.
Whether you’re a busy parent trying to get dinner on the table quickly, a meal prep enthusiast planning for the week ahead, or someone who just loves really good chicken, this recipe has you covered. The sweet and savory glaze is utterly addictive, the chicken stays incredibly tender, and the whole family will be asking for seconds.
I’d love to hear how your Sweet Glazed Chicken Tenders turn out! Did you add any special twists? Serve them in a creative way? Drop a comment below and let me know! And if you love this recipe as much as I do, please share it with your friends, save it to your favorite Pinterest board, and don’t forget to give it a try this week. Happy cooking! 🍯✨