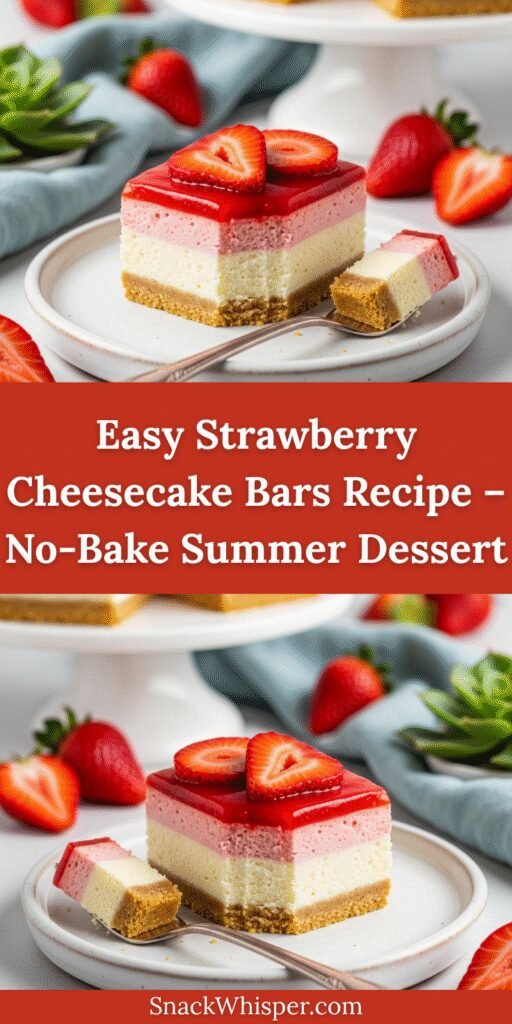
If you’re looking for the perfect summer dessert that combines creamy cheesecake filling with fresh, juicy strawberries and a buttery graham cracker crust, these strawberry cheesecake bars are about to become your new obsession! This easy strawberry cheesecake bars recipe delivers all the rich, tangy flavor of classic New York-style cheesecake in a convenient handheld form that’s perfect for potlucks, barbecues, birthday parties, and holiday gatherings.
What makes these cheesecake bars truly special is how incredibly simple they are to make. Unlike traditional cheesecake that requires a water bath and hours of careful baking, these bars come together quickly with minimal effort. The creamy cheesecake layer sits perfectly atop a golden graham cracker crust, topped with a gorgeous strawberry topping that adds both beauty and flavor. Whether you’re serving them at a Memorial Day cookout, a Fourth of July celebration, or just because it’s Tuesday and you deserve something sweet, these strawberry cream cheese bars are guaranteed to disappear fast!
History / Background
Cheesecake has been delighting dessert lovers for literally thousands of years. The ancient Greeks are credited with creating the first cheesecake on the island of Samos around 2,000 B.C., where it was served to athletes during the first Olympic games. The Romans later adopted the recipe, and as their empire expanded across Europe, so did cheesecake.
The modern cheesecake we know and love today, however, is distinctly American. In 1872, a New York dairy farmer accidentally created cream cheese while trying to recreate French Neufchâtel cheese. This discovery revolutionized cheesecake-making in America. By the early 1900s, cream cheese-based cheesecake became synonymous with New York, where Jewish delicatessens popularized the dense, creamy style we now call New York cheesecake.
Cheesecake bars specifically emerged as home bakers sought easier, more portable alternatives to the classic round cheesecake. By baking cheesecake in a rectangular pan and cutting it into squares or bars, dessert became more shareable, easier to serve at parties, and required less precision than a perfect circular slice. The addition of fresh strawberries is a natural pairing—strawberries and cream have been a beloved combination in European and American desserts for centuries. Today, strawberry cheesecake bars represent the perfect fusion of convenience, classic flavor, and crowd-pleasing appeal.
Why You’ll Love This Recipe
These homemade strawberry cheesecake bars are everything you want in a dessert: creamy, sweet, tangy, and absolutely irresistible. They taste like they came from a fancy bakery but require just a handful of simple ingredients and basic mixing bowls.
Here’s why this recipe will become your go-to dessert:
- Easier than regular cheesecake – No water bath, no cracking worries, no springform pan required
- Perfect for crowds – Makes 12-16 bars, ideal for potlucks, parties, and gatherings
- Make-ahead friendly – Tastes even better after chilling overnight
- Customizable – Works beautifully with other berries or fruit toppings
- No fancy equipment needed – Just basic baking tools you already own
- Kid-approved – The sweet strawberry topping makes these a hit with children
- Budget-friendly – Uses affordable, everyday ingredients
- Gorgeous presentation – The layers look stunning on any dessert table
- Balanced flavor – The tangy cream cheese perfectly balances the sweet strawberries
Ingredient Notes
Let’s talk about what makes these strawberry cheesecake bars so deliciously perfect. Each ingredient plays an important role in creating that dreamy texture and flavor.
Graham Crackers – The foundation of these bars starts with classic graham crackers. You’ll need about 1½ cups of graham cracker crumbs (roughly 10-12 full crackers). You can buy pre-made crumbs or pulse whole crackers in a food processor. Substitute with vanilla wafer cookies, Biscoff cookies, or even Oreos (without the filling) for a different flavor profile.
Butter – Unsalted butter binds the crust together and adds richness. Make sure it’s fully melted for easy mixing. If you only have salted butter, reduce the added salt slightly.
Cream Cheese – This is the star of the show! Use full-fat brick-style cream cheese (not spreadable), and make sure it’s at room temperature so it blends smoothly without lumps. Low-fat versions will work but won’t be as rich and creamy.
Granulated Sugar – Sweetens both the crust and the cheesecake layer. You can reduce the sugar slightly if you prefer less sweetness, but don’t skip it entirely as it affects texture.
Eggs – Eggs provide structure to the cheesecake layer. Room temperature eggs incorporate more easily and create a smoother filling.
Vanilla Extract – Pure vanilla extract adds warmth and depth. Don’t skip this—it enhances every other flavor in the recipe.
Sour Cream – Adding sour cream creates an ultra-creamy texture and adds that signature tangy cheesecake flavor. Greek yogurt works as a substitute.
Fresh Strawberries – The fresher the better! Look for bright red, fragrant berries. You’ll need about 2-3 cups of sliced strawberries for topping. Frozen strawberries can work in a pinch but will release more liquid.
Cornstarch – Helps thicken the strawberry topping so it’s glossy and spoonable, not runny.
Lemon Juice – A splash of fresh lemon juice brightens the strawberry topping and balances the sweetness perfectly.
Equipment Needed
You don’t need any fancy tools to make these beautiful strawberry cheesecake bars. Here’s what you’ll need:
- 9×13-inch baking pan – Standard rectangular pan works perfectly
- Parchment paper or aluminum foil – For easy removal and cleanup
- Food processor or zip-top bag with rolling pin – To crush graham crackers
- Large mixing bowls (2-3)
- Electric hand mixer or stand mixer – Makes mixing the cream cheese filling smooth and effortless
- Rubber spatula – For scraping down bowl sides
- Measuring cups and spoons
- Small saucepan – For cooking the strawberry topping
- Whisk
- Sharp knife – For slicing clean bars
- Cooling rack

Strawberry Cheesecake Bars Recipe
- Total Time: 4 hours 55 minutes
- Yield: 12-16 bars 1x
- Diet: Vegetarian
Description
Creamy, dreamy strawberry cheesecake bars with a buttery graham cracker crust, tangy cream cheese filling, and fresh strawberry topping. These easy-to-make bars are perfect for summer parties, potlucks, and special occasions!
Ingredients
For the Crust:
- 1½ cups graham cracker crumbs (about 10-12 full crackers)
- ¼ cup granulated sugar
- 6 tablespoons unsalted butter, melted
- Pinch of salt
For the Cheesecake Filling:
- 16 oz (2 blocks) cream cheese, softened to room temperature
- ½ cup granulated sugar
- 2 large eggs, room temperature
- ⅓ cup sour cream
- 1 tablespoon all-purpose flour
- 1 teaspoon pure vanilla extract
- ¼ teaspoon salt
For the Strawberry Topping:
- 3 cups fresh strawberries, hulled and sliced
- ⅓ cup granulated sugar
- 1 tablespoon cornstarch
- 1 tablespoon fresh lemon juice
- 2 tablespoons water
Instructions
Step 1: Prepare the Pan and Preheat Oven
Preheat your oven to 325°F (163°C). Line a 9×13-inch baking pan with parchment paper, leaving an overhang on two sides for easy removal later. Lightly spray with non-stick cooking spray and set aside.
Step 2: Make the Graham Cracker Crust
In a medium bowl, combine the graham cracker crumbs, sugar, melted butter, and a pinch of salt. Mix with a fork until the mixture resembles wet sand and holds together when pressed. Press this mixture firmly and evenly into the bottom of your prepared pan. Use the bottom of a measuring cup or glass to pack it down tightly. Bake the crust for 10 minutes, then remove and set aside to cool slightly while you prepare the filling.
Step 3: Prepare the Cheesecake Filling
In a large mixing bowl, beat the softened cream cheese with an electric mixer on medium speed until smooth and creamy, about 2-3 minutes. Scrape down the sides of the bowl. Add the sugar and beat for another 2 minutes until light and fluffy. Add the eggs one at a time, beating on low speed just until incorporated after each addition. Don’t overmix! Add the sour cream, flour, vanilla extract, and salt. Beat on low speed just until smooth and combined, scraping the bowl as needed.
Step 4: Bake the Cheesecake Bars
Pour the cream cheese filling over the warm crust, spreading it evenly with a spatula. Gently tap the pan on the counter a few times to release any air bubbles. Bake at 325°F for 30-35 minutes. The edges should be set, but the center should still have a slight jiggle (it will firm up as it cools). Don’t overbake or the bars will be dry. Remove from the oven and let cool completely on a wire rack (about 1 hour), then refrigerate for at least 3-4 hours or overnight.
Step 5: Make the Strawberry Topping
Once the cheesecake bars are chilled and set, prepare the strawberry topping. In a small saucepan, combine 1 cup of the sliced strawberries, sugar, cornstarch, lemon juice, and water. Cook over medium heat, stirring frequently, until the mixture comes to a simmer and thickens, about 5-7 minutes. The strawberries will break down and create a glossy sauce. Remove from heat and stir in the remaining 2 cups of fresh sliced strawberries. Let the topping cool to room temperature, about 20 minutes.
Step 6: Top and Serve
Spread the strawberry topping evenly over the chilled cheesecake. Return to the refrigerator for at least 30 minutes to let the topping set slightly. When ready to serve, use the parchment paper overhang to lift the entire slab out of the pan. Place on a cutting board and use a sharp knife (wiped clean between cuts) to slice into 12-16 bars. Serve chilled and enjoy!
Notes
- Room temperature ingredients are crucial – Cold cream cheese will create lumps. Let it sit out for 45-60 minutes before starting.
- Don’t overbake – The center should still jiggle slightly when done. It will firm up completely when chilled.
- Clean cuts – Wipe your knife with a warm, damp cloth between each cut for the cleanest, prettiest bars.
- Make-ahead friendly – These bars actually taste better after sitting overnight, making them perfect for party prep.
- Storage – Keep covered in the refrigerator for up to 5 days. The strawberry topping will soften slightly over time but still tastes delicious.
- Prep Time: 20 minutes
- Cook Time: 35 minutes
- Category: Dessert
- Method: Baking
- Cuisine: American
Nutrition
- Serving Size: 1 bar (based on 16 servings)
- Calories: 245
- Sugar: 21g
- Sodium: 180mg
- Fat: 14g
- Saturated Fat: 8g
- Unsaturated Fat: 5g
- Trans Fat: 0g
- Carbohydrates: 27g
- Fiber: 1g
- Protein: 4g
- Cholesterol: 65mg
Tips & Variations
One of the best things about this strawberry cheesecake bars recipe is how easily you can customize it to suit your preferences or what you have on hand!
Berry Variations: Swap strawberries for blueberries, raspberries, blackberries, or use a mixed berry combination. Each brings its own unique flavor while maintaining that delicious contrast with the creamy cheesecake.
Chocolate Crust: Use chocolate graham crackers or crushed Oreos (filling removed) instead of regular graham crackers for a chocolate-strawberry combination that’s absolutely divine.
Lemon Twist: Add 1 tablespoon of fresh lemon zest to the cheesecake filling for a bright, citrusy lemon strawberry cheesecake bar that’s perfect for spring.
No-Bake Version: For a no-bake option, increase the cream cheese to 24 oz, skip the eggs, and add 1 cup of heavy whipping cream (whipped to stiff peaks). Fold the whipped cream into the cream cheese mixture and chill for 6 hours.
Gluten-Free: Use gluten-free graham crackers or crushed gluten-free cookies for the crust. The rest of the recipe is naturally gluten-free (just verify the flour is gluten-free or use cornstarch instead).
Lighter Version: Use reduced-fat cream cheese (not fat-free), Greek yogurt instead of sour cream, and reduce the sugar by 2-3 tablespoons in the filling. The texture will be slightly less rich but still delicious.
Individual Servings: Press the crust into a lined muffin tin and top with filling. Bake for 18-22 minutes for adorable mini cheesecake bars.
Pro Chef Tips
Want to take your strawberry cheesecake bars from good to absolutely spectacular? Here are some professional baker secrets:
Temperature is everything: Room temperature ingredients blend together seamlessly without overmixing, which can incorporate too much air and cause cracks. Take your cream cheese and eggs out of the fridge 1-2 hours before baking.
The tap test: After mixing your filling, tap the bowl firmly on the counter several times. This releases hidden air bubbles that can create holes in your finished bars.
Low and slow wins: Baking cheesecake at a lower temperature (325°F vs 350°F+) prevents the edges from overcooking while the center finishes. It also reduces the risk of cracking.
The jiggle test: Your cheesecake is done when the edges are set but the center still jiggles like barely-set Jell-O when you gently shake the pan. It will continue to cook as it cools and will be perfectly set when chilled.
Gradual cooling prevents cracks: Let your bars cool gradually at room temperature before refrigerating. A sudden temperature change can cause cracking.
Macerate your berries: If you have extra time, toss your sliced strawberries with a tablespoon of sugar 30 minutes before making the topping. This draws out the juices and intensifies the strawberry flavor.
Layer for visual appeal: Reserve a few perfect strawberry slices and arrange them decoratively on top of your cooked topping for a professional, bakery-worthy presentation.
Common Mistakes to Avoid
Even the easiest recipes can go wrong if you’re not careful. Here are the most common mistakes people make with cheesecake bars and how to avoid them:
Mistake #1: Using cold cream cheese – This is the number one culprit behind lumpy cheesecake filling. Cold cream cheese refuses to blend smoothly no matter how long you mix it. Solution: Let cream cheese sit at room temperature for at least 45-60 minutes. If you’re in a rush, cut it into small cubes and microwave for 10 seconds at a time until soft but not melted.
Mistake #2: Overmixing the batter – Beating the filling too vigorously or for too long incorporates excess air, which creates bubbles and can cause cracking. Solution: Mix on low to medium-low speed and stop as soon as everything is combined. You’re going for smooth, not fluffy.
Mistake #3: Overbaking – Overbaked cheesecake is dry, crumbly, and dense instead of creamy and luscious. Solution: Remember that the center should still jiggle slightly when done. It will firm up during cooling and chilling.
Mistake #4: Skipping the chill time – Cutting into warm or barely-cool cheesecake bars results in a goopy mess. Solution: Be patient! Give your bars at least 4 hours (or overnight) in the fridge before slicing. They’ll slice cleanly and taste so much better.
Mistake #5: Not lining the pan properly – Without parchment paper overhang, you’ll struggle to get clean bars out of the pan. Solution: Line your pan with parchment paper that extends up and over two opposite sides. This creates “handles” to lift the entire slab out easily.
Storage & Meal Prep
Cheesecake bars are actually perfect for making ahead because they need that long chill time anyway! Here’s everything you need to know about storing them properly:
Refrigerator Storage: Store your strawberry cheesecake bars in an airtight container or cover the pan tightly with plastic wrap. They’ll stay fresh and delicious for up to 5 days in the refrigerator. The strawberry topping may release a bit of liquid over time, but this doesn’t affect the taste.
Keeping Bars Fresh: If you’ve already cut your bars, place a small piece of parchment or wax paper between layers to prevent them from sticking together. This is especially helpful if you’re transporting them to a party or potluck.
Preventing Sogginess: The graham cracker crust can soften slightly after a few days due to moisture from the cheesecake layer. If this bothers you, you can bake the crust for an extra 2-3 minutes to make it crispier initially, or add 1-2 extra tablespoons of melted butter to make it sturdier.
Reheating (Not Recommended): These bars are meant to be served cold! Room temperature is fine for about 30 minutes if you prefer a less chilled texture, but don’t warm them up or the cheesecake will become soft and lose its structure.
Make-Ahead & Freezer Notes
These strawberry cheesecake bars are an absolute dream for advance preparation. In fact, they taste even better when made a day or two ahead!
Make-Ahead Instructions:
Cheesecake actually improves with time as the flavors meld together beautifully. You can make the entire recipe up to 2 days in advance. Simply prepare the bars through Step 4 (after baking and chilling the cheesecake layer), cover tightly with plastic wrap, and refrigerate. Add the strawberry topping on the day you plan to serve for the freshest look and taste, or add it up to 24 hours ahead if you prefer.
Freezing Cheesecake Bars:
Yes, these bars freeze beautifully! Freeze them WITHOUT the strawberry topping for best results. Here’s how:
- Bake and completely chill the cheesecake bars (through Step 4)
- Cut into individual bars or leave whole
- Wrap tightly in plastic wrap, then again in aluminum foil, or place in an airtight freezer container
- Label with the date and freeze for up to 2 months
- Thaw overnight in the refrigerator before serving
- Add fresh strawberry topping after thawing
Freezing the Strawberry Topping: You can freeze the strawberry topping separately in an airtight container for up to 3 months. Thaw in the refrigerator overnight and stir well before using. The texture may be slightly softer than fresh, but it will still taste delicious.
Best Reheating/Serving Method: No reheating needed! Thaw frozen bars in the refrigerator overnight, add your strawberry topping, and serve cold. If the bars are too firm straight from the freezer, let them sit at room temperature for 10-15 minutes before cutting.
Serving Suggestions
Strawberry cheesecake bars are absolutely delicious on their own, but here are some wonderful ways to serve them that will make your dessert spread even more impressive:
Coffee & Tea Pairings: These bars pair beautifully with hot coffee, iced lattes, cappuccinos, or a nice cup of black or green tea. The slight bitterness of coffee balances the sweetness perfectly.
Whipped Cream: A dollop of freshly whipped cream or even Cool Whip adds an extra layer of luxury and lightness.
Extra Berries: Serve alongside a bowl of fresh mixed berries (blueberries, raspberries, blackberries) for guests who want extra fruit.
Chocolate Drizzle: Melt some dark or white chocolate and drizzle it artistically over the bars just before serving for an elegant touch.
Ice Cream: Make it à la mode! A small scoop of vanilla bean ice cream alongside a cheesecake bar transforms it into an extra-special sundae-style dessert.
Sparkling Wine: For adult gatherings, serve these bars with prosecco, champagne, or a sweet rosé wine. The bubbles and the creamy cheesecake are a match made in heaven.
Garden Party Spread: Include these bars as part of a dessert table with fresh fruit salad, lemon cookies, and iced tea for a beautiful spring or summer celebration.
Brunch Addition: These bars aren’t just for dessert! They’re wonderful as part of a brunch spread alongside quiches, fruit platters, and pastries.
FAQs Section
Q: Can I use frozen strawberries instead of fresh?
A: Yes, you can, but there are some considerations. Frozen strawberries release more liquid as they thaw, which can make your topping runnier. If using frozen berries, thaw them completely and drain excess liquid first. You may need to increase the cornstarch to 1½-2 tablespoons to achieve the right consistency. For best results and the prettiest presentation, fresh strawberries are always recommended.
Q: Why did my cheesecake bars crack?
A: Cracks typically happen from overbaking, overmixing the batter (which incorporates too much air), or cooling too quickly. Make sure your cream cheese is at room temperature so you don’t need to overmix, take the bars out when the center still jiggles slightly, and let them cool gradually at room temperature before refrigerating. The good news? The strawberry topping hides any cracks perfectly!
Q: Do I have to use a 9×13-inch pan?
A: A 9×13-inch pan is ideal for the right thickness of layers, but you can adapt. An 8×8 or 9×9-inch pan will give you thicker bars—increase baking time by 5-10 minutes and check for doneness. For thinner bars, use a larger pan (like 10×15) and reduce baking time by 5-10 minutes. Just watch carefully and use the jiggle test.
Q: How do I get clean, professional-looking cuts?
A: The secret is a hot, sharp knife! Run your knife under very hot water, wipe it completely dry, then make one cut. Wipe the knife clean, run it under hot water again, dry it, and make the next cut. Repeat this process for every single cut. Yes, it’s a bit tedious, but it creates those gorgeous, bakery-perfect bars with clean edges.
Q: Can I make these bars without eggs?
A: Eggs provide crucial structure in baked cheesecake. For an egg-free version, you’ll want to make a no-bake version instead. Use 24 oz of cream cheese, skip the eggs and flour, add 1 cup of heavy cream (whipped to stiff peaks), and fold it into the sweetened cream cheese mixture. Chill for at least 6 hours before adding topping.
Q: My crust is too crumbly and won’t stick together. What happened?
A: This usually means there wasn’t enough butter to bind the crumbs. Make sure you’re using 6 tablespoons (¾ stick) of melted butter and mixing until the mixture holds together when pressed. It should look like wet sand. If it’s still too dry, add another tablespoon of melted butter. Also, press the crust very firmly into the pan—really pack it down.
Q: Can I use a different type of cookie for the crust?
A: Absolutely! Graham crackers are traditional, but vanilla wafers, Biscoff cookies, shortbread cookies, gingersnaps, or even Oreos (with filling removed) all make delicious crusts. Just pulse them to fine crumbs and use the same measurements. Each cookie will bring its own unique flavor profile to your bars.
Conclusion
There you have it—everything you need to create the most incredible, crowd-pleasing strawberry cheesecake bars! These beauties combine the classic elegance of New York-style cheesecake with the convenience of a handheld bar dessert. Whether you’re bringing them to a summer potluck, serving them at a birthday celebration, or just treating yourself to something special on a weeknight, these bars are guaranteed to impress.
The best part? Once you master this basic recipe, you can customize it endlessly with different fruits, crusts, and toppings. It’s one of those versatile recipes that becomes a staple in your dessert rotation because it’s both foolproof and fancy.
I’d absolutely love to hear how your strawberry cheesecake bars turn out! Did you make any fun variations? Serve them at a special occasion? Drop a comment below and let me know, and don’t forget to rate the recipe. If you loved these bars as much as I do, please share this recipe with your friends and family—and be sure to save it to your Pinterest boards so you can find it easily whenever that cheesecake craving hits!
Happy baking, friends! 🍓✨