Get ready to fall head over heels for the easiest, most flavorful chicken dinner you’ll ever make! This Honey Glazed Chicken features tender, juicy chicken pieces coated in a luscious sweet-and-savory glaze that caramelizes beautifully as it cooks. The combination of golden honey, rich soy sauce, aromatic garlic, and a hint of tanginess creates a glossy coating that clings to every bite, delivering restaurant-quality flavor right in your own kitchen.
This recipe is a true weeknight warrior – it comes together in under 40 minutes with ingredients you likely already have in your pantry, yet it’s impressive enough to serve to dinner guests. The honey glaze transforms ordinary chicken into something extraordinary, creating a beautiful mahogany color and a flavor profile that hits all the right notes: sweet but not cloying, savory with depth, and just a touch of tang to balance everything perfectly. Whether you’re cooking for picky kids who need vegetables disguised in deliciousness, meal prepping for the week ahead, or looking for that go-to recipe that never fails to impress, this Honey Glazed Chicken delivers every single time. Serve it over fluffy rice to catch every drop of that incredible glaze, alongside roasted vegetables, or with a crisp salad for a complete meal that’ll have everyone asking for seconds!
History / Background
While honey-glazed chicken might feel like a modern dinner table staple, the tradition of combining honey with poultry spans centuries and crosses multiple cultures. Honey has been used as a cooking ingredient for over 8,000 years, with ancient civilizations recognizing its remarkable properties as both a sweetener and a natural preservative. The ancient Egyptians, Greeks, and Romans all incorporated honey into their cooking, often pairing it with meats and poultry to create rich, complex glazes.
The specific style of honey-glazed chicken we know and love today has its roots in several culinary traditions. Chinese cuisine has long featured honey in savory applications, particularly in Cantonese cooking where honey-roasted meats are traditional favorites. These techniques made their way to Western kitchens through the fusion of Asian and American cooking styles that became popular in the mid-20th century. Meanwhile, European cooking traditions have their own history of honey-glazed meats, particularly in French and German cuisines where honey was paired with mustard and herbs to create sophisticated glazes for game birds and poultry.
The American interpretation of honey-glazed chicken really took off in the 1970s and 1980s as home cooks sought quick, flavorful recipes that could compete with the convenience of fast food while delivering homemade quality. The combination of honey with soy sauce – a marriage of American and Asian ingredients – became particularly popular during this era of culinary experimentation. This fusion created what many consider the quintessential honey-glazed chicken: sweet, sticky, and utterly addictive.
Today, honey-glazed chicken represents the best of modern home cooking: simple ingredients, minimal preparation, maximum flavor, and universal appeal. It’s a recipe that’s been passed down through generations, shared at potlucks, and recreated in countless home kitchens. Each family often has their own twist – some add a kick of heat with red pepper flakes, others incorporate fresh ginger for zing, and some swear by a splash of apple cider vinegar for brightness. What remains constant is honey’s magical ability to transform ordinary chicken into something truly special, creating that irresistible sticky-sweet glaze that keeps us coming back for more.
Why You’ll Love This Recipe
This isn’t just another chicken recipe – it’s the one that will become your family’s most-requested dinner, the dish you turn to when you need a guaranteed winner, and the recipe you’ll share with friends who ask for your secret to perfect weeknight meals. The beauty of this Honey Glazed Chicken lies in its perfect balance: it’s incredibly easy yet impressively delicious, budget-friendly yet restaurant-quality, and quick enough for busy weeknights yet special enough for entertaining.
Here’s why this recipe deserves a permanent spot in your dinner rotation:
- Ridiculously Easy – No complicated techniques, no exotic ingredients, just straightforward cooking that anyone can master on their first try
- Lightning Fast – From start to finish in under 40 minutes, making it perfect for those hectic weeknight rushes
- Kid-Approved – Even the pickiest eaters love the sweet, sticky glaze; it’s a proven picky-eater winner
- Budget-Friendly – Uses affordable chicken pieces and pantry staples, feeding a family of four for under $15
- Minimal Cleanup – Everything cooks in one skillet or baking dish, meaning less time scrubbing and more time enjoying
- Naturally Gluten-Free Option – Easily adaptable for gluten-free diets with a simple soy sauce swap
- Meal Prep Champion – Makes fantastic leftovers that taste even better the next day; perfect for weekly meal prep
- Versatile – Works beautifully with chicken thighs, breasts, drumsticks, or wings – use whatever you have or prefer
- Impressive Presentation – That glossy, caramelized glaze looks like you spent hours in the kitchen
- Customizable – Easily adjusted for spice levels, sweetness preferences, and dietary needs
- Foolproof Results – This recipe is nearly impossible to mess up; it works perfectly every single time
- Crowd-Pleaser – Universally loved; perfect for potlucks, parties, or family gatherings
Ingredient Notes
Let’s break down what makes this glaze so incredibly delicious and talk about how each ingredient contributes to the magic:
Chicken: Boneless, skinless chicken thighs are the gold standard for this recipe – they stay juicy, don’t dry out, and absorb the glaze beautifully. However, chicken breasts work wonderfully too (just watch cooking time as they cook faster), and bone-in pieces like drumsticks or wings create an even more dramatic presentation. Dark meat delivers more flavor and forgiveness, while white meat is leaner.
Honey: The star of the show! Use good-quality honey for best results – local honey adds lovely floral notes, while darker honey like buckwheat provides deeper, more robust flavor. Honey not only sweetens but also helps the glaze caramelize beautifully and cling to the chicken. In a pinch, maple syrup or agave can substitute, though the flavor profile changes slightly.
Soy Sauce: Provides that essential savory depth and umami that balances honey’s sweetness. Regular soy sauce works perfectly, but low-sodium gives you better control over salt levels. For gluten-free needs, tamari or coconut aminos work beautifully. Don’t skip this – it’s what transforms the glaze from one-dimensional sweet to complex and crave-worthy.
Garlic: Fresh minced garlic is non-negotiable for the best flavor. It adds aromatic depth and that irresistible savory quality. Garlic powder can substitute in a pinch (use 1 teaspoon), but fresh truly makes a difference. The garlic mellows as it cooks, becoming sweet and fragrant.
Rice Vinegar or Apple Cider Vinegar: This is the secret ingredient many recipes leave out! The acidity brightens the glaze, cuts through the sweetness, and adds complexity. It also helps tenderize the chicken slightly. Rice vinegar is milder and slightly sweet, while apple cider vinegar brings more tang – both work beautifully.
Ginger: Fresh ginger adds a warm, slightly spicy note that elevates the entire dish. It’s optional but highly recommended for that authentic Asian-inspired flavor. Ground ginger can substitute (use 1/2 teaspoon), but fresh provides brighter, more vibrant flavor.
Cornstarch: The magic thickening agent that transforms thin liquid into that gorgeous, glossy, stick-to-the-chicken glaze. Don’t skip this – it’s what makes the sauce coat the chicken rather than puddle beneath it.
Sesame Oil: Just a touch adds nutty depth and authentic Asian flavor. If you don’t have it, vegetable or olive oil works, though you’ll miss that characteristic toasted sesame aroma.
Red Pepper Flakes: Optional but wonderful for those who like a little heat. Adds a subtle kick that plays beautifully against the sweetness without overwhelming the dish.
Substitutions: For keto/low-carb, use sugar-free honey substitute or a combination of erythritol and molasses. For paleo, coconut aminos replace soy sauce perfectly. For budget-friendly, use whatever chicken pieces are on sale – this glaze works on everything!
Equipment Needed
This recipe requires minimal equipment – another reason to love it! Here’s what you’ll need:
- Large oven-safe skillet or cast iron pan – 12-inch works perfectly for stovetop-to-oven method; cast iron gives the best sear and heat retention
- Baking dish – 9×13-inch if using the baking method instead of skillet
- Small mixing bowl – For whisking together the glaze ingredients
- Whisk or fork – To thoroughly combine the glaze and prevent cornstarch lumps
- Tongs or spatula – For flipping chicken and ensuring even coating with glaze
- Measuring cups and spoons – For accurate ingredient measurements
- Cutting board and sharp knife – For mincing garlic and ginger, and preparing chicken
- Meat thermometer – Optional but recommended to ensure chicken reaches safe 165°F internal temperature
- Paper towels – For patting chicken dry before cooking (crucial for proper browning!)
- Pastry brush – Optional but helpful for basting chicken with glaze during cooking
- Grater or microplane – If using fresh ginger, for easy mincing
Honey Glazed Chicken Recipe
- Total Time: 35 minutes
- Yield: 4 servings 1x
- Diet: Gluten Free
Description
Succulent chicken pieces coated in a sticky, sweet, and savory honey glaze that caramelizes to perfection. This easy one-pan recipe delivers restaurant-quality results with minimal effort – perfect for busy weeknights or impressive enough for entertaining!
Ingredients
For the Chicken:
- 1.5 to 2 pounds boneless, skinless chicken thighs or breasts (about 4-6 pieces)
- 1 tablespoon olive oil or vegetable oil
- Salt and black pepper to taste
- Sesame seeds for garnish (optional)
- Sliced green onions for garnish (optional)
For the Honey Glaze:
- 1/3 cup honey
- 1/4 cup soy sauce (or tamari for gluten-free)
- 3 cloves garlic, minced (about 1 tablespoon)
- 1 tablespoon rice vinegar or apple cider vinegar
- 1 tablespoon fresh ginger, minced (or 1/2 teaspoon ground ginger)
- 1 tablespoon cornstarch
- 2 tablespoons water
- 1 teaspoon sesame oil
- 1/4 teaspoon red pepper flakes (optional, for heat)
- 1/4 teaspoon black pepper
Instructions
- Prepare the Chicken: Pat chicken pieces completely dry with paper towels – this is crucial for achieving a beautiful golden sear. Season both sides generously with salt and black pepper. If using chicken breasts, you can pound them to even thickness (about 3/4 inch) for uniform cooking, or slice them horizontally into cutlets.
- Make the Glaze: In a small mixing bowl, whisk together honey, soy sauce, minced garlic, rice vinegar, ginger, sesame oil, red pepper flakes (if using), and black pepper until well combined. In a separate small cup, mix cornstarch with the 2 tablespoons of water to create a slurry (this prevents lumps). Add the cornstarch slurry to the honey mixture and whisk vigorously until completely smooth with no lumps. Set aside.
- Preheat Oven: Preheat your oven to 375°F (190°C). This ensures it’s ready when you need it for the second cooking stage.
- Sear the Chicken: Heat the oil in a large oven-safe skillet (cast iron is ideal) over medium-high heat until shimmering but not smoking. Carefully add the chicken pieces in a single layer without crowding – work in batches if necessary. Sear for 3-4 minutes on the first side without moving them, allowing a golden-brown crust to form. Flip and sear the second side for another 3-4 minutes until golden. The chicken doesn’t need to be fully cooked at this stage.
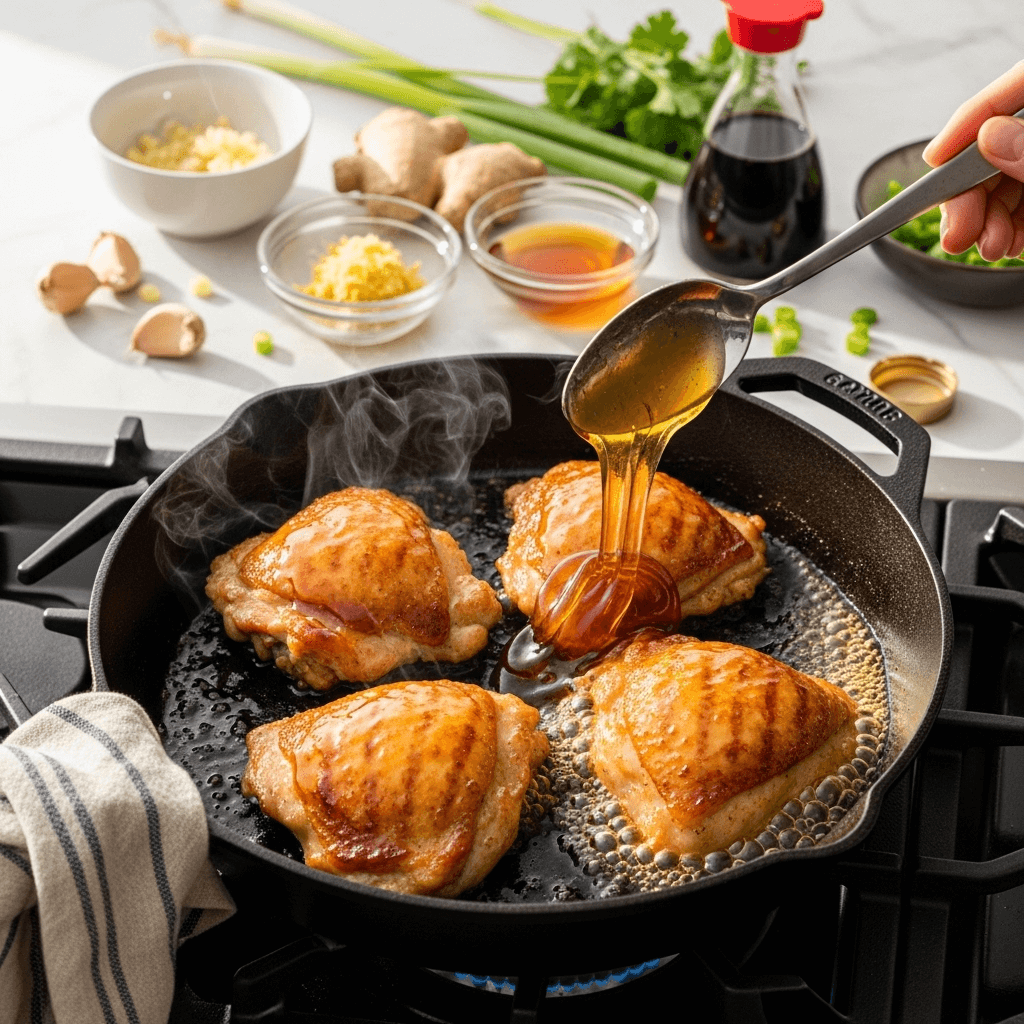
- Add the Glaze: Reduce heat to medium-low. Give the honey glaze one final whisk, then pour it over and around the chicken in the skillet. Use a spoon or pastry brush to coat the chicken pieces thoroughly, ensuring they’re completely covered with glaze. Let the glaze bubble gently for 1-2 minutes, swirling the pan occasionally to prevent sticking.
- Bake to Perfection: Transfer the entire skillet to the preheated oven (remember, the handle will be hot!). Bake for 12-15 minutes for boneless thighs, 10-12 minutes for chicken breasts, or until the internal temperature reaches 165°F when checked with a meat thermometer inserted into the thickest part. The glaze should be thick, glossy, and caramelized around the edges.
- Baste and Thicken: Remove the skillet from the oven using oven mitts (that handle is very hot!). The glaze will have thickened beautifully. Use a spoon to baste the chicken with the glaze from the pan, coating each piece generously. If the glaze seems too thin, place the skillet over medium heat for 1-2 minutes, spooning the glaze over the chicken repeatedly until it reaches your desired consistency.
- Rest and Serve: Let the chicken rest in the skillet for 3-5 minutes. This allows the juices to redistribute and the glaze to set slightly, making it even stickier and more delicious. Transfer chicken to a serving platter or individual plates, drizzle with remaining glaze from the pan, and garnish with sesame seeds and sliced green onions if desired. Serve immediately while hot and glossy!
Notes
- Chicken Thickness Matters: If using chicken breasts, consider pounding them to even thickness or butterflying thick pieces. This ensures even cooking and prevents dry, overcooked edges with raw centers.
- Don’t Skip Patting Dry: Moisture on the chicken surface prevents proper browning. Dry chicken = better sear = better flavor.
- Glaze Consistency: If your glaze is too thin after baking, simmer it on the stovetop for a minute or two. Too thick? Add a tablespoon of water or chicken broth and stir.
- Stovetop-Only Method: If you don’t have an oven-safe skillet, sear the chicken as directed, transfer to a baking dish, pour glaze over, and bake at 375°F for 15-20 minutes.
- Slow Cooker Adaptation: Place chicken in slow cooker, pour glaze over (without the cornstarch slurry initially), cook on LOW for 4-5 hours or HIGH for 2-3 hours. Mix cornstarch with water, stir into the sauce in the last 30 minutes to thicken.
- Crispier Glaze: For extra caramelization, broil for 2-3 minutes at the end, watching carefully to prevent burning.
- Prep Time: 10 minutes
- Cook Time: 25 minutes
- Category: Main Dish
- Method: Stovetop & Baking
- Cuisine: Asian-American Fusion
Nutrition
- Serving Size: 1 piece chicken with glaze (approximately 6 oz)
- Calories: 318
- Sugar: 18g
- Sodium: 642mg
- Fat: 11g
- Saturated Fat: 2.5g
- Unsaturated Fat: 7.5g
- Trans Fat: 0g
- Carbohydrates: 22g
- Fiber: 0.5g
- Protein: 32g
- Cholesterol: 142mg
Nutrition information is approximate and calculated using boneless, skinless chicken thighs. Values will vary based on specific ingredients used and portion sizes.
Tips & Variations
Spicy Honey Glazed Chicken: Double the red pepper flakes to 1/2 teaspoon, add 1 tablespoon sriracha or hot sauce to the glaze, or brush chicken with chili garlic sauce before applying the honey glaze. For extreme heat lovers, add sliced fresh jalapeños or serrano peppers to the skillet.
Citrus Twist: Add 1 tablespoon of fresh orange juice and 1 teaspoon orange zest to the glaze for bright, fruity notes. Lemon works beautifully too – try 2 teaspoons fresh lemon juice and lemon zest for a honey-lemon variation that’s absolutely divine.
Garlic Lover’s Version: Triple the garlic to 9 cloves (yes, really!). The garlic becomes sweet and mellow as it cooks, adding incredible depth without overwhelming heat. Add some garlic powder (1/2 teaspoon) to the glaze for even more garlicky goodness.
Healthier Adaptations: Use skinless chicken breast for leaner protein. Reduce honey to 1/4 cup and add 2 tablespoons of unsweetened applesauce to maintain moisture while cutting sugar. Use low-sodium soy sauce to reduce sodium content significantly.
Sticky Wings: This glaze is absolutely phenomenal on chicken wings! Use 2 pounds of wings, bake at 400°F for 25 minutes, toss with glaze, then bake another 15-20 minutes until sticky and caramelized.
Asian-Inspired Additions: Add 1 teaspoon of five-spice powder to the glaze for complex, warm flavor. Stir in 1 tablespoon of hoisin sauce for extra depth and sweetness. A splash of mirin (sweet rice wine) adds authentic Japanese flavor.
Grilled Version: Marinate chicken in half the glaze for 30 minutes to 2 hours. Grill over medium-high heat, basting with remaining glaze during the last 5 minutes of cooking. The glaze caramelizes beautifully over open flame!
Herb Enhancement: Add 1 teaspoon of fresh thyme leaves or 1/2 teaspoon dried thyme to the glaze. Fresh rosemary (1 teaspoon minced) adds earthy, sophisticated flavor. Finish with fresh cilantro or Thai basil for herbaceous brightness.
One-Pan Meal: Add vegetables directly to the skillet! Baby potatoes, broccoli florets, snap peas, or sliced bell peppers all roast beautifully alongside the chicken and soak up that incredible glaze.
Pro Chef Tips
The Dry Chicken Secret: This cannot be overstated – patting your chicken completely dry before seasoning and searing is the number one thing professional cooks do that home cooks often skip. Moisture creates steam, which prevents the Maillard reaction (browning) from occurring. Dry surface = better crust = more flavor. Use paper towels and really press to absorb all surface moisture.
Cornstarch Slurry Technique: Always mix cornstarch with cold water separately before adding to your glaze. Adding cornstarch powder directly to the sauce creates impossible-to-remove lumps. The slurry ensures smooth, glossy results. Make it right before using – cornstarch slurries separate if they sit.
Temperature Control Mastery: Use medium-high heat for searing to develop that beautiful golden crust, but reduce to medium-low before adding the glaze. High heat causes honey to burn quickly, turning bitter rather than caramelizing beautifully. The glaze should bubble gently, not violently.
The Basting Secret: Professional kitchens constantly baste meats while cooking – it’s how they achieve that gorgeous, glossy finish. Every few minutes, spoon the glaze from the pan over the chicken. This builds layers of flavor and creates that signature sticky coating.
Resting is Non-Negotiable: Just like steaks, chicken needs to rest after cooking. Cutting into it immediately causes all those delicious juices to run out onto the plate instead of staying in the meat. Three to five minutes makes the difference between dry chicken and juicy perfection.
Fresh Garlic and Ginger Prep: For the most aromatic flavor, mince your garlic and ginger as finely as possible – almost to a paste. Larger chunks don’t distribute flavor as evenly and can burn. A microplane grater works wonders for both, creating perfect texture and maximizing flavor release.
Caramelization Without Burning: Watch your oven closely during the last few minutes of cooking. Honey can go from beautifully caramelized to burnt in seconds. If the glaze is browning too quickly, tent loosely with foil or reduce oven temperature to 350°F.
The Finishing Touch: Right before serving, add a tiny drizzle of fresh sesame oil and a few drops of rice vinegar over the chicken. This “finishing” technique brightens all the flavors and adds professional polish. Fresh herbs or citrus zest at the very end provide aromatic lift.
Common Mistakes to Avoid
Overcrowding the Pan: When searing chicken, leaving space between pieces is crucial. Crowded chicken steams rather than sears, preventing that golden-brown crust from forming. If your pan can’t fit all the pieces with at least an inch between them, work in batches. Yes, it takes a few extra minutes, but the flavor difference is dramatic.
Using High Heat Throughout: While high heat is perfect for the initial sear, continuing with high heat after adding the honey glaze is a recipe for disaster. Honey burns quickly at high temperatures, becoming bitter and black. Once that glaze goes into the pan, reduce heat to medium-low and let it work its magic gently.
Skipping the Cornstarch: Some cooks think they can skip the cornstarch and the glaze will thicken on its own. While it will reduce slightly, it won’t achieve that gorgeous, sticky, spoon-coating consistency that makes this dish special. Cornstarch creates the glossy, clingy glaze that transforms this from good to extraordinary. Don’t skip it!
Overcooking the Chicken: Chicken breasts especially can go from perfectly juicy to dry and rubbery in just a minute or two. Invest in an instant-read meat thermometer (they’re under $15) and pull the chicken at exactly 165°F internal temperature. Carryover cooking will bring it to the perfect doneness while it rests.
Not Tasting and Adjusting: Honey varies in sweetness, soy sauce varies in saltiness, and personal preferences vary wildly. Before coating your chicken, taste the glaze and adjust. Too sweet? Add more vinegar or soy sauce. Too salty? Add more honey. Too thick? Thin with water. The glaze should taste intensely flavorful – almost too much – because it’ll mellow when coating the chicken.
Forgetting to Baste: The glaze in the bottom of the pan is liquid gold – don’t let it just sit there! Spooning it over the chicken repeatedly during and after cooking ensures every bite is coated with that sticky, sweet-savory goodness. This is what creates that restaurant-quality glossy appearance.
Storage & Meal Prep
Refrigerator Storage: Once cooled to room temperature, transfer honey-glazed chicken to an airtight container. Store in the refrigerator for up to 4 days. The glaze may firm up when cold – this is completely normal. Store any extra glaze separately in a small container for drizzling when reheating.
Reheating Methods: The microwave works in a pinch – heat individual portions on medium power in 1-minute intervals until warmed through, about 2-3 minutes total. For best results that maintain texture, reheat in a skillet over medium-low heat with a splash of water or chicken broth, covered, for 5-7 minutes until heated through. The oven method (350°F for 10-12 minutes covered with foil) keeps the chicken moist and even re-crisps the glaze slightly.
Meal Prep Strategy: This recipe is phenomenal for weekly meal prep. Cook a double batch on Sunday, portion into four containers with rice and vegetables, and you’ve got four ready-to-go lunches or dinners. The chicken actually tastes better the next day as flavors meld and deepen.
Glaze Separation: If your refrigerated chicken has glaze that seems separated or oily, don’t worry – just stir it before reheating, or add a tiny splash of water and heat through. The glaze will come back together beautifully.
Preventing Dryness: When meal prepping, slightly undercook the chicken by 5°F (pull it at 160°F instead of 165°F) since it will continue cooking when reheated. Store extra glaze separately and drizzle over chicken after reheating to restore moisture and flavor.
Leftover Magic: Chopped leftover honey-glazed chicken is incredible in grain bowls, wraps, salads, fried rice, or quesadillas. The sweet-savory flavor adds interest to any dish.
Make-Ahead & Freezer Notes
Marinating Option: While not required, you can marinate the chicken in half the glaze (reserve the other half for cooking) for 2-24 hours before cooking. This infuses deeper flavor but isn’t necessary for delicious results. Marinate in the refrigerator in a sealed container or zip-top bag.
Freezing Uncooked: Season chicken pieces, place in a freezer bag with the honey glaze (mixed but without cornstarch added yet), remove air, seal, and freeze flat for up to 3 months. Label with the date and cooking instructions. To cook, thaw completely in refrigerator overnight, add cornstarch slurry to glaze, then proceed with the recipe as written.
Freezing Cooked Chicken: This freezes beautifully! Cool completely, then freeze in airtight containers or freezer bags for up to 3 months. For best texture, freeze the chicken and glaze separately if possible. Thaw overnight in the refrigerator before reheating.
Reheating from Frozen: You can reheat individual frozen portions directly from the freezer. Microwave on 50% power for 5-7 minutes, flipping halfway, until heated through. Or bake covered at 350°F for 25-30 minutes until an internal temperature of 165°F is reached.
Best Freezer Practices: Portion into individual servings before freezing for grab-and-go convenience. Flatten freezer bags to save space and allow faster, more even thawing. Remove as much air as possible to prevent freezer burn.
Make-Ahead for Entertaining: Sear the chicken up to a day ahead, refrigerate, then finish with glaze and baking when guests arrive. The chicken will take an extra 5 minutes in the oven since it’s starting cold. This strategy lets you serve hot, fresh-from-the-oven chicken with minimal last-minute work.
Serving Suggestions
This versatile honey-glazed chicken pairs beautifully with countless sides, making it perfect for various meal occasions:
Perfect Rice Pairings: Serve over fluffy white jasmine rice or basmati rice to catch every drop of that precious glaze. Brown rice adds nutty flavor and fiber. Fried rice transforms this into a complete one-plate meal. Coconut rice adds tropical sweetness that complements the honey beautifully.
Vegetable Sides: Steamed or roasted broccoli, snap peas, green beans, or asparagus keep things light and healthy. Stir-fried bok choy or Chinese broccoli adds authentic Asian flair. Roasted Brussels sprouts or cauliflower provide earthy contrast to the sweet glaze. Honey-glazed carrots echo the main dish’s sweetness.
Noodle Options: Serve over lo mein noodles, rice noodles, or even spaghetti tossed with sesame oil and green onions. The glaze coats noodles beautifully for a pasta-style dish kids especially love.
Salad Pairings: A crisp Asian-inspired slaw with cabbage, carrots, and sesame-ginger dressing provides refreshing crunch. Simple mixed greens with mandarin oranges and almonds balance the richness. Cucumber salad with rice vinegar adds cool contrast.
Potato Sides: Garlic mashed potatoes, roasted baby potatoes, or even French fries work wonderfully. The starchy sides soak up the glaze deliciously.
Bread Options: Serve with warm dinner rolls, garlic bread, or steamed bao buns for a fun twist. The bread is perfect for mopping up extra glaze from plates!
Complete Meal Ideas: Create rice bowls with chicken, edamame, shredded carrots, cucumber, and avocado drizzled with extra glaze. Make lettuce wraps with chopped chicken, crunchy vegetables, and rice in butter lettuce cups. Serve alongside egg rolls or spring rolls for an Asian-inspired feast.
Beverage Pairings: The sweet-savory flavors pair nicely with crisp white wines like Riesling or Gewürztraminer, light beers, green tea, or sparkling water with lime. For non-alcoholic options, ginger ale or iced green tea complement the Asian-inspired flavors.
FAQs Section
Can I use bone-in chicken pieces instead of boneless?
Absolutely! Bone-in, skin-on chicken thighs or drumsticks work beautifully and often have even more flavor. The cooking time increases significantly – plan for 35-45 minutes in the oven at 375°F, or until the internal temperature reaches 165°F. For extra crispy skin, broil for 2-3 minutes at the end. The bones add flavor to the glaze, and many people prefer the juicier texture of bone-in pieces.
Why is my glaze too thin or not sticking to the chicken?
This usually means either the cornstarch wasn’t properly incorporated or the glaze didn’t cook long enough to thicken. Make sure you mix the cornstarch with water first (creating a slurry) before adding to the honey mixture, and whisk thoroughly to eliminate any lumps. If your glaze is thin after baking, transfer the chicken to a plate, place the skillet on the stovetop over medium heat, and simmer the glaze for 2-3 minutes while stirring until it thickens and becomes glossy. Then spoon it back over the chicken.
Can I make this in an air fryer?
Yes, and it turns out fantastic! Pat chicken dry, season with salt and pepper, and air fry at 380°F for 12 minutes. Flip, brush generously with honey glaze (make the full recipe), and air fry another 8-10 minutes, brushing with more glaze every 3-4 minutes. The result is incredibly sticky with slight charred edges that are absolutely delicious. Just watch carefully to prevent burning.
Is this recipe suitable for meal prep and how long does it last?
This is one of the best meal prep recipes out there! The chicken stays moist and flavorful for up to 4 days in the refrigerator when stored in airtight containers. In fact, many people say it tastes even better the next day as flavors continue to meld. Portion it with your choice of grains and vegetables for complete ready-to-go meals. It also freezes beautifully for up to 3 months, making it perfect for batch cooking.
What’s the best way to reheat honey-glazed chicken without drying it out?
The skillet method is best: place chicken in a covered skillet over medium-low heat with a splash of water or chicken broth (about 2 tablespoons). Heat for 5-7 minutes, flipping halfway, until warmed through. The steam from the covered pan keeps it moist, and the gentle heat prevents overcooking. Microwave works too – heat on medium power (50-70%) rather than full power, which can make chicken rubbery. Add a tablespoon of water to the container and cover before microwaving.
Can I use this glaze on other proteins like pork or salmon?
Absolutely! This versatile glaze is incredible on pork chops, pork tenderloin, salmon fillets, shrimp, or even tofu. For pork, cook to 145°F internal temperature. For salmon, bake at 400°F for 12-15 minutes depending on thickness. Shrimp cooks incredibly quickly – just 2-3 minutes per side in a hot skillet. The glaze complements virtually any protein beautifully.
How can I make this less sweet or reduce the sugar content?
Reduce the honey to 1/4 cup and increase the soy sauce to 1/3 cup for a more savory profile. You can also add an extra tablespoon of rice vinegar to cut the sweetness with acidity. For sugar-free options, use sugar-free honey substitutes or a combination of a low-carb sweetener like erythritol (1/4 cup) mixed with 2 tablespoons of sugar-free maple syrup for moisture and flavor complexity.
Conclusion
And there you have it – the perfect Honey Glazed Chicken recipe that’s about to become your family’s most-requested dinner! This gorgeous, glossy dish proves that weeknight cooking doesn’t have to be boring or complicated. With just a handful of pantry ingredients and minimal hands-on time, you can create restaurant-quality chicken that rivals takeout but tastes infinitely better and costs a fraction of the price.
The beauty of this recipe lies in its versatility and reliability. Whether you’re feeding toddlers or entertaining dinner guests, cooking for one or meal prepping for the week, using chicken thighs or breasts, making it spicy or keeping it mild – this honey glaze adapts to your needs while delivering consistently delicious results. It’s the kind of recipe you’ll make dozens of times, tweaking and personalizing until it becomes uniquely yours.

