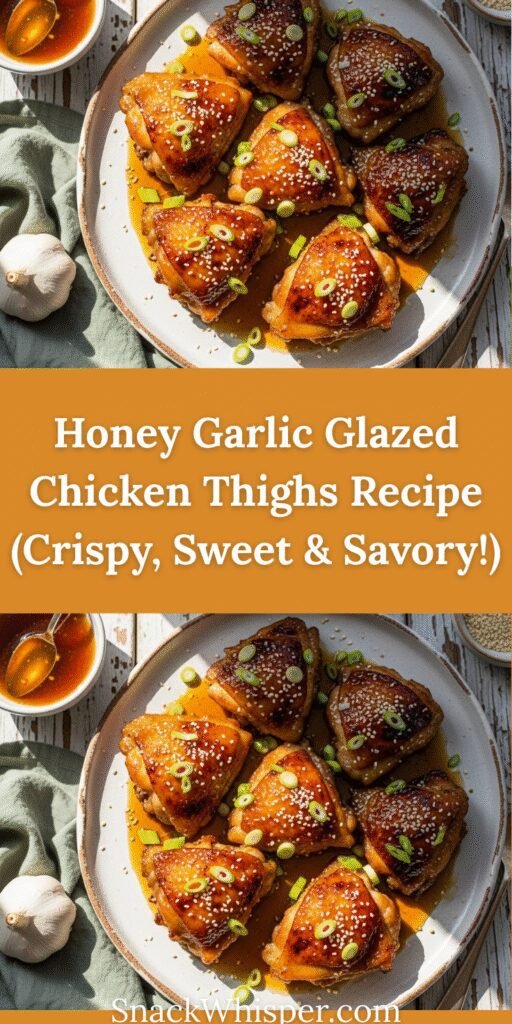
If you’re looking for a weeknight dinner that tastes like restaurant-quality comfort food but comes together in about 30 minutes, this Honey Garlic Glazed Chicken Thighs recipe is your new best friend! These juicy, crispy-skinned chicken thighs are bathed in a sticky, sweet-and-savory glaze that’s absolutely irresistible. The combination of golden honey, aromatic garlic, and just the right amount of soy sauce creates a flavor explosion that’ll have your family asking for seconds (and thirds!).
This recipe is perfect for busy weeknights when you want something impressive without the stress, Sunday family dinners, meal prep sessions, or even special occasions when you want to wow your guests without spending hours in the kitchen. The beauty of this dish is its versatility—it pairs beautifully with rice, roasted vegetables, mashed potatoes, or a fresh green salad. Plus, chicken thighs are incredibly forgiving, staying moist and tender even if you slightly overcook them, making this an ideal recipe for beginner cooks and experienced home chefs alike.
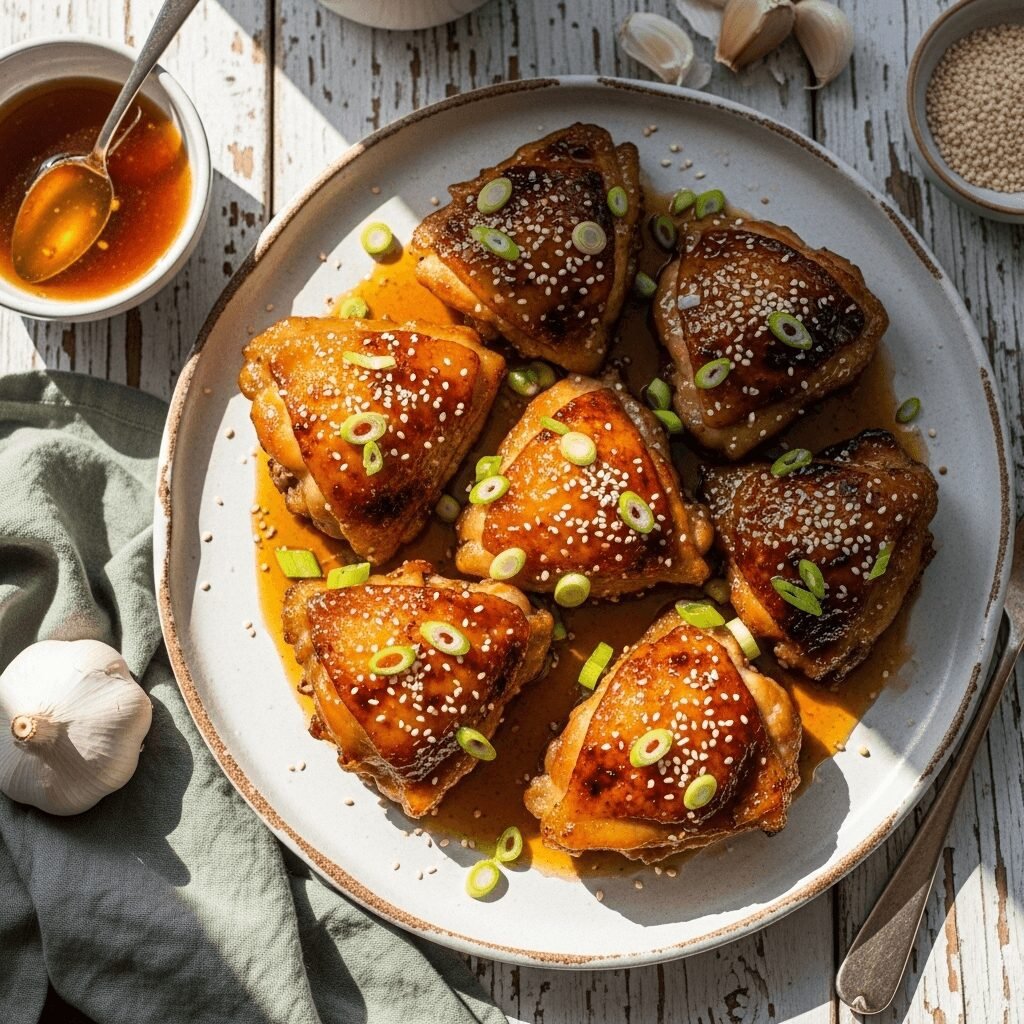
The glossy, caramelized glaze clings to every piece of chicken, creating those coveted crispy edges while keeping the meat incredibly juicy inside. And the aroma while this cooks? Absolutely heavenly! Your kitchen will smell like your favorite Asian-fusion restaurant, and your taste buds will thank you with every single bite.
History / Background
Honey garlic chicken has become a beloved staple in American home cooking, though its roots trace back to the fusion of Asian cooking techniques and Western flavor preferences. While not a traditional dish from any single culture, it represents the beautiful marriage of Chinese-American cuisine influences with the American love for sweet and savory combinations.
The use of honey and garlic together in cooking dates back centuries across various cultures. In Chinese cooking, the balance of sweet and savory (often achieved through honey or sugar combined with soy sauce and garlic) is a fundamental principle. When Chinese immigrants brought their culinary traditions to America in the 19th and 20th centuries, these flavors began to merge with American cooking styles and available ingredients, creating the Chinese-American cuisine we know today.
Honey garlic chicken gained massive popularity in the 1980s and 1990s as home cooks began experimenting with Asian-inspired flavors. The recipe became a weeknight favorite because it delivered complex, restaurant-worthy flavors using simple pantry ingredients. Unlike more complex Asian dishes requiring hard-to-find ingredients, honey garlic chicken could be made with items most Americans already had: honey, garlic, soy sauce, and chicken.
The shift from chicken breasts to chicken thighs in this recipe reflects modern cooking trends. While chicken breasts dominated American cooking for decades due to health consciousness, food enthusiasts have rediscovered the superior flavor and texture of dark meat. Chicken thighs are more forgiving, stay juicier, and have a richer flavor that stands up beautifully to bold glazes like this honey garlic sauce. Today, this recipe is a Pinterest sensation, a meal prep favorite, and a go-to dinner for families across America who want something special without the fuss.
Why You’ll Love This Recipe
This Honey Garlic Glazed Chicken Thighs recipe checks every box for the perfect weeknight dinner. It’s the kind of recipe you’ll make once and then add to your regular rotation because it’s just that good and that easy.
Here’s why this recipe will become your new favorite:
- Quick & Easy – Ready in just 30 minutes from start to finish, with minimal prep work required
- One-Pan Wonder – Everything cooks in a single skillet, meaning less cleanup and more time enjoying your meal
- Budget-Friendly – Chicken thighs are one of the most affordable cuts of meat, and the other ingredients are simple pantry staples
- Family-Approved – The sweet and savory flavor appeals to even picky eaters, including kids who might normally resist chicken
- Naturally Gluten-Free Adaptable – Easily made gluten-free by using tamari or coconut aminos instead of regular soy sauce
- Meal Prep Champion – Makes excellent leftovers that taste just as good (or better!) the next day
- Restaurant-Quality Flavor – Delivers impressive, complex flavors that taste like you spent hours cooking
- Foolproof Method – Chicken thighs are incredibly forgiving and stay juicy even if slightly overcooked
- Versatile Serving Options – Pairs beautifully with countless side dishes from rice to vegetables to salads
- Visually Stunning – The glossy, caramelized glaze looks absolutely gorgeous, making it perfect for sharing on social media or serving to guests
Ingredient Notes
Let’s break down what makes this recipe so delicious and talk about the key ingredients that create that irresistible honey garlic flavor:
Chicken Thighs (Bone-in, Skin-on) – The star of the show! Bone-in, skin-on thighs are preferred because the skin crisps up beautifully and the bone adds extra flavor and moisture. You can use boneless, skinless thighs if you prefer, but you’ll miss out on that crispy skin texture. The dark meat of thighs has more fat than chicken breasts, keeping them incredibly juicy and flavorful.
Honey – Provides natural sweetness and helps create that sticky, glossy glaze. Use good quality honey for best results. Different varieties like clover, wildflower, or orange blossom will add subtle flavor variations. Avoid artificial honey or honey blends.
Garlic – Fresh garlic is essential! Minced garlic cloves provide aromatic depth and that characteristic pungent flavor. Don’t substitute with garlic powder here—fresh is key for this recipe. Plan on 4-6 cloves depending on your garlic love level.
Soy Sauce – Adds saltiness, umami depth, and that savory element that balances the honey’s sweetness. Use low-sodium soy sauce if you’re watching salt intake, or substitute with tamari (for gluten-free) or coconut aminos (for a soy-free option).
Rice Vinegar – Provides acidity that brightens the sauce and prevents it from being too sweet. Apple cider vinegar can work in a pinch, but rice vinegar has a milder, slightly sweeter flavor that’s perfect here.
Ginger (Optional) – Fresh grated ginger adds a warm, spicy note that complements the garlic beautifully. While optional, it’s highly recommended for that extra layer of flavor.
Red Pepper Flakes – A pinch adds subtle heat without making the dish spicy. Perfect for adults while still keeping it kid-friendly. Adjust to your heat preference.
Cornstarch – Used to thicken the glaze so it coats the chicken perfectly instead of running off. Just a small amount creates that restaurant-style glossy finish.
Olive Oil or Vegetable Oil – Needed for searing the chicken and getting that golden, crispy skin. Choose an oil with a high smoke point.
Salt & Black Pepper – Essential for seasoning the chicken before cooking. Don’t skip this step—it builds foundational flavor.
Green Onions & Sesame Seeds – Optional garnishes that add freshness, color, and visual appeal. They’re the perfect finishing touch!
Equipment Needed
You don’t need any fancy kitchen gadgets for this recipe—just a few basic tools that most home cooks already have:
- Large Oven-Safe Skillet or Cast Iron Pan (12-inch) – Essential for searing the chicken and finishing in the oven. Cast iron works beautifully for even heat distribution.
- Small Saucepan or Mixing Bowl – For preparing the honey garlic glaze.
- Sharp Knife & Cutting Board – For mincing garlic and chopping green onions.
- Measuring Cups & Spoons – For accurate ingredient measurements.
- Whisk or Fork – To combine the glaze ingredients smoothly.
- Tongs or Spatula – For flipping the chicken safely.
- Meat Thermometer – Optional but helpful to ensure chicken reaches 165°F internal temperature.
- Paper Towels – For patting chicken dry before cooking (this helps achieve crispy skin).
- Small Bowl – For mixing the cornstarch slurry.

Honey Garlic Glazed Chicken Thighs Recipe
- Total Time: 35 minutes
- Yield: 4 servings 1x
- Diet: Gluten Free
Description
Crispy, juicy chicken thighs coated in a sticky sweet and savory honey garlic glaze that’s bursting with flavor. This easy one-pan recipe delivers restaurant-quality results in just 35 minutes, perfect for busy weeknights or special occasions!
Ingredients
For the Chicken:
- 6-8 bone-in, skin-on chicken thighs (about 2.5-3 lbs)
- 1 tablespoon olive oil or vegetable oil
- 1 teaspoon salt
- ½ teaspoon black pepper
- ½ teaspoon garlic powder
- ½ teaspoon paprika (optional, for color)
For the Honey Garlic Glaze:
- ⅓ cup honey
- ¼ cup low-sodium soy sauce (or tamari for gluten-free)
- 5-6 cloves garlic, minced
- 2 tablespoons rice vinegar
- 1 tablespoon fresh grated ginger (optional)
- ¼ teaspoon red pepper flakes (adjust to taste)
- 1 tablespoon cornstarch
- 2 tablespoons water
For Garnish (optional):
- 2 green onions, sliced
- 1 tablespoon sesame seeds
- Fresh cilantro
Instructions
Step 1: Prep the Chicken
Pat the chicken thighs completely dry with paper towels—this is crucial for crispy skin! Season both sides generously with salt, black pepper, garlic powder, and paprika if using.
Step 2: Preheat the Oven
Preheat your oven to 400°F (200°C) while you prepare the other components.
Step 3: Make the Honey Garlic Glaze
In a small bowl or saucepan, whisk together honey, soy sauce, minced garlic, rice vinegar, ginger (if using), and red pepper flakes. In a separate small bowl, mix cornstarch with 2 tablespoons of water to create a slurry. Set both aside.
Step 4: Sear the Chicken
Heat oil in a large oven-safe skillet or cast iron pan over medium-high heat. Once the oil is shimmering, place chicken thighs skin-side down in the pan. Don’t move them! Let them sear undisturbed for 6-8 minutes until the skin is golden brown and crispy. Flip and cook for another 3-4 minutes on the other side.
Step 5: Add the Glaze
Reduce heat to medium. Pour the honey garlic mixture over and around the chicken thighs. Let it simmer for 2-3 minutes, spooning the sauce over the chicken occasionally.
Step 6: Thicken the Sauce
Stir the cornstarch slurry once more (it settles), then pour it into the skillet. Stir gently to combine with the glaze. The sauce will begin to thicken within 1-2 minutes.
Step 7: Finish in the Oven
Transfer the entire skillet to the preheated oven. Bake for 12-15 minutes until the chicken reaches an internal temperature of 165°F and the glaze is bubbling and caramelized.
Step 8: Rest and Serve
Remove from oven (careful—the handle is hot!). Let the chicken rest for 3-5 minutes. The glaze will thicken slightly as it cools. Garnish with sliced green onions, sesame seeds, and fresh cilantro if desired. Serve immediately with your favorite sides!
Notes
- For boneless, skinless thighs: Reduce cooking time by about 5 minutes and skip the oven step—just finish on the stovetop with a lid on for 8-10 minutes.
- Make it spicier: Add more red pepper flakes or a drizzle of sriracha to the glaze.
- Low-carb version: Replace honey with a sugar-free sweetener like monk fruit syrup (adjust to taste).
- Extra crispy skin: After baking, turn on the broiler for 2-3 minutes to caramelize the top even more.
- Don’t have an oven-safe skillet? Transfer chicken to a baking dish before putting it in the oven.
- Glaze too thick: Add a splash of water or chicken broth to thin it out.
- Glaze too thin: Simmer longer or add a bit more cornstarch slurry.
- Prep Time: 10 minutes
- Cook Time: 25 minutes
- Category: Dinner
- Method: Stovetop to Oven
- Cuisine: Asian-American Fusion
Nutrition
- Serving Size: 1 chicken thigh with glaze
- Calories: 385
- Sugar: 12g
- Sodium: 580mg
- Fat: 22g
- Saturated Fat: 6g
- Unsaturated Fat: 14g
- Trans Fat: 0g
- Carbohydrates: 15g
- Fiber: 0g
- Protein: 32g
- Cholesterol: 165mg
Nutritional values are approximate and may vary based on specific ingredients used and portion sizes.
Tips & Variations
Flavor Variations:
- Spicy Honey Garlic: Add 1-2 tablespoons of sriracha or gochujang to the glaze for a spicy kick.
- Citrus Twist: Add 1 tablespoon of orange juice and some orange zest for a bright, citrusy version.
- Teriyaki Style: Replace rice vinegar with mirin and add an extra tablespoon of soy sauce.
- Herb-Infused: Add fresh thyme or rosemary sprigs to the pan while baking for an aromatic herb note.
- Smoky Version: Add ½ teaspoon of smoked paprika to the glaze for depth.
Protein Swaps:
- Use bone-in, skin-on chicken drumsticks (increase cooking time by 5-10 minutes)
- Try with pork chops (reduce cooking time to 15-20 minutes total)
- Works beautifully with salmon fillets (reduce cooking time significantly to 10-12 minutes total)
Vegetable Additions:
- Throw in broccoli florets, snap peas, or bell peppers during the last 10 minutes of cooking
- Add sliced mushrooms to the pan while searing the chicken
- Roast baby potatoes alongside the chicken for a complete one-pan meal
Dietary Modifications:
- Paleo: Use coconut aminos instead of soy sauce
- Keto/Low-Carb: Replace honey with a keto-friendly sweetener like allulose
- Whole30: Use coconut aminos and compliant sweetener like date paste
- Gluten-Free: Use tamari or coconut aminos instead of soy sauce
Pro Chef Tips
1. Dry = Crispy: The number one secret to perfectly crispy chicken skin is starting with completely dry chicken. Pat it thoroughly with paper towels and even let it air-dry in the refrigerator uncovered for an hour if you have time.
2. Don’t Crowd the Pan: Make sure there’s space between each chicken thigh. Overcrowding creates steam, preventing that beautiful golden sear. Cook in batches if necessary.
3. Patience with the Sear: Resist the urge to flip the chicken too early. When the skin is properly seared, it will release naturally from the pan. If it’s sticking, it’s not ready yet.
4. Control Your Heat: Start with medium-high heat for the sear, then reduce to medium when adding the glaze. Too high heat will burn the honey and garlic.
5. Fresh Garlic Timing: Add fresh garlic to the liquid mixture rather than cooking it directly in the hot pan. This prevents burning and bitter flavors while still delivering that aromatic punch.
6. Quality Honey Matters: Honey is a star ingredient here, so use good quality, pure honey. The flavor really comes through in the finished dish.
7. Don’t Skip the Cornstarch Slurry: This is what transforms a thin sauce into a gorgeous, glossy glaze that clings to every piece of chicken. Mix it well before adding to prevent lumps.
8. Use a Meat Thermometer: For perfectly cooked chicken every time, check that the internal temperature reaches 165°F in the thickest part of the thigh (not touching the bone).
Common Mistakes to Avoid
1. Using Wet Chicken: Cooking chicken straight from the package without drying it leads to steamed, rubbery skin instead of crispy, golden perfection. Always pat completely dry with paper towels.
2. Moving the Chicken Too Soon: Flipping the chicken before it’s properly seared causes the skin to tear and stick to the pan. Be patient—when it’s ready, it will release naturally. This usually takes 6-8 minutes of undisturbed cooking.
3. Burning the Garlic and Honey: Adding the glaze to a screaming-hot pan will burn the honey and garlic, creating bitter flavors. Always reduce heat to medium before adding the sauce, and don’t leave it unattended.
4. Skipping the Cornstarch: Without the cornstarch slurry, your sauce will be thin and watery instead of a thick, luxurious glaze. This small step makes a huge difference in the final presentation and how well the sauce coats the chicken.
5. Overcooking the Chicken: While chicken thighs are forgiving, they can still dry out if overcooked. Use a meat thermometer to check for 165°F internal temperature, and remove from heat promptly. The residual heat will continue cooking slightly as it rests.
6. Not Letting it Rest: Cutting into the chicken immediately causes all those delicious juices to run out onto the plate instead of staying in the meat. Give it at least 3-5 minutes to rest before serving.
7. Wrong Pan Type: Using a non-oven-safe pan means you’ll have to transfer everything mid-cooking, risking spills and losing that beautiful caramelization. Always use an oven-safe skillet or cast iron pan.
Storage & Meal Prep
Refrigerator Storage:
Store leftover honey garlic chicken in an airtight container in the refrigerator for up to 4 days. Keep the chicken and extra glaze together so the meat stays moist. The flavors actually deepen and improve over the first day or two, making this an excellent meal prep option.
Reheating Instructions:
The best way to reheat this chicken is in a 350°F oven for 10-15 minutes, which helps retain the crispy skin. You can also reheat in the microwave for 2-3 minutes (though the skin won’t be as crispy), or in a covered skillet over medium heat with a splash of water to prevent drying out.
Portion Control for Meal Prep:
This recipe is perfect for weekly meal prep! Divide the chicken and glaze into individual meal prep containers along with your choice of rice, quinoa, or vegetables. The chicken stays delicious and reheats beautifully, making it easy to grab a healthy, homemade lunch or dinner throughout the week.
Shelf Life:
Properly stored in the refrigerator, this dish maintains its quality for 3-4 days. After that, the texture may begin to deteriorate, though it’s still safe to eat if stored properly. Always check for any off smells or appearance before consuming leftovers.
Make-Ahead & Freezer Notes
Make-Ahead Preparation:
You can season the chicken thighs up to 24 hours in advance and store them covered in the refrigerator. Prepare the honey garlic glaze and store it separately in an airtight container in the fridge for up to 3 days. When ready to cook, simply bring everything to room temperature for 20 minutes, then proceed with the recipe.
Freezing Raw:
Season the raw chicken thighs and place them in a freezer-safe bag. Prepare the glaze and freeze it separately in a freezer-safe container. Both will keep for up to 3 months. Thaw overnight in the refrigerator before cooking as directed.
Freezing Cooked Chicken:
Cooked honey garlic chicken thighs freeze beautifully! Let them cool completely, then place in a freezer-safe container or heavy-duty freezer bag with the glaze. Remove as much air as possible to prevent freezer burn. Freeze for up to 3 months. Label with the date and reheating instructions.
Thawing & Reheating from Frozen:
For best results, thaw frozen cooked chicken overnight in the refrigerator. Reheat in a 350°F oven for 20-25 minutes until heated through, or microwave individual portions for 3-4 minutes. You can also reheat from frozen—just add an extra 10-15 minutes to the oven time and cover with foil to prevent drying out.
Freezer Tips:
The glaze may separate slightly after freezing and thawing. Simply stir it well or give it a quick warm-up on the stovetop to recombine. For best texture, freeze chicken without the skin already touching the glaze—add the glaze during reheating to maintain better crispiness.
Serving Suggestions
This versatile honey garlic chicken pairs beautifully with so many different sides! Here are some delicious serving ideas:
Classic Pairings:
- Steamed White or Brown Rice – The perfect base to soak up all that delicious glaze
- Jasmine or Basmati Rice – Aromatic rice adds an elegant touch
- Fried Rice – Turn it into a complete Asian-inspired feast
- Cauliflower Rice – For a low-carb, keto-friendly option
Vegetable Sides:
- Roasted Broccoli – The slight char complements the sweet glaze perfectly
- Steamed Green Beans – Light and crisp, a fresh contrast to the rich chicken
- Sautéed Bok Choy – Keeps with the Asian theme beautifully
- Roasted Brussels Sprouts – Caramelized edges pair wonderfully with the honey garlic
- Stir-Fried Snap Peas and Bell Peppers – Add color and crunch
Starch Options:
- Mashed Potatoes – Creamy, comforting, and perfect for soaking up the glaze
- Roasted Baby Potatoes – Crispy on the outside, fluffy inside
- Sweet Potato Fries – The sweetness complements the honey glaze
- Egg Noodles or Rice Noodles – For a more Asian-fusion presentation
Salads:
- Asian Cucumber Salad – Cool, refreshing, and cuts through the richness
- Simple Green Salad with Sesame Dressing – Light and fresh
- Cabbage Slaw – Adds crunch and acidity
Bread:
- Garlic Bread – Because you can never have too much garlic!
- Dinner Rolls – Perfect for sopping up every drop of glaze
- Steamed Buns – For a fun, Asian-inspired serving style
Complete Meal Ideas:
- Serve over coconut rice with roasted broccoli and a side of cucumber salad
- Plate with garlic mashed potatoes, green beans, and dinner rolls
- Create a rice bowl with vegetables, pickled carrots, and a soft-boiled egg
- Make it a sheet pan dinner by roasting potatoes and vegetables alongside
FAQs Section
Q: Can I use boneless, skinless chicken thighs instead?
A: Absolutely! Boneless, skinless thighs work great, though you’ll miss the crispy skin. Reduce the cooking time by about 5 minutes total, and you can skip the oven step—just cover the pan and cook on the stovetop for 8-10 minutes after adding the glaze. Check that internal temperature reaches 165°F.
Q: Can I make this with chicken breasts?
A: Yes, but chicken breasts require more careful cooking to prevent drying out. Use boneless, skinless breasts and pound them to even thickness. Reduce cooking time significantly—about 4-5 minutes per side on stovetop, then 10-12 minutes in the oven. Be extra careful not to overcook, as breasts don’t have the fat content that keeps thighs moist.
Q: How do I make the glaze thicker or thinner?
A: For a thicker glaze, add more cornstarch slurry (mix ½ tablespoon cornstarch with ½ tablespoon water) and simmer until desired consistency. For thinner glaze, add a splash of water, chicken broth, or a bit more rice vinegar and stir well.
Q: Is there a substitute for honey?
A: Maple syrup works well as a 1:1 substitute, though it will give a slightly different flavor profile. Agave nectar also works. For a keto/low-carb version, try a sugar-free pancake syrup or a blend of powdered erythritol with a bit of water (start with ¼ cup and adjust sweetness to taste).
Q: My sauce burned—what went wrong?
A: The most common cause is adding the honey garlic glaze to a pan that’s too hot. Always reduce heat to medium before adding the glaze. Honey contains natural sugars that caramelize and burn quickly at high temperatures. If your glaze is burning, immediately reduce heat and add a splash of water or broth to cool things down.
Q: Can I double this recipe?
A: Yes! Just make sure you have a large enough pan (or use two pans) so the chicken isn’t crowded. You may need to work in batches for the searing step to achieve proper browning. The glaze recipe doubles perfectly—just make sure to use a larger saucepan if cooking it separately.
Q: Why is my chicken skin not crispy?
A: The most likely culprits are: (1) starting with wet chicken—always pat completely dry with paper towels, (2) moving the chicken too soon before a proper sear forms, (3) overcrowding the pan which creates steam, or (4) using too low heat for the initial sear. Start with medium-high heat and resist touching the chicken for at least 6-8 minutes.
Q: How do I know when the chicken is done?
A: The most reliable method is using a meat thermometer—chicken is safe when it reaches 165°F internal temperature in the thickest part (not touching bone). Visually, the juices should run clear when pierced, and the meat should no longer be pink. With bone-in thighs, the meat near the bone should be opaque, not translucent.
Conclusion
There you have it—your new go-to recipe for Honey Garlic Glazed Chicken Thighs! This dish truly has it all: incredible flavor, beautiful presentation, simple preparation, and that perfect balance of sweet and savory that keeps everyone coming back for more. Whether you’re cooking for your family on a busy Tuesday night or preparing an impressive meal for weekend guests, this recipe delivers every single time.
The beauty of this dish is how it transforms humble chicken thighs into something truly special with just a handful of everyday ingredients. That glossy, caramelized glaze, the crispy golden skin, the tender, juicy meat—it’s comfort food at its finest, with a touch of elegance that makes it feel like a treat.
I hope you love this recipe as much as my family does! It’s been in our regular dinner rotation for years, and I never get tired of it. The best part? It’s endlessly adaptable, so you can make it your own with different variations, spice levels, and serving options.

