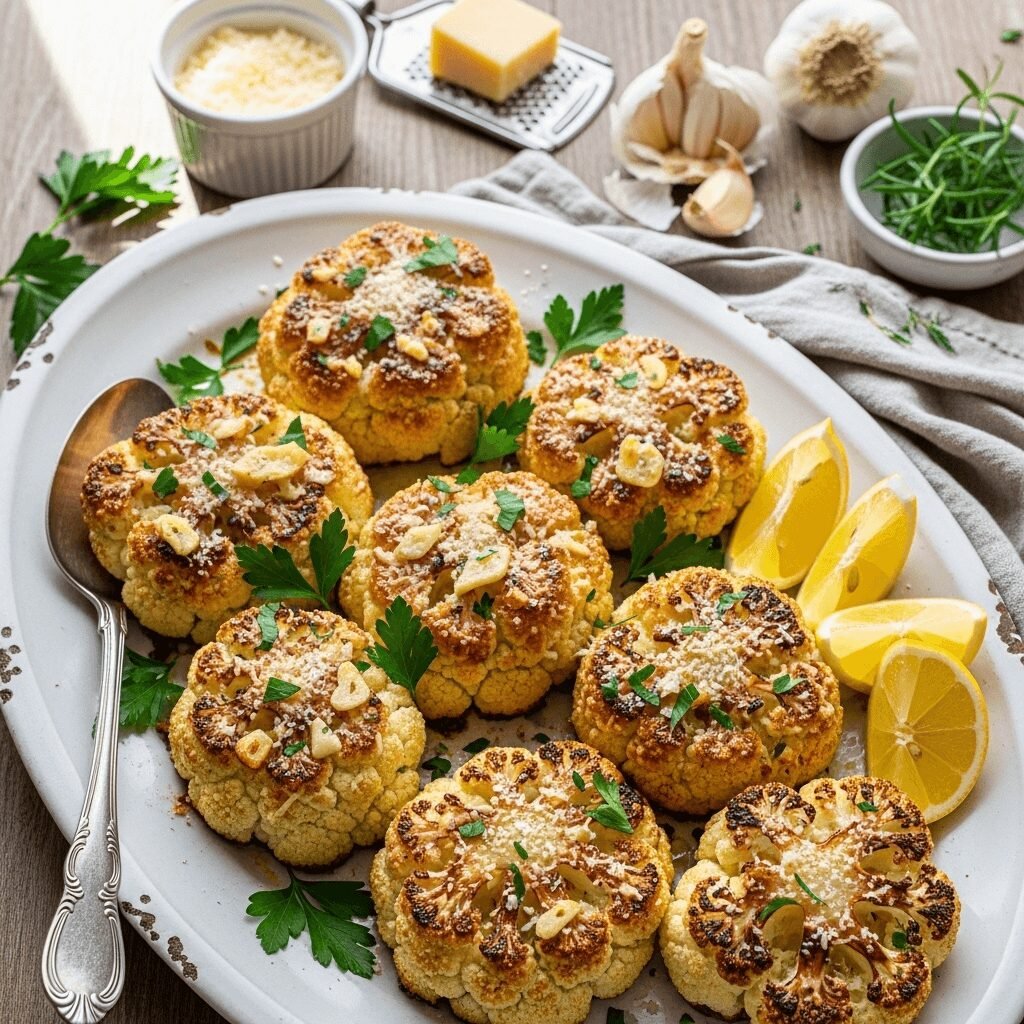
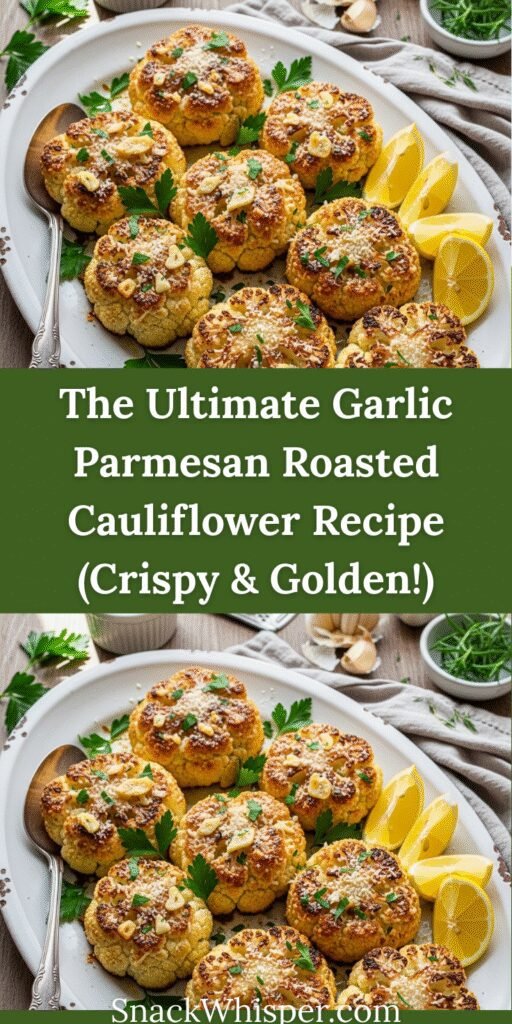
If you’ve been searching for a vegetable side dish that’s so delicious it could steal the spotlight from the main course, this Garlic Parmesan Roasted Cauliflower is about to become your new obsession. Imagine perfectly golden cauliflower florets with crispy, caramelized edges, coated in fragrant garlic and nutty Parmesan cheese that creates an irresistible crust. This isn’t your average steamed cauliflower – this is cauliflower transformed into something so flavorful and addictive that even the pickiest vegetable skeptics will be reaching for seconds.
What makes this recipe truly special is how simple roasting transforms humble cauliflower into restaurant-quality elegance. The high heat caramelizes the natural sugars in the cauliflower, creating those coveted crispy edges while keeping the interior tender. The garlic infuses every bite with aromatic flavor, while the Parmesan adds a salty, umami-rich coating that becomes gloriously crispy in the oven. It’s the perfect example of how a few quality ingredients and the right technique can elevate an everyday vegetable into something extraordinary.
This versatile dish works beautifully in so many scenarios. Serve it as a sophisticated side dish for holiday dinners, weeknight family meals, or dinner parties where you want to impress. It’s perfect alongside roasted chicken, grilled steak, or baked fish. Health-conscious eaters love it because it’s naturally low-carb, keto-friendly, and gluten-free, yet tastes indulgent enough to satisfy any comfort food craving. Parents appreciate how it makes vegetables exciting for kids, while meal preppers value how well it reheats throughout the week. Whether you’re cooking for two or feeding a crowd, this cauliflower delivers every single time.
History / Background
Cauliflower has an incredibly rich history that spans thousands of years, originating in the Mediterranean region and spreading throughout Europe and Asia via ancient trade routes. The Romans were among the first to cultivate cauliflower, though it looked quite different from the compact white heads we know today. The name “cauliflower” itself comes from the Latin words “caulis” (cabbage) and “floris” (flower), literally meaning “cabbage flower,” which perfectly describes its unique appearance.
For centuries, cauliflower was considered a luxury vegetable in Europe, gracing the tables of nobility and appearing in elaborate Renaissance banquets. It wasn’t until the 16th century that cauliflower made its way to France, where it became a favorite of King Louis XIV and featured prominently in classical French cuisine. The vegetable eventually traveled to England and then across the Atlantic to North America, where Thomas Jefferson grew it in his experimental gardens at Monticello.
The technique of roasting vegetables, particularly at high temperatures, has ancient origins but experienced a major resurgence in the late 20th century as home cooks discovered that roasting brings out incredible flavors and textures that boiling or steaming simply can’t achieve. The Maillard reaction – that magical chemical process that creates browning and develops complex flavors – transforms cauliflower from bland and boring into sweet, nutty, and absolutely delicious.
The combination of garlic and Parmesan represents a beautiful marriage of Italian culinary tradition. Parmigiano-Reggiano, the “King of Cheeses,” has been produced in Northern Italy for over 800 years using virtually unchanged methods. Garlic has been cultivated in Mediterranean regions for millennia and forms the aromatic backbone of Italian cooking. Together, they create a flavor profile that’s become beloved worldwide.
The modern trend of roasted cauliflower, particularly with garlic and Parmesan, emerged from the “vegetables as the star” movement of the early 2000s, when chefs and home cooks alike began treating vegetables with the same care and attention previously reserved for proteins. This recipe also gained massive popularity with the rise of low-carb and keto diets, as roasted cauliflower provides that satisfying, almost indulgent eating experience without the carbs of traditional comfort foods. Today, it’s become a staple on restaurant menus and dinner tables across America, proving that vegetables can be just as crave-worthy as any other dish.
Why You’ll Love This Recipe
This Garlic Parmesan Roasted Cauliflower is about to revolutionize how you think about vegetables, and once you experience those crispy, golden edges and that incredible garlic-cheese flavor, you’ll understand why it’s become a viral sensation on food blogs and Pinterest boards everywhere.
Here’s why this recipe deserves a permanent place in your cooking rotation:
- Incredibly simple – Just five main ingredients and one pan, yet it tastes like something from an upscale restaurant
- Naturally healthy – Packed with vitamins, fiber, and antioxidants while being low in calories and carbs
- Keto and low-carb friendly – Perfect for anyone following a low-carb lifestyle without feeling deprived
- Gluten-free – Naturally free of gluten, making it safe for those with celiac disease or gluten sensitivities
- Budget-friendly – Cauliflower is affordable and available year-round, making this an economical side dish
- Kid-approved – Even picky eaters love the crispy texture and cheesy, garlicky flavor
- Meal prep champion – Makes excellent leftovers and can be prepped ahead for busy weeks
- Versatile serving options – Works as a side dish, appetizer, or even a main course for lighter meals
- Crowd-pleaser – Perfect for potlucks, holidays, and dinner parties where you need to feed many
- Quick cooking time – Ready in about 30 minutes from start to finish
- Foolproof technique – Hard to mess up, making it perfect for beginner cooks
- Converts vegetable haters – The crispy, savory profile makes even confirmed veggie skeptics come back for more
- Elegant presentation – Looks impressive on the plate with minimal effort
- Customizable – Easily adapted with different seasonings, cheeses, or add-ins
Ingredient Notes
Understanding your ingredients is essential to creating the best roasted cauliflower. Here’s what you need to know about each component and how to choose quality ingredients.
Cauliflower: Choose firm, compact heads with tightly packed florets and bright white color (though purple, orange, and green varieties work too!). The leaves should look fresh and green, not wilted or brown. A medium-large head (about 2-2.5 pounds) yields approximately 6-8 cups of florets. Avoid cauliflower with brown spots or a strong odor. The size of your florets matters – aim for 1.5 to 2-inch pieces so they cook evenly and develop those crispy edges without burning.
Olive Oil: Extra virgin olive oil provides the best flavor and helps achieve that beautiful golden-brown color. You’ll need about ¼ cup for a large head of cauliflower. The oil is crucial for crisping and helps the seasonings adhere to the florets. For a higher smoke point, you can use regular olive oil or avocado oil, though extra virgin adds more depth of flavor. Don’t skimp on the oil – it’s what makes the cauliflower crispy rather than dry.
Garlic: Fresh garlic is absolutely essential here – you’ll need 4-6 large cloves, minced or pressed. Fresh garlic provides aromatic, pungent flavor that becomes sweet and mellow when roasted. Jarred minced garlic can work in a pinch but lacks the vibrant flavor of fresh. Some cooks prefer garlic powder for more even distribution (use 1-2 teaspoons), but fresh garlic creates those delicious crispy bits that add textural interest.
Parmesan Cheese: Real Parmigiano-Reggiano is worth the investment here. Freshly grated Parmesan melts beautifully and creates that irresistible crispy, cheesy crust. You’ll need about ¾ to 1 cup, grated. Always buy a block and grate it yourself – pre-grated Parmesan contains anti-caking agents that prevent proper melting and crisping. The aged, nutty flavor of quality Parmesan is irreplaceable, though Pecorino Romano (sharper and saltier) or Grana Padano (milder) can substitute in a pinch.
Seasonings: Salt and black pepper are your foundation. Kosher salt or sea salt works best for even seasoning. You’ll also want Italian seasoning, which typically includes oregano, basil, thyme, and rosemary – this adds herbal complexity. Red pepper flakes are optional but add a subtle warmth that complements the garlic beautifully. Some recipes add paprika for color and subtle smokiness.
Optional Additions: Fresh lemon juice squeezed over the finished cauliflower brightens all the flavors. Fresh parsley adds color and freshness. A drizzle of balsamic glaze creates restaurant-worthy presentation and adds sweet-tangy notes.
Equipment Needed
Having the right tools makes this recipe even easier and ensures the best results. Here’s what you’ll need:
- Large baking sheet – A rimmed half-sheet pan (18×13 inches) provides plenty of space for the cauliflower to spread out without crowding
- Parchment paper or silicone baking mat – Prevents sticking and makes cleanup effortless (foil works but may cause sticking)
- Sharp chef’s knife – For cutting the cauliflower into even florets
- Large cutting board – Provides workspace for breaking down the cauliflower
- Large mixing bowl – For tossing cauliflower with oil and seasonings
- Measuring cups and spoons – For accurate ingredient measurements
- Garlic press or microplane – Makes mincing garlic quick and easy
- Box grater – For grating fresh Parmesan cheese (if buying a block)
- Spatula or tongs – For tossing cauliflower halfway through roasting
- Oven mitts – Safety essential for handling hot pans

Garlic Parmesan Roasted Cauliflower Recipe
- Total Time: 35-40 minutes
- Yield: 6 servings 1x
- Diet: Gluten Free
Description
This Garlic Parmesan Roasted Cauliflower features crispy, golden florets with caramelized edges, coated in aromatic garlic and nutty Parmesan cheese. It’s a healthy, flavorful side dish that’s ready in just 35 minutes and pairs perfectly with any main course!
Ingredients
Main Ingredients:
- 1 large head cauliflower (about 2-2.5 pounds), cut into florets
- ¼ cup extra virgin olive oil
- 5 cloves garlic, minced or pressed
- ¾ cup freshly grated Parmesan cheese (divided)
- 1 teaspoon Italian seasoning
- ¾ teaspoon salt (adjust to taste)
- ½ teaspoon black pepper
- ¼ teaspoon red pepper flakes (optional)
For Garnish:
- 2 tablespoons fresh parsley, chopped
- 1 tablespoon fresh lemon juice
- Extra Parmesan cheese for serving
Instructions
- Preheat the Oven: Preheat your oven to 425°F (220°C). Line a large baking sheet with parchment paper or a silicone baking mat for easy cleanup and to prevent sticking.
- Prepare the Cauliflower: Remove the outer leaves from the cauliflower head and cut off the stem. Break or cut the cauliflower into bite-sized florets, approximately 1.5 to 2 inches in size. Try to keep them relatively uniform so they cook evenly. You should have about 6-8 cups of florets.
- Dry the Florets: This is important! Pat the cauliflower florets completely dry with paper towels or a clean kitchen towel. Any excess moisture will prevent the cauliflower from getting crispy and will create steam instead of roasting.
- Season the Cauliflower: Place the dried cauliflower florets in a large mixing bowl. Drizzle with olive oil and toss well to coat every piece. Add the minced garlic, half of the Parmesan cheese (about 6 tablespoons), Italian seasoning, salt, black pepper, and red pepper flakes if using. Toss everything together until the florets are evenly coated with the oil, garlic, and seasonings.
- Arrange on Baking Sheet: Spread the seasoned cauliflower in a single layer on your prepared baking sheet. Make sure the florets aren’t touching or overlapping – they need space for air to circulate and edges to crisp up. If necessary, use two baking sheets rather than crowding everything onto one.
- First Roast: Place the baking sheet in the preheated oven and roast for 15 minutes undisturbed. This allows the bottoms to develop that beautiful golden-brown color.
- Flip and Add More Cheese: After 15 minutes, remove the pan from the oven and use a spatula to flip the cauliflower florets. Sprinkle the remaining Parmesan cheese (about 6 tablespoons) evenly over the top of the cauliflower.
- Final Roast: Return the pan to the oven and continue roasting for another 10-15 minutes, until the cauliflower is golden brown with crispy, caramelized edges and the cheese is melted and lightly browned. The florets should be tender when pierced with a fork but still have some texture.
- Finish and Serve: Remove from the oven and transfer the roasted cauliflower to a serving dish. Squeeze fresh lemon juice over the top, sprinkle with chopped fresh parsley, and add extra grated Parmesan if desired. Serve immediately while hot and crispy.
Notes
- Size Matters: Cutting florets to uniform size ensures even cooking. Smaller pieces will cook faster and get crispier, while larger pieces stay more tender inside.
- Don’t Skip Drying: Wet cauliflower will steam instead of roast, resulting in mushy texture without those crispy edges.
- Space is Key: Overcrowding the pan creates steam and prevents browning. Use two pans if needed.
- Oven Temperature: If your oven runs cool, increase temperature to 450°F. If it runs hot, reduce to 400°F to prevent burning.
- Fresh Parmesan Only: Pre-grated cheese won’t melt and crisp the same way – always grate from a block.
- Timing Variations: Ovens vary, so check at 20 minutes total. You want golden-brown edges, not burnt florets.
- Prep Time: 10 minutes
- Cook Time: 25-30 minutes
- Category: Side Dish
- Method: Roasting
- Cuisine: Italian-American
Nutrition
- Serving Size: About 1 cup (1/6 of recipe)
- Calories: 145
- Sugar: 3g
- Sodium: 420mg
- Fat: 11g
- Saturated Fat: 3g
- Unsaturated Fat: 7g
- Trans Fat: 0g
- Carbohydrates: 8g
- Fiber: 3g
- Protein: 7g
- Cholesterol: 10mg
Note: Nutrition information is approximate and will vary based on specific ingredients used and portion sizes.
Tips & Variations
The beauty of roasted cauliflower is how easily you can customize it to match your preferences or create entirely new flavor profiles. Here are some delicious ways to make this recipe your own:
Spicy Version: Add 1 teaspoon cayenne pepper or chipotle powder to the seasoning mix. Drizzle with sriracha or hot honey after roasting for sweet heat. Red pepper flakes can be increased to ½-1 teaspoon for significant kick.
Lemon Herb: Add the zest of one lemon to the seasoning mix before roasting, then squeeze fresh lemon juice over the finished dish. Increase fresh herbs with chopped thyme, rosemary, or dill.
Buffalo Cauliflower: Toss the roasted cauliflower with buffalo sauce and a drizzle of melted butter after cooking. Serve with ranch or blue cheese dressing for dipping.
Mediterranean Style: Replace Parmesan with crumbled feta cheese, add Kalamata olives and sun-dried tomatoes in the last 5 minutes of roasting, and finish with fresh oregano and a drizzle of tahini.
Asian-Inspired: Replace olive oil with sesame oil, skip the Parmesan, and add soy sauce, ginger, and a sprinkle of sesame seeds. Drizzle with sweet chili sauce after roasting.
Bacon Lover’s: Add ½ cup cooked, crumbled bacon in the last 5 minutes of roasting. The bacon fat can partially replace some olive oil for extra flavor.
Curry Roasted: Add 1-2 tablespoons curry powder to the oil mixture for an Indian-inspired version. Finish with fresh cilantro and a squeeze of lime.
Vegan Version: Replace Parmesan with nutritional yeast (use about 3 tablespoons for cheesy flavor) or dairy-free Parmesan alternative.
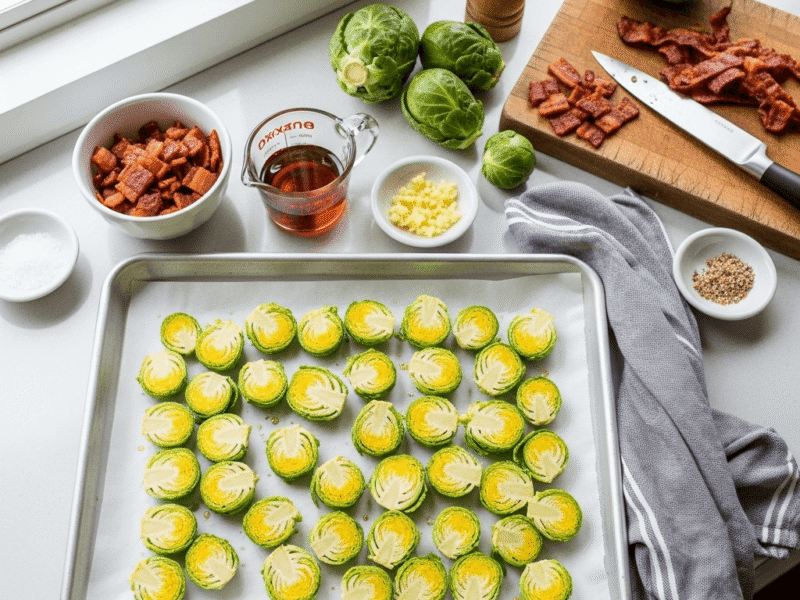
Extra Vegetables: Add halved Brussels sprouts, broccoli florets, or sliced bell peppers to create a multi-vegetable roast.
Pro Chef Tips
Taking your roasted cauliflower from good to absolutely phenomenal comes down to these professional techniques that make all the difference:
Cut for Even Cooking: When breaking down cauliflower, aim for florets with a flat side. This creates maximum surface area contact with the pan, which means more caramelization and crispy edges. Save the tender stems – peel and slice them, then roast alongside the florets.
The Dry-Roast Technique: For maximum crispiness, some chefs dry-roast the cauliflower for 10 minutes before adding any oil or seasonings. This drives off excess moisture and creates an even crispier result. Then toss with oil and continue roasting.
Use Two Temperatures: Start at 450°F for the first 10 minutes to jump-start browning, then reduce to 400°F for the remaining time. This creates crispy exteriors without burning before the interiors cook through.
Add Parmesan in Stages: Adding half the Parmesan at the beginning helps it adhere to the florets, while adding the rest halfway through creates that crispy cheese crust without burning.
Don’t Flip Too Early: Let the cauliflower develop a proper crust before flipping. If it’s sticking to the pan, it’s not ready yet – properly roasted cauliflower will release naturally when a crust forms.
Finish Under the Broiler: For restaurant-level char and crispy cheese, turn on the broiler for the last 2-3 minutes of cooking. Watch carefully to prevent burning. This creates those deeply caramelized spots that add incredible flavor.
Salt in Layers: Season the cauliflower before roasting, then taste and adjust with finishing salt (like flaky sea salt) right before serving. This creates depth and ensures proper seasoning throughout.
Add Acid at the End: Always add fresh lemon juice or vinegar after roasting, not before. Acid added before roasting can make vegetables soggy and prevent browning.
Common Mistakes to Avoid
Even with a simple recipe like roasted cauliflower, there are several common pitfalls that can impact your results. Here’s how to avoid them:
Overcrowding the Pan: This is the number one mistake. When cauliflower florets touch each other, they steam instead of roast, resulting in soggy, pale cauliflower without those coveted crispy edges. The florets need space for hot air to circulate. If your baking sheet looks crowded, use two sheets and rotate them halfway through cooking. The investment in pan space pays off in crispy, golden perfection.
Skipping the Drying Step: Cauliflower naturally contains a lot of moisture, and if you don’t dry it thoroughly after washing, that water creates steam in the oven. Steam is the enemy of crispiness. Take an extra minute to pat every floret completely dry with paper towels or a clean kitchen towel. This simple step makes a dramatic difference in the final texture.
Using Pre-Grated Cheese: Those convenient bags of pre-shredded Parmesan contain cellulose (wood pulp) and anti-caking agents that prevent clumping in the bag. Unfortunately, these additives also prevent the cheese from melting properly and forming that delicious crispy crust. Always buy a block of Parmigiano-Reggiano and grate it fresh – it takes two extra minutes but transforms the dish.
Wrong Oven Temperature: Too low (below 400°F) and your cauliflower will dry out before browning. Too high (above 450°F for most ovens) and the garlic and cheese will burn before the cauliflower cooks through. The sweet spot is 425°F for most home ovens, but get to know your oven’s quirks and adjust accordingly.
Cutting Florets Too Large or Too Small: Florets that are too large won’t develop enough crispy surface area and may remain undercooked in the center. Florets that are too small will burn before the insides become tender. Aim for 1.5 to 2-inch pieces with at least one flat side for optimal results. Consistency in size matters more than the exact measurement.
Storage & Meal Prep
Roasted cauliflower is fantastic for meal prep and stores beautifully, making it perfect for busy weeks when you want healthy sides ready to go.
Refrigerator Storage: Allow the roasted cauliflower to cool completely to room temperature, then transfer to an airtight container. Store in the refrigerator for up to 4-5 days. The cauliflower will soften slightly as it sits but remains delicious. Store in a single layer if possible to prevent the florets from becoming soggy from condensation.
Reheating for Best Results: To restore crispiness, reheat in a 400°F oven for 5-8 minutes until warmed through and edges crisp up again. Spread in a single layer on a baking sheet – don’t microwave if you want to maintain any crispiness. The microwave will work for heating but will make the cauliflower soft rather than crispy. An air fryer at 375°F for 3-5 minutes also works wonderfully for reheating.
Meal Prep Strategy: Roast a double or triple batch on Sunday and portion into containers for easy sides throughout the week. Pair with different proteins each day – it goes with virtually everything. The cauliflower actually tastes great cold or at room temperature too, making it perfect for packed lunches.
Preventing Sogginess: If meal prepping, slightly undercook the cauliflower (by about 3-5 minutes) so it doesn’t become mushy when reheated. Store with a paper towel in the container to absorb any excess moisture.
Make-Ahead & Freezer Notes
Planning ahead makes weeknight dinners so much easier, and this cauliflower offers several make-ahead options.
Prep-Ahead (Uncooked): Cut the cauliflower into florets up to 2 days in advance. Store in an airtight container in the refrigerator with a paper towel to absorb moisture. When ready to cook, remove from the fridge 15 minutes before roasting, toss with oil and seasonings, then roast as directed. This cuts your active cooking time significantly.
Partial Make-Ahead: Toss the cauliflower with oil and seasonings (except the Parmesan) up to 4 hours ahead. Keep refrigerated, then add Parmesan right before roasting. This allows the garlic and seasonings to marinate the cauliflower for even deeper flavor.
Freezing Roasted Cauliflower: While not ideal, you can freeze roasted cauliflower for up to 2 months. Cool completely, then freeze in a single layer on a baking sheet until solid. Transfer to freezer bags, removing as much air as possible. The texture won’t be as crispy when reheated, but it’s still tasty and convenient. Reheat from frozen in a 400°F oven for 10-12 minutes.
Freezing Raw Cauliflower: Raw cauliflower florets can be frozen for up to 6 months. Blanch for 2 minutes in boiling water, shock in ice water, drain thoroughly, and pat completely dry before freezing in bags. This preserves texture better than freezing raw. Cook from frozen, adding 5-10 minutes to the roasting time.
Best Reheating Method: For frozen or refrigerated roasted cauliflower, always reheat in the oven rather than the microwave if you want to restore any crispiness. Spread in a single layer on a baking sheet and roast at 400°F until hot and crispy edges return.
Serving Suggestions
This versatile roasted cauliflower pairs beautifully with countless main dishes and works in various meal contexts.
Protein Pairings: Serves perfectly alongside roasted chicken, grilled steak, pan-seared pork chops, baked salmon, or lamb chops. The garlic and Parmesan flavors complement virtually any protein. It’s also excellent with Italian meatballs, chicken parmesan, or osso buco for a full Italian-inspired meal.
Grain and Starch Sides: While the cauliflower is low-carb on its own, it pairs wonderfully with garlic mashed potatoes, creamy polenta, risotto, or crusty Italian bread for soaking up any flavorful bits left on the plate. For a lighter option, serve with quinoa or farro.
Salad Additions: Chop leftover roasted cauliflower and add it to Caesar salad, grain bowls, or Mediterranean salads for extra flavor and texture. It’s particularly delicious tossed with arugula, cherry tomatoes, and balsamic vinaigrette.
Pasta Integration: Toss roasted cauliflower with pasta, olive oil, red pepper flakes, and extra Parmesan for a simple, satisfying vegetarian pasta dish. It’s especially good with orecchiette or penne.
Bowl Meals: Use as a component in Buddha bowls or power bowls with grains, proteins, and other roasted vegetables. The roasted cauliflower adds substantial flavor and texture.
Appetizer Service: Serve smaller portions as an appetizer with marinara sauce or garlic aioli for dipping. Present on a platter with toothpicks for easy party service.
Breakfast Integration: Surprisingly delicious alongside eggs and bacon for a savory breakfast. Try it in a breakfast hash with potatoes and eggs.
Holiday Tables: This elegant side dish fits perfectly on Thanksgiving, Christmas, or Easter menus, offering a lighter option alongside heavier dishes.
Wine Pairings: The garlicky, cheesy flavors pair beautifully with Italian whites like Pinot Grigio or Vermentino, or light reds like Chianti. For non-alcoholic options, sparkling water with lemon or iced herbal tea complement nicely.
FAQs Section
Can I use frozen cauliflower for this recipe?
While fresh cauliflower produces the best results with the crispiest texture, frozen cauliflower can work in a pinch. The challenge is that frozen cauliflower contains excess moisture that prevents proper crisping. If using frozen, thaw it completely, then squeeze out as much water as possible using a clean kitchen towel. Spread on paper towels to air-dry for 15-20 minutes before proceeding with the recipe. Add an extra 5-10 minutes to the roasting time and expect a softer texture than fresh cauliflower, though the flavor will still be delicious.
Why isn’t my cauliflower getting crispy?
Several factors affect crispiness: insufficient oven temperature (make sure it’s fully preheated to 425°F), overcrowding on the pan (florets need space), excess moisture (always pat dry thoroughly), too little oil (don’t be afraid to use the full ¼ cup), or flipping too frequently (let it sit undisturbed for the first 15 minutes to develop a crust). If your oven runs cool, increase the temperature to 450°F. Using parchment paper or a silicone mat also helps prevent sticking and promotes even browning.
Can I make this dairy-free or vegan?
Absolutely! For a dairy-free version, replace the Parmesan cheese with nutritional yeast, which provides a cheesy, nutty flavor without any dairy. You’ll need about 3-4 tablespoons. Another option is using dairy-free Parmesan alternatives available at most grocery stores. The cauliflower will still be delicious with just garlic, herbs, and olive oil even without any cheese substitute – the roasting process creates incredible flavor on its own.
How do I know when the cauliflower is done?
Perfectly roasted cauliflower should be golden brown with deeply caramelized, crispy edges and spots. When you pierce a floret with a fork, it should be tender but still have a slight bite – not mushy or falling apart. The Parmesan should be melted and lightly browned. Cooking times can vary based on floret size and oven accuracy, so start checking around the 20-minute mark. If the edges are browning too quickly but the centers aren’t tender, reduce the oven temperature to 400°F and continue cooking.
What can I do with leftover roasted cauliflower?
Leftover roasted cauliflower is incredibly versatile! Chop it and add to scrambled eggs or frittatas, toss it with pasta and olive oil for a quick lunch, blend it into soups for added depth and creaminess, add to grain bowls or salads, use as a pizza topping, mash it for a low-carb alternative to mashed potatoes, or simply reheat and enjoy as a side dish. It’s also delicious served at room temperature as part of an antipasto platter.
Can I roast cauliflower without oil?
While you can technically roast cauliflower without oil, the results will be quite different. The oil is essential for achieving crispy, caramelized edges and helps the seasonings and cheese adhere to the florets. Without oil, cauliflower tends to dry out and won’t brown properly. If you’re trying to reduce fat, you can use less oil (2-3 tablespoons instead of ¼ cup) and add a few tablespoons of vegetable broth for moisture, though the texture won’t be quite as crispy. Alternatively, use an oil spray to lightly coat the florets while using less total oil.
Why does my garlic burn before the cauliflower is done?
Garlic burns easily at high temperatures because of its sugar content. To prevent burning while still getting that amazing garlic flavor, you have several options: use garlic powder instead of fresh (it won’t burn), mince the garlic very finely so it adheres to the florets rather than sitting exposed on the pan, toss the cauliflower with garlic-infused olive oil rather than raw garlic pieces, or add the fresh garlic for only the last 10 minutes of roasting. Some cooks also wrap individual garlic cloves in foil and roast them alongside the cauliflower, then squeeze the soft, caramelized garlic over the finished dish.
Conclusion
And there you have it – everything you need to create the most incredible, restaurant-quality Garlic Parmesan Roasted Cauliflower that’ll have everyone at your table convinced that vegetables can be just as exciting as any other dish! This recipe proves that healthy eating doesn’t have to be boring or complicated. With just a handful of simple ingredients, the magic of high-heat roasting, and a few pro tips, you can transform an everyday vegetable into something truly spectacular.
What I absolutely love about this recipe is how it fits into any lifestyle or occasion. Need a quick weeknight side dish? It’s done in 35 minutes. Cooking for picky eaters? Those crispy, cheesy edges win over even the most devoted veggie skeptics. Following a low-carb or keto diet? This dish satisfies those comfort food cravings without the carbs. Planning a holiday dinner? It’s elegant enough to grace any festive table. It’s the kind of versatile, reliable recipe that becomes a household staple because it works beautifully every single time.
I can’t wait to hear how your Garlic Parmesan Roasted Cauliflower turns out! Did you try any of the flavor variations? Make it extra spicy? Maybe your kids surprised you by asking for seconds? Drop a comment below and share your experience – I genuinely love hearing from readers and discovering how you customize these recipes to make them your own. And if this recipe becomes a family favorite (which I’m confident it will), please save it to your Pinterest boards so you can find it easily next time and help other home cooks discover this delicious way to enjoy vegetables!
Now preheat that oven, grab a head of cauliflower, and get ready to create some crispy, golden, garlicky magic. Your taste buds will thank you!