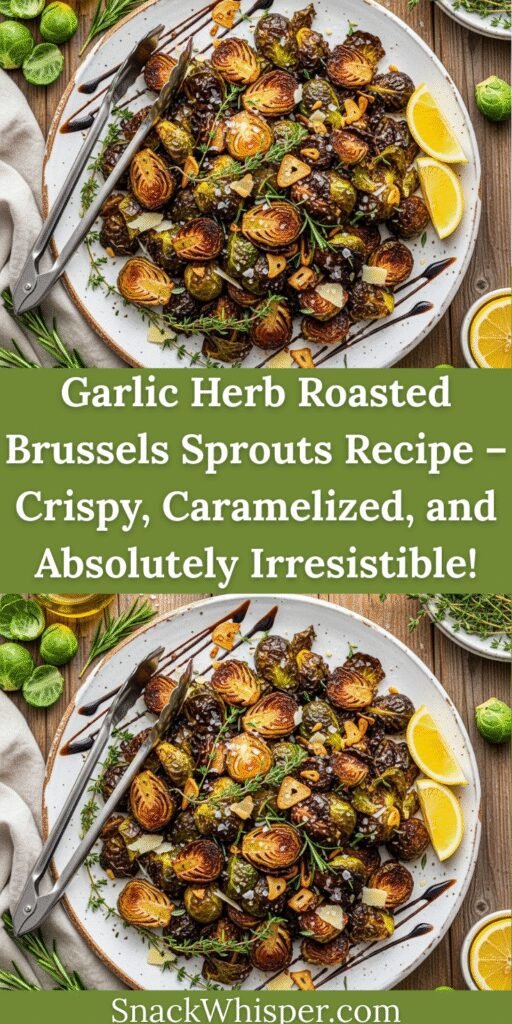
Say goodbye to boring, mushy Brussels sprouts and hello to the most addictively delicious vegetable side dish you’ll ever make! These Garlic Herb Roasted Brussels Sprouts are about to change everything you thought you knew about this underappreciated vegetable. Imagine perfectly roasted sprouts with crispy, caramelized outer leaves that are almost like chips, tender centers that melt in your mouth, and an aromatic coating of garlic, fresh herbs, and just the right amount of seasoning that makes them absolutely irresistible.
This recipe has become a viral sensation on Pinterest and dinner tables across America because it transforms Brussels sprouts from “vegetables kids refuse to eat” into “the dish everyone fights over.” The secret? High-heat roasting that creates incredible texture contrast—crispy, almost charred edges with a sweet, nutty flavor, paired with tender, creamy centers. Add fragrant garlic, aromatic fresh herbs like rosemary and thyme, a drizzle of good olive oil, and you’ve got a side dish that steals the show from the main course.
What makes these roasted Brussels sprouts so special is their versatility and crowd-pleasing appeal. They’re elegant enough for Thanksgiving dinner or holiday gatherings, yet simple enough for weeknight meals. They pair beautifully with virtually any protein—roasted chicken, grilled steak, baked salmon, or pork chops—and they’re substantial enough that vegetarians often enjoy them as a main course over grains or pasta. Plus, they’re naturally gluten-free, vegan (or easily made so), low-carb, keto-friendly, and packed with nutrients.
Whether you’re a Brussels sprouts skeptic who’s been scarred by overcooked, sulfurous versions from childhood, or already a fan looking for the perfect preparation method, this recipe will become your new go-to. The high-heat roasting technique eliminates that bitter, cabbage-y taste and replaces it with sweet, nutty, caramelized deliciousness. Once you try Brussels sprouts this way, you’ll never go back to steaming or boiling them again!
History / Background
Brussels sprouts have a fascinating history that spans centuries and continents. Despite their name suggesting Belgian origins, the exact birthplace of Brussels sprouts remains somewhat mysterious. Wild cabbage varieties, from which Brussels sprouts descended, grew throughout the Mediterranean region for thousands of years. However, the cultivated Brussels sprout as we know it today—with those characteristic small, compact heads growing along a thick stalk—was likely first developed in Belgium, possibly near Brussels, sometime in the 13th century, though the first written reference didn’t appear until 1587.
These miniature cabbage-like vegetables remained relatively localized to Belgium and the Netherlands for centuries before spreading throughout Europe. French settlers brought them to Louisiana in the 18th century, but Brussels sprouts didn’t gain widespread popularity in America until the 1800s. By the early 20th century, they had become a common sight in American gardens and markets, though their reputation wasn’t always positive.
For much of the 20th century, Brussels sprouts suffered from a serious image problem, particularly in the United States and Britain. Home cooks and institutional kitchens typically boiled them into submission, often overcooking them until they turned musty-gray and developed that infamous sulfurous smell and bitter taste. This preparation method—boiling Brussels sprouts for 10-15 minutes or longer—released glucosinolate sinigrin, the compound responsible for that unpleasant cabbage smell and bitter flavor. Generations of children grew up believing they hated Brussels sprouts, when really they hated overcooked Brussels sprouts.
The Brussels sprouts renaissance began in the late 1990s and early 2000s, driven by several factors. First, innovative chefs discovered that high-heat cooking methods—roasting, pan-frying, and grilling—transformed Brussels sprouts into something completely different. These techniques caramelized the natural sugars, creating sweet, nutty flavors while maintaining textural contrast between crispy outer leaves and tender centers. Restaurants, particularly upscale bistros and farm-to-table establishments, began featuring Brussels sprouts as trendy side dishes, often with bacon, balsamic glaze, or Parmesan cheese.
Second, Dutch seed companies developed new Brussels sprouts varieties with improved flavor profiles—sweeter, less bitter, and more appealing to modern palates. These newer cultivars contain lower levels of the compounds responsible for bitterness, making them more universally enjoyable even when not perfectly cooked.
The roasting method specifically gained tremendous popularity through food blogs, Pinterest, and social media in the 2010s. Home cooks discovered that roasting Brussels sprouts at high temperatures (400-425°F) for 25-30 minutes created restaurant-quality results with minimal effort. The addition of garlic and herbs—drawing from Mediterranean cooking traditions—elevated simple roasted vegetables into something worthy of celebration.
Today, Brussels sprouts have completed their redemption arc. They’ve gone from despised cafeteria vegetables to Instagram-worthy side dishes that people actively crave. Annual Brussels sprout consumption in the United States has increased dramatically over the past two decades, and roasted Brussels sprouts with garlic and herbs have become a holiday table staple, appearing at Thanksgiving, Christmas, and Easter dinners across the country.
Why You’ll Love This Recipe
These garlic herb roasted Brussels sprouts are about to become your most-requested side dish, and here’s exactly why they deserve a permanent spot in your recipe rotation. First and foremost, they’re absolutely delicious—the kind of vegetables that convert even the most dedicated veggie-avoiders into Brussels sprouts enthusiasts. The combination of crispy, caramelized edges and tender centers creates an addictive texture that keeps you reaching for “just one more.”
Here’s why this recipe will become your go-to vegetable side:
- Incredibly Easy: Requires just 5 ingredients and minimal prep—trim, toss, roast. That’s it! Even kitchen beginners can nail this recipe.
- Hands-Off Cooking: Once they’re in the oven, you’re free to prepare the rest of your meal. No stirring, no babysitting required.
- Perfectly Crispy: High-heat roasting creates those coveted crispy, almost chip-like outer leaves while keeping centers tender and creamy.
- Naturally Sweet: Roasting caramelizes the natural sugars in Brussels sprouts, eliminating bitterness and creating sweet, nutty flavor.
- Versatile Side Dish: Pairs beautifully with literally any main course—chicken, beef, pork, fish, or as a vegetarian main over grains.
- Holiday-Worthy: Elegant enough for Thanksgiving, Christmas, or Easter dinner, yet simple enough for weeknight meals.
- Crowd-Pleaser: Converts Brussels sprouts skeptics and satisfies longtime fans—this recipe wins over everyone.
- Budget-Friendly: Brussels sprouts are affordable year-round, and this recipe uses minimal additional ingredients.
- Healthy & Nutritious: Packed with vitamins C and K, fiber, and antioxidants—guilt-free indulgence at its finest.
- Diet-Friendly: Naturally gluten-free, vegan, paleo, Whole30-compliant, keto-friendly, and low-carb—fits virtually every eating style.
- Make-Ahead Friendly: Can be prepped hours in advance, making holiday meal planning stress-free.
- Meal Prep Champion: Makes excellent leftovers that reheat beautifully for easy weekday lunches or dinners.
- Kid-Approved: The crispy texture and sweet flavor make these Brussels sprouts surprisingly popular with children.
The flavor profile is absolutely perfect—garlicky without being overwhelming, herbaceous and aromatic from fresh herbs, with a subtle richness from olive oil and a touch of salt that brings everything together. These Brussels sprouts are so good that people who claim to hate vegetables will find themselves sneaking seconds (and thirds!) from the serving platter.
Ingredient Notes
Let’s break down what makes these garlic herb roasted Brussels sprouts so spectacularly delicious and why each ingredient matters:
Brussels Sprouts: Choose firm, bright green sprouts that feel heavy for their size with tightly packed leaves. Smaller sprouts (1-1½ inches diameter) tend to be sweeter and more tender, though larger ones work perfectly when halved or quartered. Avoid yellowing, loose, or soft sprouts. Substitution: While nothing truly replaces Brussels sprouts, cauliflower or broccoli can be roasted using the same method.
Olive Oil: Extra virgin olive oil is ideal for its flavor and health benefits. The oil helps achieve crispy, caramelized edges and carries the garlic and herb flavors. Don’t skimp—vegetables need adequate oil to roast properly. Substitution: Avocado oil for higher smoke point, melted coconut oil, or melted butter/ghee for extra richness.
Garlic: Fresh garlic is essential for that aromatic, savory flavor. Minced garlic distributes evenly and gets slightly roasted, developing sweet, mellow notes. Use plenty—garlic lovers can add even more! Substitution: Garlic powder works in a pinch (use 1 teaspoon per 4-5 cloves fresh), but fresh is vastly superior.
Fresh Herbs: Rosemary and thyme are traditional and provide earthy, aromatic flavors that complement Brussels sprouts beautifully. Fresh herbs are preferred but dried work too. Substitution: Parsley, sage, oregano, or an Italian herb blend all work wonderfully. Dried herbs: use 1 teaspoon dried for every tablespoon fresh.
Salt: Essential for bringing out the natural sweetness of Brussels sprouts and balancing flavors. Use kosher salt or sea salt for best results—the larger crystals distribute more evenly. Substitution: Any salt works, just adjust quantities (table salt is more concentrated).
Black Pepper: Adds subtle heat and complexity. Freshly ground black pepper provides the best flavor. Substitution: White pepper for milder flavor, or red pepper flakes for heat.
Optional Add-Ins: Balsamic vinegar (drizzled before serving), grated Parmesan cheese, crispy bacon bits, toasted nuts (pecans, walnuts, almonds), dried cranberries, lemon zest, or honey glaze can customize the flavor profile.
Equipment Needed
You’ll need minimal equipment for this simple roasting recipe:
- Large Rimmed Baking Sheet (half-sheet pan, 18×13 inches): Essential for spreading Brussels sprouts in a single layer for proper roasting and caramelization. Rimmed edges prevent rolling.
- Sharp Knife: For trimming stem ends and halving Brussels sprouts
- Cutting Board: For prep work
- Large Mixing Bowl: For tossing Brussels sprouts with oil, garlic, and seasonings
- Measuring Spoons: For accurate oil and seasoning quantities
- Garlic Mincer or Microplane (optional): Makes quick work of mincing garlic finely
- Spatula or Wooden Spoon: For tossing Brussels sprouts during roasting for even browning
- Parchment Paper or Aluminum Foil (optional): Makes cleanup easier, though not required for roasting
That’s it! This is one of the simplest recipes in terms of equipment needs. If you have a baking sheet and a knife, you’re ready to make restaurant-quality roasted Brussels sprouts!
Garlic Herb Roasted Brussels Sprouts Recipe
- Total Time: 40 minutes
- Yield: 6 servings 1x
- Diet: Gluten Free
Description
Perfectly roasted Brussels sprouts with crispy, caramelized outer leaves and tender centers, tossed with aromatic garlic and fresh herbs. This simple yet elegant side dish transforms Brussels sprouts into irresistible, addictive vegetables that pair beautifully with any main course. Ready in just 40 minutes with minimal prep and hands-off cooking.
Ingredients
- 2 lbs Brussels sprouts (about 6-7 cups)
- 3 tablespoons extra virgin olive oil
- 4-5 cloves garlic, minced (about 1½ tablespoons)
- 1 tablespoon fresh rosemary, finely chopped (or 1 teaspoon dried)
- 1 tablespoon fresh thyme leaves (or 1 teaspoon dried)
- 1 teaspoon kosher salt (or to taste)
- ½ teaspoon freshly ground black pepper
- Optional: 1 tablespoon balsamic vinegar (for drizzling after roasting)
- Optional: ¼ cup grated Parmesan cheese (for garnish)
- Optional: Lemon wedges (for serving)
Instructions
- Preheat the Oven: Preheat your oven to 425°F (220°C). This high temperature is crucial for achieving crispy, caramelized Brussels sprouts. Position the oven rack in the center position.
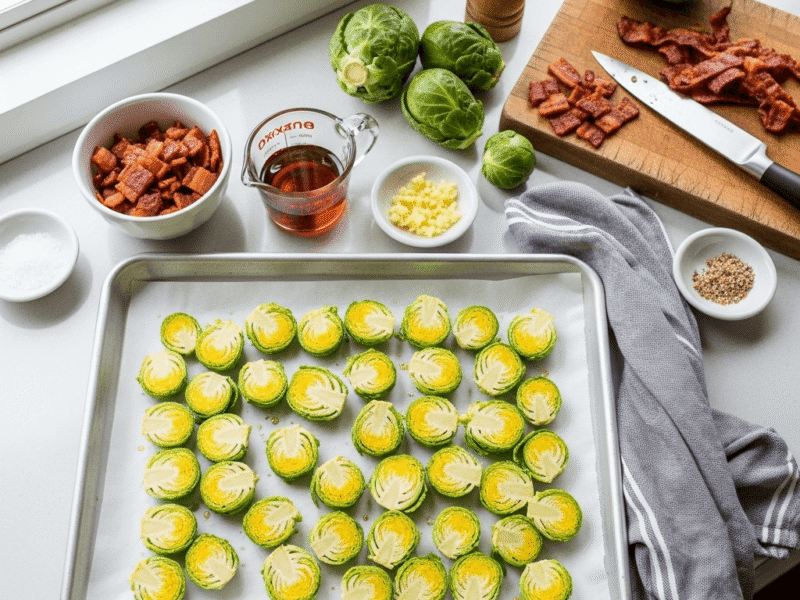
- Prep the Brussels Sprouts: Rinse Brussels sprouts under cold water and pat completely dry with paper towels or a clean kitchen towel—this is important for crispiness! Trim off the stem ends (about ¼ inch) and remove any yellow or damaged outer leaves. Cut each Brussels sprout in half lengthwise through the stem. For very large sprouts (over 2 inches), cut into quarters. Try to keep pieces relatively uniform in size for even cooking.
- Season: Place the halved Brussels sprouts in a large mixing bowl. Drizzle with olive oil, add minced garlic, chopped rosemary, thyme leaves, salt, and black pepper. Toss thoroughly with your hands or a large spoon, making sure every sprout is evenly coated with oil and seasonings. Massage the seasonings into the sprouts for best flavor distribution.
- Arrange on Baking Sheet: Spread the seasoned Brussels sprouts in a single layer on a large rimmed baking sheet, cut-side down. This is crucial—cut sides touching the pan will caramelize beautifully. Don’t overcrowd! The sprouts should have space around them. If they’re too crowded, they’ll steam instead of roast. Use two baking sheets if necessary.
- Roast: Place the baking sheet in the preheated oven and roast for 20 minutes undisturbed. This allows the cut sides to develop that gorgeous golden-brown caramelization.
- Toss and Continue Roasting: After 20 minutes, remove the pan from the oven and use a spatula to flip and toss the Brussels sprouts. Return to the oven and roast for an additional 5-10 minutes, until the sprouts are tender when pierced with a fork and the outer leaves are crispy and deeply caramelized with some charred edges. Total roasting time is 25-30 minutes depending on size.
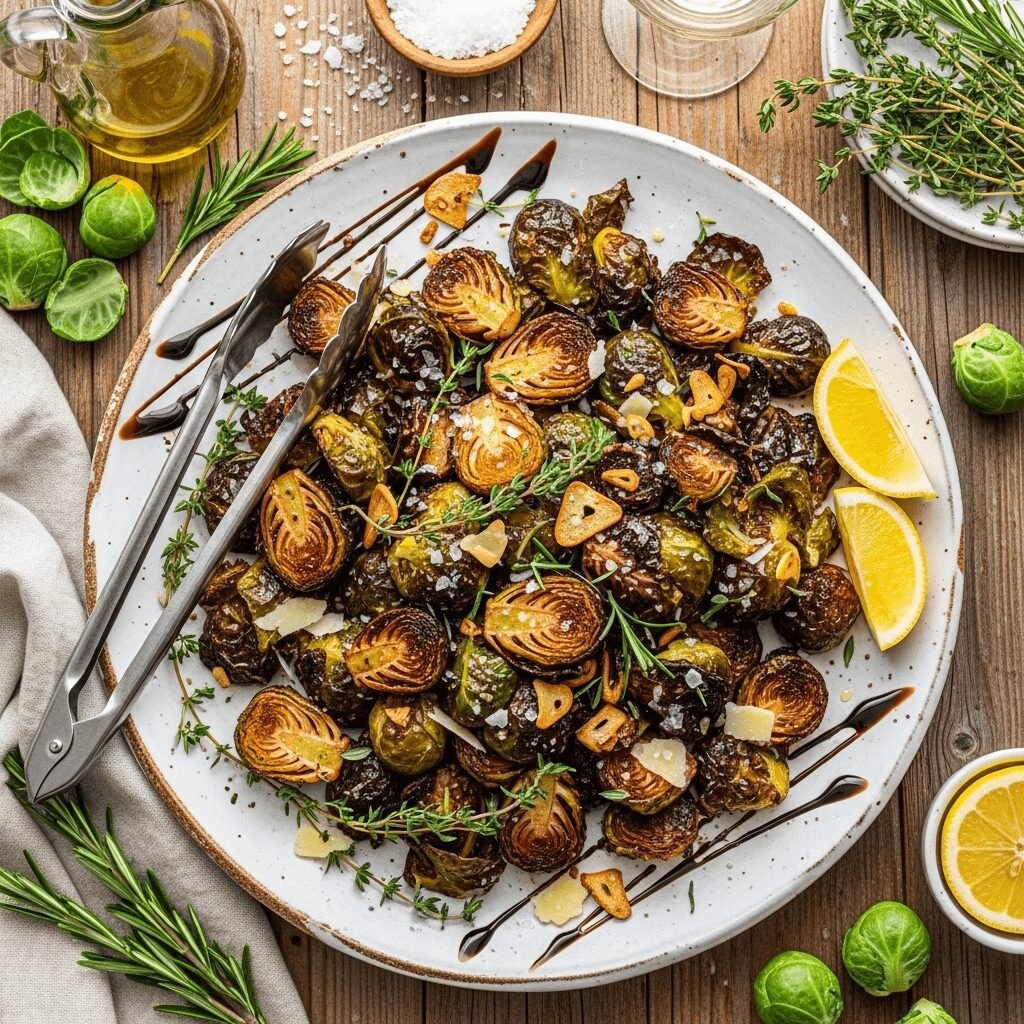
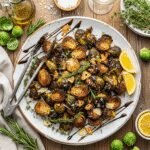
- Finish and Serve: Remove from the oven and transfer to a serving dish. If desired, drizzle with balsamic vinegar while still hot, sprinkle with grated Parmesan cheese, and serve with lemon wedges on the side. Taste and adjust seasoning with additional salt and pepper if needed. Serve immediately while hot and crispy.
Notes
- Size Matters: Cut Brussels sprouts uniformly so they cook evenly. Larger pieces take longer to roast.
- Don’t Skip Drying: Wet Brussels sprouts won’t crisp up properly. Pat them very dry after washing.
- Cut-Side Down: Placing the flat, cut side against the pan creates maximum caramelization and crispiness.
- Don’t Overcrowd: Crowded sprouts steam instead of roast. Use two pans if necessary for proper spacing.
- Fresh vs. Frozen: Fresh Brussels sprouts work best. If using frozen, thaw completely, drain, and pat extremely dry. Increase roasting time by 5-10 minutes.
- Oven Variations: All ovens vary. Check at 20 minutes and adjust remaining time based on how quickly they’re browning.
- Add-Ins: For extra flavor, add bacon bits, dried cranberries, or toasted nuts during the last 5 minutes of roasting.
- Prep Time: 10 minutes
- Cook Time: 25-30 minutes
- Category: Side Dish, Vegetable
- Method: Roasting, Baking
- Cuisine: American, Mediterranean-inspired
Nutrition
- Serving Size: About 1 cup roasted Brussels sprouts (⅙ of recipe)
- Calories: 95
- Sugar: 2g
- Sodium: 410mg
- Fat: 7g
- Saturated Fat: 1g
- Unsaturated Fat: 6g
- Trans Fat: 0g
- Carbohydrates: 9g
- Fiber: 4g
- Protein: 3g
- Cholesterol: 0mg
Nutrition information is approximate and calculated per serving without optional ingredients. Actual values may vary based on specific ingredients used. Brussels sprouts are an excellent source of vitamins C and K, folate, and antioxidants.
Tips & Variations
This versatile recipe adapts beautifully to different tastes and occasions! Here are fantastic ways to customize it:
Balsamic Roasted Brussels Sprouts: Drizzle with 2 tablespoons of balsamic vinegar before roasting, or toss with balsamic glaze immediately after roasting for sweet-tart flavor that’s absolutely addictive.
Parmesan Crusted: Toss with ½ cup freshly grated Parmesan cheese during the last 5 minutes of roasting for a crispy, cheesy coating that’s irresistible.
Bacon Brussels Sprouts: Add ½ cup cooked, crumbled bacon during the last 5 minutes of roasting. The smoky, salty bacon complements the sweet roasted sprouts perfectly.
Honey Garlic Version: Drizzle with 1-2 tablespoons of honey mixed with extra garlic before roasting for sweet, caramelized Brussels sprouts.
Spicy Kick: Add ½ teaspoon red pepper flakes with the seasonings, or drizzle with hot honey or sriracha after roasting for heat lovers.
Asian-Inspired: Replace olive oil with sesame oil, add fresh ginger with the garlic, and finish with soy sauce, sesame seeds, and sliced green onions.
Lemon Herb: Add 1 tablespoon lemon zest with the herbs and squeeze fresh lemon juice over the roasted sprouts before serving for bright, citrusy flavor.
Maple Dijon: Whisk together 2 tablespoons maple syrup and 1 tablespoon Dijon mustard, then drizzle over Brussels sprouts during the last 5 minutes of roasting.
Nuts and Dried Fruit: Toss with toasted pecans, walnuts, or almonds and dried cranberries or pomegranate seeds after roasting for festive holiday flair.
Mediterranean Style: Add sliced red onion and cherry tomatoes during roasting, finish with crumbled feta cheese and Kalamata olives.
Truffle Brussels Sprouts: Drizzle with truffle oil after roasting and top with shaved Parmesan for an ultra-luxurious version.
Pro Chef Tips
Want to elevate your roasted Brussels sprouts from good to absolutely restaurant-perfect? These professional techniques make all the difference:
Dry Them Thoroughly: This cannot be overstated—moisture is the enemy of crispy Brussels sprouts. After washing, pat them completely dry with paper towels or a clean kitchen towel. Let them air-dry for 10-15 minutes if you have time. Wet sprouts will steam instead of roast, resulting in soggy, pale vegetables instead of crispy, caramelized ones.
Remove Loose Leaves: As you trim and halve Brussels sprouts, loose outer leaves will naturally fall off. Don’t discard them! Toss these separately with oil and spread them on the baking sheet—they’ll get incredibly crispy and chip-like, almost like kale chips. They’re often the first to disappear from the serving platter!
Cut-Side Down is Crucial: Always place the flat, cut side of halved Brussels sprouts directly against the hot baking sheet. This creates maximum contact with the hot surface, resulting in beautiful caramelization and that coveted golden-brown crust. The rounded side up allows outer leaves to crisp while the interior stays tender.
Don’t Skimp on Oil: Brussels sprouts need adequate oil to roast properly—about 1½ tablespoons per pound. Too little oil results in dry, tough sprouts that don’t caramelize. The oil conducts heat, promotes browning, and carries flavors. Don’t be afraid to use enough!
Hot Oven is Essential: 425°F is the sweet spot for roasted Brussels sprouts. Lower temperatures will cook them through but won’t achieve that crispy, caramelized exterior. Higher temperatures risk burning before they’re tender. If your oven runs hot or cool, use an oven thermometer to verify the actual temperature.
Space Them Out: Overcrowding is one of the biggest mistakes home cooks make. Brussels sprouts need breathing room—at least ½ inch between pieces. Crowded vegetables release moisture that can’t evaporate quickly enough, causing steaming instead of roasting. Use two baking sheets if necessary.
Add Garlic Strategically: Raw minced garlic can burn during the long roasting time. For best results, add half the garlic at the beginning and toss the remaining half with the Brussels sprouts when you flip them at the 20-minute mark. This ensures garlicky flavor without bitter, burnt bits.
Don’t Fear Char: Those dark, almost black, crispy edges aren’t burnt—they’re the best part! They provide incredible flavor and addictive crunch. As long as the sprouts aren’t uniformly black and smoking, those deeply caramelized, charred bits are exactly what you want.
Toss Halfway Through: Flipping Brussels sprouts after 20 minutes ensures even browning and prevents one side from burning while the other stays pale. Use a thin metal spatula to scrape under them (they’ll stick slightly—this is good!), flip them over, and redistribute for the final roasting.
Season After Tasting: Oven roasting concentrates flavors, so Brussels sprouts that seem perfectly seasoned raw might taste under-seasoned after roasting. Always taste one after roasting and adjust salt, pepper, or other seasonings before serving.
Serve Immediately: Roasted Brussels sprouts are best enjoyed hot from the oven when they’re at peak crispiness. They’re still delicious at room temperature, but they lose some of that incredible crispy texture as they cool. If making ahead, reheat in a hot oven to restore crispiness.
Common Mistakes to Avoid
Even this simple recipe can go wrong without proper technique. Here’s how to sidestep the most common pitfalls:
Mistake #1: Not Drying Brussels Sprouts Properly – Wet Brussels sprouts are the number one reason people end up with soggy, steamed vegetables instead of crispy, roasted ones. Water on the surface creates steam in the oven, preventing proper caramelization and browning. The solution: after washing, pat Brussels sprouts completely dry with paper towels, rubbing each one individually if necessary. If you have time, spread them out on a kitchen towel and let them air-dry for 10-15 minutes before proceeding. They should feel dry to the touch, not damp.
Mistake #2: Overcrowding the Pan – When Brussels sprouts are crammed together on the baking sheet, they steam in their own moisture instead of roasting and caramelizing. This results in mushy, pale sprouts without those coveted crispy edges. The solution: spread Brussels sprouts in a single layer with space between each piece—they should barely touch, if at all. If your pan isn’t big enough, use two baking sheets. The extra pan is worth the superior results. Properly spaced sprouts get air circulation that allows moisture to evaporate and edges to crisp up beautifully.
Mistake #3: Using Too Low a Temperature – Roasting Brussels sprouts at 350°F or 375°F will cook them through but won’t achieve the caramelization and crispiness that makes this recipe special. At lower temperatures, they’ll be tender but soft and pale rather than crispy and golden-brown. The solution: preheat your oven to a full 425°F (or even 450°F if your oven runs cool). This high heat creates rapid surface browning while the interior cooks through perfectly. Use an oven thermometer to verify your oven’s actual temperature—many run 25-50 degrees off the dial setting.
Mistake #4: Cutting Brussels Sprouts Unevenly – If some pieces are tiny and others are huge, the small ones will burn before the large ones finish cooking. This results in a batch where some are perfect, some are charred, and some are undercooked. The solution: aim for uniformity. Halve small-to-medium Brussels sprouts, and quarter the large ones. All pieces should be roughly the same size—about 1-1½ inches at the widest point. This ensures everything finishes cooking at the same time.
Mistake #5: Skipping the Flip – If you leave Brussels sprouts undisturbed for the entire roasting time, the cut sides touching the pan will get beautifully caramelized while the tops remain pale and soft. Flipping them halfway through ensures even browning and allows outer leaves to crisp up on both sides. The solution: set a timer for 20 minutes, then remove the pan and use a spatula to flip and redistribute the Brussels sprouts. Return them to the oven for the final 5-10 minutes. This extra step makes a huge difference in texture and appearance.
Mistake #6: Forgetting to Remove Outer Leaves – Yellow, wilted, or damaged outer leaves don’t improve with roasting—they just taste bitter and look unappealing. The solution: during prep, peel off and discard any discolored or damaged leaves. The remaining leaves will caramelize beautifully and add to the dish rather than detracting from it.
Storage & Meal Prep
These roasted Brussels sprouts store reasonably well and make excellent meal prep:
Refrigerator Storage: Transfer completely cooled Brussels sprouts to an airtight container and refrigerate for up to 4-5 days. Note that they’ll lose some crispiness when stored, though the flavor remains excellent.
Reheating Instructions:
- Oven Method (Best for Crispiness): Preheat oven to 400°F. Spread Brussels sprouts on a baking sheet in a single layer and reheat for 8-10 minutes until heated through and crispy. This method restores much of the original texture.
- Stovetop: Heat a large skillet over medium-high heat with a drizzle of olive oil. Add Brussels sprouts and sauté for 5-7 minutes, stirring occasionally, until heated through and re-crisped.
- Air Fryer: Reheat at 375°F for 4-5 minutes, shaking the basket halfway through. This is the fastest method for restoring crispiness.
- Microwave (Quick but Not Ideal): Heat in 30-second intervals until warmed through. Brussels sprouts will be soft rather than crispy using this method.
Cold Options: Roasted Brussels sprouts are also delicious cold or at room temperature! Chop them and add to salads, grain bowls, wraps, or enjoy them straight from the fridge as a quick snack.
Meal Prep Tips:
- Roast a large batch on Sunday for easy weeknight sides throughout the week
- Add to lunch bowls with grains, protein, and other roasted vegetables
- Chop leftovers and add to omelets, frittatas, or scrambled eggs for breakfast
- Toss with pasta, olive oil, and Parmesan for a quick vegetarian dinner
Food Safety Notes:
- Always refrigerate within 2 hours of cooking (1 hour if room temperature exceeds 90°F)
- Cooked vegetables are safe for 4-5 days when properly refrigerated at 40°F or below
- If Brussels sprouts smell off or show signs of mold, discard immediately
- Reheat to at least 165°F for food safety
Make-Ahead & Freezer Notes
Planning ahead? Here’s what works best:
Make-Ahead Options:
- Prep Raw: Trim, halve, and dry Brussels sprouts up to 24 hours ahead. Store in an airtight container lined with paper towels in the refrigerator. Toss with oil and seasonings just before roasting for best results.
- Fully Seasoned: Toss Brussels sprouts with oil, garlic, and herbs up to 4 hours ahead. Refrigerate in the mixing bowl covered with plastic wrap. Spread on the baking sheet and roast when ready.
- Par-Roasted: Roast Brussels sprouts for 15 minutes, cool completely, and refrigerate for up to 2 days. When ready to serve, finish roasting at 425°F for 10-15 minutes until crispy and heated through.
Freezing Raw Brussels Sprouts:
- Fresh Brussels sprouts can be blanched and frozen for up to 12 months
- Blanch whole sprouts in boiling water for 3-5 minutes, shock in ice water, drain thoroughly, and freeze in freezer bags
- Frozen Brussels sprouts can be roasted directly from frozen—increase cooking time by 10-15 minutes and expect them to be slightly less crispy than fresh
Freezing Roasted Brussels Sprouts (Not Recommended):
- While technically possible, I don’t recommend freezing fully roasted Brussels sprouts as they become mushy and lose their appealing texture when thawed and reheated
- If you must freeze leftovers, spread them on a baking sheet to freeze individually, then transfer to freezer bags for up to 2 months
- Reheat from frozen in a 425°F oven for 15-20 minutes, but expect texture changes
Best Practice: Since Brussels sprouts roast in just 30 minutes and prep takes only 10 minutes, I recommend making them fresh or using the par-roasting make-ahead method for best results. The minimal time investment ensures optimal taste and texture.
Serving Suggestions
These versatile roasted Brussels sprouts pair beautifully with countless main courses! Here are winning combinations:
With Poultry:
- Roasted Chicken: Classic pairing—the earthy Brussels sprouts complement juicy roasted or rotisserie chicken perfectly
- Herb-Crusted Turkey: Essential for Thanksgiving or any holiday turkey dinner
- Grilled Chicken Breasts: Healthy weeknight dinner that’s satisfying and delicious
- Duck or Cornish Hens: Elegant enough for special occasions
With Beef:
- Steak: Ribeye, New York strip, or filet mignon—Brussels sprouts add vegetables to a steakhouse-worthy meal
- Prime Rib: Traditional holiday pairing that’s absolutely spectacular
- Beef Tenderloin: Perfect for Christmas or New Year’s Eve dinner
- Meatloaf: Comfort food elevated with gourmet vegetables
With Pork:
- Pork Chops: Whether grilled, pan-seared, or baked, Brussels sprouts complement pork beautifully
- Pork Tenderloin: Lean, elegant, and pairs wonderfully with roasted vegetables
- Ham: Easter dinner classic—Brussels sprouts balance the sweetness of glazed ham
- Bacon-Wrapped Anything: Double down on the bacon-Brussels sprouts flavor combination
With Seafood:
- Salmon: Especially honey-glazed or lemon-herb salmon for a healthy, flavorful dinner
- Cod or Halibut: Light white fish benefits from the robust flavor of garlic-herb vegetables
- Shrimp: Garlic butter shrimp and roasted Brussels sprouts create surf-and-turf magic
- Scallops: Pan-seared scallops with Brussels sprouts is restaurant-quality elegant
Vegetarian Main Course Ideas:
- Serve over quinoa, farro, or brown rice with a fried egg on top
- Toss with pasta, olive oil, and Parmesan for a simple vegetarian dinner
- Add to grain bowls with hummus, tahini, and other roasted vegetables
- Stuff into pita or wraps with falafel and tahini sauce
Complete Holiday Menus:
- Thanksgiving: Turkey + Brussels sprouts + mashed potatoes + cranberry sauce + dinner rolls
- Christmas: Prime rib + Brussels sprouts + Yorkshire pudding + roasted carrots + red wine
- Easter: Ham + Brussels sprouts + scalloped potatoes + green bean casserole + hot cross buns
Beverage Pairings:
- Red Wine: Pinot Noir or Merlot complement the earthy, caramelized flavors
- White Wine: Chardonnay or Sauvignon Blanc for lighter pairings
- Beer: Amber ale, brown ale, or porter pair wonderfully
- Non-Alcoholic: Sparkling apple cider, cranberry juice, or herbal tea
FAQs Section
Q: Why do my Brussels sprouts taste bitter?
A: Bitterness usually comes from two sources: First, overcooking, especially boiling or steaming. High-heat roasting at 425°F caramelizes natural sugars and eliminates bitterness. Second, old or poor-quality Brussels sprouts. Choose fresh, firm, bright green sprouts and avoid those with yellow leaves or soft spots. Newer cultivars are bred to be less bitter, so buying fresh makes a difference. Finally, adding a touch of sweetness (balsamic vinegar, honey, or maple syrup) after roasting balances any residual bitterness beautifully.
Q: Can I use frozen Brussels sprouts for this recipe?
A: Yes, but with cave
ats. Frozen Brussels sprouts contain significantly more moisture than fresh, which makes achieving crispy, caramelized results more challenging. If using frozen: thaw completely, then spread them on paper towels and pat extremely dry—you may need to use multiple layers of towels. Place them on the baking sheet and let them air-dry for 15-20 minutes before tossing with oil and seasonings. Increase roasting time by 10-15 minutes and expect them to be slightly less crispy than fresh. For truly exceptional results, I recommend using fresh Brussels sprouts whenever possible.
Q: How do I know when Brussels sprouts are done roasting?
A: Perfectly roasted Brussels sprouts should be tender when pierced with a fork or knife (no hard, crunchy core), with the outer leaves deeply golden-brown and crispy—many leaves will have dark, charred edges (this is desirable!). The cut sides touching the pan should be caramelized to a rich golden-brown or even slightly blackened. Total roasting time is typically 25-30 minutes at 425°F. Check at 20 minutes—if they’re browning too quickly, reduce temperature to 400°F; if they’re still pale, increase temperature to 450°F and continue roasting.
Q: My Brussels sprouts are burning on the outside but still hard inside. What am I doing wrong?
A: This usually indicates your oven temperature is too high or your Brussels sprouts are too large. First, verify your actual oven temperature with an oven thermometer—many ovens run 25-50°F hotter than the dial setting. If your oven is accurate at 425°F but Brussels sprouts are burning, try these fixes: cut larger sprouts into smaller pieces (quarters instead of halves), lower the temperature to 400°F and roast longer (35-40 minutes), or cover the baking sheet with foil for the first 15 minutes to slow exterior browning while the interiors cook through. Position the oven rack in the center, not too close to the heating element.
Q: Can I prepare Brussels sprouts ahead for holiday dinners?
A: Absolutely! For best results, use the par-roasting method: roast Brussels sprouts at 425°F for 15-20 minutes until they’re starting to brown but not fully cooked. Cool completely, then refrigerate in an airtight container for up to 2 days. About 15 minutes before serving, spread them on a baking sheet and finish roasting at 425°F for 10-15 minutes until crispy, hot, and fully caramelized. This method allows you to do most of the work ahead while still serving freshly roasted, crispy Brussels sprouts. Alternatively, prep them completely (trimmed, halved, and tossed with seasonings) up to 4 hours ahead and refrigerate until ready to roast.
Q: What can I do with leftover roasted Brussels sprouts?
A: Leftover Brussels sprouts are incredibly versatile! Chop them and add to breakfast omelets, frittatas, or scrambled eggs. Toss them with pasta, olive oil, and Parmesan for a quick dinner. Add to grain bowls, salads, or Buddha bowls for lunch. Make Brussels sprouts hash by sautéing with diced potatoes and onions. Blend into soup for added nutrition and flavor. Reheat and serve as a side dish throughout the week. They’re also delicious cold—eat straight from the fridge as a healthy snack, or add to sandwiches and wraps for extra vegetables and flavor.
Q: How do I prevent Brussels sprouts from rolling off my cutting board when trimming them?
A: This is a common frustration! The easiest method: cut a thin slice off the stem end first to create a flat base, then stand the Brussels sprout upright on this flat end and cut downward through the middle to halve it. The flat base prevents rolling and gives you stability for a clean, safe cut. For extra security, use a damp kitchen towel under your cutting board to prevent it from sliding. Always use a sharp knife—dull knives require more pressure and are more likely to slip, making the job more dangerous.
Q: Are Brussels sprouts healthy?
A: Extremely! Brussels sprouts are nutritional powerhouses packed with vitamins, minerals, and beneficial compounds. One cup provides over 100% of your daily vitamin C and K needs, plus significant amounts of folate, vitamin A, manganese, potassium, and fiber. They’re rich in antioxidants and contain compounds called glucosinolates that may have cancer-fighting properties. They’re naturally low in calories (about 38 calories per cup raw, 95 calories per cup roasted with olive oil), high in fiber (4g per cup), and contain plant-based protein. Brussels sprouts are also anti-inflammatory and support digestive health, making them an excellent addition to any healthy diet.
Conclusion
And there you have it—your complete guide to making the most incredible Garlic Herb Roasted Brussels Sprouts that will convert even the most dedicated Brussels sprouts skeptics into enthusiastic fans! This recipe proves that vegetables can be absolutely crave-worthy when prepared with the right technique. High-heat roasting transforms humble Brussels sprouts from bitter, mushy cafeteria vegetables into crispy, caramelized, addictively delicious side dishes that people actually fight over at the dinner table.
The magic lies in the simplicity—just five basic ingredients (Brussels sprouts, olive oil, garlic, herbs, and salt) and a straightforward roasting method create something truly special. Those crispy, almost chip-like outer leaves, the tender, sweet centers, and the aromatic garlic-herb coating come together in perfect harmony. Every bite delivers satisfying crunch followed by creamy tenderness, with layers of flavor that keep you reaching for more.
What I love most about this recipe is its incredible versatility. These Brussels sprouts work for absolutely any occasion—elegant enough for Thanksgiving dinner and Christmas feasts, yet simple enough for Tuesday night meals. They pair beautifully with any protein you can imagine, fit virtually every dietary preference, and they’re packed with nutrition so you can feel good about eating (and serving) them. Plus, they’re budget-friendly and available year-round, making them a practical addition to your regular rotation.
Remember, the keys to Brussels sprouts success are simple: start with fresh, firm sprouts; pat them completely dry; use high heat (425°F); give them space on the pan; place cut-sides down for maximum caramelization; and don’t be afraid of those dark, crispy edges—they’re the best part! Follow these fundamental principles, and you’ll achieve restaurant-quality results every single time.
Now it’s time to give Brussels sprouts the redemption they deserve in your kitchen! Preheat that oven, grab a pound or two of fresh Brussels sprouts, and prepare to be amazed at how delicious vegetables can be when roasted to crispy, caramelized perfection. Whether you’re a longtime Brussels sprouts fan or someone who’s been avoiding them since childhood, this recipe will change your perspective forever.
I’d absolutely love to hear about your garlic herb roasted Brussels sprouts experience! Drop a comment below and share your results—did they convert any Brussels sprouts haters in your household? What variations did you try? Did you add bacon, balsamic, or Parmesan? And if you’re as obsessed with these crispy, caramelized vegetables as I am, please pin this recipe to your favorite Pinterest boards so you can find it easily for your next meal. Share it with friends and family who need to discover how incredible Brussels sprouts can be when properly prepared!
Happy cooking, friends! May your Brussels sprouts always be crispy on the outside, tender on the inside, and disappear from the serving platter faster than you can say “can we make these again tomorrow?” Here’s to vegetables that taste so good, you’ll forget they’re healthy!