
If you’re searching for a chicken dinner that’s bursting with flavor, incredibly simple to make, and looks like it came straight from a fancy bistro, then this garlic herb butter chicken is about to become your new weeknight hero. Imagine tender, juicy chicken breasts (or thighs!) bathed in a luscious butter sauce infused with aromatic garlic and fresh herbs. Each bite delivers rich, savory flavors with that irresistible garlicky goodness that makes everyone come back for seconds.
What makes this garlic herb butter chicken so incredibly popular is its perfect balance of elegance and ease. It’s fancy enough to serve to dinner guests when you want to impress, yet simple enough to throw together on a busy Tuesday night when you need dinner on the table fast. The best part? It all comes together in one skillet in less than 30 minutes, which means minimal cleanup and maximum flavor.
Serve this gorgeous dish any night of the week as your main course, pair it with your favorite sides for Sunday family dinner, or make it the star of your next dinner party. It’s versatile, crowd-pleasing, and guaranteed to have everyone asking for the recipe. Trust me—once you master this garlic herb butter chicken, you’ll be making it on repeat!
History / Background
While garlic herb butter chicken doesn’t have ancient roots like some traditional dishes, it’s a beautiful example of French cooking techniques meeting American home cooking practicality. The concept of cooking proteins in butter sauces comes from classic French cuisine, where “beurre blanc” (white butter sauce) and compound butters have been cornerstones of fine dining for centuries.
In French culinary tradition, butter has always been considered liquid gold. French chefs perfected the art of using butter not just as a cooking fat, but as a sauce base that adds richness, glossiness, and depth to dishes. The technique of basting meat in butter while it cooks—a method called “arroser”—ensures moisture retention and develops incredible flavor. This is exactly what we’re doing with our garlic herb butter chicken.
Garlic and herbs have been flavor companions to poultry across Mediterranean and European cuisines for thousands of years. Ancient Romans used butter, garlic, and herbs like thyme and rosemary to enhance their meals, though they often favored olive oil in warmer climates. The combination became especially popular in Northern France, where butter was more abundant than olive oil.
The modern American version of garlic herb butter chicken emerged in the 1980s and 1990s as home cooks began embracing restaurant-style cooking at home. Food magazines and early cooking shows popularized the idea that you didn’t need complicated techniques or hard-to-find ingredients to create restaurant-quality meals. This dish embodies that philosophy perfectly—it uses pantry staples and a simple pan-sauce technique to create something truly spectacular.
Today, garlic herb butter chicken represents the perfect marriage of French technique and American practicality. It’s become a staple in home kitchens across the country because it delivers big flavor with minimal effort, proving that the best recipes don’t always need to be complicated. The beauty of butter, the punch of fresh garlic, and the aromatic lift from herbs create a timeless combination that never goes out of style.
Why You’ll Love This Recipe
This garlic herb butter chicken is about to revolutionize your weeknight dinner routine, and here’s exactly why you’ll fall head over heels for it: it tastes like you spent hours in the kitchen but actually takes less time than ordering takeout. The rich, buttery sauce with chunks of golden garlic and fragrant herbs makes even the pickiest eaters clean their plates, and the one-pan preparation means you’re not stuck doing dishes all evening.
Here’s what makes this recipe absolutely unbeatable:
- Ready in 30 minutes or less – From fridge to table faster than you can say “what’s for dinner,” making it perfect for busy weeknights
- One-pan wonder – Everything cooks in a single skillet, which means easy cleanup and less time doing dishes
- Budget-friendly – Uses affordable chicken breasts or thighs and basic pantry ingredients that won’t break the bank
- Naturally low-carb and keto-friendly – Perfect for those following low-carb diets without sacrificing flavor or satisfaction
- Impressive presentation – Looks and tastes restaurant-quality, making it ideal for both family dinners and entertaining guests
- Incredibly versatile – Works beautifully with chicken breasts, thighs, or even pork chops; easily customized with your favorite herbs
- Kid-approved flavor – The buttery garlic sauce is universally loved, even by picky eaters who usually turn their noses up at dinner
- Foolproof technique – Even beginner cooks can nail this recipe on the first try with just basic cooking skills
- Healthy protein-packed meal – Delivers lean protein without heavy, calorie-laden sauces or breading
- Meal prep friendly – Makes great leftovers and can be prepped ahead for stress-free weeknight meals
Ingredient Notes
Let’s break down what goes into this flavor-packed dish and why each ingredient plays an important role:
Chicken Breasts or Thighs – I recommend using boneless, skinless chicken breasts for their lean protein and quick cooking time, but boneless, skinless chicken thighs work beautifully too and stay extra moist. For the best results, choose breasts that are similar in size and thickness so they cook evenly. If your breasts are very thick (over 1 inch), butterfly or pound them to an even thickness. Thighs are more forgiving and harder to overcook, making them great for nervous cooks.
Butter – This is the star of the sauce, so quality matters. Use real, unsalted butter (not margarine) so you can control the salt level. European-style butter with higher fat content creates an even richer sauce. The butter serves as both the cooking fat and the base for your pan sauce, creating that luxurious, glossy finish that makes this dish restaurant-worthy.
Fresh Garlic – Absolutely essential and non-negotiable! You’ll need 6-8 cloves, minced or thinly sliced. Fresh garlic provides aromatic depth and that signature flavor we’re after. The garlic softens and mellows in the butter, becoming sweet and nutty rather than harsh. Please don’t substitute garlic powder here—fresh is absolutely necessary for the authentic flavor and texture.
Fresh Herbs – A combination of fresh thyme, rosemary, and parsley creates the most complex, aromatic flavor profile. Fresh herbs release their oils when cooked in butter, infusing the entire dish with fragrance. Thyme and rosemary provide earthy, savory notes, while parsley adds brightness and color. You can use all of one herb if that’s what you have, but the combination is magical. In a pinch, dried herbs work (use one-third the amount), but fresh really makes a difference.
Chicken Broth or White Wine – Just a splash deglazes the pan, picking up all those flavorful brown bits (called fond) stuck to the bottom and incorporating them into your sauce. Chicken broth is the safe, family-friendly option, while white wine adds sophisticated acidity and depth. Either works beautifully.
Lemon Juice – Fresh lemon juice brightens the rich butter sauce and cuts through the fat, providing balance. It adds a fresh, zingy note that keeps the dish from feeling heavy. Always use fresh-squeezed lemon juice rather than bottled for the best flavor.
Olive Oil – Used in combination with butter for searing the chicken. Olive oil has a higher smoke point than butter alone, preventing burning while still allowing the butter flavor to shine through. This combination gives you the best of both worlds.
Seasonings – Simple salt, black pepper, and optional paprika for color and a hint of smokiness. Some recipes add Italian seasoning or herbes de Provence, which work wonderfully too. Season generously—chicken needs proper seasoning to taste great.
Optional: Heavy Cream – Not traditional, but adding 2-3 tablespoons of heavy cream at the end creates an even lusher, more velvety sauce. This is optional but highly recommended for special occasions when you want to go all out.
Equipment Needed
Here’s what you’ll need to gather before you start cooking:
- Large heavy-bottomed skillet or sauté pan (12-inch is ideal) – Cast iron, stainless steel, or hard-anodized aluminum all work great. Nonstick is fine but won’t develop as much fond for the sauce.
- Meat thermometer – Essential for checking doneness without cutting into the chicken and losing juices
- Tongs – For flipping chicken breasts without piercing them
- Chef’s knife and cutting board – For mincing garlic and chopping herbs
- Measuring cups and spoons – For accurate butter, broth, and lemon juice measurements
- Meat mallet or rolling pin (optional) – For pounding chicken to even thickness if needed
- Small bowl – For mixing seasonings if desired
- Wooden spoon or spatula – For stirring the sauce and scraping up the fond
- Serving platter – For presenting your beautiful finished dish

Garlic Herb Butter Chicken Recipe
- Total Time: 30 minutes
- Yield: 4 servings 1x
- Diet: Gluten Free
Description
This garlic herb butter chicken features tender, juicy chicken breasts cooked in a rich butter sauce loaded with fresh garlic and aromatic herbs. Restaurant-quality flavor in under 30 minutes!
Ingredients
For the Chicken:
- 4 boneless, skinless chicken breasts (about 6-8 oz each)
- 1 teaspoon salt
- ½ teaspoon black pepper
- ½ teaspoon paprika (optional, for color)
- 1 tablespoon olive oil
- 2 tablespoons butter
For the Garlic Herb Butter Sauce:
- 4 tablespoons (½ stick) unsalted butter
- 6-8 cloves garlic, minced or thinly sliced
- 2 tablespoons fresh thyme leaves (or 2 teaspoons dried)
- 1 tablespoon fresh rosemary, finely chopped (or 1 teaspoon dried)
- ¼ cup chicken broth or dry white wine
- 2 tablespoons fresh lemon juice
- ¼ cup fresh parsley, chopped
- Salt and pepper to taste
- 2-3 tablespoons heavy cream (optional, for extra richness)
Instructions
Step 1: Prepare the Chicken
Pat the chicken breasts completely dry with paper towels—this is crucial for getting a good sear. If your chicken breasts are very thick (over 1 inch), place them between plastic wrap and pound them with a meat mallet to an even ¾-inch thickness. This ensures even cooking. Season both sides generously with salt, pepper, and paprika if using.
Step 2: Sear the Chicken
Heat a large skillet over medium-high heat. Add the olive oil and 2 tablespoons of butter, swirling to coat the pan. Once the butter is melted and the foam subsides, add the chicken breasts carefully. Don’t move them! Let them sear undisturbed for 5-6 minutes until a golden-brown crust forms on the bottom. Flip the chicken using tongs and cook for another 5-6 minutes on the second side.
Step 3: Check for Doneness
Insert a meat thermometer into the thickest part of the chicken. It should read 165°F (74°C). If it’s not quite there, reduce heat to medium and cook for another 1-2 minutes. Once done, transfer the chicken to a plate and tent loosely with foil to keep warm. Don’t worry if the pan looks dark—those brown bits are pure flavor!
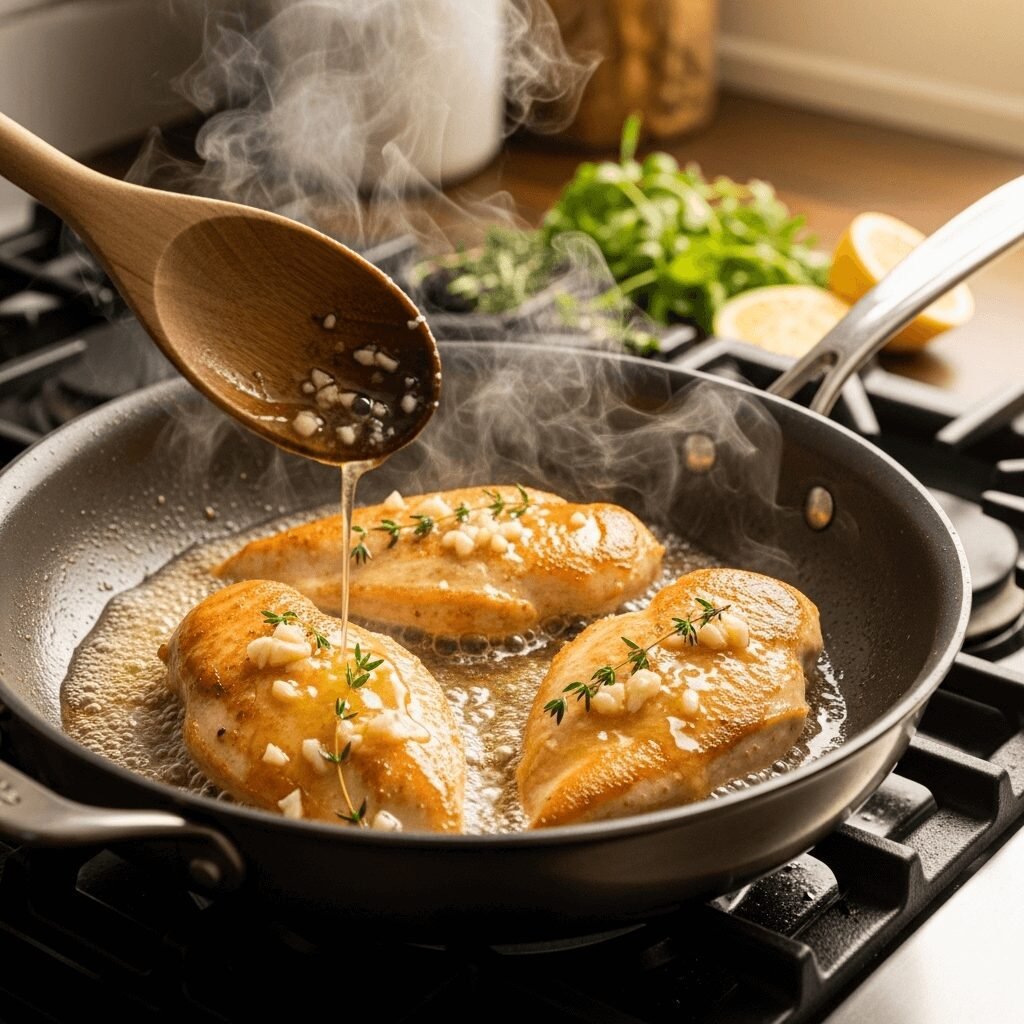
Step 4: Make the Garlic Herb Butter Sauce
Reduce heat to medium-low. Add the remaining 4 tablespoons of butter to the same skillet. Once melted, add the minced garlic, thyme, and rosemary. Cook for 1-2 minutes, stirring constantly, until the garlic is fragrant and just beginning to turn golden. Be careful not to burn the garlic—it will turn bitter.
Step 5: Deglaze the Pan
Pour in the chicken broth or white wine, scraping up all those beautiful brown bits stuck to the bottom of the pan with a wooden spoon. This is called deglazing, and it adds incredible depth to your sauce. Let the liquid simmer for 1-2 minutes to reduce slightly.
Step 6: Finish the Sauce
Stir in the lemon juice and half the chopped parsley. Taste the sauce and adjust seasoning with salt and pepper as needed. If using heavy cream, stir it in now for extra richness. The sauce should be glossy and fragrant, with visible bits of garlic and herbs throughout.
Step 7: Combine and Serve
Return the chicken breasts to the skillet, spooning the garlic herb butter sauce generously over the top. Let the chicken warm in the sauce for 1-2 minutes, basting it with the butter. Transfer to a serving platter or individual plates, pouring the remaining sauce over the chicken. Garnish with the remaining fresh parsley and serve immediately while hot.
Notes
- Even thickness is key: If your chicken breasts vary significantly in size, the thinner ones will overcook while the thicker ones finish cooking. Take time to pound them to even thickness.
- Don’t skip the resting: Letting the chicken rest for 2-3 minutes before serving allows the juices to redistribute, keeping the meat moist and tender.
- Pan temperature matters: If your heat is too high, the butter and garlic will burn. Medium to medium-low is perfect once you start making the sauce.
- Make it creamier: For an even more decadent sauce, add ¼ cup heavy cream or 2 tablespoons cream cheese.
- Wine substitution: If you don’t have white wine, use extra chicken broth plus an additional teaspoon of lemon juice for brightness.
- Herb flexibility: Use whatever fresh herbs you have on hand—basil, oregano, and sage all work beautifully in this dish.
- Prep Time: 10 minutes
- Cook Time: 20 minutes
- Category: Dinner
- Method: Stovetop
- Cuisine: French-American
Nutrition
- Serving Size: 1 chicken breast with sauce
- Calories: 380
- Sugar: 1g
- Sodium: 720mg
- Fat: 24g
- Saturated Fat: 13g
- Unsaturated Fat: 9g
- Trans Fat: 0g
- Carbohydrates: 3g
- Fiber: 0g
- Protein: 38g
- Cholesterol: 145mg
Nutrition information is calculated based on the ingredients and provided as a courtesy. Values may vary based on specific brands and preparation methods.
Tips & Variations
Spicy Garlic Butter Chicken: Add ½ teaspoon red pepper flakes or a diced jalapeño to the garlic butter for a spicy kick that heat lovers will adore.
Creamy Tuscan Version: Add ½ cup heavy cream, ¼ cup sun-dried tomatoes, and 2 cups fresh spinach to the sauce for a Tuscan-inspired variation that’s absolutely incredible.
Lemon Pepper Style: Double the lemon juice and add extra cracked black pepper for a bright, zesty version that’s perfect for summer.
Mediterranean Twist: Use oregano and basil instead of thyme and rosemary, add Kalamata olives and a sprinkle of feta cheese at the end.
Mushroom Addition: Sauté 8 oz sliced mushrooms after cooking the chicken, then proceed with the sauce recipe. The mushrooms add earthy depth and make the dish more substantial.
Chicken Thighs Option: Substitute bone-in, skin-on chicken thighs for even more flavor and moisture. Increase cooking time to 8-10 minutes per side.
Dairy-Free Version: Use ghee or olive oil instead of butter, and skip the optional cream. It won’t be quite as rich, but it’s still delicious.
Whole30 Compliant: Use ghee instead of butter and ensure your broth contains no added sugar or non-compliant ingredients.
Pro Chef Tips
Dry chicken is golden chicken: Professional chefs know that moisture is the enemy of a good sear. Pat your chicken completely dry with paper towels, then let it sit at room temperature for 10-15 minutes before cooking. This removes surface moisture and takes the chill off, promoting even cooking.
The basting technique: Once you return the chicken to the sauce, tilt the pan slightly and use a spoon to continuously baste the chicken with the butter sauce for 30-60 seconds. This restaurant technique ensures every bite is coated with flavor and keeps the chicken moist.
Control your garlic: Garlic goes from perfectly golden to burnt and bitter in seconds. Once you add it to the butter, stay at the stove and stir constantly. If it starts browning too quickly, pull the pan off the heat briefly to control the temperature.
Build layers of flavor: Season the chicken well before cooking, taste the sauce before finishing, and don’t be shy about adjusting seasoning at the end. Professional cooking is all about tasting and adjusting throughout the process.
The fond is liquid gold: Those brown bits stuck to the pan aren’t burnt food—they’re concentrated flavor. Make sure to scrape them up thoroughly when deglazing. This is where much of your sauce’s depth comes from.
Butter temperature matters: When making the sauce, let the butter melt gently over medium-low heat rather than high heat. This prevents the milk solids from burning and keeps your sauce silky rather than separated.
Rest before slicing: If you’re planning to slice the chicken for presentation, let it rest for 3-5 minutes first. Cutting immediately causes all the juices to run out onto your cutting board instead of staying in the meat.
Fresh herbs at the finish: While you cook herbs in the butter for flavor, adding a handful of fresh herbs right at the end provides a bright, fresh pop that makes the dish taste alive and vibrant.
Common Mistakes to Avoid
Overcooking the chicken: This is the most common mistake, resulting in dry, tough meat. Use a meat thermometer and pull the chicken at exactly 165°F. Carryover cooking will bring it up a couple more degrees as it rests. Overcooked chicken can’t be fixed, so err on the side of caution.
Burning the garlic: Garlic burns quickly and turns bitter when exposed to high heat. Always add garlic to butter over medium-low heat and stir constantly. If you see it starting to brown too fast, remove the pan from heat immediately. Burnt garlic will ruin your entire sauce.
Using wet chicken: If you put wet chicken in the pan, it will steam instead of sear, resulting in gray, rubbery chicken without that beautiful golden crust. Always pat completely dry and let it sit at room temperature briefly before cooking.
Crowding the pan: If your skillet isn’t large enough to fit all four chicken breasts with space between them, cook in batches. Crowded chicken steams instead of searing. Better to cook two at a time and keep them warm in a low oven than to crowd them all in at once.
Skipping the deglazing step: Don’t skip adding the liquid and scraping up the fond! This step is crucial for building flavor in your sauce. Without deglazing, you leave behind all those delicious brown bits and your sauce will taste flat.
Not tasting as you go: The biggest mistake home cooks make is not tasting their food before serving. Taste the sauce and adjust the salt, acid (lemon), or butter to get it just right. Every ingredient varies in intensity, so seasoning by feel rather than measurement is key.
Storage & Meal Prep
Refrigerator Storage: Transfer cooled chicken and sauce to an airtight container and refrigerate for up to 4 days. Store the chicken and sauce together so the chicken stays moist and continues absorbing flavor. The butter sauce will solidify when cold, which is completely normal.
Reheating Instructions: The best method is to reheat gently on the stovetop over low heat. Place the chicken and sauce in a skillet, add a tablespoon or two of chicken broth or water, cover, and heat for 5-7 minutes until warmed through. The liquid helps re-emulsify the butter sauce. You can also microwave individual portions in 30-second intervals, but the stovetop method preserves texture better.
Reheating Without Drying Out: Add a splash of liquid (broth, wine, or even water) when reheating to prevent the chicken from drying out. Cover the pan or container to trap moisture. Never reheat on high heat—low and slow is the way to go.
Meal Prep Tips: This recipe is excellent for meal prep! Cook the chicken on Sunday and portion it into containers with your choice of sides. The flavors actually develop and deepen after a day in the refrigerator. When you’re ready to eat, simply reheat and enjoy.
Texture After Storage: The chicken will remain tender if stored properly and not overcooked initially. The sauce will thicken as it cools, becoming more of a coating than a pourable sauce. This is normal and it will loosen up again when reheated with a bit of liquid.
Make-Ahead & Freezer Notes
Make-Ahead Option: You can season the chicken breasts up to 24 hours in advance and keep them covered in the refrigerator. This actually helps the seasoning penetrate the meat. Bring to room temperature for 15 minutes before cooking for best results. The sauce really should be made fresh as butter sauces don’t hold well, but you can have all your ingredients prepped and ready to go.
Partial Prep Strategy: Measure out all your ingredients, mince the garlic, chop the herbs, and store everything in small containers in the fridge. When you’re ready to cook, dinner will come together in literally 20 minutes. This is my favorite approach for busy weeknights.
Freezing Cooked Chicken: The cooked chicken freezes reasonably well, though butter sauces tend to separate upon thawing. Freeze the chicken and sauce together in an airtight, freezer-safe container for up to 3 months. To maintain quality, wrap tightly in plastic wrap, then again in foil before placing in a freezer bag.
Thawing and Reheating from Frozen: Thaw overnight in the refrigerator for best results. Reheat gently on the stovetop over low heat, whisking the sauce to re-emulsify the butter. Add a splash of fresh broth and a knob of fresh butter to help bring the sauce back together. You may need to add fresh herbs at the end to brighten the flavors.
Best Practices: Honestly, this dish is so quick to make that I rarely freeze it. The fresh-made version is so superior that the 30 minutes of active cooking time is worth it. However, if you have leftovers you won’t eat within 4 days, freezing is a good option to prevent waste.
Freezing Raw Chicken: You can freeze the seasoned raw chicken breasts in a marinade bag with the olive oil and seasonings for up to 3 months. Thaw in the refrigerator overnight, then proceed with the recipe as written. This is a great meal-prep strategy.
Serving Suggestions
This garlic herb butter chicken pairs beautifully with so many sides that you’ll never run out of dinner combinations:
Starches: Serve over creamy mashed potatoes, buttered egg noodles, fluffy white rice, or garlic parmesan pasta. The rich sauce begs for something to soak it up! Cauliflower mash is a fantastic low-carb option that works wonderfully.
Vegetables: Roasted asparagus, green beans almondine, honey-glazed carrots, roasted Brussels sprouts, or sautéed spinach all complement the rich chicken perfectly. The vegetables provide freshness and color contrast.
Salads: A simple Caesar salad, mixed green salad with balsamic vinaigrette, or an arugula salad with lemon dressing cuts through the richness and adds crunch and brightness to the plate.
Bread: Crusty French bread, garlic bread, dinner rolls, or focaccia are essential for sopping up every last drop of that incredible garlic herb butter sauce. No sauce should be left behind!
Low-Carb Sides: Zucchini noodles, cauliflower rice, roasted broccoli, or sautéed zucchini keep the meal keto-friendly while still being satisfying.
Wine Pairings: A crisp Chardonnay, Sauvignon Blanc, or Pinot Grigio pairs beautifully with the buttery, garlicky flavors. If you prefer red, go for a light Pinot Noir that won’t overpower the delicate chicken.
Complete Meal Ideas: Try serving with mashed potatoes and roasted green beans for a classic comfort dinner, or with cauliflower rice and sautéed spinach for a lighter, low-carb option. For entertaining, serve with wild rice pilaf and roasted asparagus for an elegant presentation.
FAQs Section
Q: Can I use chicken thighs instead of breasts?
A: Absolutely! Boneless, skinless chicken thighs work beautifully and are actually more forgiving because they’re harder to overcook. They’re also more flavorful due to their higher fat content. Cook them for about the same amount of time, checking that they reach 165°F internal temperature. Bone-in, skin-on thighs also work but will need 8-10 minutes per side.
Q: My butter sauce looks separated or greasy. What went wrong?
A: Butter sauces can “break” (separate) if they get too hot or if there’s not enough liquid to emulsify them properly. To fix it, remove from heat and whisk in a tablespoon of cold butter or a splash of cold cream. If making the sauce again, keep the heat at medium-low and make sure to add the liquid (broth or wine) to help emulsify. Constant gentle stirring also helps keep everything combined.
Q: Can I make this dairy-free?
A: Yes! Substitute the butter with ghee (clarified butter, which is technically dairy-free for most people) or use olive oil. The flavor profile changes—it becomes more Mediterranean than French—but it’s still delicious. You’ll lose some of that rich, buttery flavor, but the garlic and herbs still shine through beautifully.
Q: How do I know when the chicken is done without a thermometer?
A: While a thermometer is always best, you can check by making a small cut in the thickest part of the breast. The meat should be opaque white throughout with no pink, and the juices should run clear, not pink. Press the chicken with your finger—it should feel firm but still give slightly, not hard or mushy. That said, I highly recommend investing in an instant-read thermometer for consistent results.
Q: Can I use dried herbs instead of fresh?
A: Yes, but use about one-third the amount called for, as dried herbs are more concentrated. So instead of 2 tablespoons fresh thyme, use 2 teaspoons dried. Add dried herbs earlier in the cooking process to give them time to rehydrate and release their flavors. Fresh herbs still provide better flavor and visual appeal, but dried herbs work in a pinch.
Q: The garlic is burning before my chicken is done. What should I do?
A: This means your heat is too high or you’ve added the garlic too early. Make the garlic butter sauce after you’ve removed the fully cooked chicken from the pan. Never cook garlic over high heat—it burns quickly and becomes bitter. If you notice it starting to brown too much, immediately remove the pan from heat and add your liquid (broth or wine) to stop the cooking.
Q: Can I use pre-minced garlic from a jar?
A: While I always recommend fresh garlic for best flavor and texture, jarred minced garlic can work in a pinch. Use about half the amount called for, as jarred garlic has a sharper, less nuanced flavor. The texture won’t be quite as nice (no tender golden bits of garlic), but the dish will still be tasty. Fresh garlic really does make a noticeable difference though!
Q: What’s the best way to reheat this without making the chicken rubbery?
A: Reheat gently over low heat on the stovetop, adding a couple tablespoons of chicken broth or water to the pan. Cover and heat for 5-7 minutes until warmed through. The key is low and slow—high heat will make the chicken tough and rubbery. Never microwave on high power; use 50% power in short intervals instead, checking frequently.
Conclusion
And there you have it—everything you need to know to make the most incredible garlic herb butter chicken right in your own kitchen! This recipe has saved my weeknight dinners countless times, and I absolutely love how something so simple can taste so absolutely restaurant-worthy. The combination of tender chicken, aromatic garlic, fresh herbs, and that luscious butter sauce is pure magic on a plate.
Whether you’re cooking for your family on a busy Tuesday night, meal prepping for the week ahead, or entertaining guests for a special dinner, this garlic herb butter chicken is guaranteed to impress. The best part? You’ll look like a culinary genius while secretly knowing just how easy it was to pull off!
I’d absolutely love to hear how your garlic herb butter chicken turns out! Did you add any special touches or variations? What sides did you serve it with? Drop a comment below and share your experience. And if this recipe becomes a hit in your household (which I’m confident it will), please pin it to your favorite Pinterest boards so you can find it again and again. Your fellow home cooks will thank you for sharing!
Now grab that skillet and get cooking—dinner is about to get a whole lot more delicious! Happy cooking, friends!

