
Get ready to discover the secret to the most incredible baked chicken wings you’ve ever made—crispy on the outside, juicy on the inside, and absolutely drenched in the most heavenly garlic butter sauce. These Garlic Butter Baked Chicken Wings are about to change your game day forever, and the best part? They’re baked, not fried, which means less mess, less oil, and way more flavor packed into every single bite.
These wings hit that perfect sweet spot between restaurant-quality and actually doable on a weeknight. The secret is a simple technique that renders the skin incredibly crispy without deep frying, then tossing those golden beauties in a luscious garlic butter sauce that’s so good you’ll want to drink it with a straw (please don’t, but I understand the temptation). Whether you’re hosting a Super Bowl party, looking for the perfect appetizer for your next gathering, or just want to treat yourself to something ridiculously delicious, these wings deliver every single time.
The beauty of this recipe is its versatility. Serve them as an appetizer that’ll have everyone fighting over the last piece, make them the star of your game day spread, or pair them with some fries and coleslaw for a complete meal that rivals any sports bar. They’re finger-licking good in the best possible way, and unlike their deep-fried cousins, you won’t feel weighed down after eating them. Plus, your kitchen won’t smell like a fast-food joint for three days—always a bonus!
History / Background
While chicken wings have been enjoyed around the world for centuries, the American-style chicken wing as we know it today was born in Buffalo, New York, in 1964 at the Anchor Bar. The story goes that Teressa Bellissimo was faced with a late-night snack emergency when her son and his friends showed up hungry. She took chicken wings (which were typically used for stock), deep-fried them, tossed them in hot sauce and butter, and served them with celery and blue cheese dressing. Thus, the Buffalo wing was born, and American food culture was forever changed.
Since that fateful night, chicken wings have evolved from bar food afterthought to a culinary phenomenon worth billions of dollars. Americans consume approximately 1.42 billion chicken wings during Super Bowl weekend alone—that’s enough wings to circle the Earth three times if you laid them end to end! The wing craze has spawned countless variations, from traditional Buffalo style to honey BBQ, teriyaki, Korean-style gochujang, lemon pepper, and of course, the beloved garlic butter version.
Garlic butter wings likely emerged as restaurants and home cooks began experimenting beyond the classic Buffalo sauce. Italian-American cuisine’s influence brought the love of garlic and butter to the wings game, creating a less spicy but equally addictive alternative. The garlic butter combination is pure magic—the rich, creamy butter carries the aromatic garlic flavor while creating that irresistible glossy coating on the crispy skin.
The shift toward baked wings rather than fried is a more recent phenomenon, driven by both health-conscious eating and the simple fact that baking is way more practical for home cooks. Deep frying requires special equipment, gallons of oil, careful temperature monitoring, and creates a huge mess. Baking wings at a high temperature, especially with the right technique, can achieve that same crispy exterior without all the hassle. It’s a win-win that’s made wings accessible to everyone, not just those with deep fryers.
Why You’ll Love This Recipe
These Garlic Butter Baked Chicken Wings are about to become your new obsession, and once you taste them, you’ll understand why. They combine the best of everything: crispy texture, incredible flavor, and surprising ease of preparation. You get all the satisfaction of restaurant-style wings without leaving your house or breaking the bank.
Here’s why these wings are absolutely irresistible:
- Incredibly crispy without frying – The baking powder technique creates shatteringly crisp skin that rivals any deep-fried wing
- Ridiculously flavorful – Fresh garlic, butter, herbs, and Parmesan create a flavor bomb that’s addictively delicious
- Easy and foolproof – No special equipment needed, and the recipe is straightforward enough for beginner cooks
- Healthier than fried wings – Baked wings have significantly less oil but don’t sacrifice any of that crispy, crunchy texture
- Perfect for parties – Easily scalable for crowds, and they stay crispy even when sitting out
- Budget-friendly – Chicken wings are relatively inexpensive, making this a cost-effective way to feed a crowd
- Customizable – The base recipe is amazing, but you can easily adjust the flavors to your preference
- Gluten-free and keto-friendly – This recipe naturally fits multiple dietary preferences
- Less messy than frying – Your kitchen stays clean, and you’re not dealing with disposing of gallons of used oil
- Great for meal prep – Make a big batch and reheat throughout the week for quick protein-packed snacks
- Kid-approved – Even picky eaters love these wings—they’re not too spicy and the garlic butter is universally appealing
- Restaurant-quality at home – Save money by making wings that taste better than takeout
Ingredient Notes
Let’s break down what makes these wings so special, ingredient by ingredient. Understanding your components helps you make smart choices and nail this recipe every time.
Chicken wings: You can buy whole wings and cut them yourself into drumettes and flats (removing the tips for stock), or save time by buying them pre-cut. Look for wings that aren’t overly large—medium-sized wings cook more evenly and get crispier. Fresh or frozen works fine, but if using frozen, make absolutely sure they’re fully thawed and completely dried before baking.
Baking powder (NOT baking soda): This is the secret weapon for crispy wings. Baking powder raises the pH of the chicken skin, allowing it to break down and crisp up more efficiently. It also helps draw moisture to the surface where it evaporates quickly in the oven. Make sure you’re using aluminum-free baking powder and definitely NOT baking soda—they’re different, and baking soda will make your wings taste metallic and weird.
Salt: Essential for seasoning and also helps dry out the skin. Kosher salt or sea salt works best because the larger crystals help season evenly. The salt also draws moisture out of the skin, which contributes to that crispy texture.
Butter: Use real butter, not margarine. Salted or unsalted both work—if using salted, you may want to reduce the added salt slightly. The butter creates that rich, luxurious coating and carries all the garlic flavor beautifully.
Garlic: Fresh minced garlic is absolutely essential here—don’t even think about using garlic powder or jarred minced garlic. You want that fresh, pungent, aromatic quality. Plan on using 5-7 cloves depending on their size and how much you love garlic (more is always better in my opinion).
Fresh herbs: Parsley is traditional and adds a fresh, bright note that balances the richness. You can also use fresh basil, cilantro, or a combination. Dried herbs won’t give you the same fresh flavor, so if you don’t have fresh, consider leaving them out rather than substituting dried.
Parmesan cheese: Freshly grated Parmesan adds a salty, nutty, umami depth to the garlic butter sauce. The shelf-stable pre-grated stuff won’t melt as nicely and has anti-caking agents that affect the texture. Grate it fresh for the best results.
Optional additions: Red pepper flakes add a nice kick if you like heat. Black pepper adds subtle warmth. Lemon juice or zest brightens everything up and cuts through the richness. A splash of hot sauce can bridge the gap between garlic butter and Buffalo styles.
Equipment Needed
The great news is you don’t need any fancy equipment to make perfect crispy wings at home. Here’s what you’ll need:
- Large baking sheet (or two) – A rimmed baking sheet (also called a half-sheet pan) is ideal. You’ll need enough space to arrange wings in a single layer without crowding
- Wire cooling rack – This is the game-changer for crispy wings. Elevating the wings allows air to circulate all around them, crisping every surface
- Large mixing bowl – For tossing wings with the baking powder mixture and later with the garlic butter sauce
- Small saucepan – For making the garlic butter sauce
- Paper towels – Crucial for drying the wings thoroughly before seasoning
- Tongs – For flipping wings halfway through cooking and tossing them in sauce
- Sharp knife and cutting board – For mincing garlic and chopping herbs
- Measuring spoons – For accurate seasoning
- Grater – If you’re grating fresh Parmesan cheese
- Aluminum foil or parchment paper (optional) – Makes cleanup easier if you line your baking sheet under the wire rack
Pro tip: If you don’t have a wire rack, you can still make crispy wings by arranging them directly on a baking sheet and flipping them halfway through cooking. They won’t be quite as crispy on all sides, but they’ll still be delicious.
Print
Garlic Butter Baked Chicken Wings Recipe
- Total Time: 1 hour
- Yield: 4 servings (about 24 wing pieces) 1x
- Diet: Gluten Free
Description
These Crispy Garlic Butter Baked Chicken Wings are the perfect combination of shatteringly crispy skin and tender, juicy meat, all tossed in a luxurious garlic butter sauce with fresh herbs and Parmesan. Baked instead of fried, they’re healthier but just as addictively delicious. Perfect for game day, parties, or any time you’re craving restaurant-quality wings at home!
Ingredients
For the Wings:
- 3 pounds chicken wings (about 24 pieces), separated into drumettes and flats, tips removed
- 1½ tablespoons aluminum-free baking powder
- 1 teaspoon kosher salt
- ½ teaspoon black pepper
- ½ teaspoon garlic powder
- ¼ teaspoon paprika (optional, for color)
For the Garlic Butter Sauce:
- 6 tablespoons unsalted butter
- 6-7 cloves garlic, minced (about 2 tablespoons)
- ¼ cup fresh parsley, finely chopped
- ⅓ cup freshly grated Parmesan cheese
- ½ teaspoon salt (or to taste)
- ¼ teaspoon red pepper flakes (optional)
- 1 tablespoon fresh lemon juice (optional)
- Extra Parmesan and parsley for garnish
Instructions
- Prep and dry the wings: Pat the chicken wings completely dry with paper towels. This is crucial—any moisture will prevent crispy skin. Place them in a large bowl. If you have time, you can even let them air-dry uncovered in the refrigerator for 1-2 hours or overnight for extra crispy results.
- Season the wings: In a small bowl, mix together the baking powder, salt, black pepper, garlic powder, and paprika. Sprinkle this mixture over the wings and toss thoroughly until every wing is evenly coated. Don’t skip the baking powder—it’s the secret to crispy skin!
- Prepare for baking: Preheat your oven to 425°F (220°C). Line a large baking sheet with aluminum foil for easy cleanup, then place a wire cooling rack on top. Arrange the wings on the rack in a single layer, making sure they’re not touching. Space between wings is important for air circulation and crispiness.
- First bake: Bake the wings for 25 minutes on the middle rack. Don’t open the oven door during this time.
- Flip and continue baking: After 25 minutes, use tongs to flip each wing over. Return to the oven and bake for an additional 20-25 minutes, until the wings are deeply golden brown and crispy. The internal temperature should reach 165°F, and the skin should look dry and crispy.
- Make the garlic butter sauce: While the wings are finishing their final bake, melt the butter in a small saucepan over medium-low heat. Add the minced garlic and cook, stirring constantly, for 1-2 minutes until fragrant but not browned. Remove from heat and stir in the chopped parsley, Parmesan cheese, salt, red pepper flakes (if using), and lemon juice (if using). The cheese will melt into the butter, creating a thick, flavorful sauce.
- Toss and serve: Transfer the hot, crispy wings to a large clean bowl. Pour the garlic butter sauce over the wings and toss gently but thoroughly to coat every wing. Let them sit for 1-2 minutes so the sauce adheres to the crispy skin.
- Garnish and enjoy: Transfer to a serving platter, sprinkle with extra Parmesan cheese and fresh parsley, and serve immediately. These are best enjoyed hot and fresh!
Notes
- Baking powder vs. baking soda: Make absolutely sure you’re using baking POWDER, not baking soda. They’re not interchangeable, and baking soda will give your wings an unpleasant metallic taste.
- Don’t overcrowd: If your wings are touching on the rack, they’ll steam instead of crisp. Use two baking sheets if necessary.
- Temperature matters: An oven thermometer ensures your oven is actually at 425°F. Many ovens run hot or cold, which affects cooking time.
- Sauce variation: If you prefer saucier wings, double the garlic butter sauce recipe. Any leftovers are amazing drizzled over vegetables or bread!
- Spice level: Adjust the red pepper flakes to your preference. Add hot sauce for a Buffalo-garlic butter hybrid that’s incredible.
- Make them extra crispy: For maximum crispiness, turn on the broiler for the last 2-3 minutes of cooking, watching carefully to prevent burning.
- Prep Time: 15 minutes
- Cook Time: 45-50 minutes
- Category: Appetizer, Main Course, Game Day Food
- Method: Baking
- Cuisine: American
Nutrition
- Serving Size: 6 wing pieces (about ¾ pound)
- Calories: 485
- Sugar: 0g
- Sodium: 780mg
- Fat: 36g
- Saturated Fat: 15g
- Unsaturated Fat: 18g
- Carbohydrates: 1g
- Fiber: 0g
- Protein: 38g
- Cholesterol: 185mg
Nutrition information is an estimate and will vary based on specific brands and exact portion sizes. This calculation includes the skin-on wings and full garlic butter sauce.
Tips & Variations
One of the best things about this recipe is how versatile it is. Here are some delicious ways to customize these wings to fit your taste or dietary needs:
Flavor Variations:
- Lemon Pepper Wings: Add extra lemon zest and lots of cracked black pepper to the garlic butter
- Spicy Garlic Wings: Increase red pepper flakes and add a few dashes of hot sauce to the butter
- Herb Butter Wings: Mix in fresh rosemary, thyme, and sage along with the parsley
- Asian-Inspired: Swap the butter for sesame oil, add ginger and scallions, and toss with soy sauce
- Cajun Garlic Wings: Add Cajun seasoning to the baking powder mixture for a Southern kick
- Honey Garlic: Stir 2 tablespoons of honey into the garlic butter for a sweet and savory combination
Dietary Modifications:
- Dairy-free: Use ghee or olive oil instead of butter, and skip the Parmesan or use nutritional yeast
- Extra crispy: Add an extra ½ teaspoon of baking powder to the dry rub
- Lower sodium: Use unsalted butter and reduce the salt in both the rub and sauce
- Whole30: Skip the Parmesan and use clarified butter (ghee)
Sauce Alternatives:
- Dry rub style: Skip the garlic butter sauce entirely and increase the seasonings in the initial rub
- Buffalo-garlic hybrid: Mix equal parts garlic butter and Buffalo sauce for the best of both worlds
- BBQ garlic: Mix your favorite BBQ sauce with melted garlic butter
- Ranch butter: Add ranch seasoning mix to the garlic butter sauce
Cooking Method Variations:
- Air fryer: Cook at 400°F for 22-25 minutes, shaking the basket halfway through, then toss in sauce
- Grill finishing: Bake as directed, then finish on a hot grill for 2-3 minutes per side for char marks
- Smoked: Smoke wings at 250°F for 1.5 hours, then crisp under the broiler before saucing
Pro Chef Tips
Want to take your wings from great to absolutely legendary? Here are professional techniques that make all the difference:
1. Dry, dry, dry those wings: This cannot be overstated. Pat them dry multiple times with paper towels. Any moisture on the surface creates steam in the oven, which is the enemy of crispy skin. For even better results, leave uncovered in the refrigerator overnight—the cold, dry air works magic.
2. Don’t skip the baking powder: This is the secret that commercial kitchens have been using for years. The alkaline baking powder breaks down proteins in the chicken skin, allowing it to crisp up beautifully. It also helps render fat from under the skin, creating that perfect crunch.
3. High heat is your friend: 425°F is the sweet spot for crispy wings. Lower temperatures won’t crisp the skin properly, and higher temperatures risk burning before the interior cooks through. If you want extra crispiness at the end, a quick broil (30-60 seconds per side) works wonders.
4. Space them out: Overcrowding causes steaming. Each wing needs breathing room for hot air to circulate all around it. Use two baking sheets if necessary—it’s worth it.
5. Wire rack elevation: Lifting wings off the baking sheet on a rack allows heat and air to reach all sides simultaneously. This is what gives you that all-around crispy texture that you can’t achieve with wings sitting flat on a pan.
6. Don’t rush the garlic: When making the sauce, cook the garlic just until fragrant—about 60-90 seconds. Undercooked garlic tastes sharp and raw, while overcooked garlic turns bitter. That perfect golden moment when it smells incredible? That’s when you remove it from heat.
7. Sauce temperature matters: Toss your hot wings in warm (not cold) garlic butter sauce. The heat helps the sauce absorb into those crispy nooks and crannies. If the butter has cooled and solidified, gently rewarm it before tossing.
8. Let them rest briefly: After tossing in sauce, let the wings sit for 1-2 minutes before serving. This allows the sauce to set slightly and adhere better to the skin rather than pooling at the bottom of your serving dish.
9. Finish with fresh elements: Save some fresh parsley, a squeeze of lemon, or a sprinkle of Parmesan to add right before serving. These fresh elements bring brightness and visual appeal that makes your dish look restaurant-quality.
Common Mistakes to Avoid
Even straightforward recipes can go sideways. Here are the most common wing fails and how to avoid them:
1. Wings aren’t crispy enough: This usually comes down to moisture. Make sure wings are thoroughly dried before seasoning. Don’t overcrowd the pan—wings need space for air circulation. Ensure your oven is actually at 425°F (use an oven thermometer). And most importantly, don’t skip the baking powder in the initial rub—it’s not optional!
2. Using baking soda instead of baking powder: This is a recipe-ruining mistake. Baking soda is much more alkaline than baking powder and will give your wings a metallic, soapy taste. Always double-check you’re using baking POWDER before you start coating your wings.
3. Burning the garlic: Garlic goes from perfectly fragrant to burnt and bitter in seconds. Always cook garlic over medium-low heat while stirring constantly. The moment it starts turning golden and smells amazing, remove the pan from heat. Burnt garlic ruins the entire sauce, and there’s no fixing it—you have to start over.
4. Tossing wings in cold sauce: If your garlic butter has cooled and solidified while the wings finished cooking, it won’t coat them properly. Keep the sauce warm (gently reheat if needed) before tossing. The sauce should be liquid enough to coat every surface of every wing.
5. Not patting wings dry: I know I’ve mentioned this multiple times, but it’s the #1 mistake home cooks make. Moisture = steam = soggy skin. Take the extra two minutes to thoroughly dry every single wing with paper towels. Your crispy results will prove it was worth it.
6. Opening the oven too frequently: Every time you open the oven door, you lose heat and disrupt the cooking process. Resist the urge to check on them constantly. Flip them once at the halfway point, and otherwise leave them alone to work their magic.
Storage & Meal Prep
These wings are fantastic fresh but also store and reheat beautifully, making them great for meal prep or making ahead for parties.
Refrigerator Storage: Store leftover wings in an airtight container in the refrigerator for up to 4 days. For best results, store the wings separate from any extra sauce—this prevents them from getting soggy. You can store extra garlic butter sauce in a small container and reheat it separately when you’re ready to eat the wings.
Reheating Instructions:
- Oven method (best for maintaining crispiness): Preheat oven to 375°F. Arrange wings on a wire rack over a baking sheet. Bake for 10-15 minutes until heated through and the skin crisps back up. Toss with reheated sauce if desired.
- Air fryer method: Reheat at 375°F for 5-7 minutes, shaking the basket halfway through. This is the fastest way to restore crispiness.
- Microwave method (quick but less crispy): Place wings on a microwave-safe plate lined with paper towels. Microwave in 30-second intervals until heated through. The skin won’t be as crispy, but they’ll still taste great.
- Stovetop method: Heat a skillet over medium heat with a tiny bit of oil. Add wings and cook, turning occasionally, until heated through and skin re-crisps slightly.
Best Practices: Let wings cool completely before storing to prevent condensation, which creates sogginess. Separate layers of wings with parchment paper if stacking them in your container. Always reheat with dry heat methods (oven, air fryer) rather than steaming or boiling for best texture.
Make-Ahead & Freezer Notes
Planning ahead makes entertaining so much easier. Here’s how to prep these wings in advance:
Make-Ahead Options:
- Dry rub ahead: Season wings with the baking powder mixture up to 24 hours in advance. Store uncovered in the refrigerator—this actually improves crispiness as it dries out the skin even more.
- Sauce ahead: Make the garlic butter sauce up to 3 days ahead and store in an airtight container in the fridge. Gently reheat before tossing with freshly baked wings.
- Fully prepare ahead: Bake the wings completely, let cool, and refrigerate for up to 2 days. Reheat in a 375°F oven until hot and crispy (about 15 minutes), then toss with freshly made or reheated sauce.
Freezing Instructions:
- Raw wings: Season with the dry rub, arrange in a single layer on a baking sheet, and freeze until solid. Transfer to a freezer bag and freeze for up to 3 months. Bake from frozen, adding 5-10 minutes to the cooking time.
- Cooked wings (without sauce): Bake wings completely, let cool, then freeze in a single layer. Once frozen, transfer to freezer bags for up to 3 months. Reheat from frozen at 375°F for 20-25 minutes, then toss with fresh sauce.
- Fully sauced wings: These don’t freeze quite as well since the sauce can make them soggy when thawed. If you must freeze sauced wings, store for up to 1 month and expect slightly less crispy results when reheated.
Thawing and Reheating Frozen Wings: For best results, thaw frozen wings overnight in the refrigerator. Reheat using the oven method at 375°F for 15-20 minutes until hot and crispy. If reheating from frozen, increase time to 25-30 minutes.
Party Planning Tips: If you’re making wings for a party, bake them 1-2 hours ahead and keep them warm in a 200°F oven. Make the sauce right before guests arrive and toss the wings in it just before serving. This way, they’re hot, crispy, and perfectly sauced when people are ready to eat.
Serving Suggestions
These garlic butter wings are amazing on their own, but pairing them with the right sides and dips takes your spread to the next level:
Classic Dips:
- Ranch dressing (homemade or store-bought)
- Blue cheese dressing for those who love the traditional wing experience
- Garlic aioli for doubling down on that garlic flavor
- Honey mustard for a sweet and tangy contrast
- Extra garlic butter sauce for dipping (make a double batch!)
Perfect Side Dishes:
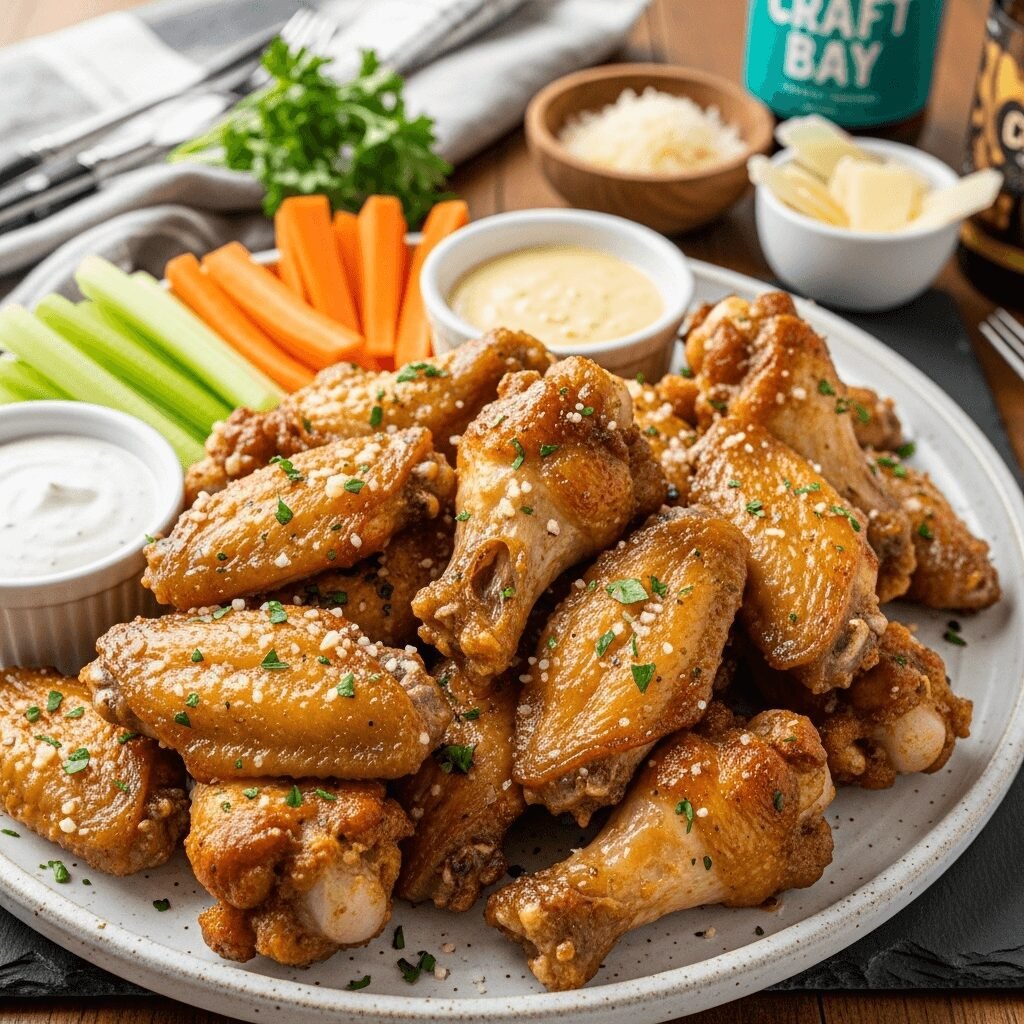
- Celery and carrot sticks – The classic wing accompaniment, offering a cool, crunchy contrast
- French fries or sweet potato fries – Because wings and fries are a match made in heaven
- Coleslaw – Creamy or vinegar-based, it cuts through the richness perfectly
- Mac and cheese – For the ultimate comfort food spread
- Corn on the cob – Grilled or roasted, with butter and seasoning
- Potato salad – Classic American picnic vibes
- Loaded potato skins – If you’re going all-in on the indulgent appetizer spread
- Caesar salad – The garlic in the dressing complements the wings beautifully
Complete Game Day Spread: Build the ultimate game day menu by serving these wings alongside:
- Spinach artichoke dip with tortilla chips
- Buffalo chicken dip (yes, wings AND dip!)
- Loaded nachos
- Mozzarella sticks
- Pizza rolls or bites
- A big tray of fresh vegetables and dip for balance
Beverages:
- Beer: Light lagers, IPAs, or wheat beers all pair perfectly with wings
- Wine: If wine is more your style, try a crisp Sauvignon Blanc or a light Pinot Noir
- Non-alcoholic: Lemonade, iced tea, or craft sodas work great
- Cocktails: Margaritas, mojitos, or even an Aperol spritz complement the garlic butter flavors
Make It a Meal: Turn these wings into a complete dinner by serving them with:
- Garlic bread for soaking up extra sauce
- A big garden salad with Italian vinaigrette
- Roasted vegetables (broccoli, Brussels sprouts, or asparagus)
- Baked beans for a BBQ-style meal
FAQs Section
Q: Can I use this recipe with chicken drumsticks or thighs instead of wings? A: Absolutely! The garlic butter sauce is fantastic on any chicken parts. For drumsticks, increase the cooking time to about 40-45 minutes at 425°F, flipping halfway through. For bone-in thighs, cook for 35-40 minutes. Boneless thighs will cook faster—about 25-30 minutes total. The baking powder trick works on all of these to create crispy skin.
Q: What’s the difference between drumettes and flats, and does it matter? A: Drumettes are the part that looks like a mini drumstick, while flats (also called wingettes) are the middle section with two bones. Drumettes have more meat, while flats have more skin and some people find them crispier. Both are delicious! They cook at the same rate, so you can use a mix or just one type depending on your preference.
Q: My wings turned out chewy instead of crispy. What went wrong? A: This usually happens for one of three reasons: 1) The wings weren’t dried thoroughly before seasoning, 2) They were overcrowded on the baking sheet and steamed instead of crisped, or 3) The oven temperature was too low. Make sure you’re using baking powder (not soda), drying the wings completely, spacing them out on a wire rack, and baking at a full 425°F.
Q: Can I make these wings ahead for a party? A: Yes! You have a few options. You can bake them a few hours ahead and keep them warm in a 200°F oven, then toss with sauce right before serving. Or bake them completely the day before, refrigerate, and reheat in a 375°F oven for 15 minutes before tossing with freshly made sauce. The garlic butter sauce itself can be made up to 3 days ahead and gently reheated.
Q: Are these wings spicy? A: Not at all! The garlic butter version is mild and family-friendly. The optional red pepper flakes add just a tiny hint of heat, but nothing intense. If you want spicy wings, increase the red pepper flakes, add hot sauce to the butter, or use cayenne pepper in the dry rub.
Q: Can I use frozen wings without thawing them first? A: It’s not recommended. Frozen wings release a lot of moisture as they thaw in the oven, which prevents the skin from crisping properly. Always thaw wings completely in the refrigerator overnight, then pat them very dry before seasoning. If you’re in a pinch, you can add 10-15 minutes to the cooking time for frozen wings, but the results won’t be as crispy.
Q: How do I get restaurant-level crispiness at home? A: The secret is threefold: 1) Use baking powder in your seasoning rub—it’s a game-changer, 2) Dry your wings obsessively with paper towels, and ideally let them air-dry uncovered in the fridge for a few hours or overnight, and 3) Use a wire rack so air circulates around all sides. These three techniques together create wings that rival any restaurant’s deep-fried version.
Q: What if I don’t have a wire rack? A: You can still make crispy wings! Arrange them directly on a greased or parchment-lined baking sheet, making sure they’re not touching. Flip them halfway through cooking to crisp both sides. They won’t be quite as uniformly crispy as rack-baked wings, but they’ll still be delicious. Consider investing in an inexpensive wire cooling rack—it’s one of the best tools for crispy baked foods.
Conclusion
There you have it—everything you need to know to make the most incredible Crispy Garlic Butter Baked Chicken Wings right in your own kitchen! These wings prove that you don’t need a deep fryer or takeout to enjoy restaurant-quality wings. With just a simple technique, your oven, and a killer garlic butter sauce, you can create wings that’ll have everyone asking for your secret.
The beauty of this recipe is in its simplicity and reliability. Once you master the basic method—dry the wings, use baking powder, bake at high heat on a rack—you can endlessly customize the flavors to suit any occasion or craving. From game day gatherings to casual weeknight dinners, these wings bring people together over finger-licking-good food that everyone loves.
What makes these wings truly special is that perfect combination of shatteringly crispy skin, juicy tender meat, and that luxurious garlic butter coating that clings to every crevice. They’re indulgent without being overly heavy, flavorful without being overwhelmingly spicy, and impressive without being complicated. It’s the kind of recipe that makes you feel like a kitchen rockstar.
I can’t wait to hear how your wings turn out! Did you make them spicier? Try a different herb combination? Serve them at a party that went viral with your friends? Drop a comment below and let me know! And if you loved this recipe, please give it a rating—it helps other home cooks discover it too.
Don’t forget to save this recipe to your Pinterest boards! Pin it to your “Game Day Recipes,” “Easy Appetizers,” “Chicken Recipes,” or “Dinner Ideas” boards so you can find it whenever a wing craving strikes. And if you make these gorgeous wings, snap a photo and share it—I absolutely love seeing your creations!
Now get in that kitchen and make some magic happen. Your taste buds (and everyone you’re cooking for) will thank you!

