
There’s something absolutely magical about biting into a perfectly crispy chicken wing that’s been tossed in garlicky, buttery goodness. These Crispy Garlic Butter Chicken Wings are the ultimate crowd-pleaser that’ll have everyone reaching for seconds (and thirds!). Whether you’re planning a game day spread, hosting a casual backyard gathering, or just craving restaurant-quality wings at home, this recipe delivers every single time.
What makes these wings so special is the double-cooking technique that ensures ultra-crispy skin on the outside while keeping the meat incredibly juicy inside. Then they’re coated in a luscious garlic butter sauce that’s savory, slightly tangy, and absolutely addictive. Unlike traditional buffalo wings, these garlic butter beauties offer a more sophisticated flavor profile that appeals to both kids and adults alike. They’re fancy enough for entertaining but simple enough for a weeknight dinner when you want something exciting.
The best part? You don’t need any deep-frying equipment or complicated ingredients. With just a few pantry staples and the right baking technique, you’ll achieve wings that rival your favorite sports bar – all from the comfort of your own kitchen.
History / Background
Chicken wings have quite the fascinating journey in American culinary history. Before the 1960s, chicken wings were often considered throwaway parts or used primarily for making stock. The iconic Buffalo wing was born in 1964 at the Anchor Bar in Buffalo, New York, when Teressa Bellissimo improvised a late-night snack for her son and his friends. She deep-fried leftover wings and tossed them in hot sauce and butter, creating what would become one of America’s most beloved appetizers.
However, garlic butter wings represent a delicious evolution of this classic. As wings gained popularity across the United States throughout the 1970s and 1980s, creative cooks began experimenting with different flavor profiles beyond the traditional spicy buffalo sauce. Garlic butter wings emerged as a milder, more universally appealing alternative, particularly popular in Italian-American communities where garlic and butter were kitchen staples.
The garlic butter variation became especially popular in the 1990s and 2000s as chain restaurants and pizzerias began offering multiple wing flavors. Today, garlic parmesan or garlic butter wings are consistently among the top-selling flavors at wing restaurants nationwide, second only to traditional buffalo. This recipe honors that tradition while incorporating modern cooking techniques that make achieving restaurant-quality crispiness at home easier than ever.
The popularity of garlic butter wings also reflects America’s growing appreciation for garlic in general. Once considered too pungent for mainstream American palates, garlic has become a celebrated ingredient, with garlic butter specifically being used on everything from breadsticks to shrimp to steak.
Why You’ll Love This Recipe
This Crispy Garlic Butter Chicken Wings recipe is about to become your new go-to for any occasion. The combination of perfectly seasoned, ultra-crispy wings with that rich, aromatic garlic butter sauce creates a flavor experience that’s simply unbeatable. These wings strike the perfect balance between indulgent and approachable – they feel special enough for entertaining but are surprisingly easy to make.
Here’s why this recipe is a total game-changer:
- Restaurant-quality crispiness at home – No deep fryer needed! The baking method with baking powder creates incredibly crispy skin.
- Family-friendly flavor – Not too spicy, making it perfect for kids and adults who prefer milder wings.
- Budget-friendly – Chicken wings are economical, and you probably have most ingredients already.
- Minimal prep time – Just 15 minutes of hands-on work before the oven does all the heavy lifting.
- Crowd-pleaser guaranteed – Perfect for game day, parties, potlucks, or any gathering.
- Customizable heat level – Easily adjust the garlic and add red pepper flakes if you want a kick.
- Make-ahead friendly – Can be prepped in advance and baked when ready to serve.
- Finger-licking good – That garlic butter sauce is so addictive, you’ll want to drizzle it on everything!
Ingredient Notes
Let’s talk about what makes these wings so incredibly delicious. Each ingredient plays a crucial role in building those layers of flavor and achieving that perfect texture.
Chicken Wings: You can use whole wings and cut them yourself into drumettes and flats, or buy them pre-cut to save time. Look for wings that are relatively uniform in size for even cooking. Pat them completely dry with paper towels – this is crucial for crispiness! If you can find “party wings” or “wing sections,” those work perfectly.
Baking Powder: This is the secret ingredient for ultra-crispy skin! Baking powder raises the pH of the chicken skin, allowing it to brown and crisp up beautifully. Make sure you’re using aluminum-free baking powder, and don’t confuse it with baking soda. The baking powder creates tiny air pockets that help moisture escape and crispiness develop.
Salt and Black Pepper: Simple seasoning is key. Kosher salt works best because it adheres well to the wings. Freshly ground black pepper adds a subtle heat and complexity.
Butter: Use real, unsalted butter for the best flavor. The butter creates a rich, luxurious coating and helps the garlic and parsley stick to the wings. Unsalted allows you to control the saltiness of your final dish.
Fresh Garlic: Fresh is absolutely essential here – don’t substitute with garlic powder for the sauce! About 6-8 cloves of minced garlic creates that bold, aromatic flavor. If you love garlic, feel free to add more. Roasting the garlic in butter mellows it slightly while intensifying its sweetness.
Fresh Parsley: This adds a pop of color and fresh, herbaceous flavor that balances the richness. Italian flat-leaf parsley has better flavor than curly parsley. You can also add fresh oregano or basil for variation.
Parmesan Cheese: Freshly grated Parmesan adds a salty, nutty, umami punch that takes these wings to the next level. Buy a block and grate it yourself for the best texture and flavor – the pre-grated stuff won’t melt and stick as nicely.
Optional Add-ins: Lemon juice (adds brightness), red pepper flakes (for heat), garlic powder (for extra garlic flavor in the dry rub), or Italian seasoning (for more herbaceous notes).
Equipment Needed
Having the right tools makes this recipe even easier. Here’s what you’ll need:
- Large baking sheet (or two) – Choose rimmed half-sheet pans for easy handling
- Wire cooling rack – Essential! This elevates the wings so air circulates all around for maximum crispiness
- Aluminum foil (optional) – For easier cleanup, though not strictly necessary
- Large mixing bowl – For tossing wings with seasonings
- Small saucepan – For making the garlic butter sauce
- Paper towels – Lots of them! For drying the wings thoroughly
- Measuring spoons and cups – For accurate measurements
- Kitchen tongs – For flipping wings and tossing in sauce
- Chef’s knife and cutting board – If you’re cutting whole wings into sections
- Garlic press or microplane (optional) – Makes mincing garlic easier
- Instant-read thermometer (optional but recommended) – To ensure wings reach 165°F

Crispy Garlic Butter Chicken Wings Recipe
- Total Time: 1 hour 5 minutes
- Yield: 4 servings (about 24 wing pieces) 1x
- Diet: Vegetarian
Description
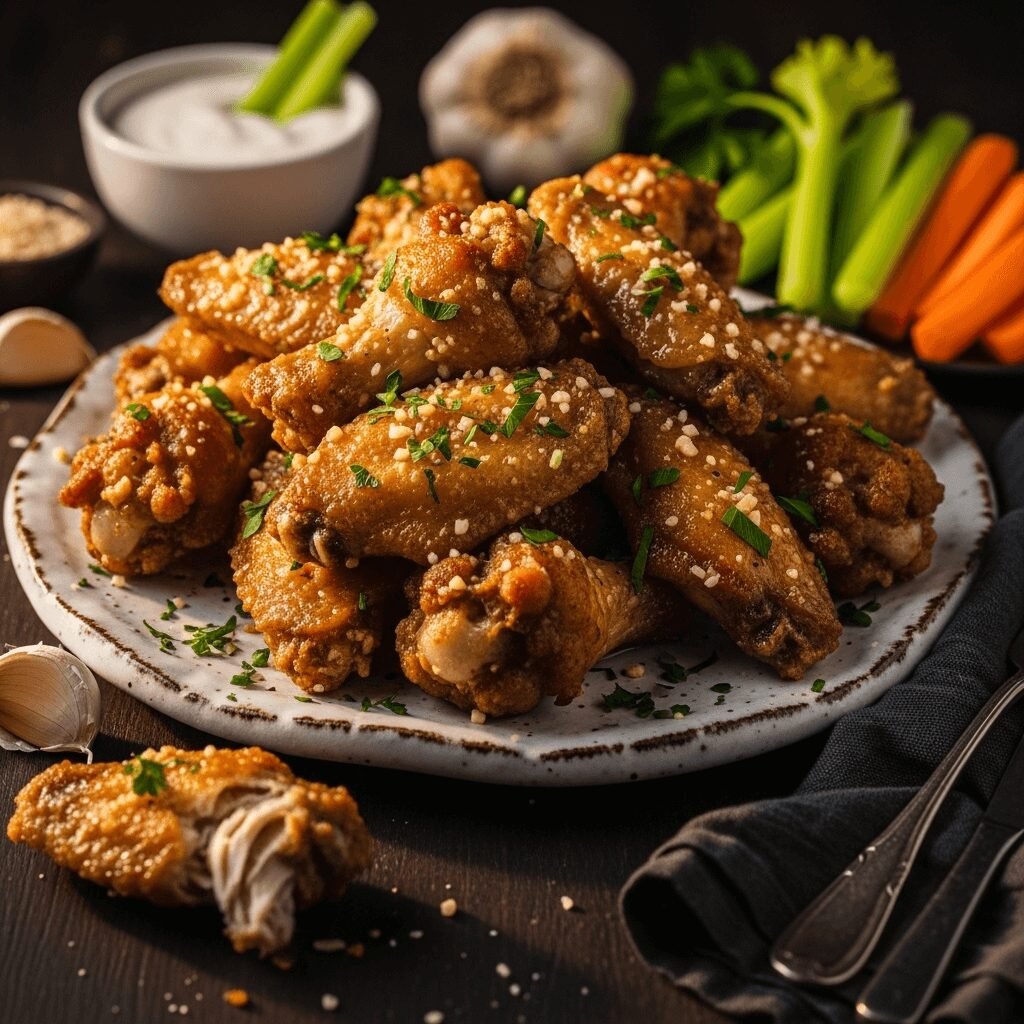
These Crispy Garlic Butter Chicken Wings are baked to golden perfection with ultra-crispy skin, then tossed in an irresistible garlic butter sauce with fresh parsley and Parmesan. No deep fryer needed – just simple ingredients and an easy baking technique that delivers restaurant-quality wings every time!
Ingredients
For the Wings:
- 3 pounds chicken wings (about 24 pieces), separated into drumettes and flats, tips removed
- 1½ tablespoons baking powder (aluminum-free)
- 1 teaspoon kosher salt
- ½ teaspoon black pepper
- ½ teaspoon garlic powder (optional)
For the Garlic Butter Sauce:
- 6 tablespoons unsalted butter
- 6-8 cloves garlic, minced (about 2 tablespoons)
- ¼ cup fresh parsley, finely chopped
- ½ cup freshly grated Parmesan cheese
- ¼ teaspoon red pepper flakes (optional)
- Salt to taste
- 1 tablespoon fresh lemon juice (optional)
Instructions
Step 1: Prepare the Wings
Pat the chicken wings completely dry using paper towels. This is the most important step for achieving crispy skin! Place them in a large mixing bowl. Any moisture on the surface will prevent crisping, so really take your time with this step.
Step 2: Season the Wings
Add the baking powder, salt, black pepper, and garlic powder (if using) to the bowl with the wings. Toss thoroughly until every wing is evenly coated. The mixture should look slightly powdery on the surface – this is exactly what you want!
Step 3: Prepare Your Baking Setup
Line a large baking sheet with aluminum foil (for easier cleanup) and place a wire cooling rack on top. Arrange the wings on the rack in a single layer, making sure they’re not touching. Space is crucial for air circulation and even crisping. Use two baking sheets if needed.
Step 4: Refrigerate (Optional but Recommended)
For extra-crispy wings, refrigerate the seasoned wings uncovered on the rack for 30 minutes to 2 hours. This dries out the skin even more. If you’re short on time, you can skip this and bake immediately.
Step 5: Preheat and Bake
Preheat your oven to 250°F. Bake the wings at this low temperature for 30 minutes. This rendering process melts out the fat under the skin.
Step 6: Increase Heat
After 30 minutes, increase the oven temperature to 425°F and bake for an additional 20 minutes until the wings are golden brown and crispy.
Step 7: Flip and Finish
Carefully flip each wing using tongs and bake for another 10-15 minutes until deeply golden, crispy, and cooked through (internal temperature should reach 165°F).
Step 8: Make the Garlic Butter Sauce
While the wings finish cooking, melt the butter in a small saucepan over medium heat. Add the minced garlic and cook for 1-2 minutes, stirring constantly, until fragrant but not browned. Remove from heat and stir in the parsley, red pepper flakes (if using), and lemon juice (if using).
Step 9: Toss and Serve
Transfer the hot, crispy wings to a large clean bowl. Pour the garlic butter sauce over the wings and toss gently to coat. Sprinkle with freshly grated Parmesan cheese and toss again. Taste and add more salt if needed.
Step 10: Serve Immediately
Transfer to a serving platter and garnish with additional parsley and Parmesan if desired. Serve hot with your favorite dipping sauces and plenty of napkins!
Notes
- Don’t skip the wire rack! It’s essential for air circulation and crispy skin all around.
- Baking powder, not baking soda: Make sure you use baking powder (preferably aluminum-free) for the best results.
- Wing size matters: If your wings are particularly large or small, adjust cooking time accordingly.
- Extra crispy tip: For even crispier wings, broil for 2-3 minutes at the end, watching carefully.
- Make it spicier: Add cayenne pepper to the dry rub or increase red pepper flakes in the sauce.
- Sauce consistency: If the sauce seems too thick, add a tablespoon of chicken broth or water.
- Prep Time: 15 minutes
- Cook Time: 50 minutes
- Category: Appetizer, Main Course
- Method: Baking
- Cuisine: American
Nutrition
- Serving Size: 6 wing pieces (about ¾ pound)
- Calories: 520
- Sugar: 0g
- Sodium: 680mg
- Fat: 38g
- Saturated Fat: 16g
- Unsaturated Fat: 18g
- Trans Fat: 0g
- Carbohydrates: 2g
- Fiber: 0g
- Protein: 42g
- Cholesterol: 185mg
Nutrition information is approximate and based on 4 servings. Actual values may vary depending on specific ingredients used.
Tips & Variations
Make It Spicy:
Add ½ teaspoon cayenne pepper to the dry rub, increase red pepper flakes to 1 teaspoon in the sauce, or drizzle with hot sauce before serving for extra heat.
Asian-Style Twist:
Replace the parsley with fresh cilantro, add 1 tablespoon soy sauce and 1 teaspoon sesame oil to the butter sauce, and garnish with sliced green onions and toasted sesame seeds.
Lemon Pepper Version:
Add 2 tablespoons fresh lemon zest and 1 tablespoon coarsely ground black pepper to the garlic butter for a tangy, peppery variation that’s incredibly popular.
Honey Garlic:
Stir 2-3 tablespoons honey into the garlic butter sauce for a sweet and savory combination that’s absolutely addictive.
Extra Cheesy:
Double the Parmesan and add ¼ cup grated Romano cheese for an even more intense cheesy flavor.
Herb Garden:
Mix in fresh basil, oregano, or thyme along with the parsley for a more complex herbaceous profile.
Low-Carb/Keto:
This recipe is already keto-friendly! Just skip any optional honey additions and stick with the classic garlic butter.
Pro Chef Tips
The Dry Skin Secret: Professional chefs know that moisture is the enemy of crispy skin. After patting wings dry, let them air-dry in the refrigerator uncovered for several hours or overnight for the absolute crispiest results. The cold, dry air of the fridge dehydrates the skin perfectly.
Baking Powder Science: The alkaline nature of baking powder breaks down proteins in the chicken skin, making it thinner and crispier. This is the same technique used in Chinese restaurants for crispy Peking duck skin!
Two-Temperature Technique: Starting at a lower temperature (250°F) renders out the fat slowly without burning, while finishing at high heat (425°F) crisps and browns the skin beautifully. This professional method ensures crispy exterior with juicy interior every time.
Fresh Garlic Timing: Cooking garlic in butter for just 1-2 minutes is crucial – any longer and it becomes bitter. The residual heat from the hot wings will continue cooking the garlic slightly after tossing.
Sauce Temperature: Slightly warm (not piping hot) garlic butter coats wings more evenly than very hot butter, which can make the coating too thin, or cold butter, which doesn’t distribute well.
Resting Time: Let wings rest on the rack for 2-3 minutes after removing from the oven. This brief rest allows the crust to set and become even crispier while the juices redistribute.
Quality Parmesan: Freshly grated Parmigiano-Reggiano is worth the extra cost. The pre-grated stuff contains cellulose (wood pulp) to prevent clumping and won’t melt properly or provide the same nutty, complex flavor.
Common Mistakes to Avoid
Not Drying the Wings Properly: This is the #1 mistake! Wet wings will steam instead of crisp. Take the time to thoroughly pat them dry with paper towels, and consider the refrigerator drying method for best results.
Overcrowding the Pan: When wings touch, they create moisture pockets that prevent even crisping. Always use a wire rack and arrange wings with space between them, even if it means using two baking sheets.
Using Baking Soda Instead of Baking Powder: These are NOT interchangeable! Baking soda is much stronger and will give your wings an unpleasant metallic taste and strange color. Always use baking powder (preferably aluminum-free).
Burning the Garlic: Garlic goes from perfectly golden to burnt and bitter in seconds. Keep the heat at medium, stir constantly, and remove from heat as soon as it’s fragrant. If garlic burns, start over – there’s no fixing burnt garlic flavor.
Tossing Wings in Sauce Too Early: If you add sauce to wings that aren’t hot from the oven, or let them sit before saucing, the coating won’t adhere properly and the wings won’t be as crispy. Sauce them immediately after removing from the oven for best results.
Storage & Meal Prep
Refrigerator Storage:
Store leftover wings in an airtight container in the refrigerator for up to 3-4 days. Keep the wings and any extra garlic butter sauce in separate containers for best quality. The crispy coating will soften in storage, but you can revive it during reheating.
Reheating for Best Results:
The air fryer is your best friend for reheating! Place wings in a single layer and air fry at 375°F for 5-7 minutes until hot and crispy. Alternatively, reheat on a wire rack in a 400°F oven for 10-12 minutes. Avoid the microwave as it makes wings soggy and rubbery.
Meal Prep Tips:
You can prepare the wings through the seasoning step, arrange them on the wire rack, cover loosely with plastic wrap, and refrigerate for up to 24 hours before baking. This actually improves crispiness! Prepare the garlic butter sauce ingredients (mince garlic, chop parsley, grate cheese) and store separately, then make the sauce fresh when the wings come out of the oven.
Room Temperature:
Cooked wings should not sit at room temperature for more than 2 hours (1 hour if the room is warmer than 90°F) to prevent bacterial growth.
Make-Ahead & Freezer Notes
Freezing Uncooked Wings:
You can season raw wings with the dry rub, freeze them in a single layer on a baking sheet until solid, then transfer to freezer bags. They’ll keep for up to 3 months. Thaw overnight in the refrigerator on a wire rack before baking as directed.
Freezing Cooked Wings:
Cooked wings can be frozen for up to 2 months, though the texture won’t be quite as crispy after thawing. Cool completely, then freeze in a single layer before transferring to freezer bags. Don’t sauce them before freezing – make fresh garlic butter when reheating.
Make-Ahead for Parties:
Bake wings up to 4 hours ahead and keep at room temperature. When ready to serve, reheat in a 400°F oven for 8-10 minutes to re-crisp, then toss with freshly made garlic butter sauce. This method keeps the coating crispy and the wings hot for serving.
Best Reheating Method for Frozen:
Thaw overnight in the refrigerator, then reheat in a 375°F oven on a wire rack for 15-20 minutes. For extra crispiness, increase temperature to 425°F for the last 5 minutes. Make fresh garlic butter sauce and toss just before serving.
Serving Suggestions
These crispy garlic butter chicken wings are incredibly versatile and pair beautifully with so many sides and accompaniments!
Classic Dipping Sauces:
Ranch dressing and blue cheese dressing are traditional favorites. Also try garlic aioli, honey mustard, or a cooling tzatziki sauce to complement the rich garlic butter.
Fresh Vegetable Sides:
Serve with celery and carrot sticks (classic!), a crisp green salad with balsamic vinaigrette, coleslaw (creamy or vinegar-based), cucumber salad, or roasted vegetables like Brussels sprouts or broccoli.
Starchy Sides:
French fries, sweet potato fries, loaded baked potatoes, garlic bread, dinner rolls, cornbread, or mac and cheese make the meal more substantial.
Game Day Spread:
Pair with other appetizers like mozzarella sticks, loaded nachos, spinach artichoke dip, buffalo chicken dip, or a cheese and charcuterie board for the ultimate party spread.
Beverage Pairings:
Cold beer (pilsner, IPA, or wheat beer), lemonade, iced tea, sparkling water with lemon, or for wine lovers, a crisp Sauvignon Blanc or light Pinot Grigio.
Make It a Meal:
Serve over a bed of rice pilaf, alongside pasta tossed in olive oil and Parmesan, with a Caesar salad, or as part of a “wing bar” with multiple sauce options and toppings so guests can customize.
FAQs Section
Q: Can I use frozen wings for this recipe?
A: Yes! Just make sure to thaw them completely in the refrigerator (usually 24 hours) and pat them VERY dry before seasoning. Frozen wings contain extra moisture, so the drying step is even more critical. Never bake wings directly from frozen as they’ll steam and won’t crisp properly.
Q: Do I really need the baking powder? Can I skip it?
A: Baking powder is essential for achieving restaurant-quality crispiness without deep frying. It’s not optional if you want truly crispy wings! It changes the pH of the skin and helps moisture escape during cooking. Without it, your wings will still be good but won’t have that signature crunch.
Q: Why aren’t my wings crispy?
A: The most common reasons are: wings weren’t dried thoroughly, you skipped the wire rack (wings need air circulation), the pan was overcrowded, or you used baking soda instead of baking powder. Make sure you’re following all the steps, especially the low-then-high temperature method.
Q: Can I make these in an air fryer?
A: Absolutely! Air fryer wings are amazing. Season the wings the same way, then air fry at 360°F for 12 minutes, flip, then cook at 400°F for another 10-12 minutes until crispy and golden. The timing may vary based on your air fryer model and wing size.
Q: My garlic butter sauce is too oily/separated. What happened?
A: This happens when the butter is too hot or if it sits too long before tossing with wings. Make the sauce right before serving, let it cool slightly (you want it warm, not scorching hot), and toss immediately with hot wings. The heat from the wings will help emulsify the sauce.
Q: Can I use drumsticks or boneless chicken instead?
A: Yes, but cooking times will change. Drumsticks need about 45-50 minutes total at 425°F (no need for the two-temperature method). For boneless chicken pieces or tenders, reduce cooking time to 20-25 minutes total. The garlic butter sauce works beautifully with any chicken parts!
Q: How do I know when the wings are fully cooked?
A: Wings are done when they reach an internal temperature of 165°F (use an instant-read thermometer inserted into the thickest part). Visually, they should be deeply golden brown and the juices should run clear. The meat should start pulling away from the bones slightly.
Conclusion
There you have it – the ultimate guide to making perfectly Crispy Garlic Butter Chicken Wings right in your own kitchen! These wings prove that you don’t need a deep fryer or complicated techniques to achieve restaurant-quality results. With just the right combination of simple ingredients, smart baking techniques, and that irresistible garlic butter coating, you’ll have a dish that’s guaranteed to disappear in minutes.
Whether you’re serving these for game day, a family dinner, or just treating yourself to something delicious, these wings deliver every single time. The crispy exterior, juicy interior, and that incredible garlic-Parmesan-butter situation happening on the outside? Pure perfection.
I’d love to hear how your wings turn out! Drop a comment below with your results, any fun variations you tried, or questions you might have. And if you love this recipe as much as I do, please give it a five-star rating and share it with your friends and family.
Don’t forget to PIN this recipe to your favorite Pinterest board so you can find it easily whenever the wing craving hits! Trust me, you’ll want to make these again and again. Happy cooking, and enjoy every crispy, garlicky, buttery bite! 🍗✨