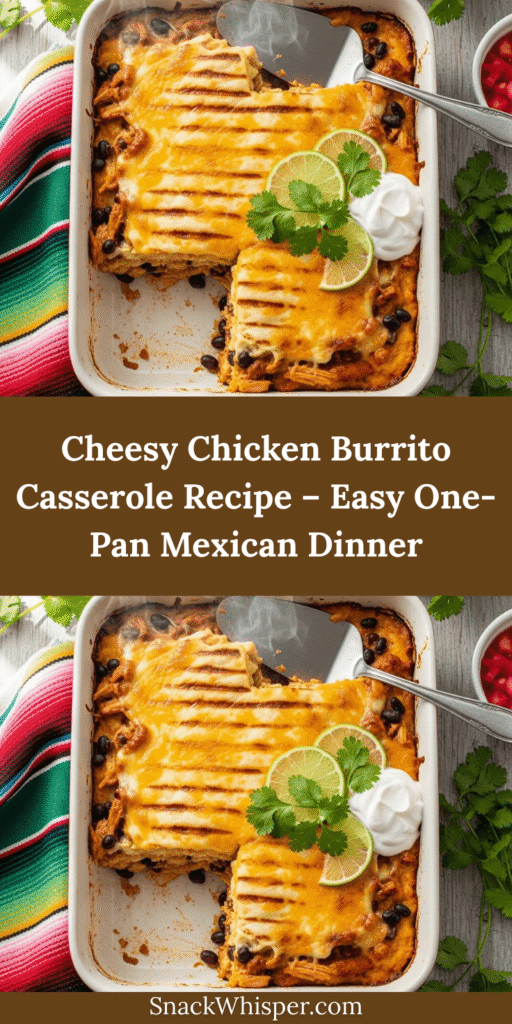
If you love the bold, satisfying flavors of a burrito but want something easier to share with the whole family, this Cheesy Chicken Burrito Casserole is about to become your new weeknight hero. Imagine all the deliciousness of a loaded chicken burrito—seasoned chicken, creamy beans, zesty salsa, and layers of melted cheese—baked together in one gorgeous casserole dish. No rolling, no wrapping, just pure comfort food magic that everyone can dig into.
This easy chicken burrito casserole is perfect for busy weeknights, potlucks, family gatherings, or meal prep Sundays. It’s the kind of dish that makes your kitchen smell amazing and has everyone asking for seconds. Whether you’re feeding picky kids, hungry teenagers, or a crowd of friends, this recipe delivers big on flavor without requiring hours in the kitchen. Plus, it’s endlessly customizable, so you can tweak it to match your family’s tastes or whatever ingredients you have on hand.
History / Background
Casseroles have long been a cornerstone of American home cooking, especially since the mid-20th century when one-dish meals became synonymous with convenience and comfort. The casserole format allowed home cooks to stretch ingredients, feed large families, and create hearty meals with minimal cleanup—a true kitchen lifesaver during busy times.
The burrito casserole is a beautiful fusion of traditional Mexican flavors and American casserole culture. While burritos themselves originated in Northern Mexico and became wildly popular across the American Southwest, the casserole version is a distinctly Tex-Mex creation. It borrows the essential components of a burrito—seasoned meat, beans, cheese, and tortillas—and reimagines them in a layered, baked format that’s easier to serve a crowd.
This style of cooking became particularly popular in the 1980s and 1990s as Tex-Mex cuisine exploded in American households. Home cooks loved how they could capture those restaurant-style flavors in a family-friendly, budget-conscious dish. The chicken burrito casserole specifically gained traction as a lighter alternative to beef-based versions, and it remains a Pinterest favorite today because it checks every box: easy, cheesy, flavorful, and totally Instagram-worthy.
Why You’ll Love This Recipe
This Cheesy Chicken Burrito Casserole isn’t just another dinner recipe—it’s a weeknight game-changer that brings restaurant-quality flavors right to your table with minimal effort. Let me tell you why this dish is about to become a regular rotation in your meal plan.
Here’s what makes it absolutely irresistible:
- Ridiculously Easy – No complicated techniques or fancy skills required. If you can stir and layer, you can make this casserole.
- One-Dish Wonder – Everything bakes together in one pan, which means less cleanup and more time to relax after dinner.
- Budget-Friendly – Uses affordable, everyday ingredients that you probably already have in your pantry and fridge.
- Family-Approved – Even picky eaters love this cheesy, flavorful dish. It’s comfort food that appeals to all ages.
- Meal Prep Champion – Makes great leftovers and can be prepped ahead, making your week so much easier.
- Customizable – Easily adapt it to be spicier, milder, vegetarian, or packed with extra veggies based on your preferences.
- Crowd-Pleaser – Perfect for potlucks, game day gatherings, or feeding a hungry crew without stress.
- Protein-Packed – Loaded with chicken and beans, this casserole is satisfying and keeps everyone full.
Ingredient Notes
Let’s talk about what goes into this delicious casserole and why each ingredient matters. Understanding your ingredients helps you make smart substitutions and really nail the flavors.
Chicken – Boneless, skinless chicken breasts or thighs work beautifully here. You can use rotisserie chicken for an even faster prep (life hack!), or cook your own. Thighs add more flavor and stay juicier, while breasts are leaner. Leftover cooked chicken works perfectly too.
Tortillas – Flour tortillas are traditional and create soft, lasagna-like layers. You can also use corn tortillas for a more authentic Mexican flavor and gluten-free option, or low-carb tortillas if you’re watching carbs. Cut them to fit your baking dish.
Black Beans – Adds protein, fiber, and heartiness. Rinse and drain canned beans well to remove excess sodium. Pinto beans or refried beans work as substitutions.
Salsa – Acts as both seasoning and sauce. Use your favorite jarred salsa or homemade. Mild, medium, or hot—you control the heat level. Chunky salsa adds texture while smooth salsa creates a more uniform consistency.
Cheese – A blend of Mexican cheese (cheddar, Monterey Jack, pepper jack) gives the best flavor and meltability. Pre-shredded is convenient, but freshly grated melts better and has superior texture. Use about 3 cups total, divided between layers and topping.
Sour Cream – Adds creaminess and tanginess that balances the spices. Greek yogurt works as a healthier substitute with similar results.
Taco Seasoning – The flavor backbone of the dish. Homemade or store-bought both work. Making your own lets you control sodium and spice levels.
Onion & Garlic – Aromatics that build flavor depth. Fresh is best, but granulated works in a pinch.
Bell Peppers – Optional but recommended for color, nutrition, and a slight sweetness. Red, green, or yellow—use what you love or have on hand.
Enchilada Sauce or Salsa Verde – Optional layer that adds extra sauciness and flavor complexity. Not essential but definitely delicious.
Equipment Needed
You don’t need a fancy kitchen to make this casserole—just a few basic tools:
- 9×13-inch Baking Dish – The standard casserole size that feeds 6-8 people perfectly. Glass or ceramic works great.
- Large Skillet – For cooking the chicken and vegetables.
- Cutting Board & Knife – For prep work.
- Mixing Bowls – For combining ingredients.
- Measuring Cups & Spoons – For accurate measurements.
- Wooden Spoon or Spatula – For stirring and mixing.
- Aluminum Foil – To cover the casserole while baking.
- Can Opener – For beans and any canned ingredients.

Cheesy Chicken Burrito Casserole Recipe
- Total Time: 55 minutes
- Yield: 8 servings 1x
- Diet: Gluten Free
Description
This Cheesy Chicken Burrito Casserole is a layered Tex-Mex masterpiece that combines seasoned chicken, black beans, salsa, and gooey cheese between soft flour tortillas. It’s all the flavors of your favorite burrito baked into one easy, family-friendly casserole that’s perfect for busy weeknights or feeding a crowd.
Ingredients
- 2 lbs boneless, skinless chicken breasts (or 4 cups cooked, shredded chicken)
- 8-10 medium flour tortillas
- 2 cups salsa (your preferred heat level)
- 1 can (15 oz) black beans, drained and rinsed
- 1 cup sour cream
- 3 cups shredded Mexican cheese blend, divided
- 1 packet (1 oz) taco seasoning
- 1 medium onion, diced
- 1 bell pepper, diced (any color)
- 3 cloves garlic, minced
- 1 cup frozen corn kernels (optional)
- 1 can (10 oz) enchilada sauce or 1 cup salsa verde (optional but recommended)
- 2 tablespoons olive oil
- Salt and pepper to taste
- Fresh cilantro for garnish
- Sliced jalapeños for garnish (optional)
Instructions
- Preheat & Prep: Preheat your oven to 375°F (190°C). Lightly grease a 9×13-inch baking dish with cooking spray or a thin layer of oil.
- Cook the Chicken: If using raw chicken, season with salt and pepper. Heat olive oil in a large skillet over medium-high heat. Cook chicken breasts for 6-7 minutes per side until golden and cooked through (internal temperature 165°F). Remove from skillet, let rest for 5 minutes, then shred or dice. If using pre-cooked or rotisserie chicken, skip this step.
- Sauté Vegetables: In the same skillet, add diced onion and bell pepper. Sauté for 4-5 minutes until softened. Add minced garlic and cook for another minute until fragrant. Don’t let the garlic burn.
- Combine Filling: In a large mixing bowl, combine shredded chicken, sautéed vegetables, black beans, corn (if using), salsa, taco seasoning, sour cream, and 1 cup of shredded cheese. Mix everything together until well combined. Taste and adjust seasoning if needed.
- First Tortilla Layer: Spread a thin layer of enchilada sauce or about 1/4 cup salsa on the bottom of your prepared baking dish. Arrange 3-4 tortillas on the bottom, overlapping slightly and tearing pieces to fill gaps as needed.
- First Filling Layer: Spread half of the chicken mixture evenly over the tortilla layer. Sprinkle with 3/4 cup cheese.
- Second Tortilla Layer: Add another layer of 3-4 tortillas over the filling.
- Second Filling Layer: Spread the remaining chicken mixture over the tortillas. Sprinkle with another 3/4 cup cheese.
- Final Tortilla Layer: Top with the remaining tortillas, creating a complete layer. Pour any remaining enchilada sauce or salsa over the top tortillas and spread evenly.
- Top with Cheese: Sprinkle the remaining cheese (about 1/2 cup) generously over the entire top surface.
- Bake Covered: Cover the baking dish tightly with aluminum foil. Bake in the preheated oven for 25 minutes.
- Bake Uncovered: Remove foil and continue baking for 10-15 minutes until the cheese is melted, bubbly, and slightly golden on top.
- Rest & Serve: Remove from oven and let the casserole rest for 5-10 minutes before slicing. This helps it hold together when serving. Garnish with fresh cilantro, sliced jalapeños, extra sour cream, and serve with your favorite toppings.
Notes
- For extra moisture and flavor, brush each tortilla layer lightly with enchilada sauce or salsa before adding the filling.
- Don’t skip the resting time after baking—it’s crucial for clean slices.
- Customize spice levels by using mild, medium, or hot salsa and adding jalapeños to the filling.
- This recipe is very forgiving—feel free to adjust ingredient amounts based on your family’s preferences.
- For a crispier top, broil for the last 2-3 minutes, watching carefully to prevent burning.
- Prep Time: 20 minutes
- Cook Time: 35 minutes
- Category: Dessert
- Method: Baking
- Cuisine: Tex-Mex
Nutrition
- Serving Size: 1 slice (1/8 of casserole)
- Calories: 485
- Sugar: 4g
- Sodium: 890mg
- Fat: 21g
- Saturated Fat: 10g
- Unsaturated Fat: 9g
- Trans Fat: 0g
- Carbohydrates: 38g
- Fiber: 5g
- Protein: 35g
- Cholesterol: 95mg
Nutritional information is approximate and will vary based on specific ingredients used.
Tips & Variations
The beauty of this chicken burrito casserole recipe is how adaptable it is. Here are some delicious ways to make it your own:
Spicy Kick: Add diced jalapeños or green chiles to the filling, use pepper jack cheese, incorporate chipotle peppers in adobo sauce, or add cayenne pepper to the seasoning mix.
Vegetarian Version: Omit the chicken and double the beans, or add sautéed mushrooms, extra bell peppers, zucchini, and use a second type of bean like pinto or kidney beans.
Low-Carb/Keto: Replace flour tortillas with low-carb tortillas or thin layers of roasted poblano peppers, use cauliflower rice instead of corn, and ensure your salsa is sugar-free.
Extra Veggie-Packed: Add sautéed spinach, diced tomatoes, sliced olives, or diced zucchini to boost nutrition without changing the core flavor.
White Chicken Version: Use a white cream sauce base (cream of chicken soup mixed with sour cream and green chiles) instead of salsa for a completely different flavor profile.
Breakfast Burrito Casserole: Swap chicken for breakfast sausage, add scrambled eggs to the layers, and use breakfast potatoes instead of beans.
Pro Chef Tips
Want to take your casserole from good to absolutely restaurant-quality? Here are some professional tricks:
Season Your Layers: Don’t just season the chicken—add a pinch of salt, pepper, and cumin to each layer as you build. This creates depth of flavor throughout the entire dish.
Toast Your Tortillas: Quickly toast tortillas in a dry skillet for 30 seconds per side before layering. This prevents them from getting soggy and adds a subtle toasted flavor.
Rest the Chicken: Always let cooked chicken rest for 5 minutes before shredding. This keeps the juices in the meat rather than on your cutting board, resulting in more flavorful, moist chicken.
Cheese Placement Strategy: Put cheese between layers AND on top, but save the finest layer for the top surface. This creates that irresistible golden, bubbly cheese crown everyone loves.
The Sauce Secret: Mix a tablespoon of lime juice and a teaspoon of cumin into your sour cream before adding it to the filling. This small step adds incredible depth and brightness.
Two-Temperature Baking: Start at 375°F covered to cook everything through, then finish with a quick 2-minute broil (watch carefully!) for that perfect golden-brown cheese top.
Fresh Herb Finish: Always garnish with fresh cilantro just before serving. The bright, fresh flavor cuts through the richness and makes every bite pop.
Common Mistakes to Avoid
Even simple recipes can go wrong. Here’s how to avoid the most common pitfalls:
Soggy Bottom Syndrome: Using too much salsa or sauce, or not draining your beans properly, creates a watery casserole. Solution: Drain beans thoroughly, don’t over-sauce, and consider mixing a tablespoon of cornstarch into your filling if it seems too wet.
Dry, Overcooked Chicken: Overcooking the chicken before it goes into the casserole makes it tough and stringy. Solution: Cook chicken to exactly 165°F internal temperature, or use rotisserie chicken for foolproof moistness every time.
Burnt Edges: The corners and edges of your casserole burn while the center is perfect. Solution: Make sure your tortillas fully cover the edges, cover with foil for most of the baking time, and reduce oven temperature by 25°F if your oven runs hot.
Bland Flavor: The casserole tastes flat or boring despite following the recipe. Solution: Don’t skip the sautéed aromatics (onion, garlic, peppers), use quality salsa with good flavor, and season each layer, not just the filling.
Falls Apart When Serving: The casserole won’t hold together when you try to slice it. Solution: Let it rest for at least 10 minutes after baking, use enough cheese to bind the layers, and make sure your layers are evenly distributed and not too thick.
Storage & Meal Prep
This casserole is a meal prep champion and stores beautifully:
Refrigerator Storage: Let the casserole cool completely, then cover tightly with plastic wrap or transfer to an airtight container. It will keep in the refrigerator for 4-5 days. Individual portions reheat even better than the whole dish.
Reheating Instructions: For best results, reheat individual portions in the microwave for 2-3 minutes on 50% power, or reheat the entire dish covered with foil in a 350°F oven for 20-25 minutes until warmed through. Add a splash of salsa or broth to prevent drying out.
Portion Control: Cut the cooled casserole into individual servings and store in meal prep containers. This makes grab-and-go lunches incredibly easy and helps with portion control.
Freshness Tips: The casserole actually tastes better the next day as the flavors meld together. The tortillas absorb the sauce and seasonings, creating an even more cohesive dish.
Make-Ahead & Freezer Notes
Planning ahead? This recipe is perfect for advance preparation:
Assemble Ahead: You can build the entire casserole up to 24 hours before baking. Cover tightly with plastic wrap and refrigerate. When ready to bake, let it sit at room temperature for 20 minutes, then bake as directed, adding 5-10 minutes to the covered baking time since it’s starting cold.
Freezer-Friendly: This casserole freezes beautifully! Assemble completely but don’t bake. Wrap tightly in plastic wrap, then cover with aluminum foil and label with the date. Freeze for up to 3 months.
Freezing Baked Casserole: You can also freeze leftover cooked casserole. Cut into portions, wrap individually, and freeze for up to 2 months. This is perfect for quick single servings.
Thawing & Baking: For unbaked frozen casserole, thaw in the refrigerator overnight. Let it sit at room temperature for 20-30 minutes before baking as directed. You can also bake from frozen—cover with foil and bake at 350°F for 90 minutes, then uncover and bake 15 minutes more.
Best Practices: Use heavy-duty aluminum foil and freezer-safe containers. Remove as much air as possible before sealing. Label clearly with the date and reheating instructions.
Serving Suggestions
Complete your Tex-Mex feast with these perfect accompaniments:
Classic Sides: Spanish rice, cilantro lime rice, Mexican street corn (elote), refried beans, black beans with cumin, or a simple side salad with lime vinaigrette.
Fresh Toppings Bar: Set out bowls of shredded lettuce, diced tomatoes, sliced avocado or guacamole, sour cream, pickled jalapeños, fresh cilantro, lime wedges, diced red onion, sliced black olives, and hot sauce. Let everyone customize their slice!
Bread & Chips: Warm tortilla chips with salsa and guacamole, crispy tortilla strips for crunch, or warm flour tortillas on the side.
Beverages: Pair with Mexican beer, margaritas (frozen or on the rocks), agua fresca, horchata, or simple lime-infused sparkling water.
Salad Options: Crisp romaine salad with avocado ranch, tangy Mexican coleslaw with lime dressing, or a simple tomato and cucumber salad with cilantro.
Game Day Spread: This casserole is perfect for parties—serve it alongside queso dip, buffalo wings, loaded nachos, and a taco bar for the ultimate Tex-Mex spread.
FAQs Section
Can I use corn tortillas instead of flour tortillas?
Absolutely! Corn tortillas work wonderfully and give a more authentic Mexican flavor. They’re also naturally gluten-free. They may be slightly more delicate, so you might need to use more tortillas to cover each layer completely. Some people prefer to lightly fry or warm corn tortillas first to make them more pliable.
Can I make this with ground beef instead of chicken?
Yes! Ground beef is a delicious alternative. Brown 1.5-2 lbs of ground beef with the onions and peppers, drain excess fat, then season with taco seasoning and proceed with the recipe. You can also use ground turkey for a leaner option.
How do I prevent my casserole from being too watery?
The key is draining your beans thoroughly and not using too much salsa or sauce. If your filling mixture looks very wet, you can drain some liquid off or add a tablespoon of cornstarch or flour to thicken it. Also, don’t skip the resting period after baking—this allows the casserole to set up properly.
Can I make this casserole in a slow cooker?
While the traditional oven method gives the best texture, you can adapt this for a slow cooker. Layer as directed in a greased slow cooker, cook on low for 4-5 hours, then add the final cheese layer and cook on high for 15 minutes until melted. The texture will be softer and less structured than the oven version.
Is this recipe gluten-free?
The casserole can easily be made gluten-free by using certified gluten-free tortillas (corn tortillas are naturally gluten-free) and ensuring your taco seasoning, salsa, and other packaged ingredients are gluten-free. Many brands contain hidden gluten, so always check labels if you have celiac disease or gluten sensitivity.
Why is my cheese not melting properly?
Pre-shredded cheese contains anti-caking agents that can prevent smooth melting. For the best results, shred cheese from a block yourself. Also, make sure you’re baking long enough and that your oven temperature is accurate—use an oven thermometer to verify.
Can I add rice to this casserole?
Definitely! Adding 2 cups of cooked rice to the filling makes it even heartier and stretches the recipe further. Mexican rice or cilantro lime rice work especially well. Just mix it into the chicken filling before layering.
Conclusion
There you have it—everything you need to create the most incredible Cheesy Chicken Burrito Casserole that’ll have your family asking for it on repeat! This recipe truly embodies everything we love about home cooking: it’s comforting, flavorful, easy to make, and brings everyone together around the dinner table.
Whether you’re meal prepping for the week, feeding a crowd, or just want a no-fuss dinner that delivers on flavor, this burrito casserole has got your back. The layers of seasoned chicken, melted cheese, and soft tortillas create pure Tex-Mex magic that’s impossible to resist. And the best part? You can customize it endlessly to match your family’s tastes and dietary needs.
I’d absolutely love to hear how your casserole turns out! Did you add extra spice? Try a fun variation? Snap a photo of your beautiful creation and share it—and don’t forget to save this recipe to your Pinterest boards so you can find it easily when those weeknight dinner cravings hit.
Ready to get cooking? Your family is going to love you for this one! Pin it, make it, and enjoy every cheesy, delicious bite! 🌯🧀