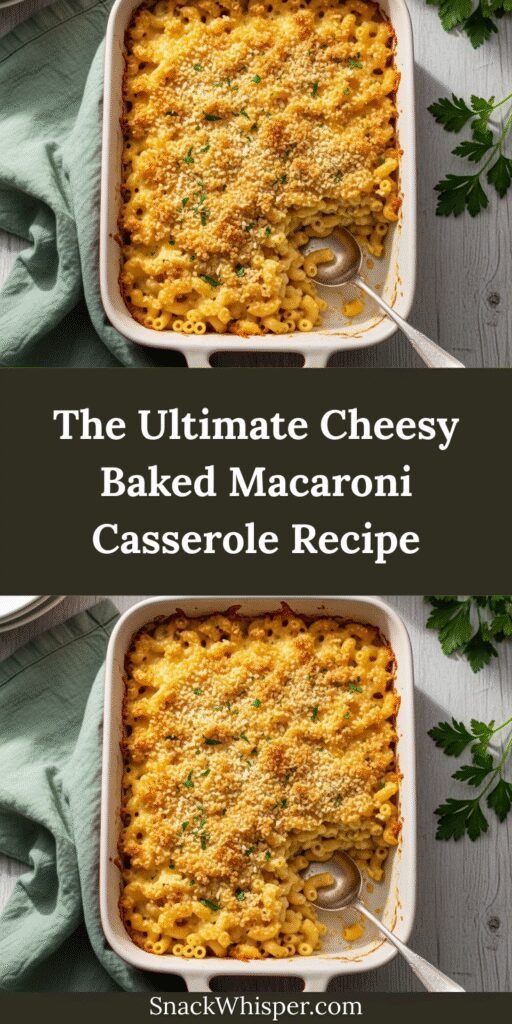
There’s something truly magical about a bubbling, golden-brown cheesy baked macaroni casserole fresh from the oven. This isn’t just any mac and cheese—it’s the ultimate comfort food casserole that brings families together around the dinner table. Imagine tender elbow macaroni swimming in a rich, creamy cheese sauce, topped with a crispy, golden breadcrumb layer that adds the perfect textural contrast to every forkful.
This cheesy baked macaroni casserole is perfect for busy weeknight dinners, potluck gatherings, holiday celebrations, or those moments when you simply crave soul-satisfying comfort food. It’s the kind of dish that makes everyone ask for seconds, and it’s surprisingly easy to prepare even if you’re not an experienced cook. Whether you’re feeding a crowd or meal prepping for the week ahead, this recipe delivers consistent, delicious results every single time.
What sets this version apart from basic stovetop mac and cheese is the baking process, which creates layers of flavor and texture that simply can’t be achieved any other way. The edges get slightly crispy while the center stays incredibly creamy, and that golden-brown cheese crust on top? Pure perfection.
History / Background
Baked macaroni casserole has deep roots in American culinary history, though its origins stretch back even further to European traditions. Macaroni and cheese itself can be traced to 14th-century Italian cookbooks, but the dish truly became an American staple in the 18th century. Thomas Jefferson is famously credited with popularizing macaroni and cheese in America after encountering it during his travels to Paris and northern Italy. He was so enamored with the dish that he brought back a pasta machine and had his chef James Hemings learn to prepare it.
The baked casserole version we know and love today became especially popular in the American South during the 19th and early 20th centuries. Southern cooks elevated the simple pasta dish by adding multiple cheeses, baking it until golden, and sometimes incorporating additional ingredients like breadcrumbs, eggs, or even a touch of hot sauce for complexity.
During the Great Depression and World War II, baked macaroni casserole became even more beloved as an affordable, filling meal that could stretch ingredients to feed large families. The introduction of Kraft’s boxed macaroni and cheese in 1937 made the concept even more accessible to American households, though homemade baked versions remained the gold standard for special occasions and Sunday dinners.
Today, cheesy baked macaroni casserole holds a cherished place in American comfort food culture. It’s a staple at church potlucks, family reunions, Thanksgiving tables, and soul food restaurants across the country. Every family seems to have their own treasured recipe, passed down through generations with small tweaks and personal touches that make it uniquely theirs.
Why You’ll Love This Recipe
This cheesy baked macaroni casserole strikes the perfect balance between nostalgic comfort and culinary satisfaction. It’s the kind of recipe that reminds you of childhood dinners at grandma’s house while still impressing dinner guests with its rich, sophisticated flavor profile.
Here’s why this recipe will become your new favorite:
- Incredibly creamy and cheesy – Multiple cheese varieties create complex flavor and that irresistible stretchy, gooey texture
- Budget-friendly ingredients – Uses pantry staples and affordable cheeses without sacrificing taste
- Crowd-pleaser guaranteed – Kids and adults alike devour this dish; picky eaters don’t stand a chance
- Make-ahead friendly – Assemble hours or even a day in advance, then bake when ready
- Perfect for meal prep – Makes generous portions that reheat beautifully throughout the week
- Customizable base recipe – Easily adapt with add-ins like bacon, vegetables, or different cheese combinations
- Foolproof technique – Simple steps ensure success even for beginner cooks
- Freezer-friendly – Double the batch and freeze half for future easy dinners
- Golden crispy topping – That crunchy breadcrumb and cheese crust adds restaurant-quality appeal
- One-dish convenience – Minimal cleanup since everything bakes together in one casserole dish
Ingredient Notes
Elbow Macaroni: The classic choice for a reason—its curved shape holds onto cheese sauce beautifully. You can substitute with shells, cavatappi, or penne, but avoid delicate pastas that might become mushy during baking.
Butter: Forms the base of the roux for our cheese sauce. Use unsalted butter so you can control the salt level. European-style butter adds extra richness if you’re feeling fancy.
All-Purpose Flour: Creates the roux that thickens the cheese sauce to perfect consistency. This is essential for preventing a runny casserole.
Whole Milk: Provides the creamy liquid base. Whole milk is recommended for richness, but 2% works in a pinch. Avoid skim milk as it produces a thinner, less satisfying sauce.
Heavy Cream: Adds luxurious richness and helps create that ultra-creamy texture. Half-and-half can substitute, though the result will be slightly less decadent.
Sharp Cheddar Cheese: The star of the show! Sharp cheddar provides robust flavor that doesn’t disappear during baking. Freshly shred your own for best melting quality—pre-shredded cheese contains anti-caking agents that affect texture.
Gruyere or Fontina Cheese: Adds sophisticated depth and amazing melting properties. Gruyere brings nutty notes while fontina offers mild sweetness. Monterey Jack or Gouda work as substitutes.
Cream Cheese: The secret ingredient for extra creaminess and tang. It helps prevent the sauce from breaking and adds body.
Dijon Mustard: Just a teaspoon enhances all the cheese flavors without making the dish taste mustardy. Trust the process!
Garlic Powder & Onion Powder: Add savory depth. Fresh garlic can burn during the long baking time, so powder works better here.
Paprika: Provides subtle color and a hint of smokiness. Smoked paprika takes it up a notch.
Panko Breadcrumbs: Creates the ultimate crispy topping. Panko stays crunchier than regular breadcrumbs. Toast them in butter before topping for extra flavor.
Parmesan Cheese: Mixed with breadcrumbs for a savory, golden crust that adds professional flair.
Equipment Needed
- Large pot (6-quart or larger) for boiling pasta
- Medium saucepan (3-quart) for making cheese sauce
- Whisk for smooth sauce consistency
- Colander for draining pasta
- 9×13-inch baking dish (deep-dish casserole pan works great)
- Box grater or food processor for shredding cheese
- Measuring cups and spoons
- Small skillet for toasting breadcrumb topping
- Wooden spoon or silicone spatula for stirring
- Aluminum foil for covering during initial baking
- Oven mitts
- Cooling rack

Cheesy Baked Macaroni Casserole Recipe
- Total Time: 1 hour 5 minutes
- Yield: 8-10 servings 1x
- Diet: Vegetarian
Description
This ultimate cheesy baked macaroni casserole features tender pasta enveloped in a rich, creamy three-cheese sauce and topped with a golden, crispy breadcrumb crust. It’s comfort food at its finest—perfect for family dinners, potlucks, or any time you need a crowd-pleasing dish that delivers pure satisfaction in every bite.
Ingredients
For the Macaroni:
- 1 pound elbow macaroni
- 1 tablespoon salt (for pasta water)
For the Cheese Sauce:
- 4 tablespoons unsalted butter
- ¼ cup all-purpose flour
- 3 cups whole milk, warmed
- 1 cup heavy cream
- 3 cups sharp cheddar cheese, freshly shredded
- 1½ cups Gruyere cheese, freshly shredded
- 4 ounces cream cheese, softened
- 1 teaspoon Dijon mustard
- 1 teaspoon garlic powder
- ½ teaspoon onion powder
- ½ teaspoon smoked paprika
- 1 teaspoon salt
- ½ teaspoon black pepper
- ¼ teaspoon cayenne pepper (optional)
For the Topping:
- 1½ cups panko breadcrumbs
- 3 tablespoons butter, melted
- ½ cup Parmesan cheese, freshly grated
- ¼ teaspoon garlic powder
- 2 tablespoons fresh parsley, chopped (optional)
Instructions
Step 1: Prepare the Pasta
Preheat your oven to 350°F (175°C). Bring a large pot of salted water to a rolling boil. Add the elbow macaroni and cook according to package directions until al dente (usually 7-8 minutes). You want the pasta slightly firm since it will continue cooking in the oven. Drain well in a colander but do not rinse—the starch helps the sauce cling to the pasta. Set aside.
Step 2: Make the Cheese Sauce Base
In a medium saucepan over medium heat, melt 4 tablespoons of butter. Once melted and foaming, add the flour and whisk continuously for 2-3 minutes to create a roux. The mixture should turn light golden and smell slightly nutty. This cooks out the raw flour taste and creates the thickening base for your sauce.
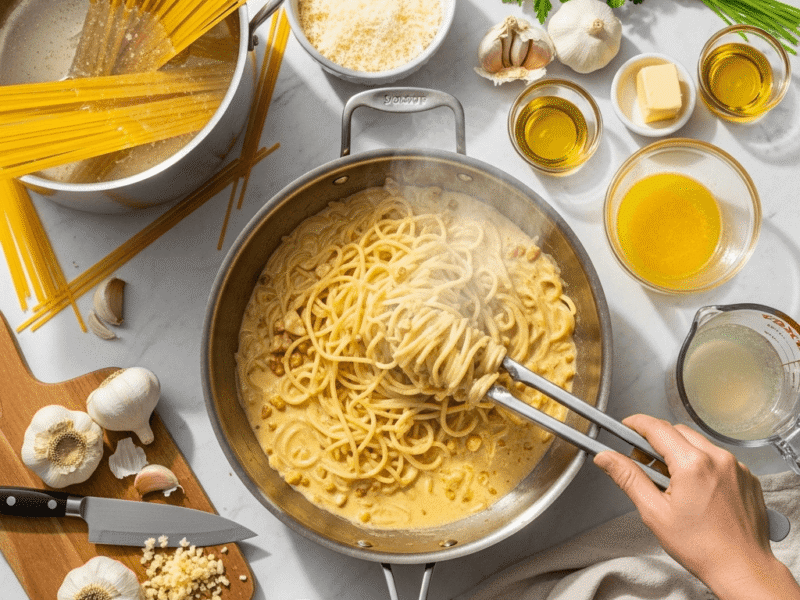
Step 3: Add the Milk and Cream
Gradually pour in the warmed milk while whisking constantly to prevent lumps. Start with about ½ cup and whisk until smooth, then continue adding the remaining milk in steady streams. Add the heavy cream and continue whisking. Bring the mixture to a gentle simmer, stirring frequently. Cook for 5-7 minutes until the sauce thickens enough to coat the back of a spoon.
Step 4: Incorporate the Cheeses
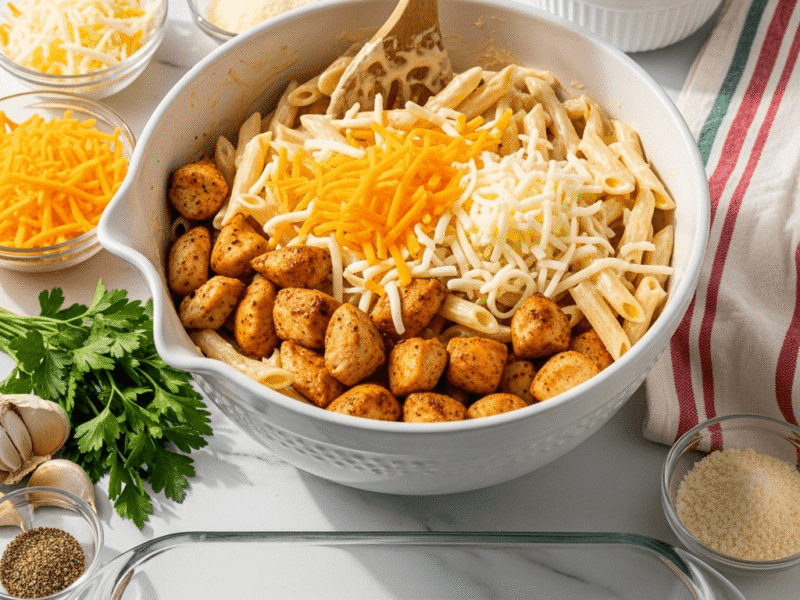
Reduce heat to low. Add the cream cheese in pieces, stirring until completely melted and smooth. Gradually add the shredded cheddar and Gruyere, one handful at a time, stirring after each addition until fully melted before adding more. This prevents the cheese from clumping. Once all cheese is incorporated, stir in the Dijon mustard, garlic powder, onion powder, paprika, salt, pepper, and cayenne if using. Taste and adjust seasoning as needed.
Step 5: Combine Pasta and Sauce
Add the drained macaroni to the cheese sauce and stir gently but thoroughly to ensure every piece of pasta is coated. The mixture should look very creamy—it will firm up slightly during baking.
Step 6: Transfer to Baking Dish
Pour the mac and cheese mixture into a greased 9×13-inch baking dish, spreading it evenly with a spatula. Gently shake the dish to settle the pasta and remove air pockets.
Step 7: Prepare the Topping
In a small skillet over medium heat, melt 3 tablespoons of butter. Add the panko breadcrumbs and toast for 3-4 minutes, stirring frequently, until golden brown. Remove from heat and stir in the Parmesan cheese, garlic powder, and parsley if using.
Step 8: Top and Bake
Sprinkle the toasted breadcrumb mixture evenly over the macaroni. Cover the dish loosely with aluminum foil and bake for 25 minutes. Remove the foil and continue baking for an additional 15-20 minutes until the top is golden brown and the edges are bubbling. For an extra-crispy top, broil for the last 2-3 minutes, watching carefully to prevent burning.
Step 9: Rest and Serve
Remove from the oven and let the casserole rest for 10 minutes before serving. This allows the sauce to set slightly, making it easier to serve neat portions. Garnish with additional parsley if desired and serve hot.
Notes
- Cheese Quality Matters: Always shred cheese from a block rather than using pre-shredded. Pre-shredded cheese contains cellulose to prevent clumping, which interferes with smooth melting.
- Sauce Too Thick? If your cheese sauce seems too thick when combining with pasta, stir in a splash of milk to loosen it. Remember it will thicken further in the oven.
- Sauce Too Thin? If it seems runny, don’t worry—baking will thicken it. Just ensure you cooked the roux properly in step 2.
- Make It Ahead: Assemble completely through step 6, cover tightly, and refrigerate up to 24 hours. Add 10-15 minutes to baking time if starting from cold.
- Gluten-Free Option: Use gluten-free pasta and substitute the flour with cornstarch (use 2 tablespoons instead of ¼ cup flour). Use gluten-free breadcrumbs for topping.
- Prep Time: 20 minutes
- Cook Time: 45 minutes
- Category: Dinner, Main Course
- Method: Baking
- Cuisine: American
Nutrition
- Serving Size: 1 cup (approximately 1/10 of recipe)
- Calories: 520
- Sugar: 6g
- Sodium: 680mg
- Fat: 32g
- Saturated Fat: 19g
- Unsaturated Fat: 11g
- Trans Fat: 0g
- Carbohydrates: 38g
- Fiber: 2g
- Protein: 22g
- Cholesterol: 95mg
Nutrition information is approximate and may vary based on specific ingredients used and serving sizes.
Tips & Variations
Protein Additions:
Transform this into a heartier main dish by stirring in 2 cups of cooked, diced chicken, crumbled bacon, cubed ham, or ground beef into the mac and cheese before baking.
Vegetable Boost:
Sneak in nutrition by folding in steamed broccoli florets, roasted cauliflower, sautéed mushrooms, or caramelized onions. This adds vitamins without sacrificing the comfort food appeal.
Spicy Kick:
Add ½ teaspoon of hot sauce or a diced jalapeño to the cheese sauce. Top with crushed red pepper flakes before serving for heat lovers.
Lobster Mac:
Make it fancy for special occasions by folding in 1 pound of cooked lobster meat. Add a tablespoon of Old Bay seasoning to the sauce for restaurant-quality seafood mac.
Southern Soul Food Style:
Beat 2 eggs and mix them into the mac and cheese before baking for a custard-like texture that’s traditional in Southern kitchens. Add a pinch of nutmeg for authentic flavor.
Buffalo Chicken Mac:
Stir in ½ cup buffalo sauce and 2 cups shredded rotisserie chicken. Top with blue cheese crumbles alongside the breadcrumbs.
Truffle Luxury:
Drizzle with truffle oil before serving and substitute half the cheddar with fontina for an upscale version.
Pro Chef Tips
Temperature Control is Key: Let your cream cheese and cheeses come to room temperature before starting. Cold cheese doesn’t melt as smoothly and can cause your sauce to break or become grainy.
Warm Your Milk: Heating the milk before adding it to the roux prevents the temperature from dropping too much, which can cause lumps. Warm it in the microwave for 1-2 minutes or in a separate saucepan.
The Pasta Water Secret: Save ½ cup of starchy pasta cooking water before draining. If your cheese sauce needs thinning, this works better than plain milk because the starch helps bind everything together.
Cheese Melting Order: Always melt cream cheese first, then add shredded cheeses gradually. This creates the smoothest sauce. Adding all the cheese at once can cause clumping and uneven melting.
Don’t Overbake: Watch for bubbling around the edges—that’s your signal the casserole is done. Overbaking can cause the sauce to separate and become oily. The center might look slightly jiggly when you remove it, but it will set as it rests.
Toast Your Breadcrumbs: This extra step takes just a few minutes but makes a massive difference. Raw breadcrumbs can taste pasty, while toasted ones add nutty flavor and stay crispy longer.
Layer for Texture: For an extra-indulgent version, reserve some cheese sauce and half the pasta. Create a layer in your baking dish, add a sprinkle of cheese, then top with remaining pasta and sauce. This creates pockets of extra cheesiness throughout.
Common Mistakes to Avoid
Using Pre-Shredded Cheese: This is the number one mistake home cooks make. Pre-shredded cheese contains anti-caking agents that prevent smooth melting and create a grainy, separated sauce. Always shred your own cheese even though it takes a few extra minutes.
Overcooking the Pasta: Remember, your macaroni will continue cooking in the oven. If you cook it to full tenderness before baking, you’ll end up with mushy pasta. Always cook to al dente (firm to the bite) when preparing baked pasta dishes.
Not Making Enough Roux: Skimping on the butter and flour mixture leads to thin, runny sauce that won’t coat the pasta properly. Follow the measurements precisely for the right consistency.
Adding Cheese to Boiling Sauce: High heat causes cheese proteins to seize up and separate. Always reduce to low heat before adding cheese, and be patient—add it gradually for the smoothest results.
Skipping the Resting Time: Cutting into the casserole immediately after removing from the oven results in a saucy mess that won’t hold its shape. Those 10 minutes of resting allow the sauce to thicken and set properly, giving you beautiful servings.
Storage & Meal Prep
Refrigerator Storage:
Allow the casserole to cool completely before covering tightly with plastic wrap or aluminum foil, or transfer to an airtight container. Properly stored, baked macaroni casserole will keep in the refrigerator for 3-4 days.
Reheating Instructions:
For best results, reheat individual portions in the microwave at 50% power for 2-3 minutes, stirring halfway through, until heated through. Add a splash of milk if the sauce seems dry. For larger portions, reheat covered in a 350°F oven for 20-25 minutes, adding a few tablespoons of milk or cream and stirring halfway through to restore creaminess.
Meal Prep Tips:
This casserole is perfect for weekly meal prep. Portion individual servings into microwave-safe containers right after baking and cooling. When reheating from the refrigerator, the microwave works best—just add a small splash of milk to each portion before heating.
Keeping it Creamy:
Pasta tends to absorb moisture as it sits, which is why leftovers can seem dry. Combat this by slightly under-baking if you know you’ll have lots of leftovers, and always add a bit of liquid when reheating.
Make-Ahead & Freezer Notes
Make-Ahead Assembly:
This recipe is fantastic for advance preparation. Assemble the entire casserole through step 6 (before adding the breadcrumb topping), cover tightly with plastic wrap, then aluminum foil, and refrigerate for up to 24 hours. When ready to bake, remove from refrigerator and let sit at room temperature for 30 minutes, then add the breadcrumb topping and bake as directed, adding an extra 10-15 minutes to the covered baking time.
Freezing Baked Casserole:
After baking and cooling completely, cover the casserole tightly with plastic wrap, then a layer of heavy-duty aluminum foil. Freeze for up to 3 months. To reheat, thaw overnight in the refrigerator, then bake covered at 350°F for 30-35 minutes until heated through.
Freezing Unbaked Casserole:
Assemble the casserole completely (including breadcrumb topping) in a freezer-safe baking dish. Cover tightly with plastic wrap and foil. Freeze for up to 2 months. To bake from frozen, remove plastic wrap, replace foil, and bake covered at 350°F for 60 minutes, then uncover and bake 20-25 minutes more until golden and bubbling.
Individual Freezer Portions:
For ultimate convenience, portion the baked and cooled casserole into individual freezer-safe containers. Freeze for up to 3 months. Reheat individual portions in the microwave from frozen—about 4-5 minutes at 50% power, stirring halfway through.
Best Reheating Method from Frozen:
For whole casseroles, oven reheating produces the best texture. Microwave reheating works well for individual portions but can make the breadcrumb topping soggy (though it’s still delicious).
Serving Suggestions
This rich, cheesy casserole pairs beautifully with lighter, fresh sides that balance its indulgent creaminess.
Fresh Salads:
A crisp garden salad with tangy vinaigrette, Caesar salad with crunchy croutons, or a simple arugula salad with lemon dressing cuts through the richness perfectly.
Vegetables:
Serve alongside roasted Brussels sprouts, steamed green beans with garlic, honey-glazed carrots, or sautéed spinach for added nutrition and color.
Proteins:
While this is hearty enough as a main course, it also works as a side dish to grilled chicken, baked pork chops, BBQ pulled pork, or glazed meatloaf for those with extra-hearty appetites.
Bread Options:
Warm garlic bread, buttery dinner rolls, or crusty French bread are perfect for sopping up any extra cheese sauce.
Complete Meal Ideas:
Pair with tomato soup for the ultimate comfort food dinner, serve at BBQs alongside coleslaw and cornbread, or make it the centerpiece of a potluck spread with various salads and vegetable sides.
Beverages:
This pairs wonderfully with iced tea, lemonade, crisp white wine like Sauvignon Blanc, or even a light beer for adults. For kids, fruit punch or apple juice works great.
FAQs Section
Can I use different pasta shapes?
Absolutely! While elbow macaroni is traditional, shells, cavatappi, penne, rotini, or any short pasta shape works wonderfully. Just avoid very delicate pastas like angel hair or pastina, as they can become too soft during baking. Larger shapes may need an extra 5 minutes of baking time.
Can I make this without breadcrumbs?
Yes! You can skip the breadcrumb topping entirely for a simpler version, or substitute with crushed crackers like Ritz, crushed potato chips for extra crunch, or simply top with extra shredded cheese. French fried onions make a delicious alternative topping too.
Why did my cheese sauce become grainy?
Graininess usually occurs from overheating the cheese or adding it to sauce that’s too hot. Always reduce heat to low before adding cheese, and add it gradually. Using pre-shredded cheese also causes graininess due to anti-caking additives. Another culprit can be using low-fat or skim milk, which doesn’t have enough fat to keep the sauce emulsified.
Can I use dairy-free alternatives?
Yes, though the result will taste different. Use plant-based butter, oat milk or cashew milk (full-fat versions), and dairy-free cheese alternatives. The texture may be slightly different, but it can still be delicious. Add a tablespoon of nutritional yeast for extra cheesy flavor.
How do I know when it’s done baking?
The casserole is done when the edges are bubbling vigorously, the top is golden brown, and you can see the sauce bubbling up around the sides. A thermometer inserted in the center should read 165°F. The center may look slightly jiggly, but it will set as it rests.
Can I add vegetables without making it soggy?
Yes! The key is to remove excess moisture first. Roast vegetables like broccoli or cauliflower beforehand to drive off moisture, or sauté vegetables like mushrooms or zucchini until they release their water. Pat vegetables dry before adding them to the mac and cheese.
Why is my baked mac and cheese dry?
This usually happens from overbaking, using too little sauce, or not covering during the initial baking phase. Make sure your pasta is well-coated with sauce before baking, cover with foil for the first 25 minutes, and don’t bake longer than directed. Adding a splash of milk before reheating leftovers helps restore moisture.
Conclusion
There you have it—the ultimate cheesy baked macaroni casserole that’s destined to become a staple in your recipe rotation! This dish represents everything we love about comfort food: it’s warm, satisfying, brings people together, and tastes absolutely incredible. Whether you’re making it for a busy Tuesday dinner, bringing it to a potluck where you want to impress, or serving it at a holiday gathering, this recipe delivers every single time.
The beauty of this recipe lies not just in its incredible flavor, but in its versatility. Once you master this base recipe, you can customize it endlessly to suit your family’s preferences, dietary needs, or whatever ingredients you have on hand. It’s the kind of recipe that becomes more valuable over time as you make it your own.
I hope you and your loved ones enjoy this cheesy baked macaroni casserole as much as my family does. There’s something special about watching everyone dig into a pan of bubbling, golden mac and cheese—the smiles, the satisfied sighs, the requests for seconds (and thirds!). That’s what home cooking is all about.
Ready to make this delicious recipe? Save this to your Pinterest boards so you can find it easily whenever that mac and cheese craving hits! Don’t forget to leave a comment below telling me how it turned out or sharing your favorite variations. I love hearing from you!
Happy cooking, and may your cheese always be melty and your breadcrumbs perfectly golden! 🧀