
There’s something absolutely magical about a perfectly baked lemon pound cake. This buttery lemon pound cake loaf is the ultimate comfort dessert that combines rich, dense crumb with bright, refreshing lemon flavor in every single bite. Whether you’re hosting a spring brunch, bringing dessert to a potluck, or simply treating yourself to an afternoon slice with tea, this classic American cake never disappoints.
What makes this lemon pound cake recipe so special is its incredible versatility and foolproof nature. The cake is moist without being heavy, sweet without being cloying, and features that signature pound cake density that makes each slice utterly satisfying. The buttery richness is perfectly balanced by fresh lemon juice and zest, creating a dessert that tastes like sunshine in cake form. Plus, it actually gets better after a day or two as the flavors meld together beautifully.
This recipe is perfect for beginners and experienced bakers alike. You don’t need any fancy techniques or specialized equipment – just good quality ingredients, a little patience, and about an hour of your time. The result? A stunning bakery-worthy lemon loaf that will have everyone asking for seconds and begging for the recipe.
History / Background
Pound cake has a rich history dating back to early 18th century Europe, with the first known recipe appearing in print in 1747. The name “pound cake” comes from the traditional recipe’s measurements: one pound each of butter, sugar, eggs, and flour. This simple 1:1:1:1 ratio made the recipe incredibly easy to remember in an era before standardized measurements, and it resulted in a dense, rich cake that could keep for days without refrigeration.
The traditional pound cake made its way to America with European settlers and quickly became a staple in Southern baking culture. American bakers began adding their own twists to the classic recipe, incorporating ingredients like sour cream, cream cheese, and various flavorings to create regional variations. The lemon pound cake specifically became beloved in the American South, where citrus trees flourished and home bakers appreciated how the bright lemon flavor cut through the cake’s richness.
Over time, modern pound cake recipes have evolved from the original four-equal-parts formula, with bakers adjusting ratios and adding leavening agents like baking powder to create a slightly lighter (though still wonderfully dense) crumb. Today’s lemon pound cake represents the perfect marriage of Old World baking tradition and contemporary American tastes – maintaining that signature dense, buttery texture while incorporating the fresh, vibrant flavor of lemon that makes it irresistible to modern palates.
The loaf format specifically became popular in American home baking because it’s easy to slice, serve, and share. Unlike layer cakes that require frosting and assembly, a pound cake loaf is beautifully simple, often needing nothing more than a light glaze to make it shine.
Why You’ll Love This Recipe
This buttery lemon pound cake loaf is about to become your new favorite go-to dessert, and here’s why: it delivers that perfect balance of simplicity and impressive results that every home baker dreams about. The flavor is incredibly well-balanced – you get that rich, buttery pound cake taste with a bright pop of lemon that keeps it from feeling heavy.
Here’s what makes this recipe a winner:
- Incredibly moist texture – The combination of butter, eggs, and sour cream creates a tender crumb that stays moist for days
- Foolproof for beginners – Simple mixing method with no complicated techniques required
- Made with pantry staples – You probably have most ingredients on hand already
- Perfect for any occasion – Works beautifully for breakfast, brunch, dessert, or afternoon tea
- Make-ahead friendly – Actually tastes better the next day, making it ideal for meal prep
- Freezer-friendly – Wraps and freezes beautifully for up to 3 months
- Impressive presentation – Looks bakery-quality with minimal effort
- Customizable – Easy to adapt with different citrus flavors or add-ins
- Budget-friendly – Uses affordable, everyday ingredients without sacrificing quality
- Kid-approved – The sweet-tart flavor appeals to all ages
- No mixer required – Can be made entirely by hand if needed
The beauty of this recipe is that it delivers restaurant-quality results with home kitchen simplicity. You’ll get rave reviews every single time you make it.
Ingredient Notes
Let’s talk about what goes into this incredible lemon pound cake and why each ingredient matters:
Unsalted Butter – The star of the show! Use high-quality unsalted butter for the best flavor and to control the salt level. The butter should be softened to room temperature (not melted) so it creams properly with the sugar. European-style butter with higher fat content will make an even richer cake. If you only have salted butter, reduce the added salt to ⅛ teaspoon.
Granulated Sugar – Creates sweetness and helps create that tender crumb through the creaming process. The sugar crystals cut into the butter to create air pockets, which give the cake its structure. Don’t substitute with other sweeteners here – granulated sugar is essential for proper texture.
Eggs – Large eggs at room temperature are crucial. They provide structure, moisture, and richness. Room temperature eggs incorporate better into the batter without deflating the creamed butter and sugar. Let cold eggs sit in warm water for 5-10 minutes before using.
All-Purpose Flour – The foundation of your cake’s structure. Measure by spooning into the measuring cup and leveling off – don’t pack it down. For extra-tender results, you can substitute up to ¼ cup of the flour with cornstarch.
Sour Cream – The secret ingredient for ultra-moist pound cake. It adds tanginess, tenderness, and keeps the cake from drying out. Full-fat sour cream works best, but Greek yogurt is an excellent 1:1 substitute if needed.
Fresh Lemons – Both zest and juice are essential for that bright, authentic lemon flavor. Use fresh lemons (not bottled juice) for the best taste. You’ll need about 3-4 medium lemons for this recipe. Meyer lemons create an even more floral, delicate lemon flavor if you can find them.
Baking Powder – Gives the cake a slight lift while maintaining that classic dense pound cake texture. Make sure yours is fresh (check the expiration date) for proper rise.
Salt – Enhances all the other flavors and balances the sweetness. Don’t skip it!
Vanilla Extract – Pure vanilla extract complements the lemon beautifully. Use real vanilla, not imitation, for the best flavor.
Powdered Sugar (for glaze) – Creates a sweet, glossy finish that sets beautifully and adds extra lemon punch when mixed with lemon juice.
Equipment Needed
You don’t need a fancy kitchen to make this beautiful lemon pound cake. Here’s what you’ll need:
- 9×5-inch loaf pan – Standard size works perfectly; avoid glass pans as they conduct heat differently
- Large mixing bowl – For creaming butter and sugar
- Medium mixing bowl – For combining dry ingredients
- Electric hand mixer or stand mixer – Makes creaming butter easier, but you can do it by hand
- Rubber spatula – For scraping down bowl sides and folding ingredients
- Measuring cups and spoons – Accurate measurements are crucial in baking
- Zester or microplane – For removing lemon zest without the bitter white pith
- Citrus juicer – Makes extracting lemon juice easier (or just use your hands)
- Wire cooling rack – Essential for proper cooling
- Parchment paper – Lines the pan for easy removal
- Toothpick or cake tester – For checking doneness
- Small bowl and whisk – For making the lemon glaze
- Pastry brush (optional) – For brushing glaze evenly

Buttery Lemon Pound Cake Loaf Recipe
- Total Time: 1 hour 15 minutes
- Yield: 10 slices 1x
- Diet: Vegetarian
Description
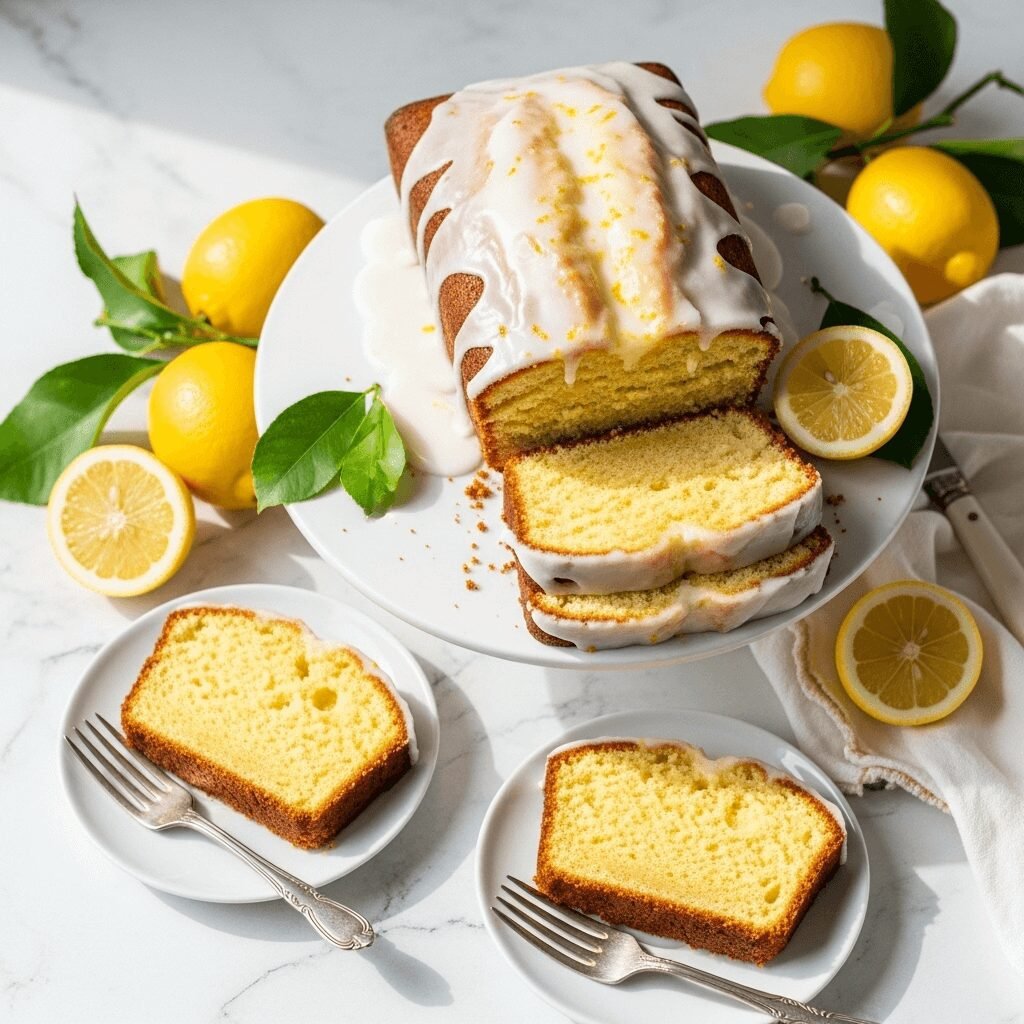
This buttery lemon pound cake loaf is perfectly moist, tender, and bursting with fresh citrus flavor. Made with simple pantry ingredients and finished with a sweet lemon glaze, it’s the ultimate crowd-pleasing dessert that works for any occasion. The dense, velvety crumb paired with bright lemon makes every bite absolutely irresistible.
Ingredients
For the Pound Cake:
- 1 cup (2 sticks/226g) unsalted butter, softened to room temperature
- 2 cups (400g) granulated sugar
- 4 large eggs, room temperature
- 3 cups (375g) all-purpose flour
- ½ teaspoon baking powder
- ½ teaspoon salt
- 1 cup (240ml) full-fat sour cream, room temperature
- 2 tablespoons fresh lemon zest (from about 2-3 lemons)
- ¼ cup (60ml) fresh lemon juice
- 2 teaspoons vanilla extract
For the Lemon Glaze:
- 1½ cups (180g) powdered sugar
- 3-4 tablespoons fresh lemon juice
- 1 teaspoon lemon zest (optional, for extra punch)
Instructions
Step 1: Prepare Your Pan and Preheat
Preheat your oven to 325°F (165°C). This lower temperature ensures even baking without over-browning the edges. Line a 9×5-inch loaf pan with parchment paper, leaving overhang on the sides for easy removal. Lightly grease the parchment with butter or cooking spray. Set aside.
Step 2: Cream Butter and Sugar
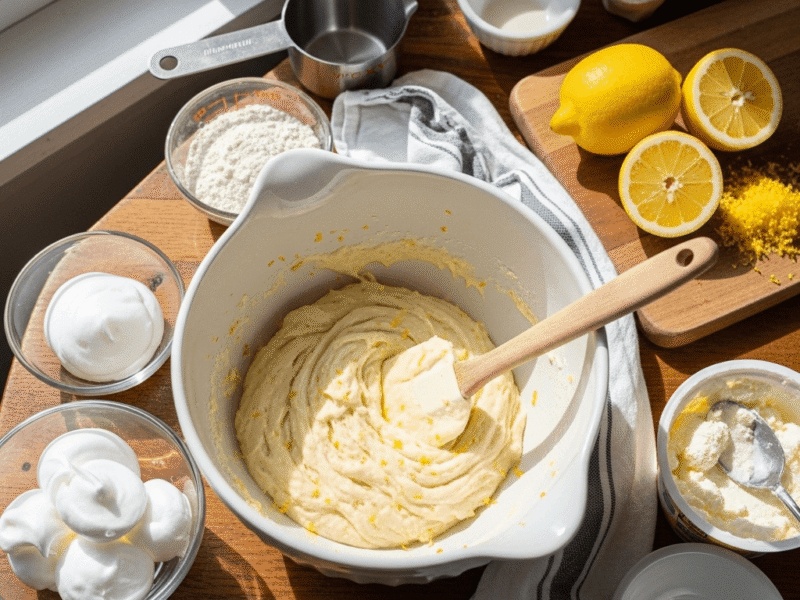
In a large mixing bowl, beat the softened butter with an electric mixer on medium speed for about 1 minute until smooth and creamy. Gradually add the granulated sugar and continue beating for 4-5 minutes until the mixture is light, fluffy, and pale in color. This creaming process is crucial – it incorporates air that helps create the cake’s texture. Scrape down the sides of the bowl as needed.
Step 3: Add Eggs
Add the eggs one at a time, beating well after each addition (about 30 seconds per egg). The mixture should look smooth and glossy. If it looks slightly curdled, don’t worry – it will come together when you add the flour. Mix in the vanilla extract, lemon zest, and lemon juice until just combined.
Step 4: Combine Dry Ingredients
In a separate medium bowl, whisk together the flour, baking powder, and salt. This ensures even distribution of the leavening and prevents clumps.
Step 5: Alternate Adding Dry and Wet
With your mixer on low speed, add the flour mixture to the butter mixture in three additions, alternating with the sour cream in two additions. Start and end with the flour mixture. The pattern should be: flour, sour cream, flour, sour cream, flour. Mix each addition just until combined – don’t overmix! Overmixing develops gluten and can make your cake tough. Use a rubber spatula to fold the batter a few times to ensure everything is incorporated, scraping the bottom of the bowl.
Step 6: Pour and Smooth
Pour the thick batter into your prepared loaf pan. Use your spatula to smooth the top evenly. Gently tap the pan on the counter 2-3 times to release any air bubbles.
Step 7: Bake
Bake for 55-65 minutes, or until a toothpick inserted into the center comes out with just a few moist crumbs (not wet batter). The top should be golden brown and spring back when lightly pressed. If the top is browning too quickly after 40 minutes, tent loosely with aluminum foil.
Step 8: Cool Properly
Remove from oven and let the cake cool in the pan for 15 minutes on a wire rack. This brief resting period helps the cake set and makes it easier to remove. After 15 minutes, use the parchment overhang to lift the cake out of the pan and place it on the wire rack. Let cool for at least 30 minutes before glazing.
Step 9: Make the Glaze
In a small bowl, whisk together the powdered sugar and lemon juice until smooth. Start with 3 tablespoons of juice and add more for a thinner consistency. The glaze should be pourable but not too runny. Add lemon zest if desired for extra flavor and visual appeal.
Step 10: Glaze and Serve
Place the cooling rack over a baking sheet to catch drips. Pour the glaze over the slightly warm cake, letting it drip down the sides naturally. You can use a pastry brush to spread it evenly if needed. Let the glaze set for about 15 minutes before slicing. Cut with a sharp serrated knife, wiping the blade between slices for clean cuts.
Notes
- Room Temperature Ingredients: This is crucial for proper mixing and texture. Cold ingredients won’t incorporate smoothly and can result in a dense, uneven cake.
- Don’t Overmix: Once you add the flour, mix just until combined. Overmixing develops gluten and creates a tough cake.
- Oven Temperature: Baking at 325°F prevents the outside from cooking too quickly before the inside is done.
- Storage: Store covered at room temperature for up to 4 days, refrigerated for up to 1 week, or frozen for up to 3 months.
- Variations: Try orange, lime, or a combination of citrus for different flavor profiles.
- Prep Time: 20 minutes
- Cook Time: 55 minutes
- Category: Dessert
- Method: Baking
- Cuisine: American
Nutrition
- Serving Size: 1 slice (1/10 of loaf)
- Calories: 485
- Sugar: 45g
- Sodium: 180mg
- Fat: 22g
- Saturated Fat: 13g
- Unsaturated Fat: 7g
- Trans Fat: 0g
- Carbohydrates: 68g
- Fiber: 1g
- Protein: 6g
- Cholesterol: 125mg
Note: Nutrition information is an estimate and may vary based on specific ingredients used.
Tips & Variations
Flavor Variations:
- Double Lemon: Add an extra tablespoon of lemon zest to the batter and brush the warm cake with lemon simple syrup before glazing
- Lemon Poppy Seed: Stir 2 tablespoons of poppy seeds into the finished batter
- Lemon Blueberry: Gently fold 1 cup of fresh blueberries tossed in 1 tablespoon of flour into the batter
- Orange Pound Cake: Substitute orange zest and juice for lemon
- Lemon Lavender: Add 1 tablespoon of culinary lavender buds to the batter (use sparingly – lavender is potent!)
- Cream Cheese Version: Replace ½ cup of butter with 4 oz softened cream cheese for extra tanginess
- Almond Lemon: Replace vanilla extract with almond extract and add ½ cup sliced almonds on top before baking
Texture Modifications:
- For a lighter crumb, separate the eggs. Beat the whites to soft peaks and fold them in at the very end
- For extra-moist cake, add 2 tablespoons of vegetable oil along with the butter
- For denser traditional pound cake, reduce baking powder to ¼ teaspoon
Glaze Options:
- Cream Cheese Glaze: Mix 4 oz softened cream cheese with powdered sugar and lemon juice
- Brown Butter Glaze: Use browned butter instead of lemon juice in the glaze for nutty richness
- Simple Syrup Soak: Brush the warm cake with lemon simple syrup (equal parts sugar and lemon juice, heated until sugar dissolves)
Pro Chef Tips
1. Room Temperature Matters: This is the single most important tip for pound cake success. All your dairy ingredients (butter, eggs, sour cream) should be at room temperature (65-70°F). Cold ingredients don’t emulsify properly, leading to a dense, uneven crumb. Plan ahead and set ingredients out 1-2 hours before baking.
2. Cream Thoroughly: Don’t rush the creaming process. Beating the butter and sugar for a full 4-5 minutes incorporates air that creates the cake’s structure. The mixture should look almost white and noticeably increased in volume. This is where your cake gets its rise and tender texture.
3. The Folding Technique: When you add the dry ingredients, use a gentle folding motion rather than aggressive mixing. Turn the bowl as you fold with a rubber spatula, scraping from the bottom to ensure everything is incorporated without overworking the gluten. Stop as soon as you don’t see any more flour streaks.
4. Tent with Foil: Because pound cakes bake for a long time, the top can over-brown before the center is done. If your cake is getting too dark after 40 minutes, loosely tent the top with aluminum foil to slow the browning while the interior finishes cooking.
5. The Toothpick Test Done Right: Your cake is done when a toothpick inserted in the center comes out with a few moist crumbs – not completely clean and not wet. Those moist crumbs mean the cake is perfectly baked. It will continue cooking slightly as it cools.
6. Glaze While Warm: Apply your glaze when the cake is still slightly warm (but not hot). The warmth helps the glaze absorb into the top layer slightly, creating better flavor while still maintaining that beautiful glossy finish on top.
7. Zest Before Juicing: Always zest your lemons before cutting and juicing them. It’s much easier to zest a whole lemon than trying to zest lemon halves!
8. Measure Flour Correctly: The #1 cause of dry, tough pound cake is too much flour. Use the spoon-and-level method: spoon flour into your measuring cup and level with a knife. Never scoop directly with the cup or tap it down.
Common Mistakes to Avoid
1. Using Cold Ingredients: This is the most common mistake! Cold butter won’t cream properly, and cold eggs can cause the batter to curdle or mix unevenly. Always bring ingredients to room temperature first. If you’re short on time, place cold eggs in warm water for 10 minutes.
2. Overmixing the Batter: Once you add the flour, overmixing develops gluten strands that make the cake tough and chewy instead of tender. Mix just until you can’t see dry flour anymore, then stop immediately. A few small lumps are fine.
3. Opening the Oven Door Too Early: Resist the urge to check on your cake before 45 minutes. Opening the oven door causes temperature fluctuations that can make your cake sink in the middle. Trust the process and use your oven light to peek instead.
4. Skipping the Parchment Paper: Without parchment paper, your pound cake is much more likely to stick to the pan, and you risk tearing it when removing. The paper overhang acts as handles for easy removal and ensures perfect results every time.
5. Cutting Too Soon: Pound cake needs to cool and set before slicing, or it will crumble and fall apart. Wait at least 30 minutes after removing from the pan (and preferably 1 hour) before cutting. The cake actually continues to cook slightly as it cools, and the texture needs time to set.
6. Not Leveling Your Batter: If you don’t smooth the top of the batter before baking, you might end up with an uneven, peaked top. Take 10 seconds to smooth it with a spatula for a more uniform, professional-looking loaf.
7. Using Bottled Lemon Juice: Fresh lemons make ALL the difference in this recipe. Bottled juice tastes artificial and won’t give you that bright, authentic lemon flavor. Fresh is best!
Storage & Meal Prep
Room Temperature Storage:
Once completely cooled and glazed, wrap the pound cake tightly in plastic wrap or store in an airtight container at room temperature for up to 4 days. The cake actually improves on day 2 as the flavors meld together. Keep it away from direct sunlight or heat sources.
Refrigerator Storage:
If your kitchen is very warm or humid, you can refrigerate the cake for up to 1 week. Wrap it well to prevent it from drying out or absorbing other food odors. Let it come to room temperature (about 30 minutes) before serving for the best flavor and texture.
Reheating Tips:
Pound cake is delicious at room temperature, but if you want to warm it up, place individual slices in the microwave for 10-15 seconds, or warm the whole loaf in a 300°F oven for 8-10 minutes. You can also toast slices in a toaster or skillet with a little butter for a crispy exterior – absolutely delicious!
Travel-Friendly:
Pound cake travels beautifully! It’s sturdy enough not to fall apart during transport. Wrap the whole loaf or individual slices in plastic wrap, then place in an airtight container. It’s perfect for picnics, potlucks, bake sales, or gifting to friends.
Make-Ahead & Freezer Notes
Make-Ahead Instructions:
You can bake this lemon pound cake 1-2 days ahead of when you need it. In fact, many bakers prefer the texture and flavor after the cake has rested for a day. Bake and cool completely, then wrap tightly and store at room temperature. Wait to add the glaze until the day you plan to serve it for the freshest appearance.
Freezing the Whole Loaf:
Pound cake freezes exceptionally well! After the cake is completely cooled, wrap it tightly in two layers of plastic wrap, then a layer of aluminum foil. Freeze for up to 3 months. To thaw, leave it wrapped and let it sit at room temperature for 3-4 hours, or overnight in the refrigerator. Glaze after thawing.
Freezing Individual Slices:
This is perfect for portion control or single servings! Slice the cake, then wrap each slice individually in plastic wrap. Place wrapped slices in a freezer bag or container. They’ll keep for up to 3 months. Thaw individual slices at room temperature for 30-45 minutes, or microwave for 20-30 seconds.
Freezing Without Glaze:
If you plan to freeze your cake, it’s best to freeze it unglazed. The glaze can become watery when thawed. Freeze the plain cake, then make fresh glaze when you’re ready to serve.
Best Reheating from Frozen:
For the best texture, let frozen cake thaw completely at room temperature while still wrapped. If you’re in a hurry, you can microwave individual slices from frozen for 30-40 seconds, though the texture won’t be quite as perfect as if you’d let it thaw naturally.
Serving Suggestions
This buttery lemon pound cake is incredibly versatile! Here are some delicious ways to serve it:
Classic Presentations:
- Slice and serve with a hot cup of coffee or Earl Grey tea for the perfect afternoon treat
- Dust with extra powdered sugar instead of glaze for an elegant, simple look
- Serve with a dollop of fresh whipped cream and berries for a stunning dessert
Elevated Serving Ideas:
- Lemon Pound Cake Trifle: Cube the cake and layer with lemon curd, whipped cream, and fresh berries in glasses
- French Toast Style: Slice day-old pound cake, dip in egg mixture, and pan-fry for an incredible breakfast
- Grilled Pound Cake: Brush slices with melted butter and grill until toasted, then top with ice cream
- With Ice Cream: Serve warm slices with vanilla bean or lemon ice cream for the ultimate dessert
- Berry Compote: Top with warm berry compote made from fresh or frozen berries
Beverage Pairings:
- Hot tea (Earl Grey, chamomile, or green tea)
- Fresh-brewed coffee or cappuccino
- Cold milk or almond milk
- Sparkling lemonade
- Sweet dessert wine like Moscato
- Limoncello (for adult gatherings)
Seasonal Twists:
- Spring: Serve with fresh strawberries and whipped cream
- Summer: Top with mixed berry compote and vanilla ice cream
- Fall: Drizzle with caramel sauce and serve with spiced apple cider
- Winter: Serve with cranberry sauce and hot cocoa
Party Presentation: For gatherings, cut the loaf into thinner slices (about ½ inch thick) and arrange on a tiered serving platter with fresh lemon slices, mint leaves, and edible flowers for a stunning presentation that’ll wow your guests.
FAQs Section
Q: Can I use salted butter instead of unsalted?
A: Yes, you can use salted butter in a pinch. If you do, reduce the added salt in the recipe to just ⅛ teaspoon (or omit it entirely) to prevent the cake from being too salty. However, unsalted butter is preferred because it gives you better control over the salt level and allows the lemon flavor to shine through more clearly.
Q: Why did my pound cake sink in the middle?
A: A sunken center usually happens for one of these reasons: opening the oven door too early (before 45 minutes), oven temperature too low, underbaking, or too much leavening. Make sure your oven is properly preheated to 325°F, don’t open the door during the first 45 minutes, and bake until a toothpick comes out with just a few moist crumbs. Also check that your baking powder is fresh!
Q: Can I make this recipe without sour cream?
A: Absolutely! You can substitute sour cream 1:1 with full-fat plain Greek yogurt, buttermilk, or even full-fat plain yogurt. Greek yogurt is the closest substitution and will give you the same tangy, moist texture. If using buttermilk, the cake will be slightly less dense but still delicious.
Q: How do I know when my pound cake is done?
A: Your pound cake is done when a toothpick or cake tester inserted into the center comes out with a few moist crumbs (not wet batter, but not completely clean either). The top should be golden brown and spring back lightly when touched. The internal temperature should reach 200-210°F if you have a thermometer. Don’t rely on timing alone – all ovens vary!
Q: Can I double this recipe?
A: Yes, you can double the recipe to make two loaves! However, it’s easier to mix two separate batches rather than one giant batch, as pound cake batter can be quite thick and difficult to mix in large quantities. If you do double it, make sure your mixer bowl is large enough to handle the volume without overflowing.
Q: Why is my pound cake dry?
A: Dry pound cake usually results from overbaking, too much flour, or not enough fat. Use the spoon-and-level method to measure flour (don’t pack it down), and start checking for doneness at 55 minutes. Remember that the cake continues to cook slightly as it cools, so don’t overbake. Also, make sure all your ingredients (especially butter and sour cream) are at full-fat, not reduced-fat versions.
Q: Can I make this in a bundt pan instead of a loaf pan?
A: Yes! This recipe works beautifully in a 10-12 cup bundt pan. Grease and flour the pan thoroughly (or use baking spray with flour). Baking time will be similar (50-65 minutes), but start checking at 50 minutes. Let cool in the pan for 15 minutes before inverting onto a wire rack. The glaze will look stunning drizzled over a bundt cake!
Conclusion
There you have it – the ultimate buttery lemon pound cake loaf that’s guaranteed to become your new favorite dessert! This recipe delivers everything you want in a perfect pound cake: that dense, tender crumb, rich buttery flavor, and bright citrus zing that keeps you coming back for just one more slice. Whether you’re baking for a special occasion or simply treating yourself to a little homemade happiness, this lemon loaf never disappoints.
The best part? It’s so much easier to make than it looks, and it gets even better with time. Make it on Sunday afternoon, and you’ll have the perfect treat to enjoy all week long with your morning coffee or as an after-dinner dessert. Your kitchen will smell absolutely amazing, and your family will think you’ve been secretly attending pastry school.
I’d love to hear how your lemon pound cake turns out! Did you make any fun variations? Serve it in a creative way? Drop a comment below and let me know. And if you loved this recipe (I know you will!), please share it with your friends and save it to your Pinterest boards so you can find it again. Don’t forget to tag me in your baking photos – I genuinely love seeing your creations!
Now, what are you waiting for? Grab those lemons and get baking! Your kitchen is about to smell like pure sunshine. 🍋
Happy baking, friend!