
There’s something magical about a one-pan dinner that brings together tender chicken, fluffy rice, and gooey melted cheese all in one beautiful, bubbling skillet. This Cheesy Chicken and Rice Skillet is the ultimate weeknight warrior—a complete meal that cooks in one pan, requires minimal prep, and delivers maximum flavor with every single bite.
This isn’t just any chicken and rice recipe. We’re talking about juicy chicken thighs or breasts nestled into perfectly seasoned rice, all simmered together until the flavors marry beautifully, then topped with a blanket of melted cheese that creates those irresistible golden, crispy edges. It’s comfort food at its finest, and it’s ready in about 45 minutes from start to finish.
Whether you’re feeding a hungry family on a busy Tuesday night, meal prepping for the week ahead, or looking for a crowd-pleasing dish to bring to a potluck, this cheesy chicken and rice skillet checks every box. It’s the kind of recipe that makes you look like a kitchen superstar while secretly being incredibly simple to pull off. Serve it straight from the skillet for a rustic presentation that says “homemade with love,” and watch as everyone comes back for seconds.
History / Background
While there isn’t a singular origin story for chicken and rice casseroles, this style of cooking has deep roots in American home cooking, particularly in Southern cuisine where one-pot meals have been a staple for generations. The concept of cooking chicken and rice together traces back to resourceful home cooks who needed to stretch ingredients and minimize cleanup—two concerns that remain just as relevant today.
In the South, chicken bog, chicken perloo, and various rice pilaf dishes have been feeding families for over a century. These dishes were born from necessity during times when every ingredient mattered and wasting food wasn’t an option. Cooks would use the entire chicken, including bones for flavor, and combine it with rice—an inexpensive, filling grain that absorbed all those delicious pan drippings.
The skillet method we’re using today is a modern evolution of these traditional dishes. As American home cooking embraced convenience in the mid-20th century, skillet dinners became increasingly popular. The addition of cheese—that glorious, melty topping we all crave—is a more contemporary twist that reflects our collective love for comfort food with an extra layer of indulgence.
Today’s cheesy chicken and rice skillet represents the perfect marriage of old-world practicality and modern flavor preferences. It honors the tradition of one-pot cooking while incorporating ingredients that are readily available in any American grocery store. This recipe has become a Pinterest favorite precisely because it delivers on multiple fronts: it’s budget-friendly, family-approved, visually appealing, and genuinely delicious.
Why You’ll Love This Recipe
This cheesy chicken and rice skillet is about to become your new weeknight hero, and here’s why: it combines everything you want in a dinner recipe without any of the fuss. You’ll get a complete, balanced meal with protein, grains, and vegetables all cooked together in one beautiful pan. No juggling multiple pots, no complicated techniques, and no mountain of dishes to wash afterward.
Here’s what makes this recipe absolutely irresistible:
- One-Pan Wonder – Everything cooks in a single skillet, which means less cleanup and more time to actually enjoy your evening
- Budget-Friendly – Uses affordable, everyday ingredients that won’t break the bank but taste like a million bucks
-
- Family-Approved – Even picky eaters can’t resist the combination of tender chicken, fluffy rice, and melted cheese
- Customizable – Easily adapt it to your family’s preferences with different proteins, vegetables, or cheese varieties
- Meal Prep Champion – Makes excellent leftovers and can be portioned out for easy weekday lunches
- Impressive Presentation – Looks restaurant-worthy when served straight from the skillet, perfect for casual entertaining
- Foolproof Method – The step-by-step process ensures perfectly cooked rice and juicy chicken every single time
- Comfort Food Perfection – Delivers that cozy, satisfying feeling we all crave after a long day
Ingredient Notes
Let’s talk about what goes into this delicious skillet and why each ingredient matters. Understanding your ingredients helps you make smart substitutions and troubleshoot any issues.
Chicken: I prefer boneless, skinless chicken thighs for this recipe because they stay incredibly moist and tender, even with longer cooking times. The slightly higher fat content means more flavor too. However, chicken breasts work beautifully if that’s what you have—just be careful not to overcook them. You can also use bone-in chicken pieces; just increase the cooking time by about 10-15 minutes.
Rice: Long-grain white rice is your best bet here. It cooks evenly, doesn’t get mushy, and absorbs all those wonderful flavors from the chicken and broth. Jasmine or basmati rice work wonderfully too. Avoid instant rice, as it will turn to mush with this cooking method. Brown rice requires significantly more liquid and cooking time, so if you want to use it, add an extra ½ cup of broth and cook for 50-60 minutes.
Chicken Broth: This is where a huge amount of flavor comes from. Use good-quality broth—homemade is fantastic, but store-bought works perfectly. Low-sodium broth gives you better control over the seasoning. In a pinch, you can use water with bouillon cubes, but the flavor won’t be quite as rich.
Cheese: I love using a combination of sharp cheddar and Monterey Jack. The cheddar brings bold flavor while the Monterey Jack melts beautifully and adds creaminess. Feel free to experiment with Mexican cheese blend, Colby Jack, or even some mozzarella for extra stretch. Freshly shredded cheese melts better than pre-shredded, which contains anti-caking agents.
Aromatics (Onion & Garlic): These form the flavor foundation. Yellow or white onion works best, but you could use shallots for a milder flavor. Fresh garlic is non-negotiable for me—it adds so much depth. Garlic powder just won’t give you the same result.
Seasonings: Paprika, onion powder, garlic powder, salt, and pepper create a well-rounded flavor profile. Smoked paprika adds an extra dimension if you have it. Italian seasoning or poultry seasoning are also excellent additions.
Butter & Oil: Butter adds richness and helps with browning, while a little oil prevents the butter from burning at higher heat. You can use all olive oil if you prefer, or substitute with ghee for a slightly nutty flavor.
Vegetables (optional): Bell peppers, peas, corn, or diced tomatoes can be added for extra nutrition and color. Add heartier vegetables like peppers with the rice; add quick-cooking ones like peas or corn in the last 5 minutes.
Equipment Needed
You don’t need a fancy kitchen to make this recipe, but having the right tools makes the process smooth and enjoyable. Here’s what you’ll need:
- Large Oven-Safe Skillet or Deep Sauté Pan (12-inch with a lid) – This is your workhorse. Cast iron is fantastic because it retains heat beautifully and goes from stovetop to oven if needed. A heavy-bottomed stainless steel or non-stick skillet with a tight-fitting lid works great too.
- Sharp Chef’s Knife – For dicing chicken, onions, and any vegetables you’re adding
- Cutting Board – Preferably one dedicated to raw meat
- Measuring Cups and Spoons – Accurate measurements ensure perfectly cooked rice
- Wooden Spoon or Silicone Spatula – For stirring and scraping up those flavorful browned bits
- Instant-Read Thermometer – Optional but helpful to ensure chicken reaches 165°F
- Box Grater or Food Processor – If shredding your own cheese (highly recommended!)
- Tongs – For flipping and removing chicken pieces
- Large Mixing Bowl – For seasoning the chicken
- Paper Towels – For patting chicken dry before cooking

Cheesy Chicken and Rice Skillet Recipe
- Total Time: 50 minutes
- Yield: 6 servings 1x
- Diet: Gluten Free
Description
A comforting one-pan cheesy chicken and rice skillet loaded with tender chicken, perfectly seasoned rice, and a blanket of melted cheese. This easy weeknight dinner requires just one skillet and delivers restaurant-quality results with minimal effort. Perfect for busy families who want a hearty, delicious meal without the cleanup hassle.
Ingredients
For the Chicken:
- 1½ lbs boneless, skinless chicken thighs (or breasts), cut into bite-sized pieces
- 1 teaspoon paprika
- 1 teaspoon garlic powder
- ½ teaspoon onion powder
- ¾ teaspoon salt
- ½ teaspoon black pepper
For the Rice:
- 2 tablespoons butter
- 1 tablespoon olive oil
- 1 medium yellow onion, finely diced
- 3 cloves garlic, minced
- 1½ cups long-grain white rice (uncooked)
- 3 cups low-sodium chicken broth
- 1 teaspoon salt
- ½ teaspoon black pepper
- ½ teaspoon paprika
- 1 bay leaf (optional)
For Topping:
- 2 cups shredded sharp cheddar cheese
- 1 cup shredded Monterey Jack cheese
- 2 tablespoons fresh parsley, chopped (for garnish)
- Green onions, sliced (optional, for garnish)
Instructions
- Season the Chicken: Pat chicken pieces dry with paper towels. In a large bowl, combine chicken with paprika, garlic powder, onion powder, salt, and pepper. Toss until evenly coated and set aside.
- Brown the Chicken: Heat 1 tablespoon butter and 1 tablespoon olive oil in a large 12-inch skillet over medium-high heat. Once hot and shimmering, add the seasoned chicken in a single layer (work in batches if needed to avoid overcrowding). Cook for 3-4 minutes per side until golden brown. The chicken doesn’t need to be fully cooked through at this stage. Remove chicken to a plate and set aside.
- Sauté the Aromatics: In the same skillet, add the remaining tablespoon of butter. Once melted, add the diced onion and cook for 3-4 minutes until softened and translucent, stirring occasionally. Add the minced garlic and cook for another 30 seconds until fragrant, being careful not to let it burn.
- Toast the Rice: Add the uncooked rice to the skillet and stir continuously for 1-2 minutes. This toasting step adds a nutty flavor and helps the grains stay separate and fluffy.
- Add Liquids and Seasonings: Pour in the chicken broth and stir well, scraping up any browned bits from the bottom of the pan (that’s pure flavor!). Add salt, pepper, paprika, and bay leaf if using. Stir to combine.
- Nestle the Chicken: Return the browned chicken pieces to the skillet, nestling them into the rice mixture. Make sure most of the rice is submerged in the liquid. Bring to a boil over medium-high heat.
- Simmer: Once boiling, reduce heat to low, cover with a tight-fitting lid, and simmer for 20-25 minutes without removing the lid. This allows the rice to steam properly and absorb all the liquid.
- Check for Doneness: After 20-25 minutes, remove from heat (keep covered) and let it rest for 5 minutes. Then check that the rice is tender and the chicken has reached an internal temperature of 165°F. If there’s still liquid and the rice isn’t tender, return to low heat for another 5 minutes.
- Add the Cheese: Remove the bay leaf. Sprinkle both cheeses evenly over the top of the chicken and rice. Cover again and let sit for 3-4 minutes until the cheese is melted and gooey. For extra golden, bubbly cheese, you can place the uncovered skillet under the broiler for 2-3 minutes (watch carefully!).
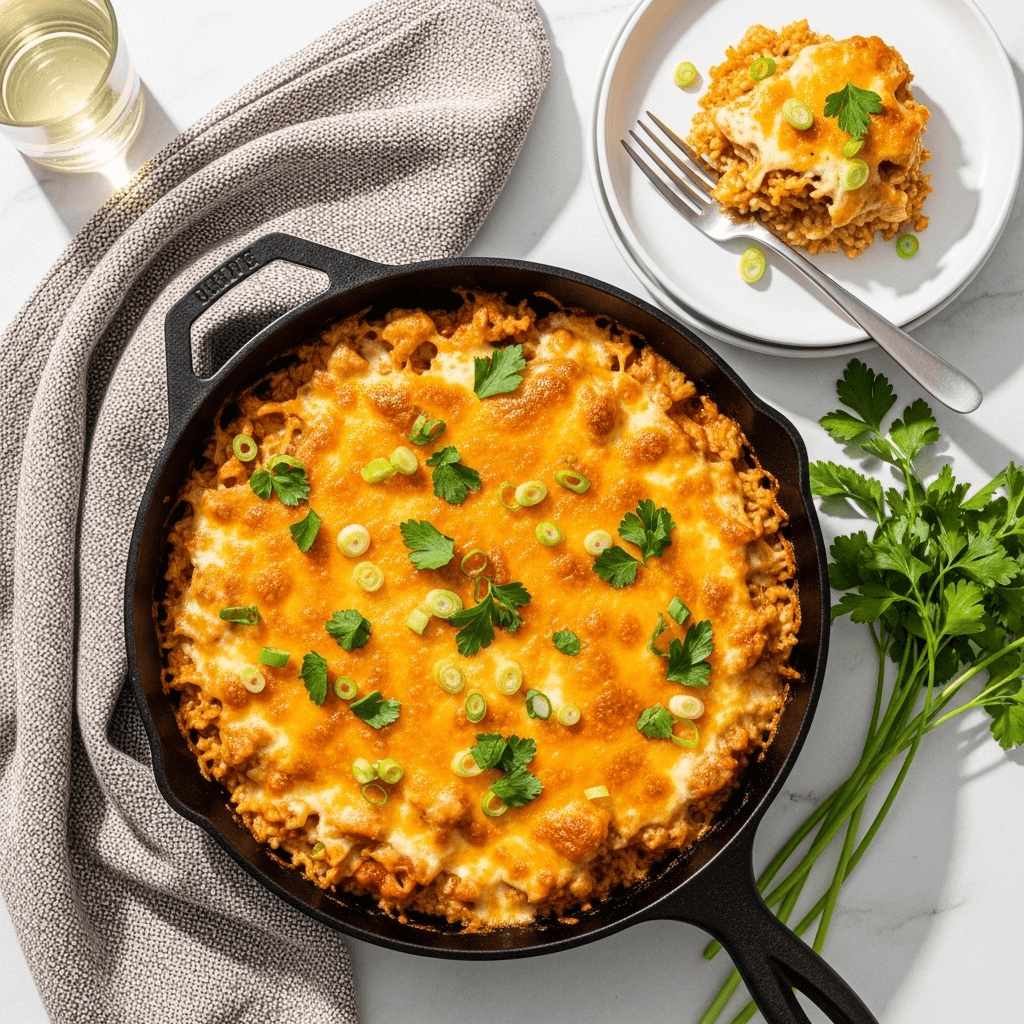
- Garnish and Serve: Sprinkle with fresh chopped parsley and sliced green onions. Serve hot directly from the skillet for that rustic, family-style appeal.
Notes
- Rice Ratio: The standard ratio is 1 part rice to 2 parts liquid. Since we’re using 1½ cups rice, 3 cups liquid is perfect.
- Chicken Temperature: Always ensure chicken reaches 165°F internal temperature for food safety.
- Lid Discipline: Resist the urge to peek! Removing the lid releases steam and can result in undercooked rice.
- Resting Time: The 5-minute rest after cooking is crucial—the rice continues to absorb moisture and becomes perfectly fluffy.
- Cheese Melting: If your cheese isn’t melting well, make sure the skillet is still warm when you add it. You can also return it to low heat for a minute or two.
- Leftovers: This dish tastes even better the next day once the flavors have had time to meld together.
- Prep Time: 15 minutes
- Cook Time: 35 minutes
- Category: Dinner
- Method: Stovetop
- Cuisine: American
Nutrition
- Serving Size: 1/6 of recipe (approximately 1½ cups)
- Calories: 485
- Sugar: 2g
- Sodium: 890mg
- Fat: 21g
- Saturated Fat: 10g
- Unsaturated Fat: 9g
- Trans Fat: 0g
- Carbohydrates: 42g
- Fiber: 1g
- Protein: 32g
- Cholesterol: 115mg
Note: Nutrition information is an estimate and will vary based on exact ingredients used and portion sizes.
Tips & Variations
One of the best things about this cheesy chicken and rice skillet is how easily you can customize it to suit your family’s tastes or whatever ingredients you have on hand. Here are some fantastic variations to try:
Spicy Kick: Add ½-1 teaspoon of cayenne pepper or red pepper flakes to the rice mixture. You can also use pepper jack cheese instead of Monterey Jack, or stir in a can of diced green chiles or jalapeños.
Veggie-Loaded: Stir in 1 cup of frozen peas, corn, or diced bell peppers during the last 5 minutes of cooking. You can also add a cup of baby spinach right before adding the cheese—it will wilt perfectly from the residual heat.
Mexican-Style: Use taco seasoning on the chicken, add a can of black beans and corn, use Mexican cheese blend, and top with cilantro, avocado, and a squeeze of lime.
Italian Twist: Season with Italian herbs (basil, oregano, thyme), add sun-dried tomatoes and artichoke hearts, and use mozzarella and parmesan cheese instead of cheddar.
Creamy Version: Stir in ½ cup of heavy cream or cream cheese during the last 5 minutes for an extra rich and creamy texture.
Broccoli Cheddar Style: Add 2 cups of small broccoli florets during the last 10 minutes of cooking. The broccoli steams perfectly with the rice.
Bacon Lovers: Cook 4-6 strips of bacon first, use the bacon fat to brown the chicken, and crumble the cooked bacon over the top with the cheese.
Lighter Option: Use chicken breast instead of thighs, reduce cheese to 1½ cups total, and add extra vegetables to bulk up the volume without added calories.
Pro Chef Tips
These professional tips will take your chicken and rice skillet from good to absolutely restaurant-quality:
1. Pat Your Chicken Dry: This seems minor, but dry chicken browns much better than wet chicken. Better browning means better flavor through the Maillard reaction. Use paper towels to thoroughly pat each piece dry before seasoning.
2. Don’t Skip the Browning: Those golden-brown bits on the chicken and the fond (browned bits) left in the pan are packed with flavor. Make sure your pan is hot enough and resist moving the chicken too soon—let it develop a proper crust.
3. Deglaze Properly: When you add the broth, use your wooden spoon to scrape up all those stuck-on bits from the bottom of the pan. This process, called deglazing, incorporates all that concentrated flavor into your rice.
4. Use the Right Heat: Too high heat will burn the bottom before the rice cooks through; too low won’t create enough steam. Medium-low to low heat once you’ve covered the pan is ideal.
5. Quality Broth Matters: Since broth is a main component, using a flavorful one makes a noticeable difference. Homemade is best, but if using store-bought, choose low-sodium so you can control the salt level.
6. Room Temperature Ingredients: If your chicken has been refrigerated, let it sit out for 15-20 minutes before cooking. Cold chicken dropped into a hot pan lowers the temperature too quickly and results in steaming rather than browning.
7. Shred Your Own Cheese: Pre-shredded cheese contains cellulose (an anti-caking agent) that prevents it from melting as smoothly. Spending 3 minutes shredding your own cheese makes a huge difference in the final texture.
8. Layer Your Seasoning: We season the chicken separately, then season the rice mixture. This layered approach to seasoning creates more depth and complexity than just seasoning everything at once.
Common Mistakes to Avoid
Even straightforward recipes can go wrong if you’re not careful. Here are the most common pitfalls and how to avoid them:
1. Lifting the Lid Too Often: Every time you lift that lid during cooking, you release steam and lower the temperature. This extends cooking time and can result in unevenly cooked rice. Trust the process and keep that lid on for the full cooking time.
2. Using Too Much or Too Little Liquid: The rice-to-liquid ratio is crucial. Too much liquid results in mushy rice; too little leaves you with crunchy, undercooked grains. Stick to the 1:2 ratio (1 cup rice to 2 cups liquid) for best results.
3. Overcrowding the Pan: When browning chicken, give each piece space. Overcrowding causes the temperature to drop, and your chicken will steam instead of brown. Work in batches if necessary—it’s worth the extra few minutes.
4. Not Checking Temperature: Guessing if chicken is done is risky. Use an instant-read thermometer to ensure it reaches 165°F. Undercooked chicken is a food safety issue; overcooked chicken is dry and tough.
5. Forgetting to Rest: That 5-minute rest after cooking isn’t optional—it allows the rice to finish absorbing moisture and redistributes juices in the chicken. Skipping this step often results in soupy rice and drier chicken.
6. Adding Cheese Too Early: If you add cheese when the skillet is still on heat, it can break and become greasy. Remove from heat, add cheese, then cover to let residual heat melt it perfectly.
7. Using Instant Rice: Instant or minute rice is pre-cooked and will turn to complete mush with this cooking method. Always use regular long-grain rice for proper texture.
Storage & Meal Prep
This cheesy chicken and rice skillet is a meal-prepper’s dream! Here’s everything you need to know about storing and reheating your leftovers:
Refrigerator Storage: Allow the skillet to cool to room temperature (don’t leave it out for more than 2 hours). Transfer to airtight containers and refrigerate for up to 4 days. The flavors actually deepen and improve after a day in the fridge, so don’t be afraid to make this ahead!
Freezer Storage: This dish freezes surprisingly well for up to 3 months. Cool completely, then portion into freezer-safe containers or heavy-duty freezer bags. Press out as much air as possible to prevent freezer burn. Label with the date and contents.
Reheating from Refrigerated: The microwave works in a pinch—add a tablespoon or two of chicken broth or water to prevent drying out, cover with a damp paper towel, and heat in 90-second intervals, stirring between. For better results, reheat in a covered skillet over medium-low heat with a splash of broth for 5-7 minutes, stirring occasionally.
Reheating from Frozen: Thaw overnight in the refrigerator for best results, then reheat as directed above. In a time crunch, you can reheat from frozen in the microwave—it will just take longer (10-12 minutes with several stirring breaks).
Meal Prep Tips: Portion individual servings into meal prep containers for grab-and-go lunches. Add a side salad or steamed vegetables when you reheat for a complete, balanced meal. The rice absorbs more moisture as it sits, so add a little broth when reheating to restore creaminess.
Make-Ahead & Freezer Notes
Planning ahead? This recipe offers several convenient make-ahead options:
Prep the Components: You can dice the chicken, chop the onions and garlic, and shred the cheese up to 24 hours in advance. Store everything in separate airtight containers in the refrigerator. When ready to cook, you’ll just need to assemble and follow the cooking instructions—dinner can be on the table in under an hour.
Brown the Chicken Ahead: Brown the seasoned chicken as directed in step 2, then refrigerate for up to 2 days. When you’re ready to make the full dish, start at step 3 (sautéing the aromatics) and continue as usual. This cuts your active cooking time significantly.
Fully Assembled (Unbaked): You can also assemble the entire dish (through step 6) and refrigerate for up to 24 hours before cooking. Let it sit at room temperature for 20-30 minutes before cooking, then proceed with simmering as directed. You may need to add an extra 5 minutes to the cooking time.
Freezer Assembly: For true make-ahead convenience, you can freeze an uncooked version. Combine all ingredients except the cheese in a freezer-safe bag, remove air, seal, and freeze flat for up to 3 months. Thaw completely in the refrigerator overnight, transfer to your skillet, and cook as directed. Add the cheese at the end as usual.
Best Reheating Method: For frozen leftovers, thawing overnight in the refrigerator gives the best texture. Reheat in a covered skillet over medium-low heat with a few tablespoons of chicken broth to restore moisture. Stir occasionally for even heating, and it’ll taste almost as good as freshly made!
Serving Suggestions
While this cheesy chicken and rice skillet is absolutely a complete meal on its own, pairing it with the right sides can elevate your dinner from satisfying to spectacular. Here are some fantastic serving ideas:
Fresh Salads: Balance the richness of the cheesy skillet with a crisp, refreshing salad. A simple mixed green salad with vinaigrette, a tangy Caesar salad, or a cucumber-tomato salad with a light lemon dressing all work beautifully.
Bread Options: Crusty French bread, warm dinner rolls, garlic bread, or buttery cornbread are perfect for soaking up any extra cheesy goodness from the bottom of the skillet.
Steamed or Roasted Vegetables: Broccoli, green beans, roasted Brussels sprouts, or honey-glazed carrots add color, nutrition, and textural variety to the plate.
Simple Slaws: A crunchy coleslaw or apple-cabbage slaw provides a refreshing contrast to the warm, creamy skillet. The acidity in the slaw dressing cuts through the richness perfectly.
Beverages: This dish pairs wonderfully with iced tea (sweet or unsweet), lemonade, or a crisp white wine like Chardonnay or Pinot Grigio for the adults.
Toppings Bar: Make it interactive by setting out bowls of toppings: sour cream, salsa, sliced avocado, fresh cilantro, hot sauce, extra shredded cheese, and crispy bacon bits. Let everyone customize their own bowl.
For a Complete Spread: Serve family-style by placing the hot skillet right on the table (on a trivet or wooden board), surrounded by your chosen sides. This casual, rustic presentation is perfect for weeknight dinners and makes cleanup even easier.
FAQs Section
Q: Can I use brown rice instead of white rice?
A: Yes, but you’ll need to adjust the recipe. Brown rice requires more liquid and a longer cooking time. Use 3½ cups of broth instead of 3 cups, and increase the simmering time to 45-50 minutes. Check that the rice is tender before proceeding with adding the cheese.
Q: My rice is still crunchy after the cooking time. What went wrong?
A: This usually means there wasn’t enough liquid or the heat was too high, causing the liquid to evaporate too quickly. Add ½ cup of warm broth or water, cover, and continue cooking on low heat for another 5-10 minutes. Next time, make sure your heat is truly on low once you cover the pan, and resist the urge to peek.
Q: Can I make this in a Dutch oven instead of a skillet?
A: Absolutely! A Dutch oven works wonderfully for this recipe and may even give you slightly better heat distribution. Follow the exact same instructions—just make sure your Dutch oven holds at least 5 quarts to accommodate all the ingredients comfortably.
Q: Is there a way to make this dish lighter or lower in calories?
A: Yes! Use chicken breasts instead of thighs, reduce the cheese to 1½ cups total (or use reduced-fat cheese), and bulk up the dish with extra vegetables like bell peppers, zucchini, or spinach. You could also substitute half the rice with riced cauliflower (add it in the last 10 minutes of cooking).
Q: The bottom of my pan burned. How do I prevent this?
A: This typically happens when the heat is too high during the simmering phase. Once you cover the pan, your heat should be on low—just barely enough to maintain a gentle simmer. Also ensure you’re using a heavy-bottomed pan that distributes heat evenly. If your burner runs hot, consider using a heat diffuser.
Q: Can I use rotisserie chicken to make this even faster?
A: Definitely! Skip steps 1-2 entirely. Proceed with sautéing the aromatics and cooking the rice as directed. When the rice is almost done (around the 20-minute mark), stir in 3 cups of shredded rotisserie chicken, cover for 5 more minutes to heat through, then add cheese. This cuts your time down to about 35 minutes total.
Q: What’s the best way to prevent the cheese from getting oily or separating?
A: Always remove the skillet from heat before adding cheese, and use freshly shredded cheese rather than pre-shredded. Cover the pan and let the residual heat melt it gently. If you use high heat or pre-shredded cheese with additives, the fats can separate and create an oily texture.
Conclusion
There you have it—the ultimate cheesy chicken and rice skillet that’s destined to become a regular in your dinner rotation! This is the kind of recipe that makes you feel like a kitchen rockstar while actually being incredibly simple to pull off. One pan, a handful of everyday ingredients, and less than an hour from start to finish. What’s not to love?
Whether you’re cooking for picky kids, impressing a date, or just treating yourself to some serious comfort food on a Wednesday night, this skillet has you covered. The combination of perfectly seasoned chicken, fluffy rice that’s absorbed all those delicious pan juices, and that gorgeous blanket of melted cheese is pretty much irresistible.
I’d love to hear how your cheesy chicken and rice skillet turns out! Did you try any of the variations? Snap a photo and share it on Pinterest—tag it with #CheesyChickenRiceSkillet so I can see your beautiful creation. And if you loved this recipe (I’m confident you will!), please leave a comment below and let me know. Your feedback helps other home cooks discover these delicious recipes too!
Happy cooking, friends! Here’s to more easy, delicious, one-pan dinners that bring joy to your table. 🧡

