
If you’re looking for a restaurant-quality seafood dish that’s ready in just 15 minutes, this Garlic Butter Roasted Shrimp recipe is about to become your new weeknight hero! Imagine plump, juicy shrimp bathed in a luscious garlic butter sauce with hints of lemon and fresh herbs—it’s the kind of dish that looks impressive but requires minimal effort. This recipe is perfect for busy weeknights when you want something special, elegant enough for date night dinners, and absolutely ideal for entertaining guests without spending hours in the kitchen.
The beauty of roasted shrimp lies in its versatility. Serve it over pasta, alongside crusty bread for dipping in that incredible garlic butter sauce, over rice, or simply as a protein-packed appetizer. Whether you’re a seafood lover or someone who’s just discovering the joy of cooking with shrimp, this foolproof recipe will have everyone at your table asking for seconds. The high-heat roasting method creates perfectly caramelized edges while keeping the shrimp tender and succulent inside—no rubbery texture here!
History / Background
Shrimp has been a beloved seafood across coastal regions worldwide for centuries, but the garlic butter preparation we know and love today has particularly strong roots in Mediterranean and Southern European cooking traditions. The French mastered the art of “scampi-style” preparations, while Italian cuisine gave us the classic shrimp scampi that inspired countless variations. The combination of butter, garlic, and seafood became a hallmark of elegant yet simple cooking.
In America, garlic butter shrimp gained massive popularity along the Gulf Coast and in Southern states where fresh shrimp was abundant. Louisiana’s Creole and Cajun cuisines elevated shrimp dishes to an art form, often incorporating butter, garlic, and bold seasonings. The roasting method, however, is a more modern adaptation that home cooks embraced for its convenience and the way high heat intensifies flavors while creating that irresistible caramelization.
What makes this particular preparation special is how it democratized what was once considered fancy restaurant fare. With the rise of home cooking blogs and social media platforms like Pinterest in the 2010s, recipes like garlic butter roasted shrimp became accessible to everyone. It proved you didn’t need culinary school training to create something that tastes like it came from a five-star kitchen. Today, it’s one of the most searched and saved shrimp recipes online, beloved for its simplicity and consistently delicious results.
Why You’ll Love This Recipe
This Garlic Butter Roasted Shrimp recipe is everything you want in a weeknight dinner—quick, delicious, and incredibly satisfying. The combination of butter, garlic, and lemon creates a sauce so good you’ll want to soak up every last drop with bread. Unlike stovetop methods that require constant attention, roasting lets the oven do the work while you prepare sides or set the table.
Here’s what makes this recipe a standout:
- Lightning-fast cooking time – Just 15 minutes from start to finish, making it perfect for busy weeknights
- Restaurant-quality results – Tastes like something you’d pay $25 for at a fancy seafood restaurant
- Minimal cleanup – Everything cooks in one baking dish, meaning fewer dishes to wash
- Budget-friendly elegance – Shrimp is often on sale, and this recipe uses simple, affordable ingredients
- Naturally low-carb and keto-friendly – Perfect for those watching their carb intake
- Incredibly versatile – Serve it a dozen different ways and it’s always delicious
- Kid-approved flavor – Even picky eaters tend to love the mild, buttery taste
- Make-ahead friendly – You can prep everything in advance for stress-free entertaining
- Naturally gluten-free – No modifications needed for gluten-free diets
- Packed with protein – A healthy, satisfying meal that keeps you full
Ingredient Notes
Let’s talk about what makes this recipe so incredibly flavorful and how to choose the best ingredients:
Shrimp: The star of the show! I recommend using large or jumbo shrimp (16-20 count or 21-25 count per pound) for the best texture and presentation. You can use fresh or frozen shrimp—just make sure frozen shrimp is completely thawed and patted dry before cooking. Peeled and deveined shrimp saves you prep time, though leaving the tails on makes for prettier presentation. Wild-caught shrimp typically has better flavor than farm-raised, but either works beautifully.
Butter: Use real, unsalted butter for the best flavor control. The butter creates that rich, luxurious sauce and helps the garlic infuse throughout. European-style butter with higher fat content will make an even richer sauce, but regular unsalted butter works perfectly. Don’t substitute margarine—it simply won’t give you the same results.
Garlic: Fresh garlic is non-negotiable here! You’ll need about 6-8 cloves, minced or finely chopped. Fresh garlic provides that pungent, aromatic flavor that jarred garlic can’t match. If you’re a garlic lover (like me!), feel free to add an extra clove or two.
Lemon: Both the juice and zest bring brightness that balances the richness of the butter. Fresh lemon is always best—bottled lemon juice lacks the vibrant flavor and aromatic oils from the zest. You’ll need about one large lemon for both juice and zest.
Fresh Herbs: Parsley is the classic choice, adding freshness and color, but you can also use fresh basil, cilantro, or a combination. Fresh herbs make a huge difference compared to dried—they add that restaurant-quality finish.
Red Pepper Flakes: Just a pinch adds subtle heat without making the dish spicy. It’s optional but highly recommended for depth of flavor.
Olive Oil: A small amount helps prevent the garlic from burning and adds another layer of flavor. Extra virgin olive oil works best.
Salt and Black Pepper: Essential for seasoning the shrimp properly. Use fine sea salt or kosher salt for even distribution.
White Wine (optional): A splash of dry white wine adds sophistication and acidity. You can substitute with chicken broth or simply use extra lemon juice.
Equipment Needed
This recipe requires minimal equipment, which is part of its appeal! Here’s what you’ll need:
- Large baking dish or sheet pan – A 9×13-inch baking dish or rimmed sheet pan works perfectly. Make sure it’s large enough that shrimp can be in a single layer.
- Cutting board and sharp knife – For mincing garlic and chopping herbs
- Microplane or zester – For zesting the lemon (a fine grater works too)
- Measuring cups and spoons – For accurate measurements
- Small mixing bowl – For combining the garlic butter mixture
- Paper towels – Essential for patting shrimp dry before cooking
- Oven mitts – For safely handling the hot baking dish
- Serving platter (optional) – For presenting your beautiful shrimp

Garlic Butter Roasted Shrimp Recipe
- Total Time: 15 minutes
- Yield: 4 servings 1x
- Diet: Gluten Free
Description
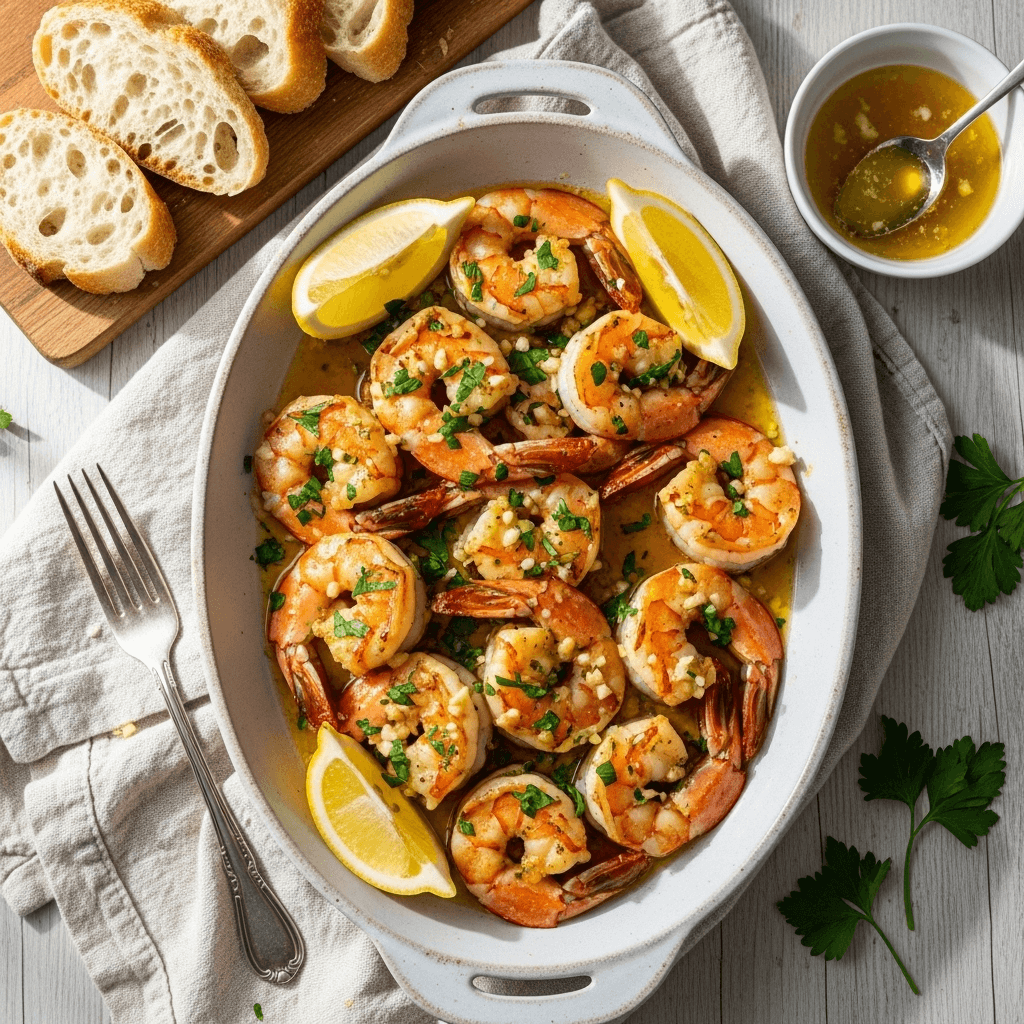
Succulent shrimp roasted in a mouthwatering garlic butter sauce with lemon and herbs. This easy 15-minute recipe delivers restaurant-quality results perfect for weeknight dinners or special occasions. The high-heat roasting creates perfectly caramelized shrimp with tender, juicy centers.
Ingredients
- 1½ pounds large shrimp (16-20 count), peeled and deveined, tails on or off
- 4 tablespoons unsalted butter, melted
- 3 tablespoons extra virgin olive oil
- 6-8 cloves fresh garlic, minced
- Zest of 1 large lemon
- 2 tablespoons fresh lemon juice
- ¼ teaspoon red pepper flakes (adjust to taste)
- ¾ teaspoon fine sea salt
- ½ teaspoon freshly ground black pepper
- ¼ cup fresh parsley, finely chopped
- 2 tablespoons fresh basil, chopped (optional)
- 2 tablespoons dry white wine (optional)
- Lemon wedges for serving
Instructions
Step 1: Preheat and Prepare
Preheat your oven to 425°F (220°C). This high temperature is key to achieving that beautiful caramelization. Pat the shrimp completely dry with paper towels—this is crucial for proper browning. Any excess moisture will cause steaming instead of roasting. Arrange the shrimp in a single layer in your baking dish, making sure they’re not overcrowded.
Step 2: Make the Garlic Butter Sauce
In a small bowl, combine the melted butter, olive oil, minced garlic, lemon zest, lemon juice, red pepper flakes, salt, and black pepper. Whisk everything together until well combined. If using white wine, add it to the mixture. The olive oil helps prevent the garlic from burning at high heat while adding extra flavor.
Step 3: Coat the Shrimp
Pour the garlic butter mixture evenly over the shrimp, making sure each piece is well coated. Use a spoon or your hands (wearing gloves) to toss the shrimp, ensuring they’re completely covered in that delicious sauce. The shrimp should still be in a single layer for even cooking.
Step 4: Roast to Perfection
Place the baking dish in the preheated oven and roast for 8-10 minutes, depending on the size of your shrimp. The shrimp are done when they turn pink and opaque throughout, with slightly curled tails. Large shrimp typically take 8-9 minutes, while jumbo shrimp may need the full 10 minutes. Be careful not to overcook—shrimp can go from perfectly tender to rubbery in just a minute or two.
Step 5: Add Fresh Herbs and Serve
Remove the baking dish from the oven (it will be very hot!). Immediately sprinkle the fresh parsley and basil over the shrimp, and give everything a gentle toss to distribute the herbs. The residual heat will release the herbs’ aromatic oils. Serve immediately with lemon wedges on the side and plenty of crusty bread for soaking up that incredible garlic butter sauce. You can also transfer to a serving platter for prettier presentation.
Notes
Shrimp Size Matters: Cooking time varies based on shrimp size. Small shrimp (31-40 count) will cook in 6-7 minutes, while extra-large or jumbo may need 10-12 minutes. Watch carefully to avoid overcooking.
Don’t Skip the Dry Step: Patting shrimp dry is essential for caramelization. Wet shrimp will steam rather than roast.
Garlic Burning Prevention: If you’re worried about garlic burning (it can at 425°F), you can add half the garlic at the beginning and stir in the remaining fresh garlic right after removing from the oven.
Tail-On vs. Tail-Off: Tails-on looks more elegant but tails-off is more convenient for eating. Your choice!
Scaling the Recipe: This recipe doubles or triples easily for entertaining. Just make sure to use multiple baking dishes to keep shrimp in a single layer.
6 ounces shrimp with sauce (approximately ⅔ cup)
- Prep Time: 5 minutes
- Cook Time: 8-10 minutes
- Category: Main Dish
- Method: Roasting
- Cuisine: American, Mediterranean-Inspired
Nutrition
- Serving Size: 6 ounces shrimp with sauce (approximately ⅔ cup)
- Calories: 285
- Sugar: 0g
- Sodium: 785mg
- Fat: 18g
- Saturated Fat: 8g
- Unsaturated Fat: 9g
- Trans Fat: 0g
- Carbohydrates: 3g
- Fiber: 0g
- Protein: 28g
- Cholesterol: 310mg
Nutrition information is approximate and calculated based on standard ingredient measurements. Actual values may vary based on specific brands and preparation methods.
Tips & Variations
One of the best things about this garlic butter roasted shrimp recipe is how easily you can customize it to suit your taste preferences or dietary needs!
Spicy Garlic Shrimp: Double the red pepper flakes or add a dash of cayenne pepper for serious heat. You can also drizzle with sriracha or your favorite hot sauce before serving.
Cajun-Style Variation: Replace the red pepper flakes with 1-2 teaspoons of Cajun or Creole seasoning for a Louisiana-inspired version.
Mediterranean Version: Add ½ cup halved cherry tomatoes to the baking dish and sprinkle with crumbled feta cheese during the last 2 minutes of cooking. Finish with fresh oregano instead of basil.
Asian-Inspired Twist: Substitute half the butter with sesame oil, add a tablespoon of grated fresh ginger, and finish with chopped scallions and sesame seeds.
Dairy-Free Option: Replace butter with additional olive oil or use ghee if you tolerate it. The flavor will be slightly different but still delicious.
Extra Vegetables: Toss in asparagus spears, sliced bell peppers, or zucchini rounds. Just note they may need a few extra minutes of cooking time, so add them to the pan first for 5 minutes before adding the shrimp.
Herb Variations: Swap parsley for fresh cilantro, dill, or tarragon. Each herb brings its own unique flavor profile.
Butter Variations: Try brown butter for a nutty, sophisticated flavor, or use garlic herb compound butter for extra intensity.
Pro Chef Tips
Want to take your garlic butter roasted shrimp from great to absolutely phenomenal? Here are insider secrets from professional kitchens:
Brine Your Shrimp: For the juiciest, most flavorful shrimp, brine them for 15-30 minutes before cooking. Dissolve 2 tablespoons of salt and 1 tablespoon of sugar in 2 cups of cold water, submerge the shrimp, then rinse and pat dry. This step ensures they stay plump and tender.
Room Temperature is Key: Take shrimp out of the refrigerator 15 minutes before cooking. Cold shrimp won’t cook as evenly and can release more moisture, preventing proper caramelization.
The Maillard Reaction: That beautiful browning you want is called the Maillard reaction, and it only happens when the surface is dry and the heat is high enough. This is why patting dry and using 425°F is so important!
Reserve Some Garlic Butter: Before pouring all the garlic butter over the shrimp, reserve 2 tablespoons. After cooking, drizzle this fresh, uncooked garlic butter over the finished dish for a bright, punchy garlic flavor that contrasts beautifully with the mellowed roasted garlic.
The Broiler Trick: For even more caramelization, turn on the broiler for the last 1-2 minutes of cooking. Watch carefully—shrimp can go from golden to burnt very quickly under the broiler!
Quality Over Quantity: Buy the best quality shrimp you can afford. The difference between fresh, wild-caught shrimp and lower-quality frozen shrimp is significant in both flavor and texture.
Finish with Cold Butter: Right before serving, add a tablespoon of cold butter to the hot shrimp and swirl. This creates a glossy, emulsified sauce that clings beautifully to the shrimp—a technique called “mounting” in professional kitchens.
Common Mistakes to Avoid
Even simple recipes can go wrong if you’re not careful. Here are the most common pitfalls and how to avoid them:
Overcooking the Shrimp: This is mistake number one! Overcooked shrimp becomes rubbery and tough. Shrimp cook incredibly fast—they’re done as soon as they turn opaque and pink. Start checking at 7 minutes for large shrimp. Remember, they’ll continue cooking slightly after you remove them from the oven due to residual heat.
Overcrowding the Pan: When shrimp are piled on top of each other, they steam instead of roast. You want that beautiful caramelization, which only happens when shrimp are in a single layer with space between them. If you’re doubling the recipe, use two baking dishes.
Using Wet Shrimp: Cannot stress this enough—dry your shrimp thoroughly! Excess moisture creates steam, preventing the gorgeous browning that makes roasted shrimp so special. Take an extra 30 seconds to pat them completely dry.
Burning the Garlic: Garlic can burn easily at high temperatures, turning bitter. The olive oil in this recipe helps protect it, but if you’re concerned, you can add half the garlic at the beginning and the other half when the shrimp come out of the oven for fresh garlic flavor without the risk.
Skipping the Lemon Zest: Many people add lemon juice but forget the zest, missing out on incredible citrus flavor. The zest contains aromatic oils that brighten the entire dish. Always zest your lemon before juicing it—it’s nearly impossible to zest an already-juiced lemon half!
Wrong Oven Temperature: Too low and your shrimp will be bland and pale; too high and the garlic burns before the shrimp cook through. 425°F is the sweet spot for this recipe.
Not Tasting for Seasoning: Always taste your garlic butter mixture before adding it to the shrimp. Adjust salt, pepper, or lemon juice as needed. It’s much easier to fix seasoning before cooking than after.
Storage & Meal Prep
Wondering how to handle leftovers or prep ahead? Here’s everything you need to know:
Storing Leftovers: Transfer cooled shrimp and any remaining garlic butter sauce to an airtight container. Store in the refrigerator for up to 3 days. The shrimp will release some liquid as they sit, which is normal. Keep in mind that reheated shrimp won’t be quite as tender as freshly cooked, but they’re still delicious!
Reheating Instructions: The key to reheating shrimp is low and slow to prevent them from becoming rubbery. Your best options are:
- Oven method: Preheat to 275°F, spread shrimp in a baking dish, cover with foil, and warm for 10-12 minutes.
- Stovetop method: Heat gently in a skillet over low-medium heat with a splash of water or broth for 3-4 minutes.
- Avoid the microwave if possible – it tends to make shrimp rubbery, but if you must, use 50% power in 30-second intervals.
Meal Prep Smart: While this dish is best fresh, you can prep components ahead. Prepare the garlic butter sauce up to 2 days in advance and store it in the refrigerator. Pat shrimp dry, place in a container, and refrigerate. When ready to cook, let everything come to room temperature for 15 minutes, then proceed with the recipe.
Leftover Ideas: Transform leftover shrimp into shrimp tacos, shrimp pasta salad, shrimp fried rice, or shrimp quesadillas. Chop them up for shrimp salad sandwiches or add to scrambled eggs for a protein-packed breakfast.
Make-Ahead & Freezer Notes
Make-Ahead Strategy: You can prep this recipe up to 8 hours ahead for stress-free entertaining. Pat shrimp dry and arrange them in your baking dish. Make the garlic butter sauce and pour it over the shrimp. Cover tightly with plastic wrap and refrigerate. When ready to cook, let the dish sit at room temperature for 15-20 minutes (this ensures even cooking), then roast as directed. You may need to add 1-2 extra minutes to the cooking time if the shrimp are still cold.
Freezing Raw Prepared Shrimp: If you want to freeze the prepared (but uncooked) shrimp in garlic butter, it’s possible but with some caveats. Arrange shrimp in a single layer in a freezer-safe baking dish, pour the garlic butter mixture over, and freeze until solid. Transfer to a freezer bag, removing as much air as possible. Freeze for up to 2 months. To cook, don’t thaw—bake from frozen at 425°F for 12-15 minutes.
Freezing Cooked Shrimp: While technically possible, I don’t recommend freezing cooked shrimp as they can become mushy and rubbery when thawed and reheated. If you must freeze leftovers, store them in an airtight container with the sauce for up to 1 month. Thaw overnight in the refrigerator and reheat gently.
Best Freezer Practice: If you know you’ll want this meal in the future, it’s better to buy frozen raw shrimp and keep them in your freezer, then thaw and prepare fresh when you’re ready to cook. Frozen shrimp keeps for 3-6 months and the quality will be much better than freezing already-cooked shrimp.
Serving Suggestions
The beauty of garlic butter roasted shrimp is its incredible versatility. Here are my favorite ways to serve this dish:
Over Pasta: Toss the shrimp and all that glorious garlic butter sauce with linguine, angel hair, or fettuccine. Add a splash of pasta water to create a silky sauce that coats every strand. Top with freshly grated Parmesan cheese and extra parsley.
With Crusty Bread: Serve alongside a warm baguette, garlic bread, or sourdough for soaking up every drop of that incredible sauce. This is honestly one of the most satisfying ways to enjoy this dish—the bread becomes a vehicle for all that garlicky, buttery goodness!
Over Rice or Grains: Spoon the shrimp and sauce over fluffy white rice, brown rice, cauliflower rice (for low-carb), risotto, or quinoa. The grains soak up the sauce beautifully.
With Vegetables: Pair with roasted asparagus, sautéed green beans, roasted Brussels sprouts, or a simple arugula salad dressed with lemon vinaigrette. Zucchini noodles (zoodles) are perfect for a low-carb option.
As an Appetizer: Serve the shrimp with toothpicks as an elegant appetizer at parties. Set out crusty bread slices on the side for guests to make their own crostini.
In Tacos or Wraps: Stuff the shrimp into warm tortillas with shredded cabbage, avocado, and a squeeze of lime for quick shrimp tacos.
Complete Meal Ideas:
- Garlic butter shrimp + creamy mashed potatoes + steamed broccoli
- Shrimp over pasta + Caesar salad + garlic knots
- Shrimp with rice pilaf + roasted vegetables + dinner rolls
- Shrimp with cauliflower rice + sautéed spinach (low-carb meal)
Wine Pairing: A crisp white wine like Sauvignon Blanc, Pinot Grigio, or Chardonnay complements the rich, garlicky flavors beautifully. For non-alcoholic options, try sparkling water with lemon or iced green tea.
FAQs Section
Q: Can I use frozen shrimp for this recipe?
A: Absolutely! Frozen shrimp works perfectly well. Just make sure to thaw them completely first—the best method is overnight in the refrigerator. In a pinch, place frozen shrimp in a colander and run cold water over them for 10-15 minutes until thawed. Always pat them completely dry with paper towels before cooking, as frozen shrimp tends to release more moisture than fresh.
Q: Should I leave the tails on or take them off?
A: This is entirely up to personal preference! Tails-on looks more elegant and is traditional for presentation, making your dish look restaurant-quality. However, tails-off is more convenient for eating, especially if you’re serving over pasta or rice where people will be using a fork. For entertaining, I usually leave tails on; for family dinners, I remove them.
Q: How do I know when the shrimp are perfectly cooked?
A: Shrimp are done when they turn from grayish-translucent to pink and opaque throughout. They’ll also curl into a loose “C” shape. If they curl into a tight “O” shape, they’re overcooked. The timing is crucial—start checking at 7-8 minutes for large shrimp. Use a fork to cut one open and check the center; it should be opaque, not translucent.
Q: Can I make this recipe dairy-free?
A: Yes! Replace the butter with additional olive oil (use a total of 6-7 tablespoons) or use a dairy-free butter substitute. While the flavor will be slightly different, the shrimp will still be delicious. You can also use ghee if you tolerate it—it adds a beautiful nutty flavor.
Q: What size shrimp should I buy?
A: I recommend large shrimp (16-20 count per pound) or extra-large (21-25 count). These sizes are substantial enough to stay juicy during roasting without overcooking. Jumbo shrimp (under 15 count) work too but may need an extra minute or two of cooking. Avoid small shrimp (31-40 count or higher) as they cook too quickly and can easily become overcooked and rubbery.
Q: My garlic burned. What did I do wrong?
A: Garlic burns easily at high temperatures, especially if the pieces are very small. To prevent this: (1) Don’t mince the garlic too finely, (2) Make sure there’s enough olive oil mixed with the butter to protect the garlic, (3) Don’t cook longer than 10 minutes, (4) Consider adding half the garlic before cooking and the other half after for fresh garlic flavor without burning risk.
Q: Can I add vegetables to roast with the shrimp?
A: Yes, but choose wisely! Quick-cooking vegetables like cherry tomatoes, thinly sliced bell peppers, or asparagus tips work well. Denser vegetables like broccoli or thick asparagus spears should be added to the pan first and roasted for 5-7 minutes before adding the shrimp. This ensures everything finishes cooking at the same time.
Conclusion
There you have it—the ultimate Garlic Butter Roasted Shrimp recipe that’s about to become your new go-to for easy, impressive dinners! Whether you’re cooking for your family on a busy Tuesday or hosting friends for a special occasion, this recipe delivers every single time. The combination of succulent shrimp, aromatic garlic, rich butter, and bright lemon creates a dish that tastes like it came from a fancy restaurant, yet takes just 15 minutes from start to finish.
The best part? This recipe is incredibly forgiving and adaptable. Make it spicy, add your favorite herbs, serve it a dozen different ways—it’s always delicious. Once you master this basic technique, you’ll find yourself turning to it again and again because it’s simply that good and that easy.
I’d love to hear how your Garlic Butter Roasted Shrimp turns out! Drop a comment below and let me know if you tried any of the variations. Did you serve it over pasta or with crusty bread? Did you add extra garlic (I won’t judge!)? Your feedback helps other home cooks and inspires new recipe ideas.
Don’t forget to save this recipe to your Pinterest boards so you can find it easily when you need a quick, delicious dinner solution! Click that Pin button and share this with your fellow food-loving friends. If you make this recipe, I’d be thrilled if you’d tag me in your photos on social media—I love seeing your beautiful creations!
Happy cooking, and here’s to many delicious garlic butter shrimp dinners in your future! 🍤✨

