
If you’ve ever thought cauliflower was boring, this Garlic Herb Roasted Cauliflower recipe is about to completely change your mind! This simple yet spectacular side dish transforms humble cauliflower florets into golden-brown, caramelized bites of heaven that are crispy on the outside and tender on the inside.
Roasted to perfection with aromatic garlic, fragrant herbs, and just the right amount of olive oil, this recipe has become a weeknight staple in kitchens across America. It’s the kind of dish that converts cauliflower skeptics into enthusiastic fans and has kids asking for seconds (yes, really!).
Whether you’re looking for a healthy side dish for your weeknight dinner, a impressive vegetable option for holiday gatherings, or a simple way to add more vegetables to your family’s diet, this garlic herb roasted cauliflower checks all the boxes. It pairs beautifully with everything from grilled chicken and roasted salmon to hearty beef dishes and vegetarian mains. The best part? It takes just 10 minutes to prep and practically cooks itself in the oven while you focus on the rest of your meal.
This recipe is perfect for busy weeknights, meal prep Sundays, Thanksgiving dinners, casual family gatherings, or any time you want a vegetable side dish that actually tastes amazing. The crispy, caramelized edges and the aromatic garlic-herb coating make this roasted cauliflower so addictive that it often disappears before it even makes it to the dinner table!
History / Background
Cauliflower has experienced quite the glow-up in recent years, transitioning from an often-overlooked vegetable to a culinary superstar. Originally cultivated in the Mediterranean region over 2,000 years ago, cauliflower was prized by ancient Romans and later became a favorite in European royal courts during the Renaissance period.
The technique of roasting vegetables at high heat to achieve caramelization has roots in traditional European cooking methods, particularly in Italian and French cuisine. However, the popularity of roasted cauliflower as we know it today really took off in American home kitchens during the early 2000s, coinciding with the rise of health-conscious eating and the farm-to-table movement.
The magic of roasting cauliflower lies in a scientific process called the Maillard reaction, where the natural sugars in the cauliflower caramelize at high temperatures, creating those irresistibly crispy, golden-brown edges and developing deep, nutty flavors that simply can’t be achieved through steaming or boiling.
In Middle Eastern cuisine, roasted cauliflower has been a beloved staple for centuries, often seasoned with warming spices like cumin and paprika. Italian cooking traditions have long celebrated roasted vegetables with olive oil, garlic, and fresh herbs, a combination that forms the backbone of this recipe.
Today, garlic herb roasted cauliflower has become a Pinterest sensation and a restaurant menu favorite, appreciated for its simplicity, versatility, and the way it transforms an everyday vegetable into something truly special. It’s a perfect example of how classic cooking techniques combined with quality ingredients can create something both nostalgic and contemporary.
Why You’ll Love This Recipe
This Garlic Herb Roasted Cauliflower recipe is about to become your go-to vegetable side dish, and here’s why: it delivers restaurant-quality results with minimal effort and maximum flavor. The combination of crispy caramelized edges, tender interiors, and aromatic garlic-herb seasoning creates a taste experience that elevates cauliflower from ordinary to extraordinary.
Here’s what makes this recipe absolutely irresistible:
- Incredibly Easy – Just toss, season, and roast! Perfect for beginner cooks and busy weeknights with only 10 minutes of hands-on prep time
- Naturally Healthy – Packed with vitamins C and K, fiber, and antioxidants, while being naturally low-carb, keto-friendly, and gluten-free
- Budget-Friendly – Cauliflower is affordable year-round, and this recipe uses simple pantry staples you probably already have
- Perfectly Crispy – The high-heat roasting technique creates those coveted golden-brown, caramelized edges that make this dish addictive
- Versatile & Customizable – Easily adapt with your favorite herbs, spices, or add-ins to match any flavor profile or dietary preference
- Family-Approved – Even picky eaters love the crispy texture and savory garlic flavor, making it a kid-friendly veggie option
- Meal Prep Champion – Holds up beautifully for 3-4 days in the fridge, making it perfect for weekly meal planning
- Impressive Presentation – Beautiful enough for holiday tables and dinner parties, yet simple enough for everyday meals
- Vegan & Vegetarian – Naturally plant-based and satisfying enough to be the star of a vegetarian meal
The beauty of this recipe lies in its simplicity. You don’t need fancy ingredients or complicated techniques—just fresh cauliflower, quality olive oil, aromatic garlic, and fragrant herbs come together to create something truly memorable.
Ingredient Notes
Understanding your ingredients is the key to cooking success! Here’s what you need to know about each component in this delicious roasted cauliflower recipe:
Cauliflower – Choose a fresh head with tight, compact florets and crisp green leaves. The florets should be creamy white without brown spots. Fresh cauliflower has a mild, slightly sweet flavor that becomes nutty when roasted. You’ll need one large head (about 2-2.5 pounds) for this recipe. Frozen cauliflower can work in a pinch, but fresh delivers superior texture and caramelization.
Olive Oil – Extra virgin olive oil is preferred for its rich flavor and high smoke point. It helps the cauliflower crisp up beautifully while adding healthy fats. You’ll need about 3-4 tablespoons. Substitute with avocado oil for an even higher smoke point, or melted coconut oil for a slightly different flavor profile.
Fresh Garlic – Fresh garlic cloves provide aromatic depth and that irresistible roasted garlic flavor. You’ll need 4-5 large cloves, minced. Fresh is always better than garlic powder here, as it caramelizes beautifully in the oven. If you’re in a pinch, use garlic powder, but reduce the amount to about 1 teaspoon.
Fresh Herbs – A combination of fresh rosemary, thyme, and parsley creates a classic herb blend that complements cauliflower perfectly. Fresh herbs provide bright, vibrant flavors that dried herbs simply can’t match. However, dried herbs work too—just use one-third the amount and add them at the beginning of roasting.
Salt & Black Pepper – Essential for enhancing all the flavors. Sea salt or kosher salt works best. Freshly ground black pepper adds a subtle heat and complexity.
Lemon Juice (Optional) – A squeeze of fresh lemon juice after roasting brightens the dish and adds a pop of acidity that balances the rich, caramelized flavors. This is optional but highly recommended!
Parmesan Cheese (Optional) – Freshly grated Parmesan adds a salty, umami punch and creates an extra crispy crust. This is completely optional and can be omitted for vegan or dairy-free diets.
Equipment Needed
Having the right tools makes cooking easier and more enjoyable! Here’s everything you’ll need to make perfect garlic herb roasted cauliflower:
- Large Rimmed Baking Sheet – A half-sheet pan (18×13 inches) works perfectly. The rimmed edges prevent oil from dripping while giving cauliflower plenty of space to roast evenly.
- Parchment Paper or Aluminum Foil – Optional but recommended for easy cleanup and to prevent sticking.
- Sharp Chef’s Knife – For cutting cauliflower into uniform florets.
- Large Mixing Bowl – To toss cauliflower with oil, garlic, and seasonings.
- Measuring Spoons – For accurate seasoning amounts.
- Garlic Press or Microplane – Makes mincing garlic quick and easy.
- Wooden Spoon or Silicone Spatula – For tossing and stirring.
- Kitchen Timer – To ensure perfect roasting timing.
- Oven Mitts – Safety first when handling hot baking sheets!

Garlic Herb Roasted Cauliflower Recipe
- Total Time: 40-45 minutes
- Yield: 6 servings 1x
- Diet: Vegetarian
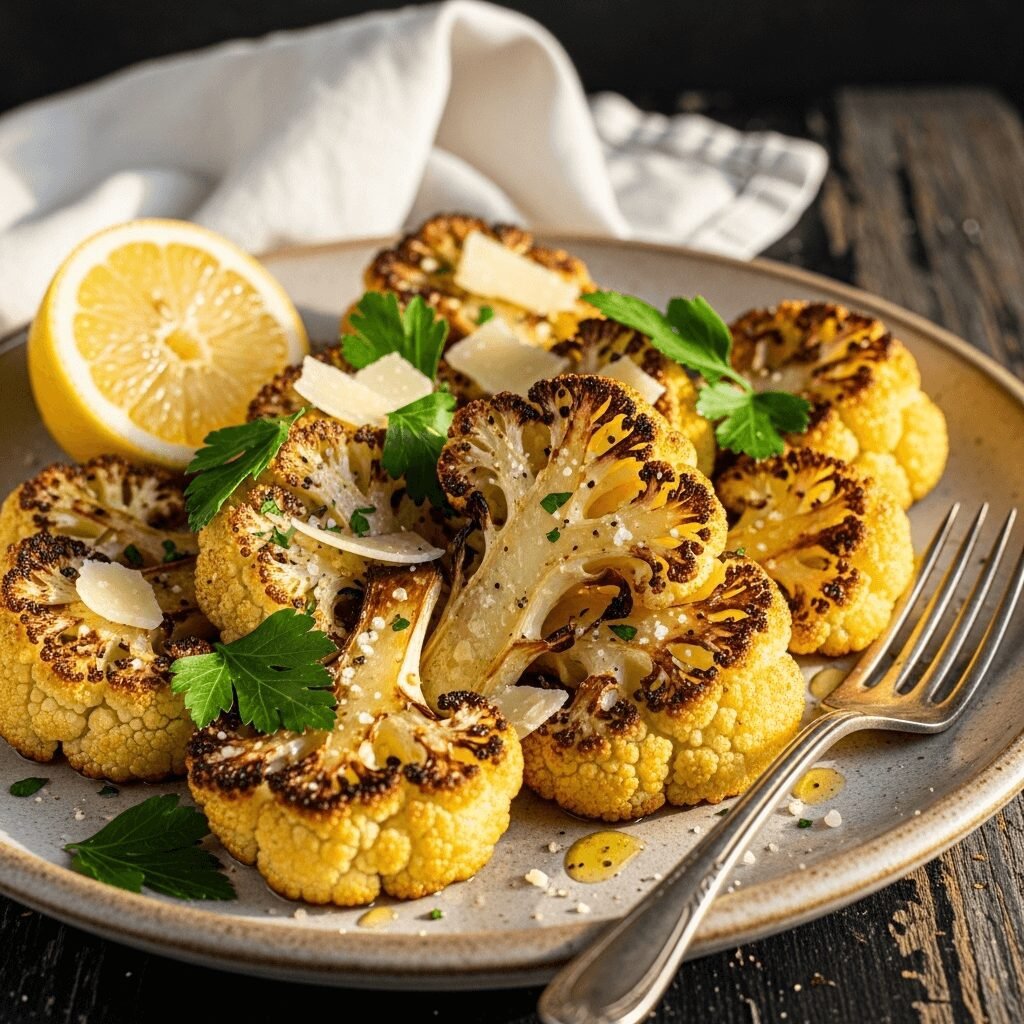
Description
Perfectly roasted cauliflower florets tossed with aromatic garlic, fresh herbs, and olive oil, then roasted until golden and caramelized. This simple yet flavorful side dish is crispy on the outside, tender on the inside, and absolutely irresistible!
Ingredients
- 1 large head cauliflower (about 2-2.5 pounds), cut into bite-sized florets
- 3-4 tablespoons extra virgin olive oil
- 4-5 large garlic cloves, minced
- 1 tablespoon fresh rosemary, finely chopped (or 1 teaspoon dried)
- 1 tablespoon fresh thyme leaves (or 1 teaspoon dried)
- 1 teaspoon sea salt (adjust to taste)
- ½ teaspoon freshly ground black pepper
- ¼ teaspoon red pepper flakes (optional, for heat)
- 2 tablespoons fresh parsley, chopped (for garnish)
- Juice of ½ lemon (optional)
- ¼ cup freshly grated Parmesan cheese (optional)
Instructions
- Preheat Your Oven: Position your oven rack in the center and preheat to 425°F (220°C). Line a large rimmed baking sheet with parchment paper or aluminum foil for easy cleanup.
- Prepare the Cauliflower: Remove the leaves from the cauliflower head and cut it into bite-sized florets, approximately 1-1.5 inches in size. Try to keep them uniform for even roasting. Pat the florets dry with paper towels to remove excess moisture—this is crucial for achieving crispy edges!
- Make the Garlic Herb Mixture: In a large mixing bowl, combine the olive oil, minced garlic, rosemary, thyme, salt, black pepper, and red pepper flakes (if using). Whisk together until well combined and fragrant.
- Coat the Cauliflower: Add the cauliflower florets to the bowl with the garlic herb mixture. Toss thoroughly using your hands or a wooden spoon, ensuring every floret is evenly coated with the seasoned oil. Take your time with this step—even coating is the secret to consistent flavor!
- Arrange on Baking Sheet: Spread the seasoned cauliflower florets in a single layer on the prepared baking sheet. Make sure they’re not overcrowded—leave a little space between florets so they roast rather than steam. Use two baking sheets if necessary.
- Roast to Perfection: Place the baking sheet in the preheated oven and roast for 30-35 minutes, stirring halfway through (around the 15-minute mark). The cauliflower is done when it’s tender when pierced with a fork and has beautiful golden-brown, caramelized edges.
- Add Final Touches: Remove from the oven and immediately sprinkle with Parmesan cheese (if using), allowing it to melt slightly from the residual heat. Squeeze fresh lemon juice over the top and garnish with chopped fresh parsley.
- Serve and Enjoy: Transfer to a serving platter and serve immediately while hot and crispy. This garlic herb roasted cauliflower pairs beautifully with virtually any main dish!
Notes
- For Extra Crispy Cauliflower: Make sure florets are completely dry before tossing with oil, avoid overcrowding the pan, and roast at 425°F or higher.
- Garlic Tip: If you’re worried about the garlic burning, you can add it halfway through the roasting time instead of at the beginning.
- Herb Variations: Feel free to experiment with other herbs like oregano, sage, or basil based on your preferences or what you have on hand.
- Storage: Store leftovers in an airtight container in the refrigerator for up to 4 days. Reheat in a 400°F oven for 5-7 minutes to restore crispiness.
- Scaling: This recipe easily doubles or triples for larger gatherings—just use multiple baking sheets and rotate them halfway through cooking.
- Prep Time: 10 minutes
- Cook Time: 30-35 minutes
- Category: Side Dish
- Method: Roasting
- Cuisine: American, Mediterranean-Inspired
Nutrition
- Serving Size: About 1 cup (approximately ⅙ of recipe)
- Calories: 110
- Sugar: 3g
- Sodium: 420mg
- Fat: 8g
- Saturated Fat: 1g
- Unsaturated Fat: 7g
- Trans Fat: 0g
- Carbohydrates: 9g
- Fiber: 3g
- Protein: 3g
- Cholesterol: 0mg (3mg with Parmesan)
Note: Nutrition information is estimated and will vary based on exact ingredients and portion sizes used.
Tips & Variations
The beauty of this garlic herb roasted cauliflower recipe is its incredible versatility! Here are some delicious ways to customize it to your taste preferences and dietary needs:
Spicy Kick: Add 1 teaspoon of smoked paprika, ½ teaspoon cayenne pepper, or a generous pinch of red pepper flakes for heat. You can also toss with hot sauce or sriracha before roasting.
Indian-Inspired: Replace the herbs with 1 tablespoon curry powder, 1 teaspoon turmeric, 1 teaspoon cumin, and ½ teaspoon garam masala for a warm, aromatic twist.
Mediterranean Style: Add 2 tablespoons capers, ½ cup halved cherry tomatoes, and ¼ cup sliced Kalamata olives during the last 10 minutes of roasting.
Asian Fusion: Toss roasted cauliflower with sesame oil, soy sauce, rice vinegar, and toasted sesame seeds immediately after roasting. Garnish with sliced green onions.
Cheesy Delight: Beyond Parmesan, try crumbled feta, shredded cheddar, or nutritional yeast for a vegan option. Add cheese during the last 5 minutes of roasting.
Buffalo Style: Toss hot roasted cauliflower with buffalo sauce and serve with ranch or blue cheese dressing for a game-day favorite.
Herb Variations: Experiment with different herb combinations like sage and brown butter, dill and lemon, or cilantro and lime.
Extra Vegetables: Add halved Brussels sprouts, sliced red onions, or bell pepper chunks to make it a more substantial roasted vegetable medley.
Sweetness Balance: Drizzle with a touch of honey or maple syrup before roasting for a sweet and savory profile.
Crunch Factor: Toss with toasted pine nuts, slivered almonds, or crushed walnuts after roasting for added texture and nutrients.
Pro Chef Tips
Want to take your roasted cauliflower from good to absolutely spectacular? Here are professional kitchen secrets that will elevate your dish:
Dry Before You Fry: The number one secret to achieving restaurant-quality crispy cauliflower is ensuring the florets are completely dry before tossing with oil. Use paper towels or even a salad spinner to remove all surface moisture—water is the enemy of crispy!
High Heat is Your Friend: Don’t be afraid of that 425°F temperature! High heat is essential for caramelization and developing those coveted golden-brown edges. Some chefs even go up to 450°F for extra crispiness.
Size Matters: Cut florets into uniform, bite-sized pieces (about 1-1.5 inches). This ensures even cooking—no burnt small pieces or undercooked large chunks. The stems can be roasted too, just cut them slightly smaller as they take longer to cook.
Don’t Crowd the Pan: Overcrowding causes steaming instead of roasting. Florets should have space to breathe. If you’re doubling the recipe, use two baking sheets rather than cramming everything onto one.
The Flip Matters: Flipping halfway through ensures even caramelization on multiple sides. Use a sturdy spatula and don’t be afraid to scrape up those delicious browned bits stuck to the pan—they’re flavor gold!
Garlic Timing: If you want milder garlic flavor or worry about burning, add minced garlic during the last 10-15 minutes of roasting instead of at the beginning. For the boldest garlic flavor, add whole peeled cloves alongside the cauliflower.
Season in Layers: Season before roasting, but also taste and adjust after roasting. A final sprinkle of flaky sea salt, fresh herbs, and a squeeze of lemon makes all the difference.
Let It Rest: Allow the cauliflower to sit for 2-3 minutes after removing from the oven. This brief resting period allows the florets to finish cooking through with residual heat while maintaining their crispy exterior.
Fresh Herb Finish: While dried herbs work great during roasting, always finish with a sprinkle of fresh herbs for a bright, vibrant pop of flavor and beautiful presentation.
Temperature Matters: Use an oven thermometer to ensure accuracy. Home ovens can vary by 25-50 degrees, which significantly impacts roasting results.
Common Mistakes to Avoid
Even simple recipes can go wrong! Here are the most common pitfalls when making roasted cauliflower and how to avoid them:
Soggy, Not Crispy Cauliflower: This happens when florets are too wet before roasting or when the pan is overcrowded. Always pat dry thoroughly and give florets breathing room on the baking sheet. Remember: space between florets = crispy results!
Burnt Garlic: Raw minced garlic can burn quickly at high temperatures, turning bitter. To prevent this, toss garlic with oil and cauliflower so it’s somewhat protected, or add it halfway through cooking. You can also use whole garlic cloves which are less likely to burn.
Uneven Cooking: Using florets of drastically different sizes means some will be burnt while others remain undercooked. Take the extra minute to cut florets uniformly—your future self will thank you!
Under-Seasoning: Cauliflower has a mild flavor and can handle bold seasoning. Don’t be shy with salt, herbs, and garlic. Under-seasoned cauliflower tastes bland and boring. Season generously and taste before serving to adjust.
Skipping the Flip: Failing to flip or stir halfway through means one side burns while the other barely browns. Set a timer for the halfway point and give everything a good stir for even caramelization all around.
Using Old or Low-Quality Oil: Olive oil adds flavor, so use a good quality extra virgin variety. Old or rancid oil will negatively impact the taste of your dish. If your olive oil smells off or musty, replace it!
Not Preheating the Oven: Starting with a cold oven means longer cooking times and less caramelization. Always preheat fully to ensure that high initial heat that creates those crispy edges from the start.
Storage & Meal Prep
Roasted cauliflower is a meal prep champion! Here’s everything you need to know about storing and enjoying leftovers:
Refrigerator Storage: Allow the roasted cauliflower to cool completely to room temperature, then transfer to an airtight container. Store in the refrigerator for up to 4 days. The florets will soften slightly during storage but still taste delicious.
Reheating for Best Results: To restore some of that crispy texture, reheat in a preheated 400°F oven for 5-7 minutes on a baking sheet. Avoid the microwave if possible, as it makes the cauliflower soggy rather than crispy. An air fryer also works wonderfully—reheat at 375°F for 3-4 minutes.
Room Temperature Serving: Roasted cauliflower can be enjoyed at room temperature, making it perfect for lunch bowls, salads, or picnic-style meals. It tastes great cold too, especially when dressed with a vinaigrette.
Meal Prep Tips: Roast a double or triple batch on Sunday to use throughout the week. Add to grain bowls, salads, wraps, pasta dishes, or simply reheat as a side. It’s a versatile foundation for countless meals.
Repurposing Leftovers: Chop leftover roasted cauliflower and add to scrambled eggs, frittatas, grain bowls, pizza toppings, or blend into soup for added nutrition and flavor.
Container Choice: Glass containers work best for storage as they don’t absorb odors and allow you to see what’s inside. Make sure the container is completely sealed to prevent the cauliflower from drying out.
Make-Ahead & Freezer Notes
Planning ahead? Here’s how to prep this recipe in advance and freeze for later:
Make-Ahead Prep (Uncooked): You can cut cauliflower into florets up to 2 days ahead. Store in an airtight container or resealable bag in the refrigerator. Wait to toss with oil and seasonings until just before roasting for the best results.
Partially Cooked Make-Ahead: Roast the cauliflower for about 20 minutes (until tender but not fully browned), let cool, and refrigerate. Finish roasting at 425°F for 10-15 minutes when ready to serve. This method gives you the convenience of prep work while maintaining that fresh-from-the-oven quality.
Freezing Raw Cauliflower: Cut florets can be frozen raw. Spread on a baking sheet, freeze until solid, then transfer to freezer bags. They’ll keep for up to 3 months. Roast from frozen, adding 5-10 minutes to the cooking time.
Freezing Cooked Cauliflower: While possible, the texture won’t be quite as crispy after freezing and thawing. If you do freeze cooked cauliflower, cool completely, freeze on a baking sheet, then transfer to freezer-safe containers. It will keep for up to 2 months.
Thawing & Reheating Frozen: Thaw frozen cooked cauliflower in the refrigerator overnight. Reheat in a 400°F oven for 8-10 minutes, which helps restore some crispiness. You can also roast from frozen, adding 5 minutes to the reheat time.
Best Freezing Strategy: For meal prep purposes, it’s actually better to freeze the cauliflower raw, then roast fresh when needed. This preserves the best texture and flavor.
Serving Suggestions
This versatile garlic herb roasted cauliflower pairs beautifully with so many dishes! Here are some delicious serving ideas:
Perfect Protein Pairings:
- Roasted chicken, grilled steak, or pan-seared salmon
- Herb-crusted pork tenderloin or lamb chops
- Baked cod or halibut for a lighter option
- Grilled shrimp or scallops for surf-and-turf vibes
Complementary Side Dishes:
- Creamy mashed potatoes or roasted sweet potatoes
- Fluffy quinoa, brown rice, or couscous
- Fresh garden salad with lemon vinaigrette
- Warm crusty bread or garlic bread for soaking up flavors
Grain Bowl Base: Layer roasted cauliflower over farro, quinoa, or rice with chickpeas, hummus, cucumber, tomatoes, and tahini dressing for a satisfying vegetarian meal.
Pasta Integration: Toss with your favorite pasta, olive oil, sun-dried tomatoes, and fresh basil. Add grilled chicken or white beans for protein.
Breakfast Applications: Mix into scrambled eggs, fold into omelets, or serve alongside breakfast hash and poached eggs.
Holiday Table: Serve as an elegant vegetable side for Thanksgiving, Christmas, or Easter dinner alongside traditional favorites.
Wine Pairings: The garlic and herbs pair wonderfully with Sauvignon Blanc, Pinot Grigio, or a light Chardonnay. For red wine lovers, try a light Pinot Noir.
Casual Entertaining: Serve as an appetizer with toothpicks and a side of ranch or garlic aioli for dipping at parties and gatherings.
FAQs Section
Can I use frozen cauliflower instead of fresh? Yes, you can use frozen cauliflower, but the results won’t be quite as crispy. Thaw it completely and pat it very dry with paper towels before tossing with oil and seasonings. You may need to add 5-10 minutes to the roasting time. For the best texture and caramelization, fresh cauliflower is always recommended.
Why is my roasted cauliflower soggy instead of crispy? Soggy cauliflower usually results from excess moisture or overcrowding on the baking sheet. Make sure to thoroughly dry the florets before tossing with oil, use a high oven temperature (425°F or higher), and spread florets in a single layer with space between them. Overcrowding causes steaming instead of roasting.
Can I make this recipe dairy-free and vegan? Absolutely! The base recipe is already vegan-friendly. Simply omit the Parmesan cheese or replace it with nutritional yeast for a cheesy, umami flavor without dairy. All other ingredients—olive oil, garlic, herbs, and cauliflower—are naturally plant-based.
How do I prevent the garlic from burning? Minced garlic can burn at high temperatures. To prevent this, make sure it’s well-coated with olive oil, toss it thoroughly with the cauliflower, or add it halfway through the roasting time. You can also use whole garlic cloves, which are less prone to burning and develop a sweet, mellow flavor.
What’s the best way to cut cauliflower into florets? Remove the leaves and cut the cauliflower in half through the core. Cut each half into quarters, then use your knife to cut away the core. Break or cut the cauliflower into bite-sized florets, approximately 1-1.5 inches in size. The stems are edible too—just cut them slightly smaller as they take longer to cook.
Can I add other vegetables to roast with the cauliflower? Definitely! Brussels sprouts, carrots, red onions, bell peppers, and broccoli all roast well alongside cauliflower. Just make sure all vegetables are cut to similar sizes for even cooking. Keep in mind that different vegetables have different cooking times, so choose those that roast at similar rates.
How do I know when the cauliflower is done roasting? The cauliflower is perfectly done when it’s tender when pierced with a fork and has golden-brown, caramelized edges. This typically takes 30-35 minutes at 425°F. The edges should be crispy and slightly charred in spots, while the centers remain tender. Don’t be afraid of those dark brown bits—they’re full of flavor!
Conclusion
There you have it—the ultimate guide to making the most incredible Garlic Herb Roasted Cauliflower you’ve ever tasted! This recipe proves that simple ingredients, when treated with care and roasted to golden perfection, can create something truly extraordinary.
Whether you’re a seasoned home cook or just beginning your culinary journey, this roasted cauliflower recipe is sure to become a regular in your dinner rotation. It’s healthy, delicious, budget-friendly, and so versatile that you’ll find yourself making it again and again. The crispy, caramelized edges combined with the aromatic garlic and herbs create a flavor experience that transforms humble cauliflower into the star of your dinner table.
I’d absolutely love to hear how your Garlic Herb Roasted Cauliflower turns out! Did you try any of the variations? Did your family devour it as quickly as mine does? Leave a comment below sharing your experience, and don’t forget to rate the recipe—your feedback helps fellow home cooks and means the world to me!
Please save this recipe to your Pinterest boards so you can make it again and again! Click that Pinterest button and save it to your “Side Dishes,” “Healthy Recipes,” or “Easy Dinners” board. And if you love this recipe as much as I think you will, share it with your friends and family who would appreciate a delicious, healthy side dish that’s actually exciting!
Happy roasting, and here’s to making vegetables taste absolutely amazing! 🥦✨