
Get ready to experience the most addictive chicken wings you’ll ever make! These Honey Garlic Chicken Wings are the perfect combination of crispy, sticky, sweet, and savory – with just the right balance of honey sweetness and robust garlic flavor that’ll have everyone licking their fingers and reaching for more. Whether you’re hosting game day, planning a party appetizer, or just craving something incredibly delicious, these wings deliver every single time.
What makes these wings so special is the technique: they’re baked until perfectly crispy, then tossed in a luscious honey garlic glaze that creates that irresistible sticky coating without the mess of deep frying. The result is restaurant-quality wings that are surprisingly easy to make at home. They’re crispy on the outside, tender and juicy on the inside, and coated in a sauce that’s so good you’ll want to pour it over everything.
These wings are perfect for Super Bowl parties, casual weeknight dinners, potlucks, birthday celebrations, or any time you need crowd-pleasing finger food that disappears in minutes. They’re also incredibly versatile – serve them as an appetizer, main course, or late-night snack. Once you master this recipe, you’ll never order takeout wings again!
History / Background
Chicken wings have a fascinating American origin story that begins in Buffalo, New York, in 1964. Teressa Bellissimo, co-owner of the Anchor Bar, reportedly invented Buffalo wings when she needed to create a late-night snack for her son and his friends. She deep-fried chicken wings and tossed them in a cayenne-based hot sauce with butter – and an American culinary icon was born.
However, the honey garlic variation represents the evolution of wing culture in America over the past several decades. As wings exploded in popularity throughout the 1980s and 1990s, restaurants and home cooks began experimenting with different flavor profiles beyond the traditional Buffalo style. Asian-inspired flavors, particularly the combination of sweet and savory elements common in Chinese-American cuisine, began influencing wing recipes.
The honey garlic flavor profile draws inspiration from several Asian cooking traditions. Chinese cuisine has long celebrated the balance of sweet and savory, using honey or sugar alongside garlic and soy sauce in dishes like honey garlic pork and sticky chicken. Korean cuisine’s love of sweet, garlicky marinades in dishes like yangnyeom chicken also influenced this style. Japanese teriyaki sauces contributed the concept of glossy, sticky-sweet glazes.
The honey garlic wing became particularly popular in the 1990s and 2000s as wing restaurants like Buffalo Wild Wings and Wingstop began offering diverse flavor profiles beyond classic Buffalo. The combination proved to be universally appealing – sweet enough for those who avoid spicy food, garlicky enough to satisfy savory cravings, and sticky-delicious enough to become addictive.
Today, honey garlic wings represent the perfect fusion of American wing culture with Asian flavor influences. They’ve become a staple at sports bars, casual restaurants, and home kitchens across America. The recipe demonstrates how American food culture embraces and adapts international flavors, creating something entirely new and delicious in the process.
Why You’ll Love This Recipe
These honey garlic chicken wings are about to become your new obsession, and I’m not being dramatic. They combine everything you love about wings – that perfect crispy skin, tender juicy meat, and addictive sauce – with a flavor profile that appeals to absolutely everyone. The honey garlic glaze is sweet without being cloying, garlicky without being overwhelming, and creates that signature sticky coating that makes wings so irresistible.
Here’s why these wings will steal your heart:
- Baked, Not Fried – Achieves crispy perfection in the oven without the mess, smell, or calories of deep frying
- Crowd-Pleasing Flavor – The sweet and savory combination appeals to kids and adults alike, even picky eaters
- Game Day Champion – Perfect for parties, tailgates, and sports watching with minimal effort
- Budget-Friendly – Chicken wings are affordable and this recipe feeds a crowd without breaking the bank
- No Special Equipment – Just a baking sheet and bowl – no deep fryer or special tools required
- Make-Ahead Friendly – Can be prepped in advance and reheated without losing that crispy texture
- Customizable Heat – Easy to add spice for those who like it hot while keeping the base recipe mild
- Sticky-Delicious – That glossy, finger-licking glaze is what wing dreams are made of
- Healthier Than Takeout – Control the ingredients and avoid mystery oils and excessive sodium
- Impressive Results – Looks and tastes like you spent hours when it’s actually quite simple
- Leftover Magic – If you have any leftovers (unlikely!), they reheat beautifully
Ingredient Notes
Chicken Wings – You’ll need about 3 pounds of chicken wings for this recipe, which typically serves 4-6 people as a main course or 8-10 as an appetizer. You can buy whole wings and cut them yourself at the joints, or purchase pre-cut “party wings” (drumettes and flats separated) to save time. Pat them completely dry before baking – this is crucial for crispy skin. Chicken drumsticks can substitute if you prefer, though cooking time will increase.
Honey – The star sweetener that gives these wings their signature sticky glaze and caramelized flavor. Use good quality honey for the best taste – local raw honey adds complexity, though standard clover honey works perfectly. Honey provides natural sweetness with deeper flavor than sugar. For a different twist, try maple syrup or agave nectar, though the flavor will change slightly.
Fresh Garlic – Absolutely essential and non-negotiable for authentic flavor. You’ll need 6-8 cloves minced very finely for the sauce. Fresh garlic provides that pungent, aromatic quality that makes these wings so addictive. Jarred minced garlic can work in a pinch but lacks the vibrant flavor of fresh. Garlic powder is not a good substitute in this sauce as it won’t provide the same depth.
Soy Sauce – Adds umami depth, saltiness, and that savory element that balances the honey’s sweetness. Use regular soy sauce for best results. Low-sodium soy sauce works if you’re watching salt intake – just taste and adjust. Tamari can substitute for a gluten-free version, or coconut aminos for a soy-free option, though the flavor will be slightly different.
Rice Vinegar – Provides acidity that brightens the sauce and cuts through the richness. Rice vinegar is milder and slightly sweet compared to other vinegars, making it perfect for this Asian-inspired sauce. Apple cider vinegar or white wine vinegar can substitute if needed, though use slightly less as they’re more acidic.
Butter – Adds richness and helps create that glossy, coating texture. Real butter is preferred for flavor, though you can use olive oil for a lighter version or to make it dairy-free. The butter also helps the sauce cling to the wings beautifully.
Ginger – Fresh grated ginger adds a warm, slightly spicy note that complements the honey and garlic perfectly. Just a teaspoon provides subtle complexity without overwhelming the dish. Ground ginger can substitute (use 1/2 teaspoon) but fresh is far superior.
Baking Powder – This is the secret weapon for ultra-crispy wings! A light coating of baking powder (not baking soda!) raises the pH of the chicken skin, allowing it to crisp up beautifully in the oven. It’s a game-changer for oven-baked wings.
Cornstarch – Used in the sauce as a thickening agent to create that perfect sticky, glossy consistency. It helps the sauce cling to every inch of the wings. Arrowroot powder can substitute if you prefer.
Equipment Needed
- Large Baking Sheet – A rimmed baking sheet (half-sheet pan) works best for spreading wings in a single layer
- Wire Rack – Essential for elevating wings above the pan so air circulates for maximum crispiness
-
- Small Saucepan – For cooking the honey garlic sauce
- Large Mixing Bowl – For tossing wings with baking powder and for coating them in sauce
- Whisk or Fork – For mixing the sauce ingredients
- Tongs – Makes flipping wings and tossing them in sauce much easier
- Measuring Cups and Spoons – For accurate ingredient proportions
- Microplane or Grater – For grating fresh ginger
- Chef’s Knife – For mincing garlic
- Cutting Board – For prep work
- Aluminum Foil or Parchment Paper – Optional, for easier cleanup (line baking sheet)
- Paper Towels – Essential for patting wings completely dry

Honey Garlic Chicken Wings Recipe
- Total Time: 1 hour
- Yield: 6 servings (about 8-10 wings per person) 1x
- Diet: Gluten Free
Description
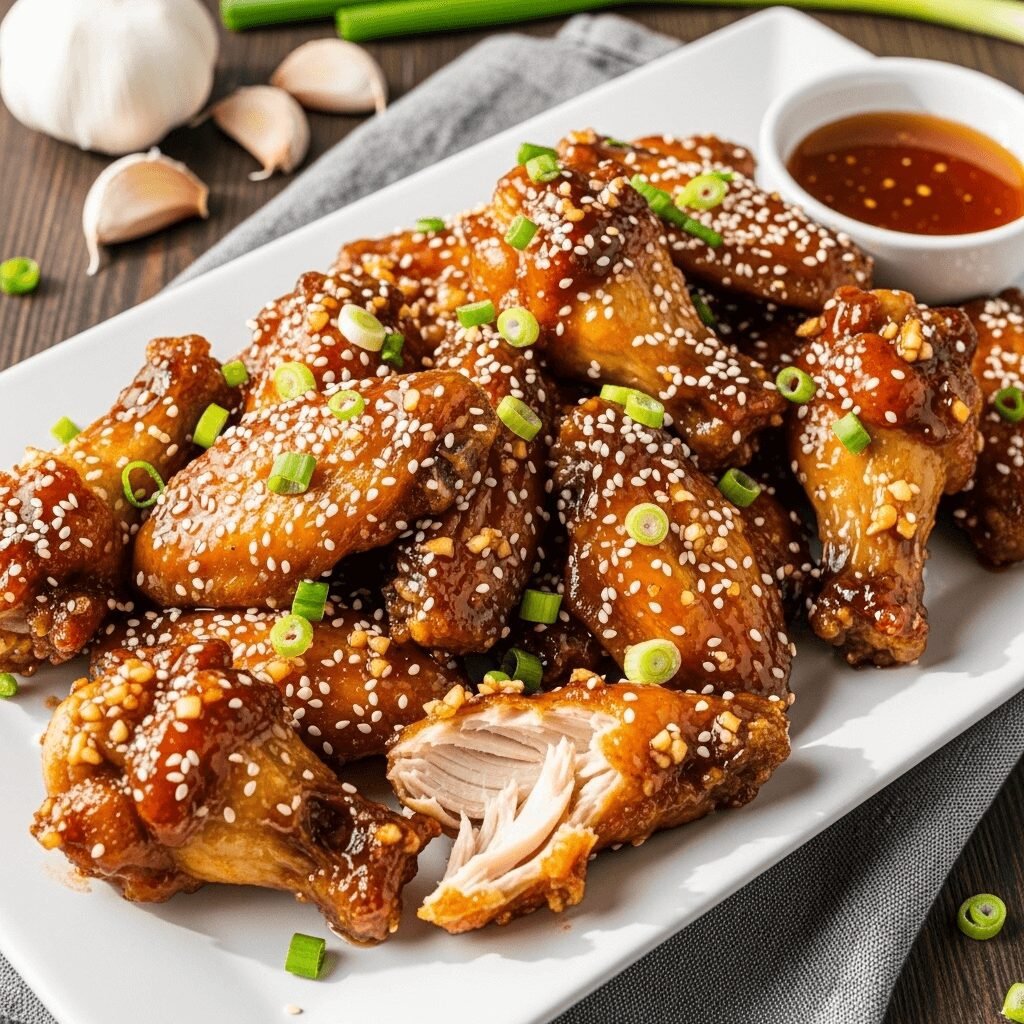
These Honey Garlic Chicken Wings are baked until perfectly crispy, then tossed in a sticky-sweet honey garlic glaze that’s absolutely irresistible. They’re perfect for parties, game day, or any time you’re craving finger-licking good wings!
Ingredients
For the Wings:
- 3 lbs chicken wings (drumettes and flats separated)
- 1 1/2 tablespoons baking powder (NOT baking soda)
- 1 teaspoon salt
- 1/2 teaspoon black pepper
- 1/2 teaspoon garlic powder
- Cooking spray or oil for the rack
For the Honey Garlic Sauce:
- 1/2 cup honey
- 6-8 garlic cloves, minced (about 2 tablespoons)
- 1/4 cup soy sauce (or tamari for gluten-free)
- 2 tablespoons rice vinegar
- 2 tablespoons butter
- 1 teaspoon fresh ginger, grated
- 1 tablespoon cornstarch
- 2 tablespoons water
- 1/4 teaspoon red pepper flakes (optional, for heat)
- Sesame seeds and sliced green onions for garnish
Instructions
- Prep the Wings – Remove wings from refrigerator and pat them completely dry with paper towels. This step is absolutely critical for crispy skin – moisture is the enemy of crispiness. If time allows, leave them uncovered in the refrigerator for 1-2 hours to air-dry the skin even more. Remove any stray feathers or excess skin.
- Preheat the Oven – Preheat your oven to 400°F (200°C). Position a rack in the upper third of the oven for optimal heat circulation. Line a large baking sheet with aluminum foil for easy cleanup, then place a wire cooling rack on top and spray it lightly with cooking spray.
- Season the Wings – In a large bowl, combine the baking powder, salt, black pepper, and garlic powder. Add the thoroughly dried wings and toss until every wing is evenly coated with the baking powder mixture. The baking powder is what creates that super crispy exterior, so make sure each wing is well-coated.
- Arrange on Rack – Place the wings on the prepared wire rack in a single layer with space between each piece. Don’t overcrowd – air needs to circulate around each wing. If necessary, use two baking sheets. The wings should not be touching each other.
- Bake the Wings – Bake for 40-45 minutes, flipping the wings halfway through at the 20-minute mark. The wings are done when they’re golden brown, crispy, and the internal temperature reaches 165°F. The skin should look dry and crispy with no wet spots. If you want extra crispiness, broil for an additional 2-3 minutes, watching carefully to prevent burning.
- Make the Honey Garlic Sauce – While the wings bake, prepare the sauce. In a small saucepan over medium heat, melt the butter. Add the minced garlic and grated ginger, cooking for 1-2 minutes until fragrant but not browned. Add the honey, soy sauce, rice vinegar, and red pepper flakes if using. Stir to combine and bring to a gentle simmer.
- Thicken the Sauce – In a small bowl, whisk together the cornstarch and water to create a slurry. Slowly pour this into the simmering sauce while whisking constantly. Continue cooking for 2-3 minutes, stirring frequently, until the sauce thickens to a glossy, syrupy consistency. It should coat the back of a spoon. Remove from heat.
- Toss Wings in Sauce – Once the wings are done baking, transfer them immediately to a large clean bowl. Pour the warm honey garlic sauce over the hot wings. Using tongs, toss the wings thoroughly to coat every piece evenly with the sticky glaze. The wings should be completely coated and glossy.
- Serve Immediately – Transfer the glazed wings to a serving platter. Drizzle any remaining sauce from the bowl over the top. Garnish with sesame seeds and sliced green onions for a pop of color and authentic Asian-American presentation. Serve immediately while hot and crispy for the best texture and flavor.
Notes
- Pat wings VERY dry – this is the most important step for crispy skin. Don’t skip it!
- Use baking powder, NOT baking soda. They are not interchangeable.
- Don’t skip the wire rack – it allows air circulation for even crisping on all sides.
- Make the sauce while wings bake so everything is ready at the same time.
- For extra crispy wings, increase oven temperature to 425°F and reduce time slightly.
- The sauce will thicken more as it cools, so don’t over-thicken it on the stove.
- For spicier wings, add more red pepper flakes or a dash of sriracha to the sauce.
- Wings are best served immediately but can be reheated (see storage section).
- Prep Time: 15 minutes
- Cook Time: 45 minutes
- Category: Appetizer, Main Course
- Method: Baking
- Cuisine: Asian-American
Nutrition
- Serving Size: 8-10 wing pieces
- Calories: 445
- Sugar: 18g
- Sodium: 780mg
- Fat: 26g
- Saturated Fat: 9g
- Unsaturated Fat: 15g
- Trans Fat: 0g
- Carbohydrates: 22g
- Fiber: 0g
- Protein: 30g
- Cholesterol: 125mg
Tips & Variations
Spicy Honey Garlic Wings – Add 1-2 teaspoons of sriracha or gochujang (Korean chili paste) to the sauce for a sweet-spicy kick. You can also toss the finished wings in extra red pepper flakes or serve with hot sauce on the side.
Extra Crispy Method – After baking at 400°F, increase temperature to 425°F and bake for an additional 5-10 minutes, or finish under the broiler for 2-3 minutes. Watch carefully to prevent burning. This creates incredibly crispy skin.
Slow Cooker Method – For a no-watch approach, place raw wings in a slow cooker with the sauce ingredients and cook on high for 2-3 hours or low for 4-5 hours. Then broil them in the oven for 5 minutes to crisp up the skin before serving.
Air Fryer Version – Cook wings in the air fryer at 380°F for 25-30 minutes, shaking the basket every 10 minutes. Increase to 400°F for the last 5 minutes for extra crispiness, then toss in the honey garlic sauce.
Sesame Honey Garlic – Add 2 tablespoons of toasted sesame oil to the sauce and increase sesame seeds in the garnish for a more pronounced Asian flavor profile.
Orange Honey Garlic – Add 2 tablespoons of fresh orange juice and 1 teaspoon of orange zest to the sauce for a bright citrus twist that complements the honey beautifully.
Honey Garlic Sriracha – Mix 2 tablespoons of sriracha into the sauce for a sweet-heat combination that’s incredibly addictive.
Keto-Friendly – Replace honey with a sugar-free honey substitute or use a combination of monk fruit sweetener and a small amount of molasses for depth. Check labels on soy sauce for hidden carbs.
Grilled Wings – Grill wings over medium-high heat for 20-25 minutes, turning frequently, then brush with the honey garlic sauce during the last 5 minutes. This adds wonderful smoky flavor.
Pro Chef Tips
Dry, Dry, Dry Those Wings – Professional chefs know that moisture is the enemy of crispy skin. After patting wings dry with paper towels, place them uncovered on a plate in the refrigerator for 1-2 hours or even overnight. This air-drying technique removes surface moisture, resulting in extraordinarily crispy skin.
Baking Powder is Magic – The baking powder trick comes from Chinese restaurants that create incredibly crispy Peking duck. The alkaline baking powder breaks down the proteins in the chicken skin, allowing it to brown and crisp faster and more completely. Always use aluminum-free baking powder for best results.
Sauce Temperature Matters – Toss hot wings in warm sauce, not cold sauce. The heat helps the sauce spread evenly and creates that perfect glossy coating. If your sauce has cooled, gently reheat it before tossing with wings.
Don’t Overcrowd – Give each wing personal space on the baking rack. Crowded wings steam instead of roast, resulting in soggy skin. If you’re making a large batch, use multiple baking sheets or cook in batches rather than cramming them together.
Two-Stage Sauce Application – For the stickiest, most flavorful wings, reserve about 1/3 of your sauce. Toss wings in 2/3 of the sauce first, then drizzle the remaining sauce over the plated wings. This creates layers of flavor and extra stickiness.
Let Sauce Reduce Properly – Don’t rush the sauce-thickening step. The cornstarch slurry needs 2-3 minutes of simmering to fully activate and reach its maximum thickening power. If you pull it off heat too soon, it won’t coat the wings properly.
Rest Before Saucing – Let wings rest for 2-3 minutes after removing from the oven before tossing in sauce. This slight cooling period helps the sauce stick better and prevents the coating from sliding off.
Fresh Garlic Timing – When cooking garlic for the sauce, watch it like a hawk. Garlic goes from perfectly fragrant to burnt and bitter in seconds. As soon as it smells amazing and turns light golden, add your liquids to stop the cooking.
Common Mistakes to Avoid
Skipping the Drying Step – This is the number one reason for soggy wings. If wings aren’t thoroughly dried before applying the baking powder mixture, the moisture will steam the skin instead of crisping it. Always pat completely dry and consider air-drying in the fridge.
Using Baking Soda Instead of Baking Powder – These are NOT interchangeable! Baking soda will make your wings taste soapy and metallic. Always use baking powder, which contains both an acid and a base that work together to crisp the skin without off-flavors.
Crowding the Baking Sheet – When wings touch each other or the pan directly (without a rack), they steam instead of roast. This creates rubbery skin instead of crispy perfection. Always use a wire rack and give wings space to breathe.
Adding Sauce Too Early – Never sauce wings before baking or you’ll end up with sticky, burnt, never-crispy wings. Always bake wings first until completely crispy, then toss in sauce right before serving. The residual heat will warm the sauce perfectly.
Over-Thickening the Sauce – Remember that the sauce will continue thickening as it cools. Stop cooking when it’s slightly thinner than your desired consistency. If you over-thicken on the stove, it will become gloppy and clumpy when tossed with wings.
Not Flipping Wings – Flipping wings halfway through baking ensures even crisping on both sides. Set a timer so you don’t forget this crucial step. Wings left unflipped will have one crispy side and one soggy side.
Storage & Meal Prep
Refrigerator Storage – Store leftover wings in an airtight container in the refrigerator for up to 3-4 days. They’ll lose some crispiness as they sit (the sauce softens the coating), but they’re still delicious and can be re-crisped when reheating.
Reheating for Crispiness – The absolute best way to reheat wings is in the oven or air fryer to restore that crispy texture. Preheat oven to 375°F, place wings on a wire rack over a baking sheet, and heat for 10-15 minutes until hot and crispy again. In an air fryer, reheat at 360°F for 5-7 minutes. Avoid the microwave if possible, as it makes wings soggy.
Sauce Separation – The sauce may separate and pool at the bottom of your storage container. This is normal! Just give the wings a quick toss when reheating, or drizzle them with a bit of fresh sauce to revive them.
Freezing Cooked Wings – Wings can be frozen for up to 3 months. Freeze them in a single layer on a baking sheet first, then transfer to a freezer bag once solid. This prevents them from sticking together. Thaw overnight in the refrigerator before reheating. The texture won’t be quite as crispy as fresh, but they’re still tasty.
Meal Prep Strategy – These wings make excellent meal prep! Cook a double batch on Sunday and portion them into individual containers with your favorite sides. Reheat throughout the week for quick lunches or dinners.
Make-Ahead & Freezer Notes
Prep Wings in Advance – You can coat the wings with the baking powder mixture up to 24 hours ahead. Place them on the wire rack over the baking sheet, cover loosely with plastic wrap, and refrigerate. This actually helps them crisp up even more beautifully when baked.
Make Sauce Ahead – The honey garlic sauce can be made up to 3 days in advance and stored in an airtight container in the refrigerator. Reheat gently on the stovetop or in the microwave, whisking until smooth before tossing with freshly baked hot wings.
Freeze Raw Seasoned Wings – Season wings with the baking powder mixture, arrange on a baking sheet, and freeze solid. Transfer frozen wings to freezer bags and store for up to 3 months. Bake from frozen, adding 10-15 minutes to the cooking time.
Freeze Sauce Separately – The sauce freezes beautifully for up to 3 months. Freeze in ice cube trays or small containers for easy portioning. Thaw overnight in the refrigerator and reheat before using.
Party Prep Timeline – If hosting a party, bake wings the morning of your event, let them cool completely, and refrigerate. Right before guests arrive, reheat in a 375°F oven for 10 minutes to crisp up, then toss with freshly warmed sauce. They’ll taste just-made!
Best Reheating from Frozen – Thaw frozen cooked wings overnight in the refrigerator. Reheat in a 375°F oven on a wire rack for 15-20 minutes until crispy and heated through. Toss with warm sauce just before serving.
Serving Suggestions
These honey garlic wings are versatile enough to serve as an appetizer or main course, and pair beautifully with a variety of sides and accompaniments.
Classic Sides – Serve with celery and carrot sticks with ranch or blue cheese dressing for a traditional wing experience. French fries, sweet potato fries, or crispy potato wedges make excellent accompaniments. Coleslaw provides a cool, crunchy contrast to the sticky-sweet wings.
Asian-Inspired Sides – Since these wings have Asian flavors, they pair beautifully with fried rice, steamed jasmine rice, or cauliflower rice for a low-carb option. Edamame, Asian cucumber salad, or stir-fried vegetables complement the flavor profile perfectly.
Salads – A fresh green salad with ginger dressing, Asian chopped salad with mandarin oranges, or a simple mixed greens salad balances the richness of the wings.
Dipping Sauces – While these wings are perfectly flavored on their own, some people love extra dipping sauces. Try ranch dressing, blue cheese dressing, spicy mayo, or extra honey garlic sauce for dipping.
Drinks – Ice-cold beer is the classic pairing – try light lagers, IPAs, or wheat beers. For wine lovers, an off-dry Riesling or Gewürztraminer complements the sweet-savory flavors beautifully. Non-alcoholic options include iced tea, lemonade, or ginger beer.
Party Platter Ideas – Create a wing platter with these honey garlic wings alongside buffalo wings and BBQ wings for variety. Serve with multiple dipping sauces, fresh veggies, and plenty of napkins!
Complete Meal – For a full dinner, serve wings with garlic bread, a garden salad, and roasted vegetables for a satisfying, balanced meal.
FAQs Section
Can I use chicken drumsticks or thighs instead of wings?
Absolutely! The honey garlic sauce works wonderfully with any chicken piece. Drumsticks will need about 40-45 minutes at 400°F, while boneless thighs need 25-30 minutes. Bone-in thighs require 35-40 minutes. Always check that internal temperature reaches 165°F. The baking powder trick works on any chicken pieces for extra crispy skin.
Do I have to use a wire rack or can I bake directly on the pan?
A wire rack is highly recommended for the crispiest wings because it allows air to circulate underneath, crisping all sides evenly. If you don’t have a rack, you can bake directly on a greased baking sheet, but flip the wings every 15 minutes and expect slightly less crispy results. The bottoms may be a bit softer.
Can I make these wings in an Instant Pot or pressure cooker?
Yes, but you’ll need a two-step process. Pressure cook wings with 1 cup of water on high pressure for 10 minutes, then quick release. Pat them dry, arrange on a baking sheet, and broil for 5-7 minutes to crisp the skin. Then toss with the honey garlic sauce. This method is faster but requires more steps.
What if I don’t have rice vinegar?
Apple cider vinegar or white wine vinegar work as substitutes, though they’re more acidic. Use only 1 1/2 tablespoons instead of 2 tablespoons and add 1/2 tablespoon of water to mellow the acidity. Regular white vinegar works too but is quite sharp, so use even less (1 tablespoon) and add more honey to balance.
How do I know when the wings are done?
Wings are fully cooked when they reach an internal temperature of 165°F (use a meat thermometer inserted into the thickest part without touching bone). Visually, they should be golden brown with dry, crispy-looking skin and clear juices. If you cut into one, the meat should be opaque white, not pink.
Can I make these gluten-free?
Yes! Use tamari or coconut aminos instead of regular soy sauce. Make sure your baking powder is gluten-free (most are, but check the label). The rest of the ingredients are naturally gluten-free. This simple swap makes the recipe completely safe for gluten-free diets.
Why are my wings not crispy?
The most common reasons are: wings weren’t dried thoroughly before baking, baking powder wasn’t used or distributed evenly, oven temperature was too low, wings were crowded on the pan, or no wire rack was used. Make sure to pat wings very dry, use baking powder liberally, give them space, and use a rack for best results.
Can I make the sauce less sweet or more garlicky?
Absolutely! Reduce honey to 1/3 cup for less sweetness, or increase garlic to 10-12 cloves for serious garlic lovers. You can also add 1 tablespoon more soy sauce to balance the sweetness with saltiness. Taste the sauce before tossing and adjust to your preference.
Conclusion
These Honey Garlic Chicken Wings are everything you want in a wing recipe – crispy, sticky, sweet, savory, and absolutely addictive. They prove that you don’t need a deep fryer to make restaurant-quality wings at home. The combination of the baking powder technique for extra-crispy skin and that luscious honey garlic glaze creates something truly special that’ll have everyone asking for your secret.
The best part about this recipe is how versatile and forgiving it is. Whether you’re cooking for game day, a casual family dinner, or an impressive party spread, these wings always deliver. They’re equally at home on a casual weeknight dinner table or as the star appetizer at your next gathering. And once you master the basic technique, you can experiment with endless flavor variations.
I hope these honey garlic wings become a regular feature in your cooking rotation like they have in mine. There’s something so satisfying about pulling a tray of gorgeous, crispy wings out of the oven and watching them disappear in minutes. The sticky fingers and happy faces tell you everything you need to know!
Ready to make the best wings of your life? I can’t wait to see your creations! When you make these honey garlic chicken wings, take a photo and share it with me on social media – I love seeing your beautiful results! Leave a comment below letting me know how they turned out and what you served them with. Did you try any of the variations? And if you loved them (which I know you will!), please give this recipe a 5-star rating and save it to your Pinterest boards so you can make them again and again!
Don’t forget to check out the tips and variations section for endless ways to customize these wings to your taste. Happy cooking, and here’s to many platters of finger-licking good wings in your future!

