
There’s something utterly magical about perfectly seared scallops glistening in a pool of golden garlic butter. Garlic Butter Scallops are one of those dishes that seem incredibly fancy but are surprisingly simple to make at home. With a beautiful golden crust on the outside and a tender, sweet interior, these scallops taste like they came straight from a high-end steakhouse – yet they take less than 10 minutes to prepare!
This recipe is perfect for romantic date nights, special celebrations, or those evenings when you want to treat yourself to something extraordinary without spending hours in the kitchen. The combination of sweet, delicate scallops with rich, aromatic garlic butter creates a flavor profile that’s both luxurious and comforting. Whether you’re serving them as an elegant appetizer or a show-stopping main course, these garlic butter scallops will have everyone asking for your secret.
The best part? You don’t need to be a professional chef to nail this recipe. With just a handful of quality ingredients and the right technique, you’ll be creating restaurant-worthy scallops that rival anything you’d pay premium prices for at a seafood restaurant.
History / Background
Scallops have been treasured as a delicacy for thousands of years, with evidence of scallop consumption dating back to ancient civilizations around the Mediterranean Sea. The scallop shell itself became a powerful symbol in art, religion, and culture – most famously depicted in Botticelli’s “The Birth of Venus” and used as a symbol by pilgrims walking the Camino de Santiago in Spain.
While scallops have been enjoyed in various preparations throughout history, the French are largely credited with popularizing the garlic butter preparation method. French cuisine has long celebrated the combination of butter, garlic, and seafood, and this classic pairing made its way into haute cuisine during the 19th and 20th centuries. The technique of searing scallops in clarified butter with aromatics became a hallmark of French bistros and fine dining establishments.
In America, scallops gained mainstream popularity in the mid-20th century as commercial fishing operations expanded along both coasts. Bay scallops from the Atlantic and sea scallops from deeper waters became accessible to home cooks, though they remained associated with upscale dining. The garlic butter preparation became especially popular in the 1980s and 1990s when French-inspired cooking techniques were adopted by American chefs.
Today, garlic butter scallops represent the perfect marriage of French technique and American accessibility. They’ve transitioned from being exclusively restaurant fare to a beloved home-cooking option for special occasions, proving that luxury doesn’t always require complicated preparations or expensive culinary training.
Why You’ll Love This Recipe
This Garlic Butter Scallops recipe strikes the perfect balance between impressive and achievable. It’s designed to give you confidence in your cooking while delivering results that taste like you’ve been training in a professional kitchen. The rich, buttery sauce infused with aromatic garlic complements the natural sweetness of the scallops without overpowering their delicate flavor.
Here’s why this recipe will become your go-to for special occasions:
- Restaurant-quality results in under 10 minutes – faster than ordering takeout
- Minimal ingredients – just 6 simple components create maximum flavor
- Foolproof technique – clear instructions ensure perfect searing every time
- Impressive presentation – looks like you spent hours cooking
- Versatile serving options – works as an appetizer, main course, or elegant topping
- Low-carb and keto-friendly – naturally fits many dietary preferences
- Budget-conscious luxury – costs less than dining out while tasting just as good
- No fishy smell – fresh scallops have a sweet, clean ocean aroma
- Perfect for date nights – romantic, sophisticated, and quick to prepare
- Easily scalable – double or triple the recipe for entertaining
Ingredient Notes
Sea Scallops (1½ pounds): Look for large, “dry” sea scallops rather than “wet” scallops. Dry scallops are untreated and will sear beautifully with a golden crust. Wet scallops have been treated with a phosphate solution that adds water weight and prevents proper browning. Your scallops should smell sweet and ocean-fresh, never fishy. Each scallop should be about 1½ inches in diameter. If you can only find bay scallops, they’ll work but will cook much faster (about 1-2 minutes per side). Fresh is always best, but good quality frozen scallops work well if thawed properly in the refrigerator overnight.
Unsalted Butter (4 tablespoons): Using unsalted butter gives you complete control over the saltiness of your dish. European-style butter with higher fat content will create an even richer sauce. The butter should be at room temperature for easy incorporation into the pan sauce. Don’t substitute margarine or plant-based spreads, as they won’t provide the same flavor or emulsification properties.
Fresh Garlic (4-5 cloves): Fresh garlic is essential here – no substitutions with jarred or powdered garlic. Mince it finely so it releases maximum flavor without burning. The garlic infuses the butter with incredible aroma and creates that signature restaurant-style flavor. For a milder garlic flavor, you can reduce to 3 cloves, but the 4-5 clove amount provides perfect balance.
Fresh Lemon (1 large): You’ll need both the juice and zest. Fresh lemon brightens the rich butter sauce and enhances the natural sweetness of the scallops. Bottled lemon juice lacks the vibrant, fresh flavor and should be avoided. A Meyer lemon can be substituted for a slightly sweeter, more floral note.
Fresh Parsley (2 tablespoons, chopped): Italian flat-leaf parsley is preferred over curly parsley for better flavor and easier chopping. The fresh herbs add color, freshness, and a subtle earthy note that balances the richness. In a pinch, fresh chives or a combination of both work beautifully.
Olive Oil (1 tablespoon): A high-quality extra virgin olive oil is used alongside butter to raise the smoke point and prevent burning during the high-heat searing process. The olive oil also adds a subtle fruity note. You can substitute with avocado oil or grapeseed oil if preferred.
Salt & Black Pepper: Sea salt or kosher salt works best for seasoning the scallops before cooking. Freshly ground black pepper provides the best flavor. Season generously, as proper seasoning is key to bringing out the natural sweetness of the scallops.
Equipment Needed
- Large cast iron or stainless steel skillet (12-inch preferred for even heat distribution)
- Paper towels (for drying scallops thoroughly)
- Tongs or thin metal spatula (for flipping scallops without tearing)
- Sharp knife (for mincing garlic and chopping parsley)
- Cutting board
- Small prep bowls (for organizing ingredients)
- Microplane or zester (for lemon zest)
- Measuring spoons
- Kitchen timer
- Serving platter (for presentation)

Garlic Butter Scallops Recipe
- Total Time: 11 minutes
- Yield: 4 servings 1x
- Diet: Gluten Free
Description
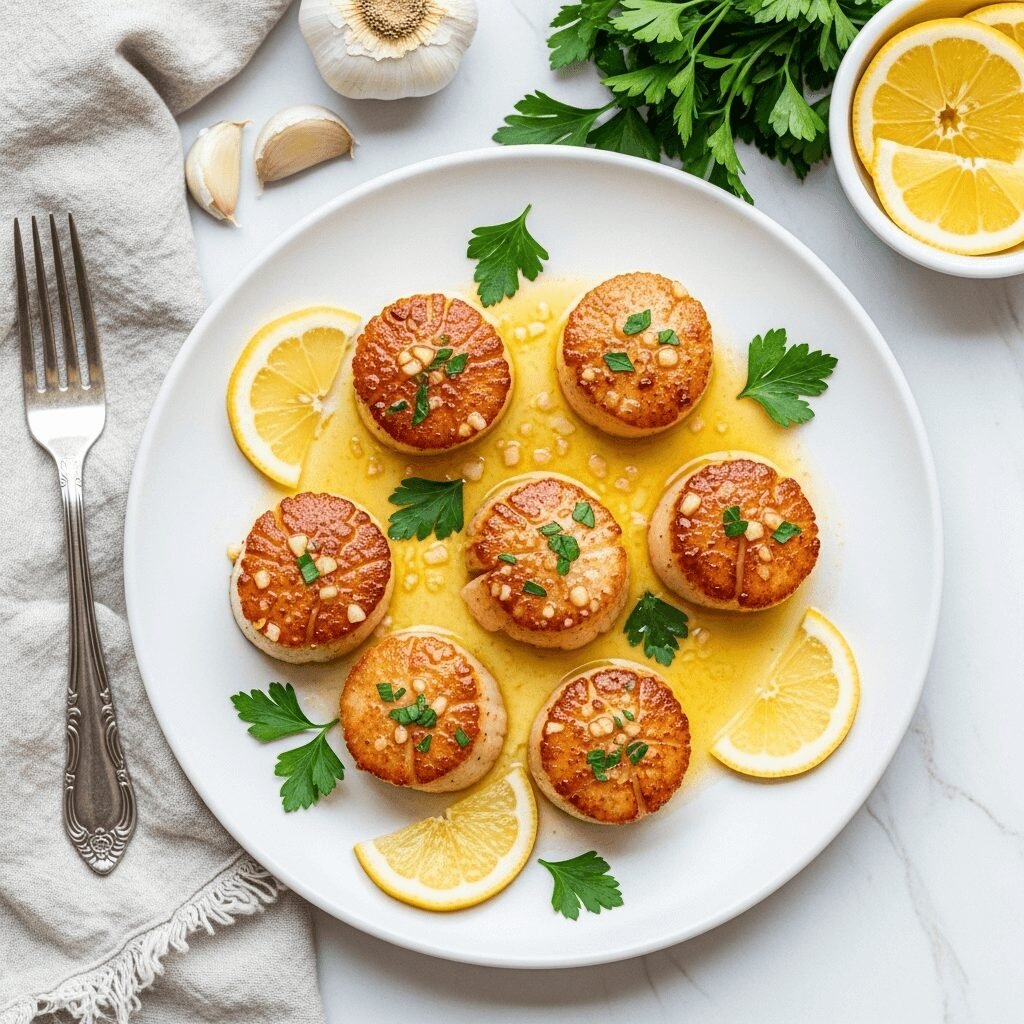
These restaurant-quality Garlic Butter Scallops feature perfectly seared sea scallops with a golden crust, bathed in a luxurious garlic-infused butter sauce with fresh lemon and herbs. Ready in just 10 minutes, this elegant dish is perfect for date nights or special occasions.
Ingredients
- 1½ pounds large sea scallops (about 12-16 scallops)
- 4 tablespoons unsalted butter, divided
- 1 tablespoon olive oil
- 4-5 cloves fresh garlic, minced
- 1 large lemon (juice and zest)
- 2 tablespoons fresh parsley, finely chopped
- ¾ teaspoon sea salt
- ½ teaspoon freshly ground black pepper
- Optional: pinch of red pepper flakes for heat
Instructions
- Prepare the scallops: Remove scallops from packaging and pat them completely dry with paper towels. Remove the small side muscle if still attached (it’s tough when cooked). Dry them again thoroughly – this is crucial for achieving a golden crust. Season both sides generously with salt and pepper.
- Heat your pan: Place a large cast iron or stainless steel skillet over medium-high heat. Let it heat for 2-3 minutes until very hot but not smoking. Add olive oil and 1 tablespoon of butter, swirling to coat the pan evenly.
- Sear the scallops: Once the butter stops foaming and the pan is shimmering hot, carefully place scallops in the pan in a single layer, leaving space between each one (don’t overcrowd or they’ll steam instead of sear). Let them cook undisturbed for 2-3 minutes until a deep golden-brown crust forms on the bottom.
- Flip and finish: Using tongs or a thin spatula, flip each scallop gently. Cook for another 2-3 minutes on the second side until golden and the scallops feel slightly firm to the touch but still tender. The internal temperature should reach 115-120°F for medium. Transfer scallops to a serving platter.
- Make the garlic butter sauce: Reduce heat to medium. Add remaining 3 tablespoons of butter to the same pan. Once melted, add minced garlic and sauté for 30-45 seconds until fragrant but not browned (watch carefully as garlic burns quickly).
- Finish the sauce: Remove pan from heat. Add lemon juice, lemon zest, and chopped parsley. Swirl everything together, scraping up any browned bits from the bottom of the pan. Taste and adjust seasoning if needed.
- Serve immediately: Pour the warm garlic butter sauce over the scallops on your serving platter. Garnish with additional fresh parsley and lemon wedges if desired. Serve right away while hot.
Notes
- Scallop doneness: The key is to not overcook scallops. They should be opaque and slightly firm but still tender and slightly translucent in the very center. Overcooked scallops become rubbery.
- Pan temperature matters: Your pan must be hot enough to sear, creating that restaurant-style crust. If the pan isn’t hot enough, scallops will release moisture and steam instead of sear.
- Don’t move them: Resist the urge to move or flip scallops multiple times. Let them sit undisturbed to develop that perfect golden crust.
- Dry scallops are essential: Moisture is the enemy of a good sear. Pat scallops dry multiple times if needed before cooking.
- Frozen scallops: If using frozen, thaw completely in the refrigerator overnight, then pat very dry before cooking.
- Prep Time: 5 minutes
- Cook Time: 6 minutes
- Category: Main Course / Appetizer
- Method: Pan-Seared
- Cuisine: French-American
Nutrition
- Serving Size: 3-4 scallops with sauce
- Calories: 245
- Sugar: 0g
- Sodium: 685mg
- Fat: 15g
- Saturated Fat: 8g
- Unsaturated Fat: 6g
- Trans Fat: 0g
- Carbohydrates: 5g
- Fiber: 0g
- Protein: 23g
- Cholesterol: 85mg
Tips & Variations
Spicy Garlic Butter Scallops: Add ½ teaspoon red pepper flakes to the garlic butter sauce, or drizzle finished scallops with spicy honey for a sweet-heat combination.
Herb Variations: Swap parsley for fresh basil, tarragon, or dill. A combination of parsley and chives creates beautiful color and flavor complexity.
Wine Addition: Deglaze the pan with 2 tablespoons of dry white wine before adding the final butter for a more sophisticated sauce with depth.
Asian-Inspired Twist: Replace lemon with lime, add a splash of soy sauce to the butter, and garnish with sliced scallions and sesame seeds.
Creamy Garlic Butter: Stir in 2 tablespoons of heavy cream to the butter sauce for an extra-luxurious, restaurant-style presentation.
Bacon-Wrapped Scallops: Wrap each scallop with a half-slice of bacon before searing (this will add cooking time and requires lower heat to render the bacon).
Mediterranean Style: Add sun-dried tomatoes, capers, and a handful of fresh spinach to the garlic butter sauce.
Lighter Option: Use half butter and half olive oil, and increase the lemon juice for a brighter, less heavy sauce.
Pro Chef Tips
Temperature is everything: Professional chefs know that scallops cook best at high heat initially to create a crust, then finished at slightly lower temperature. Start with a screaming hot pan, then reduce heat slightly after the first side develops color.
The “twist test”: Gently try to rotate a scallop after 2 minutes. If it doesn’t release easily from the pan, it’s not ready to flip. Properly seared scallops will release naturally when the crust has formed.
Basting technique: During the last 30 seconds of cooking, tilt your pan and spoon the hot butter over the tops of the scallops. This professional technique ensures even cooking and adds extra flavor.
Room temperature matters: Take scallops out of the refrigerator 10-15 minutes before cooking. Cold scallops in a hot pan create temperature shock and uneven cooking.
Quality indicators: The best scallops are dry-packed, U10 or U12 size (meaning under 10 or under 12 per pound), and have a sweet, ocean smell. They should be slightly sticky to the touch and ivory or pale pink in color.
Pan choice matters: Cast iron or heavy stainless steel retains heat better than non-stick pans, which is crucial for proper searing. Non-stick pans can’t achieve the same high heat needed for a perfect crust.
Resting isn’t necessary: Unlike meat, scallops should be served immediately after cooking. They don’t need resting time and are best enjoyed piping hot.
Common Mistakes to Avoid
Overcrowding the pan: This is the number one mistake home cooks make. When scallops are too close together, they release moisture that steams other scallops, preventing proper browning. Leave at least 1 inch between each scallop, and cook in batches if necessary.
Using wet scallops: Scallops treated with preservatives retain excess moisture and will never achieve a good sear. They’ll also have a slightly chemical taste. Always ask for “dry” scallops at the seafood counter.
Not drying thoroughly: Even with dry scallops, you must pat them completely dry with paper towels. Any surface moisture will turn to steam in the hot pan, preventing the Maillard reaction that creates that beautiful golden crust.
Flipping too early or too often: Patience is key. Let scallops sit undisturbed for 2-3 minutes per side. Moving them around prevents crust formation and tears the delicate flesh.
Overcooking: Scallops go from perfectly tender to rubbery in seconds. They should be opaque but still slightly translucent in the very center. Remember, they’ll continue cooking slightly from residual heat after removing from the pan.
Burning the garlic: Garlic burns quickly in hot butter. Add it after removing scallops and reduce heat to medium. If garlic burns, it will taste bitter and ruin your sauce – start over with fresh butter and garlic if this happens.
Using cold butter: Cold butter doesn’t emulsify properly into the sauce. Use room-temperature butter or cut it into small pieces so it melts quickly and evenly.
Storage & Meal Prep
Refrigerator Storage: Store leftover cooked scallops in an airtight container in the refrigerator for up to 2 days. Keep the garlic butter sauce in a separate container. Note that reheated scallops won’t have the same texture as freshly cooked ones, so this recipe is best enjoyed immediately.
Reheating Instructions: The best method is to gently warm scallops in the microwave for 20-30 seconds at 50% power, just until slightly warm. Overcooking during reheating will make them rubbery. Alternatively, let them come to room temperature and serve over a salad. The butter sauce can be gently rewarmed in a small saucepan over low heat.
Raw Scallop Storage: Fresh scallops should be cooked within 1-2 days of purchase. Store them in the coldest part of your refrigerator (usually the back of the bottom shelf) on ice in a colander set over a bowl to catch drips.
Shelf Life: Cooked scallops maintain best quality for 1-2 days refrigerated. The garlic butter sauce will last 3-4 days refrigerated and can be used on other seafood, chicken, or vegetables.
Make-Ahead & Freezer Notes
Can you freeze cooked scallops? While technically possible, it’s not recommended. Cooked scallops become rubbery and lose their delicate texture when frozen and reheated. This is a dish best enjoyed fresh.
Freezing raw scallops: If you bought fresh scallops but need to store them, freeze them raw. Pat completely dry, place in a single layer on a parchment-lined baking sheet, and freeze until solid. Transfer to a freezer bag, removing as much air as possible. Freeze for up to 3 months.
Thawing instructions: Never thaw scallops at room temperature or in warm water. Place frozen scallops in the refrigerator 12-24 hours before cooking. Pat extremely dry before seasoning and cooking.
Preparing components ahead: You can prep your mise en place (measured ingredients) a few hours ahead. Mince garlic, chop parsley, and measure butter and seasonings. Keep refrigerated until ready to cook. Pat scallops dry just before cooking for best results.
Garlic butter sauce make-ahead: You can make compound garlic butter ahead by mixing softened butter with minced garlic, lemon zest, and parsley. Roll into a log in parchment paper and refrigerate up to 5 days or freeze up to 3 months. Slice off rounds to melt over freshly seared scallops.
Serving Suggestions
Garlic Butter Scallops are incredibly versatile and pair beautifully with numerous side dishes. The key is to complement the rich, buttery scallops with sides that provide textural contrast or brightness.
Classic Pairings:
- Creamy mashed potatoes or cauliflower mash – soak up that delicious garlic butter sauce
- Risotto – especially lemon risotto or mushroom risotto for an ultra-luxurious meal
- Pasta – angel hair or linguine tossed in the garlic butter sauce with extra lemon
- Crusty French bread – essential for sopping up every drop of sauce
Vegetable Sides:
- Roasted asparagus with lemon and parmesan
- Sautéed green beans with almonds
- Steamed broccoli or broccolini
- Grilled zucchini with herbs
- Brussels sprouts roasted with bacon
- Spinach wilted in garlic and olive oil
Salads:
- Arugula salad with shaved parmesan and lemon vinaigrette
- Caesar salad – the classic steakhouse pairing
- Mixed greens with cherry tomatoes and balsamic
- Wedge salad with blue cheese and crispy bacon
Grain Options:
- Couscous with herbs and lemon
- Quinoa pilaf with vegetables
- Wild rice blend
- Orzo tossed with butter and parmesan
Wine Pairings: Choose crisp white wines that complement the rich butter without overwhelming the delicate scallops. Excellent choices include Chardonnay, Pinot Grigio, Sauvignon Blanc, Champagne, or a dry Riesling.
Complete Meal Ideas: For an elegant dinner party, serve scallops over creamy risotto with roasted asparagus, accompanied by a crisp white wine and finished with a light lemon sorbet for dessert. For a weeknight special, serve over pasta with a simple arugula salad and crusty bread.
FAQs Section
Q: How do I know when scallops are done cooking? A: Scallops are done when they’re opaque with a golden-brown crust on both sides and slightly firm to the touch, but still tender. They should be slightly translucent in the very center. The internal temperature should reach 115-120°F. Cooking time is typically 2-3 minutes per side for large sea scallops. Overcooked scallops become rubbery and tough, so it’s better to slightly undercook than overcook.
Q: What’s the difference between wet and dry scallops? A: “Dry” scallops are untreated and natural, with no added chemicals or preservatives. They’re slightly sticky, ivory or pale pink, and have a sweet ocean smell. “Wet” scallops have been treated with sodium tripolyphosphate (STP), which adds water weight and makes them bright white. Wet scallops release excess moisture during cooking, preventing proper browning, and have a slightly chemical taste. Always choose dry scallops for the best flavor and texture.
Q: Can I use frozen scallops for this recipe? A: Yes, but proper thawing is crucial. Never use hot water or microwave to thaw. Place frozen scallops in the refrigerator 12-24 hours before cooking. Once thawed, pat them extremely dry with paper towels multiple times—frozen scallops retain more moisture than fresh. The quality of frozen scallops varies, so buy from reputable sources. Fresh scallops will always give the best results if available.
Q: Why won’t my scallops brown properly? A: Several factors prevent browning: (1) Scallops aren’t dry enough—pat them dry multiple times, (2) Pan isn’t hot enough—wait until the pan is very hot before adding scallops, (3) Overcrowding the pan—leave space between scallops, (4) Using wet (treated) scallops instead of dry, or (5) Moving them too much—let them sit undisturbed for 2-3 minutes to develop a crust.
Q: What should I do with the small side muscle on scallops? A: The small, tough rectangular muscle on the side of the scallop should be removed before cooking as it’s chewy when cooked. Simply pinch it off with your fingers—it peels away easily. This muscle is edible but not pleasant in texture.
Q: How can I tell if scallops are fresh? A: Fresh scallops should smell sweet and ocean-like, never fishy or ammonia-like. They should be slightly firm and moist but not sitting in liquid. The color should be ivory, cream, or pale pink—avoid bright white scallops or those with excessive liquid in the package. Buy from a reputable fishmonger and ask when they arrived. Cook within 1-2 days of purchase.
Q: Can I make this recipe ahead for a dinner party? A: Unfortunately, scallops are best cooked and served immediately. They become rubbery when reheated. However, you can prep everything ahead: measure ingredients, mince garlic, chop herbs, and have scallops patted dry and seasoned. The actual cooking takes only 6 minutes, so you can cook them while guests are seated. Alternatively, make the compound garlic butter ahead and store it in the freezer for up to 3 months.
Conclusion
There you have it – the ultimate guide to creating restaurant-quality Garlic Butter Scallops right in your own kitchen! This recipe proves that luxury dining doesn’t have to be complicated or time-consuming. With just a few quality ingredients and the right technique, you can transform simple sea scallops into an extraordinary meal that rivals the finest seafood restaurants.
The beauty of this dish lies in its simplicity. The sweet, delicate flavor of perfectly seared scallops needs little embellishment—just a kiss of golden crust, a pool of aromatic garlic butter, and a bright squeeze of fresh lemon. It’s elegant enough for the most special occasions yet easy enough for a weeknight treat when you want something extraordinary.
I hope this recipe gives you the confidence to bring restaurant-quality seafood into your home cooking repertoire. Once you master the technique, you’ll find yourself making these impressive scallops again and again. They’re perfect for date nights, celebrations, holiday dinners, or any time you want to feel a little fancy without the fuss.
Ready to create your own restaurant-worthy scallops? Give this recipe a try and let me know how it turns out! I’d love to hear about your experience in the comments below. Don’t forget to snap a photo and share it on Pinterest—tag me so I can see your beautiful creation! If you loved this recipe, please save it to your favorite Pinterest boards and share it with friends who appreciate good food. Happy cooking! 🍋✨