
If you’re craving a restaurant-quality dish that comes together in less than 30 minutes, these Honey Garlic Chicken Bites are about to become your new weeknight hero! Imagine tender, juicy chunks of chicken coated in a glossy, sticky sauce that perfectly balances sweet honey with savory garlic and a hint of tang. Each bite is bursting with flavor, and the best part? You probably already have most of the ingredients in your pantry right now.
This recipe is incredibly versatile and fits seamlessly into so many occasions. Serve it over fluffy white rice or crispy fried rice for a satisfying weeknight dinner the whole family will devour. Thread them onto skewers for a crowd-pleasing party appetizer that disappears in minutes. Pack them in lunch boxes for a protein-packed midday meal that reheats beautifully. Or toss them into a fresh salad for a lighter option that doesn’t sacrifice flavor.
What makes these chicken bites so irresistible is that gorgeous caramelized coating that develops as the sauce reduces and clings to every piece of chicken. The garlic becomes fragrant and mellow, the honey adds natural sweetness without being cloying, and a splash of soy sauce brings that umami depth that makes you reach for seconds (and thirds!). Whether you’re feeding picky kids, impressing dinner guests, or simply treating yourself to something delicious after a long day, this recipe delivers every single time.
History / Background
Honey garlic chicken has become a beloved staple in American-Asian fusion cuisine, though its roots draw inspiration from several culinary traditions. The combination of honey and garlic as a flavor pairing has been used in Chinese cooking for centuries, particularly in Cantonese cuisine where sweet and savory glazes are a hallmark of many dishes. When Chinese immigrants brought their culinary techniques to North America in the 19th and 20th centuries, these flavors began to merge with Western cooking styles and readily available ingredients.
The “bite-sized” concept gained massive popularity in the 1980s and 1990s as American home cooking shifted toward convenience and finger foods. Busy families wanted dishes that were quick to prepare, easy to eat, and appealing to both adults and children. Chicken bites fit this need perfectly – they cook faster than whole chicken breasts, are naturally portion-controlled, and feel fun and approachable.
This particular style of honey garlic chicken bites represents the best of fusion cooking: it takes the traditional Chinese technique of creating glossy, caramelized sauces and adapts it for the modern American kitchen. The recipe typically uses ingredients found in any standard grocery store – boneless chicken, honey, garlic, soy sauce, and basic pantry staples – making it accessible to home cooks regardless of their experience level or access to specialty ingredients.
Today, honey garlic chicken has earned its place as a comfort food favorite across North America. It’s the dish that reminds people of their favorite Chinese takeout but made at home with fresher ingredients and less sodium. Food bloggers and home cooks have embraced this recipe because it’s almost foolproof, incredibly adaptable, and always a crowd-pleaser. It bridges generations, appealing to grandparents who love classic sweet-savory flavors and teenagers who appreciate anything with a sticky, finger-licking-good sauce.
Why You’ll Love This Recipe
Let me tell you why this honey garlic chicken bites recipe is about to earn a permanent spot in your dinner rotation! First and foremost, it’s remarkably simple. You don’t need any fancy cooking techniques, expensive equipment, or hard-to-find ingredients. If you can cut chicken and stir a sauce, you can make this dish – and make it incredibly well.
Here’s what makes this recipe absolutely irresistible:
- Lightning-fast cooking time – From start to finish, you’re looking at just 25 minutes, making it perfect for those hectic weeknights when you need dinner on the table yesterday.
- Budget-friendly ingredients – Boneless chicken thighs or breasts, honey, garlic, and soy sauce won’t break the bank, and you can easily feed a family of four for under $15.
- Kid-approved flavor – The sweet honey balances the savory elements beautifully, creating a flavor profile that even picky eaters enthusiastically embrace.
- Meal prep champion – These chicken bites store beautifully in the refrigerator for up to 4 days and actually taste even better the next day as the flavors continue to develop.
- Customizable heat level – Keep it mild for sensitive palates or add red pepper flakes and sriracha for those who love a spicy kick.
- One-pan wonder – Minimal dishes means minimal cleanup, which is always a win in my book!
- Naturally gluten-free option – Simply swap regular soy sauce for tamari or coconut aminos, and you’ve got a gluten-free meal without sacrificing any flavor.
- Restaurant-quality results – That glossy, caramelized coating rivals anything you’d order from your favorite Asian restaurant, but you control the ingredients and sodium levels.
Ingredient Notes
Let’s talk about what goes into making these incredible chicken bites and why each ingredient matters:
Boneless Chicken (Thighs or Breasts): I personally prefer boneless, skinless chicken thighs because they stay incredibly juicy and tender, even if you slightly overcook them. Chicken breasts work beautifully too and are leaner, though they require a bit more attention to avoid drying out. Cut your chicken into 1-inch cubes for even cooking and maximum sauce coverage. Substitution: You could use turkey breast cut into cubes, though it will be slightly drier.
Honey: The star sweetener that gives this dish its signature glossy coating and caramelized flavor. Use a good-quality honey for the best flavor – I love using local wildflower honey when available. Substitution: Maple syrup or agave nectar work in a pinch, though they’ll create a slightly different flavor profile.
Garlic: Fresh garlic is non-negotiable here, friends! Minced garlic from a jar just doesn’t deliver the same aromatic, pungent flavor that makes this dish so memorable. Plan on using 4-5 large cloves. Substitution: In a true emergency, garlic powder can work (use 1 teaspoon), but fresh is always best.
Soy Sauce: This brings the essential umami and saltiness that balances the honey’s sweetness. I typically use low-sodium soy sauce to control the salt level better. Substitution: Tamari for gluten-free, coconut aminos for soy-free, or liquid aminos all work wonderfully.
Rice Vinegar: Adds a subtle tang that brightens the entire sauce and prevents it from being too sweet. Substitution: Apple cider vinegar or white wine vinegar work well.
Cornstarch: This is your secret weapon for creating that thick, glossy sauce that clings to every piece of chicken. Substitution: Arrowroot powder works equally well as a thickener.
Sesame Oil: Just a small drizzle adds incredible depth and a nutty, toasted flavor that takes the dish to the next level. Substitution: You can omit it if necessary, though I highly recommend keeping it.
Ginger (optional): Fresh grated ginger adds a warming, spicy note that complements the garlic beautifully. Substitution: Ground ginger works (use ½ teaspoon), or simply omit.
Equipment Needed
You don’t need a fancy kitchen to make this recipe! Here’s what you’ll want to have on hand:
- Large skillet or wok – A 12-inch skillet with high sides works perfectly for cooking the chicken and tossing it in the sauce. A wok is ideal if you have one!
- Sharp chef’s knife – For cutting the chicken into uniform bite-sized pieces
- Cutting board – Preferably one designated for raw meat
- Measuring cups and spoons – For accurate ingredient measurements
- Small mixing bowl – To whisk together the sauce ingredients
- Whisk or fork – For mixing the sauce until smooth
- Wooden spoon or silicone spatula – For stirring and tossing the chicken
- Tongs – Optional, but helpful for flipping chicken pieces
- Serving platter or bowl – For presenting your beautiful finished dish

Honey Garlic Chicken Bites Recipe
- Total Time: 25 minutes
- Yield: 4 servings 1x
- Diet: Gluten Free
Description
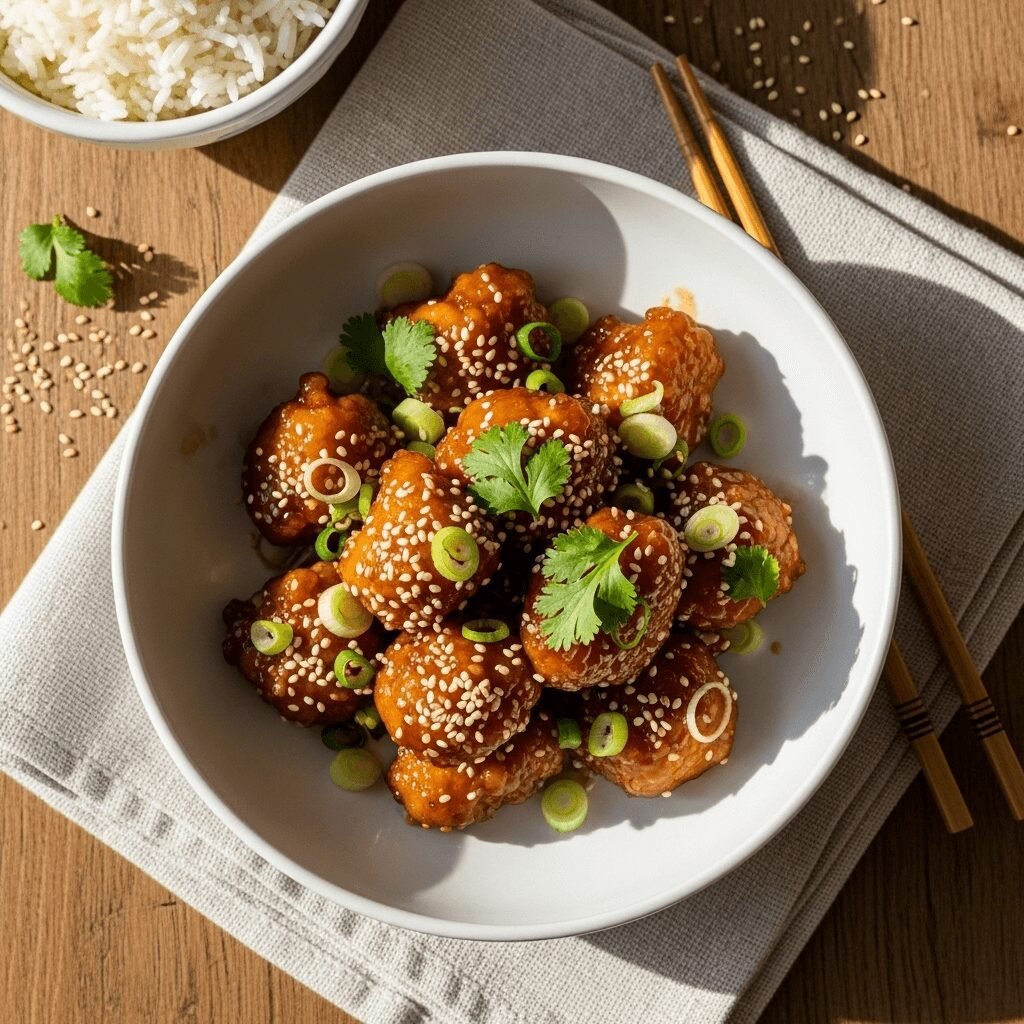
These easy Honey Garlic Chicken Bites are tender, juicy, and coated in a sticky-sweet sauce that’s absolutely irresistible! Ready in just 25 minutes with simple ingredients, this recipe is perfect for busy weeknights, meal prep, or serving as a party appetizer. The combination of sweet honey, savory garlic, and umami-rich soy sauce creates a flavor explosion that rivals your favorite takeout!
Ingredients
For the Chicken:
- 1½ pounds boneless, skinless chicken breasts or thighs, cut into 1-inch cubes
- 2 tablespoons cornstarch
- ½ teaspoon salt
- ¼ teaspoon black pepper
- 2 tablespoons vegetable oil (for cooking)
For the Honey Garlic Sauce:
- ⅓ cup honey
- ¼ cup low-sodium soy sauce (or tamari for gluten-free)
- 5 cloves garlic, minced
- 2 tablespoons rice vinegar
- 1 tablespoon cornstarch
- 2 tablespoons water
- 1 teaspoon sesame oil
- ½ teaspoon fresh grated ginger (optional)
- ¼ teaspoon red pepper flakes (optional, for heat)
For Garnish:
- 2 tablespoons sliced green onions
- 1 tablespoon sesame seeds
- Fresh cilantro (optional)
Instructions
- Prep the chicken: Pat the chicken pieces completely dry with paper towels – this is crucial for getting a nice sear! Place the chicken cubes in a medium bowl and toss with 2 tablespoons cornstarch, salt, and pepper until evenly coated.
- Make the sauce: In a small bowl, whisk together honey, soy sauce, minced garlic, rice vinegar, 1 tablespoon cornstarch, water, sesame oil, ginger (if using), and red pepper flakes (if using) until the cornstarch is completely dissolved and the mixture is smooth. Set aside.
- Sear the chicken: Heat a large skillet or wok over medium-high heat. Add the vegetable oil and swirl to coat the pan. Once the oil is shimmering and hot, add the chicken pieces in a single layer (work in batches if necessary to avoid overcrowding). Cook without moving for 2-3 minutes until golden brown on the bottom.
- Finish cooking: Flip the chicken pieces and cook for another 2-3 minutes until golden on the other side and cooked through (internal temperature should reach 165°F). The chicken doesn’t need to be swimming in sauce yet – we’re just getting a nice sear.
- Add the sauce: Reduce heat to medium. Give your sauce mixture a quick stir (the cornstarch tends to settle), then pour it over the chicken. Stir everything together, making sure each piece of chicken gets coated.
- Create that glaze: Let the sauce simmer for 3-4 minutes, stirring frequently, until it thickens and becomes glossy. The sauce should coat the back of a spoon. If it gets too thick, add a tablespoon of water. If it’s too thin, let it cook another minute.
- Garnish and serve: Remove from heat and transfer to a serving platter. Immediately garnish with sliced green onions, sesame seeds, and cilantro if desired. Serve hot over rice, noodles, or with your favorite sides!
Notes
- Cornstarch coating tip: Don’t skip coating the chicken in cornstarch before cooking – this creates a light crust that helps the sauce adhere better and adds texture.
- Don’t overcrowd the pan: If your skillet isn’t large enough to fit all the chicken in a single layer with space between pieces, cook in two batches. Overcrowding creates steam instead of a sear.
- Sauce consistency: The sauce will continue to thicken as it cools, so don’t worry if it seems slightly thin when you first remove it from heat.
- Make it spicier: Add more red pepper flakes, a drizzle of sriracha, or fresh sliced jalapeños.
- Protein swap: This sauce works beautifully with shrimp, pork tenderloin cubes, or even tofu for a vegetarian version.
- Prep Time: 10 minutes
- Cook Time: 15 minutes
- Category: Dinner
- Method: Stovetop
- Cuisine: Asian-American Fusion
Nutrition
- Serving Size: 1 serving (approximately 6 oz chicken with sauce)
- Calories: 340
- Sugar: 19g
- Sodium: 640mg
- Fat: 10g
- Saturated Fat: 2g
- Unsaturated Fat: 7g
- Trans Fat: 0g
- Carbohydrates: 28g
- Fiber: 0.5g
- Protein: 35g
- Cholesterol: 110mg
Nutrition information is an estimate and may vary based on specific ingredients used and portion sizes.
Tips & Variations
Make It Spicy: Double the red pepper flakes, add 1-2 tablespoons of sriracha to the sauce, or toss in some sliced fresh chili peppers for serious heat lovers.
Healthier Version: Use chicken breast instead of thighs to reduce fat content. You can also reduce the honey to ¼ cup if you’re watching sugar intake – the sauce will still be delicious, just slightly less sweet.
Add Vegetables: Toss in bell peppers, snap peas, broccoli florets, or sliced onions during the last few minutes of cooking for a complete one-pan meal with built-in veggies.
Pineapple Twist: Add ½ cup of fresh or canned pineapple chunks during the last 2 minutes of cooking for a sweet and tangy Hawaiian-inspired variation.
Citrus Variation: Replace half the honey with orange juice and add 1 teaspoon of orange zest for a bright, citrusy honey orange garlic chicken.
Crispier Texture: After coating the chicken in cornstarch, pan-fry the pieces until extra crispy, then toss with the sauce right before serving so they stay crunchy longer.
Slow Cooker Method: Brown the chicken first, then transfer to a slow cooker with the sauce. Cook on low for 3-4 hours or high for 1.5-2 hours. Thicken the sauce at the end if needed.
Air Fryer Version: Coat chicken in cornstarch and spray with oil. Air fry at 400°F for 10-12 minutes, shaking halfway through. Toss with sauce that you’ve thickened separately on the stovetop.
Pro Chef Tips
Dry chicken is crucial: Moisture is the enemy of a good sear. Always pat your chicken completely dry before coating with cornstarch. This ensures you get that beautiful golden crust instead of steamed, pale chicken.
Use cold chicken: If possible, keep your chicken cold until right before cooking. Cold protein sears better than room-temperature protein because the temperature difference creates a better crust.
High heat, but not too high: Medium-high heat is your sweet spot. Too low and the chicken steams; too high and the honey in the sauce will burn before the chicken cooks through.
Don’t rush the caramelization: When that sauce hits the pan and starts to bubble, resist the urge to remove it immediately. Those last 2-3 minutes of simmering are when the magic happens – the sugars caramelize, the flavors concentrate, and that irresistible glossy coating develops.
Fresh garlic timing matters: If you want a more mellow garlic flavor, add it with the sauce. For a more pronounced, spicy garlic punch, add half with the sauce and half raw at the end as garnish.
Deglaze for extra flavor: After removing the cooked chicken, add a splash of the sauce mixture to the hot pan and scrape up any browned bits stuck to the bottom (that’s pure flavor!), then return the chicken and add the remaining sauce.
Taste and adjust: Before serving, taste the sauce and adjust the balance. Too sweet? Add a splash more soy sauce or vinegar. Too salty? Add a bit more honey. Cooking is all about balance!
Common Mistakes to Avoid
Overcrowding the pan: This is the number one mistake! When chicken pieces touch each other, they steam instead of searing, resulting in pale, rubbery chicken with no caramelization. Give each piece space to breathe, or cook in batches.
Skipping the cornstarch coating: That light dusting of cornstarch on the chicken isn’t optional – it creates texture, helps achieve a golden crust, and gives the sauce something to grip onto. Without it, your sauce will slide right off.
Adding sauce to overly hot chicken: If your pan is still screaming hot when you add the honey-based sauce, the sugars will burn and turn bitter within seconds. Always reduce to medium heat before adding the sauce.
Not dissolving the cornstarch completely: Lumpy sauce is not cute! Make sure to whisk that cornstarch thoroughly with the other sauce ingredients, and give it another quick stir right before adding to the pan since cornstarch settles.
Overcooking the chicken: Chicken breasts especially can go from perfectly juicy to dry and tough in just a minute or two. Use a meat thermometer and remove from heat at 165°F – carryover cooking will finish the job.
Storage & Meal Prep
These honey garlic chicken bites are absolutely fantastic for meal prep and leftovers, making them perfect for busy weeks!
Refrigerator Storage: Allow the chicken to cool completely, then transfer to an airtight container. Store in the refrigerator for up to 4 days. Pro tip: The flavors actually deepen and become even more delicious after a day in the fridge as the chicken continues to absorb the sauce.
Reheating Instructions: For best results, reheat gently in a skillet over medium-low heat with a splash of water or chicken broth to loosen the sauce (it thickens considerably when cold). You can also microwave in 30-second intervals, stirring between each, until heated through. Avoid high heat when reheating, as it can make the chicken rubbery.
Meal Prep Tips: Cook a double batch on Sunday and portion into individual containers with rice and steamed vegetables for grab-and-go lunches throughout the week. The chicken stays moist and the sauce doesn’t get soggy, making it ideal for meal prep containers.
Shelf Life: Cooked chicken bites will maintain optimal quality for 3-4 days refrigerated. While technically safe to eat for up to 4-5 days if stored properly, the texture is best within the first few days.
Make-Ahead & Freezer Notes
Yes, you can absolutely prepare this recipe in advance and even freeze it for future meals!
Make-Ahead Raw Chicken: Cut and season your chicken up to 24 hours in advance. Store the coated chicken pieces in an airtight container in the refrigerator. Prepare the sauce and store separately. When ready to cook, everything comes together in minutes.
Make-Ahead Cooked: Cook the entire recipe, cool completely, and refrigerate for up to 2 days before serving. The flavors actually improve! Reheat gently before serving.
Freezing Instructions: For best results, freeze the cooked chicken and sauce together in freezer-safe containers or heavy-duty freezer bags. Remove as much air as possible to prevent freezer burn. Label with the date and freeze for up to 3 months.
Thawing & Reheating from Frozen: Thaw overnight in the refrigerator for best results. Reheat in a skillet over medium heat with a tablespoon or two of water to refresh the sauce. You can also reheat from frozen – just add 5-10 minutes to the reheating time and use lower heat to ensure the chicken heats through evenly.
Freezing Tip: The sauce may separate slightly during freezing. This is normal! Just stir well while reheating, and it will come back together beautifully.
Serving Suggestions
These versatile chicken bites pair wonderfully with so many sides and accompaniments! Here are my favorite ways to serve them:
Classic Combinations:
- Steamed jasmine rice or brown rice – The perfect canvas for that incredible sauce
- Fried rice or cauliflower rice – For extra flavor and texture
- Lo mein or rice noodles – Toss the chicken and sauce with noodles for a complete meal
- Steamed vegetables – Broccoli, snap peas, green beans, or bok choy
Creative Serving Ideas:
- Over a crispy salad with mixed greens, shredded cabbage, carrots, and a sesame ginger dressing
- In lettuce wraps with cucumber, cilantro, and extra sauce for drizzling
- As a rice bowl with edamame, avocado, pickled vegetables, and a drizzle of spicy mayo
- On skewers as an appetizer for parties (thread the chicken before cooking)
- In meal prep containers with quinoa and roasted vegetables
Perfect Side Dishes:
- Asian cucumber salad – Cool, crisp, and refreshing
- Egg rolls or spring rolls – Store-bought or homemade
- Potstickers or dumplings – Pan-fried or steamed
- Garlic green beans – Quick sautéed with soy sauce
- Coconut rice – Adds a subtle sweetness that complements the honey garlic flavor
Beverage Pairings: Serve with iced green tea, a crisp white wine like Riesling or Pinot Grigio, or even a light beer. For non-alcoholic options, try sparkling water with lime or a refreshing lemonade.
FAQs Section
Can I use frozen chicken for this recipe?
Yes, but make sure to thaw it completely first and pat it very dry before coating with cornstarch. Frozen chicken releases excess moisture during cooking, which prevents proper browning. Thaw overnight in the refrigerator for best results.
Why is my sauce too thin or not thickening?
The most common culprit is not mixing the cornstarch properly into the cold liquid – it needs to be completely dissolved before heating. Also, make sure you’re letting the sauce simmer for the full 3-4 minutes. If it’s still thin, mix 1 teaspoon cornstarch with 1 tablespoon cold water and add it to the simmering sauce.
Can I make this recipe in an Instant Pot?
While you can, I don’t recommend it for this particular recipe. The quick stovetop method gives you better control over the texture of the chicken and the consistency of the sauce. Pressure cooking tends to make the chicken too soft and the sauce harder to reduce to that perfect glossy consistency.
Is this recipe kid-friendly?
Absolutely! Kids love the sweet honey flavor, and you can easily adjust the garlic and omit any spicy ingredients. The bite-sized pieces are perfect for little hands, and it’s a great way to introduce children to Asian-inspired flavors.
Can I use honey substitutes for a healthier version?
You can substitute with pure maple syrup, agave nectar, or even a sugar-free honey alternative, though each will slightly change the flavor profile. Maple syrup adds a deeper, more molasses-like sweetness, while agave is milder. Keep in mind that the calorie difference is minimal between these natural sweeteners.
What’s the best way to reheat leftovers without drying out the chicken?
The key is gentle heat and a little added moisture. Reheat in a skillet over medium-low heat with 2-3 tablespoons of water or chicken broth, stirring occasionally until warmed through. This refreshes the sauce and keeps the chicken juicy. Avoid the microwave if possible, but if you must, use 50% power and add a splash of water.
How do I make this recipe gluten-free?
Simply swap regular soy sauce for tamari (which is naturally gluten-free) or coconut aminos. Make sure your cornstarch is certified gluten-free (most are, but always check the label). Everything else in the recipe is naturally gluten-free!
Conclusion
There you have it, friends – a restaurant-quality honey garlic chicken bites recipe that’s so easy to make at home, you’ll wonder why you ever ordered takeout! The combination of tender, juicy chicken with that sticky, caramelized honey garlic sauce is pure comfort food magic. Whether you’re feeding your family on a busy Tuesday night, meal prepping for the week ahead, or hosting friends for a casual dinner party, this recipe delivers every single time.
I love how versatile and forgiving this recipe is. You can make it exactly as written, or customize it with your favorite vegetables, adjust the spice level to suit your taste, or even change up the protein entirely. The techniques you’ll learn here – coating protein for better texture, creating a balanced sauce, and achieving that perfect glossy glaze – will serve you well in countless other recipes too.
Now it’s your turn to head to the kitchen and create some delicious magic! I’d absolutely love to hear how your honey garlic chicken bites turn out. Did you add any creative twists? Serve them in a unique way? Have any questions or tips to share with fellow home cooks? Drop a comment below and let’s chat!
And if you love this recipe as much as I do, please consider saving it to your Pinterest boards and sharing it with your friends and family. When you make it, snap a photo and tag me on social media – there’s nothing I enjoy more than seeing your beautiful creations come to life in your own kitchen. Happy cooking, and get ready for those requests for seconds! 🍯✨