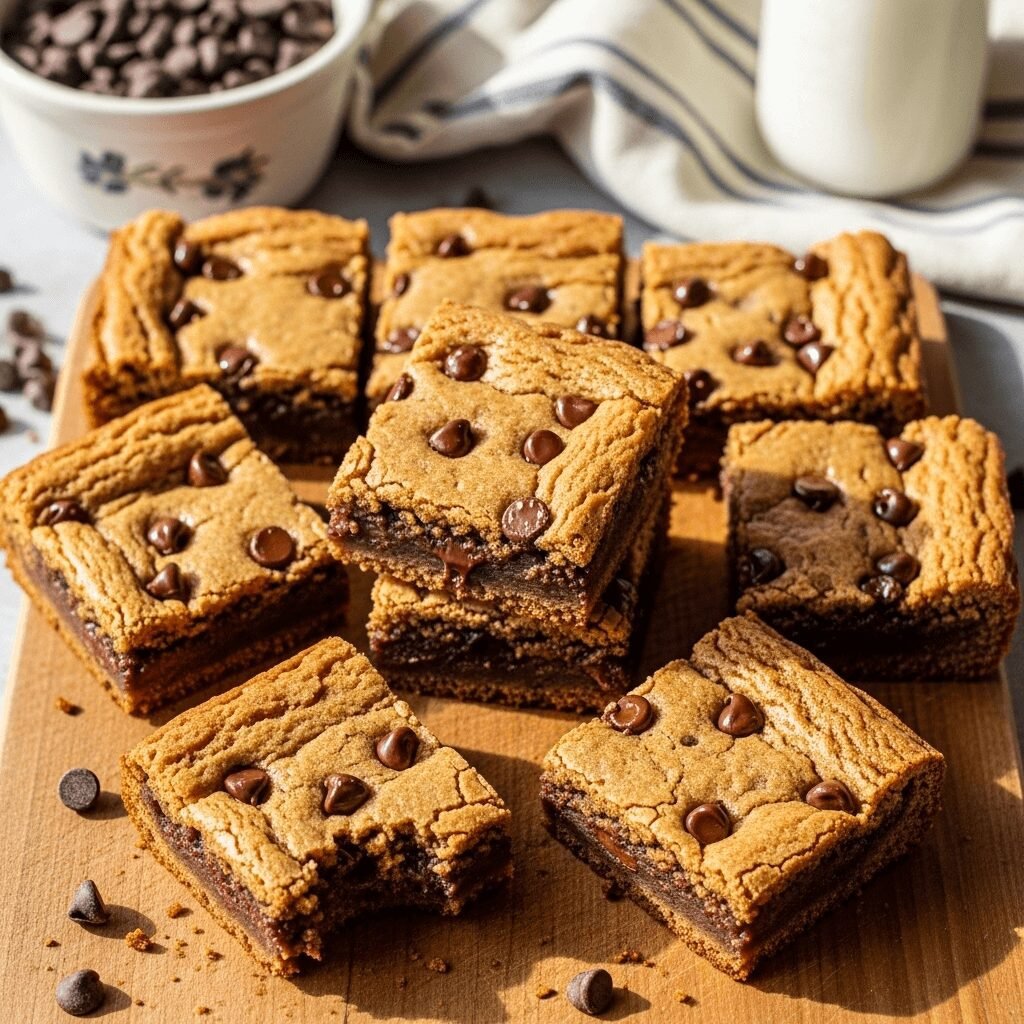

If you’ve ever found yourself torn between baking a batch of chewy chocolate chip cookies and whipping up a pan of rich, buttery blondies, I have the perfect solution for you. These Chocolate Chip Cookie Blondies combine the best of both worlds into one irresistible dessert that’ll have everyone asking for seconds.
These gorgeous golden bars taste exactly like your favorite chocolate chip cookies but with that dense, fudgy texture that makes blondies so addictive. They’re incredibly easy to make—no mixer required, just one bowl and a wooden spoon. Whether you’re bringing them to a potluck, packing them in lunchboxes, serving them at a holiday gathering, or simply satisfying your own sweet tooth on a random Tuesday evening, these cookie blondies are about to become your new go-to dessert.
The magic happens when you get those crispy, caramelized edges surrounding a soft, gooey center loaded with melty chocolate chips. They’re perfect for any occasion, from casual weeknight treats to impressive party desserts that look like you spent hours in the kitchen.
History / Background
The story of blondies is a delicious piece of American baking history. While brownies have chocolate as their star ingredient, blondies—sometimes called “blonde brownies”—showcase the rich, butterscotch-like flavor of brown sugar and butter. The first blondie recipes appeared in American cookbooks in the late 1800s, though they looked quite different from what we know today.
Interestingly, blondies may actually predate brownies. The earliest chocolate brownies didn’t appear in cookbooks until the late 1890s, while molasses-based bar cookies (the ancestors of modern blondies) were already popular. The term “blondie” became widely used in the 1950s as a playful contrast to “brownie,” and home bakers embraced these golden treats as a delicious alternative.
The genius of adding chocolate chips to blondies likely emerged during America’s love affair with chocolate chip cookies in the mid-20th century. After Ruth Wakefield invented the chocolate chip cookie at the Toll House Inn in the 1930s, American bakers began adding chocolate chips to everything. Someone brilliant had the idea to combine the cookie dough flavor profile with the convenient bar format of blondies, and these Chocolate Chip Cookie Blondies were born.
Today, these treats represent the best of American home baking—simple ingredients, easy preparation, and absolutely delicious results that bring people together around the dessert table.
Why You’ll Love This Recipe
These Chocolate Chip Cookie Blondies are about to become your most-requested recipe, and here’s why. They deliver all the nostalgic comfort of homemade chocolate chip cookies without the hassle of scooping, spacing, and baking multiple batches. You simply mix everything in one bowl, spread it into a pan, and bake. It’s baking therapy at its finest—minimal cleanup, maximum reward.
Here’s what makes this recipe absolutely irresistible:
- Incredibly easy – No electric mixer needed, just a bowl and spoon
- One-bowl wonder – Minimal cleanup means more time enjoying your treats
- Perfect texture – Crispy edges with a soft, chewy center every single time
- Crowd-pleaser – Both kids and adults go crazy for these
- Budget-friendly – Uses simple pantry staples you probably already have
- Great for gifting – They travel well and make thoughtful homemade gifts
- Customizable – Easy to adapt with your favorite mix-ins and flavors
- Make-ahead friendly – Bakes beautifully and stores for days
- Feeds a crowd – One pan makes 16 generous servings
Ingredient Notes
Let me walk you through the ingredients that make these blondies so special. Understanding what each component does will help you achieve perfect results every time.
All-Purpose Flour – This provides the structure for your blondies. Don’t overmix once you add the flour, or your bars might turn out tough instead of tender.
Brown Sugar – The star of the show! Brown sugar gives blondies that signature butterscotch flavor and chewy texture. I prefer light brown sugar, but dark brown sugar works beautifully if you want a deeper molasses flavor. Don’t substitute with white sugar—you’ll lose that characteristic blondie taste.
Butter – Use unsalted butter so you can control the salt level. Make sure it’s melted and slightly cooled before mixing. The butter creates that rich, cookie-like flavor and tender crumb.
Eggs – Room temperature eggs incorporate more smoothly into the batter. They add moisture and help bind everything together.
Vanilla Extract – Pure vanilla extract is worth the investment. It amplifies all the other flavors and adds that warm, homemade taste.
Baking Powder – Just a small amount gives these blondies a slight lift without making them cakey.
Salt – Don’t skip it! Salt balances the sweetness and makes all the flavors pop.
Chocolate Chips – Semi-sweet chocolate chips are classic, but feel free to use milk chocolate for sweeter bars or dark chocolate for a more sophisticated flavor. You can also mix different types.
Equipment Needed
You don’t need fancy equipment for this recipe, which is part of its charm. Here’s what you’ll need:
- 9×9-inch square baking pan (or 8×8 for thicker blondies)
- Parchment paper or aluminum foil (for easy removal)
- Large mixing bowl
- Wooden spoon or sturdy spatula (no mixer needed!)
- Measuring cups and spoons
- Whisk (for combining dry ingredients)
- Small saucepan or microwave-safe bowl (for melting butter)
- Toothpick or cake tester (for checking doneness)
- Wire cooling rack

Chocolate Chip Cookie Blondies Recipe
- Total Time: 35-40 minutes
- Yield: 16 bars 1x
- Diet: Vegetarian
Description
These Chocolate Chip Cookie Blondies are the perfect combination of chewy chocolate chip cookies and fudgy blondies. With crispy edges, a gooey center, and plenty of melty chocolate chips, they’re an easy one-bowl dessert that everyone will love.
Ingredients
- 1/2 cup (1 stick/113g) unsalted butter, melted and slightly cooled
- 1 cup (200g) packed light brown sugar
- 1 large egg, room temperature
- 1 egg yolk, room temperature
- 2 teaspoons pure vanilla extract
- 1 1/4 cups (156g) all-purpose flour
- 1/2 teaspoon baking powder
- 1/2 teaspoon salt
- 1 cup (175g) semi-sweet chocolate chips
- 1/4 cup (45g) chocolate chips for topping (optional)
Instructions
- Preheat and prepare: Preheat your oven to 350°F (175°C). Line a 9×9-inch square baking pan with parchment paper, leaving an overhang on two sides for easy removal. Lightly grease the parchment.
- Mix wet ingredients: In a large mixing bowl, whisk together the melted butter and brown sugar until well combined and smooth, about 1 minute. The mixture should look glossy.
- Add eggs and vanilla: Add the whole egg, egg yolk, and vanilla extract. Whisk vigorously for about 30 seconds until the mixture is smooth and slightly thickened. It should lighten in color slightly.
- Combine dry ingredients: In a separate bowl, whisk together the flour, baking powder, and salt.
- Mix the batter: Add the dry ingredients to the wet ingredients. Using a wooden spoon or sturdy spatula, gently fold everything together until just combined. Don’t overmix—a few flour streaks are okay. The batter will be thick.
- Add chocolate chips: Fold in 1 cup of chocolate chips, reserving a handful for topping if desired. Mix gently until evenly distributed.
- Spread and top: Scrape the batter into your prepared pan. Use a spatula to spread it evenly into the corners. The batter will be thick, so take your time. Sprinkle the remaining chocolate chips on top if using.
- Bake: Bake for 25-30 minutes, or until the edges are golden brown and set, and the center looks slightly underdone. A toothpick inserted into the center should come out with a few moist crumbs—not wet batter, but not completely clean either.
- Cool completely: Let the blondies cool in the pan on a wire rack for at least 30 minutes, or until completely cool. This is crucial for the texture! Use the parchment overhang to lift the entire block out of the pan, then cut into 16 squares.
Notes
- Don’t overbake: These blondies continue to set as they cool. Slightly underbaking gives you that perfect chewy texture.
- Brown butter option: For extra flavor, brown your butter before using. Let it cool to room temperature first.
- Size matters: Using an 8×8 pan will give you thicker blondies with longer baking time (32-35 minutes).
- Storage: These keep at room temperature in an airtight container for up to 5 days.
- Prep Time: 10 minutes
- Cook Time: 25-30 minutes
- Category: Dessert
- Method: Baking
- Cuisine: American
Nutrition
- Serving Size: 1 blondie (1/16 of recipe)
- Calories: 185
- Sugar: 18g
- Sodium: 95mg
- Fat: 8g
- Saturated Fat: 5g
- Unsaturated Fat: 2.5g
- Trans Fat: 0g
- Carbohydrates: 27g
- Fiber: 1g
- Protein: 2g
- Cholesterol: 35mg
Tips & Variations
One of the beautiful things about this recipe is how easily it adapts to your preferences and dietary needs. Here are some of my favorite ways to customize these blondies:
Flavor Variations:
- Nutty Blondies: Add 3/4 cup chopped walnuts, pecans, or toasted hazelnuts along with the chocolate chips
- Salted Caramel: Sprinkle flaky sea salt on top before baking and drizzle with caramel sauce after cooling
- Peanut Butter Swirl: Drop spoonfuls of peanut butter on top of the batter and swirl with a knife before baking
- Triple Chocolate: Replace 1/4 cup flour with cocoa powder and use a mix of white, milk, and dark chocolate chips
- Espresso Enhancement: Add 1 tablespoon instant espresso powder to intensify the chocolate flavor
- S’mores Style: Top with mini marshmallows and crushed graham crackers during the last 5 minutes of baking
Dietary Adaptations:
- Gluten-Free: Use a 1:1 gluten-free flour blend (I’ve had success with Bob’s Red Mill)
- Dairy-Free: Replace butter with coconut oil and use dairy-free chocolate chips
- Lower Sugar: Reduce brown sugar to 3/4 cup (though texture will be slightly different)
Pro Chef Tips
After making these blondies countless times, I’ve picked up some professional tricks that take them from good to absolutely incredible:
Room temperature matters: Bring your eggs to room temperature by placing them in warm water for 5 minutes. This helps them incorporate smoothly and creates a better texture.
Don’t skip the extra egg yolk: That additional yolk makes these incredibly rich and fudgy. It’s the secret to that perfect chewy texture.
Measure flour correctly: Spoon flour into your measuring cup and level it off with a knife. Scooping directly from the bag can pack in 20% more flour, leading to dry, cakey blondies.
Use the parchment sling: Lining your pan with parchment paper that overhangs the sides makes removal foolproof and cleanup a breeze.
The toothpick test: Your toothpick should have moist crumbs clinging to it, not wet batter. If it comes out completely clean, you’ve overbaked.
Cool completely before cutting: I know it’s tempting, but warm blondies will fall apart. Patience is rewarded with clean, beautiful squares.
Invest in good chocolate: The chocolate chips are front and center here, so quality matters. I love Ghirardelli or Guittard brands.
Common Mistakes to Avoid
Even with a simple recipe, small mistakes can affect your results. Here’s what to watch out for:
Overmixing the batter: Once you add the flour, mix just until combined. Overmixing develops gluten, making your blondies tough and cakey instead of tender and chewy.
Using cold butter or eggs: Cold ingredients don’t incorporate smoothly, leading to lumpy batter and uneven texture. Always start with melted, slightly cooled butter and room temperature eggs.
Overbaking: This is the most common mistake! Blondies should look slightly underdone in the center when you remove them from the oven. They’ll continue cooking as they cool.
Cutting too soon: I cannot stress this enough—wait until they’re completely cool. Warm blondies are delicious but messy. Cool blondies cut into perfect, photo-worthy squares.
Wrong pan size: Using a pan that’s too large will give you thin, crispy blondies. Too small, and they’ll be undercooked in the center. Stick to 9×9 or 8×8 inches.
Storage & Meal Prep
These Chocolate Chip Cookie Blondies store beautifully, which makes them perfect for meal prep or making ahead for gatherings.
Room Temperature Storage: Keep blondies in an airtight container at room temperature for up to 5 days. Place parchment paper between layers if stacking to prevent sticking.
Refrigerator Storage: While not necessary, refrigerating makes them extra fudgy. Store in an airtight container for up to 1 week. Let them come to room temperature before serving, or warm slightly in the microwave for 10-15 seconds.
Maintaining Freshness: Add a slice of bread to your storage container. It’ll keep the blondies soft and moist by releasing humidity.
Reheating: While delicious at room temperature, you can warm individual blondies in the microwave for 10-15 seconds for that fresh-from-the-oven experience with melty chocolate chips.
Make-Ahead & Freezer Notes
These blondies are fantastic for planning ahead, whether you’re preparing for a party or just want treats on hand.
Baking Ahead: Bake the blondies up to 3 days in advance. Let them cool completely, then store tightly covered at room temperature. They actually taste even better the next day as the flavors meld together.
Freezing Baked Blondies: These freeze beautifully for up to 3 months. Cut into squares, wrap each individually in plastic wrap, then store in a freezer-safe bag. Thaw at room temperature for 1-2 hours, or microwave for 20-30 seconds.
Freezing Unbaked Batter: You can prepare the batter, spread it in the pan, cover tightly, and freeze for up to 2 months. Bake from frozen, adding 10-15 minutes to the baking time.
Best Thawing Method: For the best texture, thaw frozen blondies slowly at room temperature rather than microwaving. If you’re in a hurry, a 15-20 second microwave zap works perfectly.
Serving Suggestions
While these blondies are absolutely delicious on their own, here are some creative ways to serve them:
Classic Presentation: Serve warm with a cold glass of milk—it’s nostalgic perfection.
Dessert Elevation: Top with a scoop of vanilla ice cream and drizzle with hot fudge or caramel sauce for an impressive sundae.
Coffee Time: Pair with your afternoon coffee or espresso. The butterscotch notes complement coffee beautifully.
Party Platter: Cut into smaller bite-sized pieces and arrange on a platter with fresh berries and whipped cream.
À La Mode: Serve warm with your favorite ice cream flavor—salted caramel, coffee, or cookies and cream all work wonderfully.
Gift Packaging: Stack in a clear cellophane bag tied with ribbon for thoughtful homemade gifts.
Brunch Addition: Cut into small squares and serve alongside fresh fruit as a sweet brunch option.
FAQs Section
Can I use salted butter instead of unsalted?
Yes, but reduce the added salt to 1/4 teaspoon. Salted butter can vary in saltiness between brands, so taste your batter if you’re concerned (though consuming raw flour isn’t recommended).
Why are my blondies cakey instead of chewy?
This usually means they were overbaked or the batter was overmixed. Remember, the toothpick should come out with moist crumbs, not clean. Also, make sure you’re using brown sugar, not white sugar.
Can I make these in a different sized pan?
Yes! An 8×8 pan will give you thicker blondies (bake 32-35 minutes), while a 9×13 pan will give you thinner bars (bake 20-22 minutes). Adjust baking time accordingly.
Why is there an extra egg yolk in this recipe?
That extra yolk creates an incredibly rich, fudgy texture. The additional fat from the yolk makes these taste more like cookie dough. You can use two whole eggs instead, but the texture will be slightly less rich.
Can I double this recipe?
Absolutely! Double the ingredients and bake in a 9×13-inch pan. The baking time will be similar, around 28-32 minutes.
My blondies are crumbly and dry. What happened?
This typically means too much flour was added or they were overbaked. Make sure to measure flour by spooning it into the measuring cup and leveling off, not scooping directly from the bag.
Can I add other mix-ins besides chocolate chips?
Definitely! Try butterscotch chips, white chocolate chips, M&Ms, chopped candy bars, dried fruit, or nuts. Keep the total mix-in amount around 1-1.5 cups for best results.
Conclusion
There you have it—the ultimate guide to making perfect Chocolate Chip Cookie Blondies that’ll have everyone begging for the recipe. These gorgeous golden bars truly are the best of both worlds, combining everything you love about chocolate chip cookies with the convenience and fudgy texture of blondies.
What I love most about this recipe is how it brings people together. Whether you’re baking for your family, bringing treats to the office, or preparing dessert for a holiday gathering, these blondies never disappoint. They’re simple enough for beginning bakers yet delicious enough to impress even the toughest critics.
The beauty of baking is that every batch is an opportunity to make something special, and these blondies deliver every single time. So grab your mixing bowl, melt that butter, and treat yourself to these incredible bars. Your kitchen is about to smell absolutely amazing!
I’d love to hear how your blondies turn out! Drop a comment below with your favorite variation, and don’t forget to save this recipe to your Pinterest boards so you can find it whenever that sweet tooth strikes. Happy baking, friend!