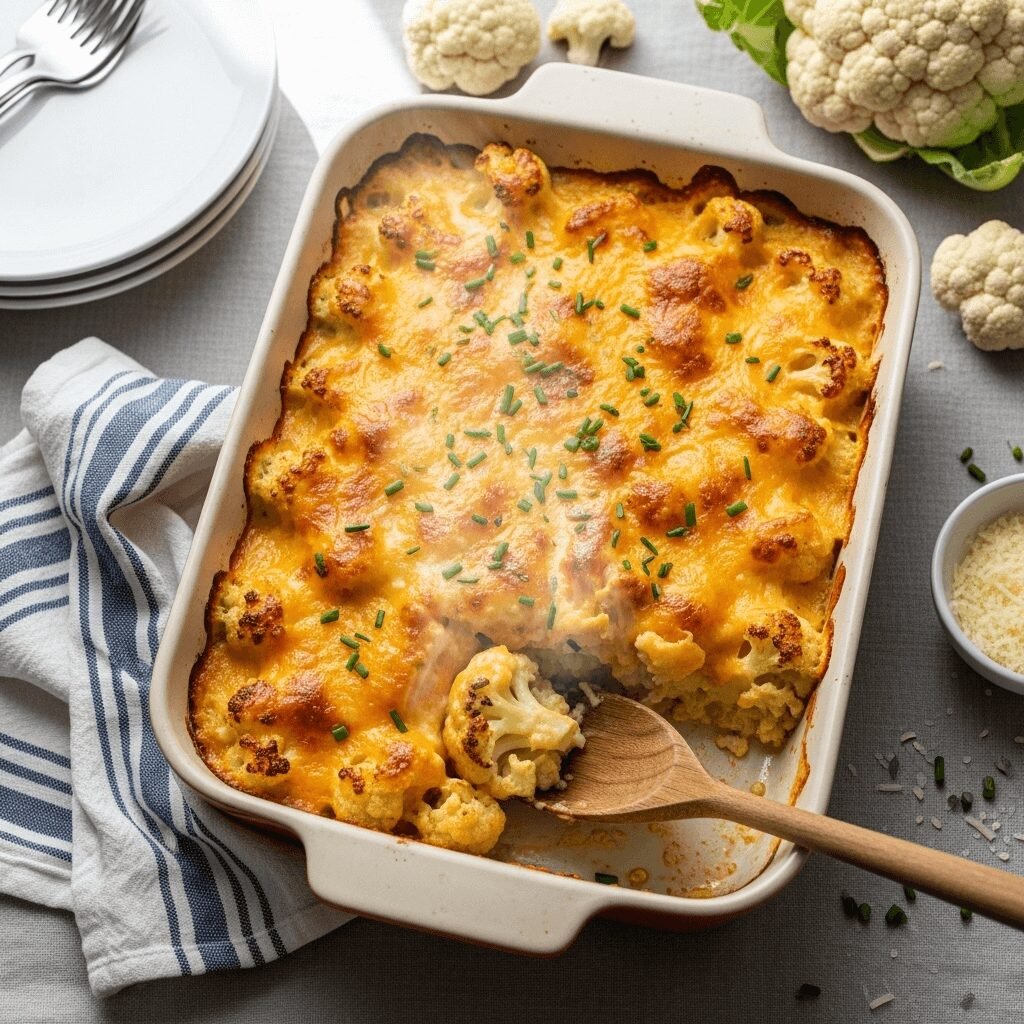

If you’re looking for a vegetable side dish that even the pickiest eaters will love, this Cheesy Cauliflower Bake is your answer! Imagine tender cauliflower florets smothered in a rich, creamy cheese sauce, topped with golden, bubbly cheese, and baked until perfectly crispy on top. This dish transforms humble cauliflower into something absolutely irresistible—a side dish that often steals the show from the main course!
This cheesy cauliflower bake is perfect for weeknight family dinners, holiday gatherings, potlucks, or any time you want to sneak more vegetables onto your plate without sacrificing flavor. It’s comfort food at its finest, combining the nutritional benefits of cauliflower with the indulgent satisfaction of cheese. Whether you’re serving it alongside roasted chicken, grilled steak, or as part of a vegetarian spread, this baked cauliflower casserole delivers every single time.
The beauty of this recipe lies in its simplicity and versatility. You can have it on the table in about 45 minutes, and it requires just basic ingredients you probably already have in your kitchen. Plus, it’s incredibly adaptable—you can make it lighter, add extra protein, or amp up the cheese factor depending on your preferences and dietary needs.
History & Background of Cauliflower Bake
Cauliflower bakes and gratins have a rich culinary history that spans multiple cultures and centuries. The concept of baking vegetables in a creamy cheese sauce originated in French cuisine with the classic “gratin,” a cooking technique where ingredients are topped with a browned crust, often using breadcrumbs, cheese, or a combination of both. The word “gratin” comes from the French verb “gratter,” meaning “to scrape” or “to grate,” referring to the scraped crust from the bottom of the pan—the most coveted part!
Cauliflower itself has been cultivated for over 2,000 years, originating in the Mediterranean region before spreading throughout Europe and eventually to America. While cauliflower was once considered a luxury vegetable in medieval Europe, it became more widely available in the 19th and 20th centuries. The combination of cauliflower with cheese sauce became particularly popular in British and American home cooking during the mid-20th century, when casseroles and one-dish meals rose to prominence.
The American version of cauliflower bake embraced the comfort food philosophy—generous amounts of cheese, creamy sauces, and simple preparation methods that busy families could rely on. During the 1950s and 60s, when convenience and hearty meals were prioritized, cheesy vegetable bakes became dinner table staples. Today, this dish has experienced a renaissance as home cooks seek ways to make vegetables more appealing while still keeping meals wholesome and satisfying.
What makes this particular recipe special is how it bridges traditional comfort food with modern dietary awareness. Cauliflower has become a superstar vegetable in recent years, celebrated for its versatility and nutritional profile. This cheesy cauliflower bake honors the classic preparation while being adaptable to contemporary tastes—you can make it keto-friendly, gluten-free, or lightened up without losing that essential comfort food appeal.
Why You’ll Love This Cheesy Cauliflower Bake Recipe
This isn’t just another vegetable side dish—it’s the kind of recipe that converts cauliflower skeptics into enthusiastic fans! The combination of tender cauliflower, velvety cheese sauce, and that irresistible golden-brown top creates a dish that’s both sophisticated enough for entertaining and comforting enough for everyday family meals.
Here’s why this recipe will become a regular in your dinner rotation:
- Incredibly Easy – No complicated techniques or hard-to-find ingredients required. If you can make a basic cheese sauce, you can make this!
- Kid-Approved – The cheesy goodness completely transforms cauliflower into something children actually request at dinner
- Budget-Friendly – Cauliflower is affordable year-round, and the other ingredients are pantry staples
- Make-Ahead Friendly – Assemble hours or even a day ahead, then simply pop it in the oven when you’re ready
- Crowd-Pleasing – Perfect for potlucks, holidays, and gatherings—this dish always disappears first
- Nutritious & Satisfying – You’re getting a full serving of vegetables while feeling like you’re indulging
- Versatile – Works as a side dish or can be the star of a vegetarian meal
- Low-Carb Friendly – Naturally lower in carbs than potato-based casseroles, making it keto-adaptable
- Customizable – Easy to adjust the cheese blend, add proteins, or incorporate your favorite seasonings
- Restaurant-Quality Results – Looks and tastes like something you’d order at a steakhouse, but made in your own kitchen
Ingredient Notes for Cheesy Cauliflower Bake
Understanding your ingredients helps you make smart substitutions and achieve the best possible results. Here’s what you need and why each component matters:
Cauliflower – The star of the show! Choose a fresh, firm head with tight, white florets and bright green leaves. Aim for about 2 pounds (one large head). You can also use pre-cut florets to save time, though whole heads are usually more economical. If cauliflower isn’t available, broccoli works beautifully as a substitute.
Butter – Provides richness and helps create the roux for our cheese sauce. Unsalted butter gives you better control over the final seasoning. For a dairy-free version, use plant-based butter or olive oil.
All-Purpose Flour – The thickening agent that transforms milk into a silky sauce. For gluten-free preparation, substitute with gluten-free all-purpose flour blend or cornstarch (use half the amount).
Whole Milk – Creates a creamy, luscious sauce base. Whole milk provides the best texture, but you can use 2% milk if needed. Heavy cream can be mixed in for extra richness, or use half-and-half for a middle ground.
Sharp Cheddar Cheese – The primary cheese that delivers that classic, tangy flavor. Sharp cheddar melts beautifully and provides robust taste. You’ll need about 2 cups, freshly shredded from a block (pre-shredded cheese contains anti-caking agents that can affect melting).
Parmesan Cheese – Adds a nutty, salty depth and helps create that golden-brown crust. Use freshly grated Parmesan for best results—the pre-grated stuff works in a pinch but doesn’t melt as smoothly.
Garlic – Fresh minced garlic adds aromatic flavor to the sauce. Two to three cloves provide the perfect amount without overwhelming the dish. Garlic powder can substitute (about 1/2 teaspoon), but fresh is always better.
Seasonings – Salt, black pepper, and a pinch of nutmeg are the classics. Nutmeg might seem unusual, but it’s a traditional addition to cheese sauces that enhances the overall flavor without being detectable. Paprika adds color and a subtle smokiness.
Optional Add-ins – Bacon crumbles, caramelized onions, breadcrumbs for extra crunch, fresh herbs like thyme or chives, or a dash of hot sauce for heat.
Equipment Needed
Having the right tools makes this recipe even easier. Here’s what you’ll need:
- Large Pot – For blanching the cauliflower florets before baking
- 9×13-inch Baking Dish – The ideal size for even cooking and serving 6-8 people (a 9×9-inch dish works for smaller portions)
- Medium Saucepan – For making the cheese sauce
- Whisk – Essential for creating a smooth, lump-free sauce
- Colander – For draining the blanched cauliflower
- Sharp Knife and Cutting Board – For breaking down the cauliflower head
- Measuring Cups and Spoons – For accurate ingredient portions
- Box Grater or Food Processor – For shredding cheese (if not using pre-shredded)
- Wooden Spoon – For stirring the sauce
- Aluminum Foil – For covering during the first part of baking if needed

Cheesy Cauliflower Bake Recipe
- Total Time: 45 minutes
- Yield: 6-8 servings 1x
- Diet: Vegetarian
Description
This Cheesy Cauliflower Bake features tender cauliflower florets smothered in a rich, creamy cheese sauce and baked until golden and bubbly. It’s the ultimate comfort food side dish that transforms simple cauliflower into an irresistible crowd-pleaser perfect for weeknight dinners or special occasions.
Ingredients
- 1 large head cauliflower (about 2 pounds), cut into bite-sized florets
- 3 tablespoons unsalted butter
- 3 tablespoons all-purpose flour
- 2 cups whole milk, warmed
- 2 cups sharp cheddar cheese, freshly shredded (divided)
- ½ cup Parmesan cheese, freshly grated (divided)
- 3 cloves garlic, minced
- 1 teaspoon salt (or to taste)
- ½ teaspoon black pepper
- ¼ teaspoon ground nutmeg
- ½ teaspoon paprika
- 2 tablespoons fresh chives or parsley, chopped (for garnish)
- Optional: ¼ cup breadcrumbs for extra crunch
Instructions
- Preheat and Prep: Preheat your oven to 375°F (190°C). Lightly grease a 9×13-inch baking dish with butter or cooking spray. Cut the cauliflower into evenly-sized florets, about 1-2 inches each, discarding the thick core and leaves.
- Blanch the Cauliflower: Bring a large pot of salted water to a boil. Add the cauliflower florets and cook for 5-6 minutes until just tender but still slightly firm (they’ll continue cooking in the oven). Drain thoroughly in a colander and set aside.
- Make the Cheese Sauce: In a medium saucepan over medium heat, melt the butter completely. Add the minced garlic and sauté for about 30 seconds until fragrant, being careful not to burn it.
- Create the Roux: Sprinkle the flour over the melted butter and whisk continuously for 1-2 minutes. The mixture should become paste-like and lightly golden—this is your roux, which will thicken the sauce.
- Add the Milk: Gradually pour in the warmed milk while whisking constantly to prevent lumps. Continue whisking until the sauce begins to thicken, about 3-4 minutes. It should coat the back of a spoon.
- Add the Cheese: Remove the saucepan from heat. Stir in 1½ cups of the shredded cheddar and ⅓ cup of the Parmesan cheese, stirring until completely melted and smooth. Add the salt, pepper, nutmeg, and paprika. Taste and adjust seasonings as needed.
- Combine: Place the drained cauliflower florets in the prepared baking dish. Pour the cheese sauce evenly over the cauliflower, gently stirring to ensure all florets are coated.
- Top and Bake: Sprinkle the remaining ½ cup cheddar cheese and remaining Parmesan over the top. If using breadcrumbs, mix them with the cheese topping. Bake uncovered for 25-30 minutes, until the cheese is bubbly and the top is golden brown.
- Broil (Optional): For an extra-crispy, golden top, turn on the broiler for the last 2-3 minutes of baking. Watch carefully to prevent burning!
- Rest and Serve: Remove from the oven and let rest for 5 minutes before serving. Garnish with freshly chopped chives or parsley. Serve hot and enjoy!
Notes
- For Extra Flavor: Add crumbled cooked bacon, caramelized onions, or sautéed mushrooms to the cheese sauce before baking.
- Make it Spicy: Stir in a pinch of cayenne pepper or red pepper flakes to the cheese sauce, or top with jalapeño slices.
- Gluten-Free Option: Substitute all-purpose flour with a 1:1 gluten-free flour blend or use cornstarch (use 1½ tablespoons instead of 3 tablespoons flour).
- Lighter Version: Use 2% milk instead of whole milk and reduce cheese quantities by 25%. The sauce will be slightly thinner but still delicious.
- Don’t Overcook the Cauliflower: During blanching, keep it slightly firm since it will continue cooking in the oven. Mushy cauliflower won’t hold up well.
- Cheese Matters: Always shred cheese from a block rather than using pre-shredded. Pre-shredded cheese contains anti-caking agents that prevent smooth melting.
- Prep Time: 15 minutes
- Cook Time: 30 minutes
- Category: Side Dish
- Method: Baking
- Cuisine: American
Nutrition
- Serving Size: 1 cup (approximately ⅙ of recipe)
- Calories: 285
- Sugar: 5g
- Sodium: 520mg
- Fat: 19g
- Saturated Fat: 11g
- Unsaturated Fat: 6g
- Trans Fat: 0g
- Carbohydrates: 14g
- Fiber: 3g
- Protein: 14g
- Cholesterol: 55mg
Nutrition information is approximate and calculated based on standard ingredient measurements. Values may vary based on specific brands and modifications.
Tips & Variations for Your Cauliflower Bake
The beauty of this recipe is how easily you can customize it to suit your taste preferences, dietary needs, or whatever you have on hand in your kitchen. Here are some fantastic ways to make this dish your own:
Cheese Variations: While cheddar is classic, feel free to experiment! Try a combination of Gruyère and white cheddar for a more sophisticated flavor, or add mozzarella for extra gooeyness. Pepper jack cheese adds a spicy kick, while smoked gouda brings a wonderful smoky depth. You can also use a Mexican cheese blend for a southwestern twist.
Protein Additions: Transform this side dish into a complete meal by adding protein. Cooked, chopped bacon or pancetta adds a smoky, salty element. Diced ham makes it heartier. Rotisserie chicken chunks turn it into a complete dinner. Even cooked ground sausage works beautifully mixed into the cheese sauce.
Vegetable Mix-ins: Don’t limit yourself to just cauliflower! Add broccoli florets for a classic combination, or incorporate roasted red peppers for sweetness. Sautéed mushrooms add earthiness, while baby spinach wilted into the cheese sauce boosts nutrition. You can even add peas or diced carrots for extra color and nutrients.
Spice It Up: For those who love heat, add diced jalapeños, a dash of hot sauce to the cheese sauce, or sprinkle red pepper flakes on top. A chipotle pepper in adobo sauce blended into the cheese mixture creates a smoky, spicy variation.
Crunchy Topping Options: Mix panko breadcrumbs with melted butter and sprinkle on top before baking for extra crunch. Crushed butter crackers, french fried onions, or even crushed potato chips create irresistible texture contrast. For a sophisticated touch, try crushed pecans or walnuts mixed with breadcrumbs.
Herb Variations: Fresh herbs elevate this dish beautifully. Try fresh thyme leaves stirred into the sauce, or fresh dill for a surprising twist. Rosemary adds earthiness, while basil creates an Italian-inspired version. Top with fresh chives, parsley, or green onions for color and freshness.
Lighter Modifications: Use low-fat milk and reduced-fat cheese to lighten the calorie load. Replace half the cheese sauce with Greek yogurt for added protein and tanginess. You can also use cauliflower “rice” instead of florets for a different texture, though cooking time will need adjustment.
Pro Chef Tips for the Perfect Cheesy Cauliflower Bake
These professional insights will take your cauliflower bake from good to absolutely spectacular:
The Blanching Secret: Don’t skip blanching the cauliflower! This crucial step accomplishes several things: it removes any bitterness, ensures even cooking, and prevents excess moisture from making your dish watery. The cauliflower should be tender-crisp when you drain it—it will finish cooking perfectly in the oven.
Dry Your Cauliflower Thoroughly: After blanching and draining, spread the florets on a clean kitchen towel and pat them completely dry. Excess water is the enemy of a creamy sauce—it dilutes the cheese sauce and can make the whole dish runny and less flavorful.
Room Temperature Ingredients: Let your milk come to room temperature or warm it slightly before adding to the roux. Cold milk can cause the roux to seize and create lumps, while warm milk incorporates smoothly for a velvety sauce.
The Perfect Roux Technique: Cook your butter and flour mixture (roux) for the full 1-2 minutes, even though it seems long. This cooking time removes the raw flour taste and develops a slightly nutty flavor that enhances the entire dish. The mixture should smell toasty and turn a light golden color.
Cheese Melting Science: Always remove the pan from heat before adding cheese. Cheese proteins can seize and become grainy when exposed to high direct heat. Off the heat, the residual warmth melts the cheese perfectly for a smooth, silky texture.
Layering Strategy: For maximum cheesiness throughout, toss half the blanched cauliflower with half the cheese sauce in a bowl before transferring to the baking dish. Add the remaining cauliflower and sauce, then top with the remaining cheese. This ensures every bite is coated.
The Browning Sweet Spot: Bake uncovered at 375°F for even cooking and proper browning. If you notice the top browning too quickly, tent loosely with foil for the first 15 minutes, then remove to allow browning. For the perfect golden crust, finish under the broiler for 2-3 minutes—but stay close and watch carefully!
Size Consistency Matters: Cut your cauliflower florets into similar sizes to ensure even cooking. Pieces that are too large will remain undercooked while small pieces become mushy. Aim for 1½ to 2-inch florets for the best texture.
Common Mistakes to Avoid
Even experienced cooks can run into trouble with this recipe. Here’s how to avoid the most common pitfalls:
Overcooking the Cauliflower: The biggest mistake is overcooking during blanching. Remember, the cauliflower continues cooking in the oven, so you want it barely tender during the blanch. Overcooked cauliflower becomes mushy and releases excess water that ruins the sauce texture. Test with a fork—it should pierce through but still have some resistance.
Lumpy Cheese Sauce: Lumps happen when you add cold milk to the roux too quickly, or when you don’t whisk constantly. Always warm your milk first, add it gradually while whisking vigorously, and never stop whisking until the sauce thickens. If you do get lumps, use an immersion blender or pour the sauce through a fine-mesh strainer before adding the cheese.
Using Pre-Shredded Cheese: Those convenient bags of pre-shredded cheese contain cellulose (an anti-caking agent) that prevents smooth melting and can create a grainy texture. Always buy a block of cheese and shred it yourself—it only takes a few extra minutes and makes a world of difference in the final result. Plus, freshly shredded cheese has more moisture and melts more beautifully.
Skipping the Seasoning: Cauliflower is mild, and cheese can dull flavors, so this dish needs proper seasoning. Don’t forget the salt, pepper, and that pinch of nutmeg. Taste your cheese sauce before pouring it over the cauliflower and adjust accordingly. Remember that the cauliflower itself isn’t seasoned, so the sauce needs enough flavor for everything.
Not Letting It Rest: It’s tempting to dig in immediately, but letting the dish rest for 5 minutes after baking allows the sauce to thicken slightly and makes serving much easier. The bubbling-hot sauce will also cool just enough to prevent burnt tongues while still being perfectly warm and comforting.
Wrong Baking Dish Size: Using a dish that’s too small causes the sauce to bubble over and makes it difficult for the top to brown properly. Too large, and the sauce spreads thin, creating a dry, overcooked result. A 9×13-inch dish is perfect for the standard recipe quantities.
Forgetting to Grease the Dish: Cheese sauce loves to stick and burn onto baking dishes. Always grease your dish well with butter or cooking spray before adding the cauliflower mixture. This makes cleanup infinitely easier and prevents the bottom layer from sticking and burning.
Storage & Meal Prep for Cheesy Cauliflower Bake
This dish stores beautifully, making it perfect for meal prep and enjoying leftovers throughout the week.
Refrigerator Storage: Allow the cauliflower bake to cool completely to room temperature before covering. Transfer leftovers to an airtight container or cover the baking dish tightly with plastic wrap or aluminum foil. Properly stored, it will keep in the refrigerator for 3-4 days. The flavors often deepen overnight, making leftovers especially delicious.
Reheating Methods: For best results, reheat individual portions in the microwave for 1-2 minutes, stirring halfway through. For larger portions, reheat in a 350°F oven covered with foil for 15-20 minutes until warmed through, then uncover for the last 5 minutes to re-crisp the top. You can also reheat on the stovetop in a covered pan over medium-low heat, stirring occasionally and adding a splash of milk if needed to loosen the sauce.
Maintaining Texture: The sauce may thicken considerably when refrigerated. When reheating, add a tablespoon or two of milk or cream to restore the creamy consistency. Stir well to incorporate. The cauliflower may soften slightly with storage, but it should still maintain good texture if properly blanched initially.
Portion Control: Consider dividing leftovers into individual serving containers for easy grab-and-go lunches or quick weeknight dinners. These portions reheat more evenly and make it simple to enjoy this dish throughout the week without committing to a large serving.
Make-Ahead & Freezer Notes
This recipe is wonderfully make-ahead friendly, perfect for busy schedules and advance meal planning.
Make-Ahead Instructions (Unbaked): Prepare the entire recipe through step 7 (after pouring the cheese sauce over the cauliflower), but don’t bake it yet. Cover the assembled dish tightly with plastic wrap and then aluminum foil, and refrigerate for up to 24 hours. When ready to bake, remove from the refrigerator and let sit at room temperature for 20-30 minutes while the oven preheats. Add an extra 5-10 minutes to the baking time since you’re starting with a cold dish.
Make-Ahead Instructions (Baked): You can fully bake the dish, let it cool completely, cover well, and refrigerate. Reheat covered at 350°F for 20-25 minutes until heated through. The texture won’t be quite as perfect as fresh, but it’s still delicious and convenient.
Freezer Instructions (Unbaked – Best Method): For optimal results, freeze the unbaked assembled casserole. Prepare through step 7, then cover tightly with plastic wrap and then two layers of heavy-duty aluminum foil. Freeze for up to 2 months. To bake from frozen, do not thaw—remove plastic wrap, replace foil, and bake covered at 375°F for 60 minutes, then uncover and bake for an additional 15-20 minutes until bubbly and golden. The extended cooking time ensures the frozen center heats through completely.
Freezer Instructions (Baked): While possible, freezing after baking can affect texture more noticeably. The cauliflower may become softer and the sauce slightly separated. If you choose this method, freeze in an airtight container for up to 2 months and thaw overnight in the refrigerator before reheating.
Freezer Tips: Label your container with the date and reheating instructions. For best quality, use within 2 months. The cheese sauce may look slightly separated after freezing, but stirring while reheating usually brings it back together beautifully.
Portion Freezing: Consider freezing in individual portions using freezer-safe containers. This allows you to thaw and reheat only what you need, preventing waste and providing convenient single servings.
Serving Suggestions for Cheesy Cauliflower Bake
This versatile dish pairs beautifully with countless main courses and fits into various meal styles. Here are some delicious serving ideas:
Classic Pairings: This cauliflower bake is a natural companion to roasted or grilled meats. Serve alongside roasted chicken, grilled steak, pork chops, or baked salmon for a complete dinner. It’s also perfect with holiday roasts—turkey, ham, or prime rib. The creamy, cheesy richness complements the savory flavors of meat beautifully.
Make It a Meal: Transform this side dish into a vegetarian main course by serving it with a fresh green salad and crusty bread. Add a protein like grilled tofu, tempeh, or a fried egg on top to make it more substantial. It’s hearty enough to be the star of the plate!
Complete Dinner Ideas: Pair with garlic bread or dinner rolls to soak up the cheese sauce. Add a simple Caesar salad or mixed greens with vinaigrette for freshness and contrast. Roasted green beans or asparagus provide a lighter vegetable option alongside the rich cauliflower. A light tomato soup makes a comforting combination for cooler evenings.
BBQ & Cookouts: This makes a fantastic potluck or cookout side dish. Serve it alongside grilled burgers, BBQ ribs, pulled pork, or grilled chicken. It’s a welcome alternative to traditional potato salad and coleslaw, and it transports well when covered tightly.
Holiday Tables: Include this as part of your Thanksgiving, Christmas, or Easter spread. It’s particularly popular as a more indulgent alternative to plain steamed vegetables. The golden, bubbly presentation looks beautiful on a holiday table.
Wine Pairings: The creamy cheese sauce pairs wonderfully with a crisp white wine like Chardonnay or Sauvignon Blanc. For red wine lovers, a light Pinot Noir complements without overwhelming the dish.
Beverage Suggestions: Serve with iced tea, lemonade, sparkling water with lemon, or even a cold beer for casual meals. The refreshing beverages provide a nice contrast to the rich, creamy dish.
FAQs About Cheesy Cauliflower Bake
Q: Can I make this recipe ahead of time for a party?
A: Absolutely! This is one of the best make-ahead side dishes. Assemble the entire casserole up to 24 hours in advance, cover tightly, and refrigerate. When your guests arrive, simply pop it in the preheated oven and bake (add 5-10 extra minutes since it’s cold). You can also freeze it unbaked for up to 2 months—perfect for holiday planning!
Q: Why is my cheese sauce grainy or separated?
A: Grainy cheese sauce usually happens from overheating the cheese or using pre-shredded cheese with anti-caking agents. Always remove the pan from heat before adding cheese, and use freshly shredded cheese from a block. If your sauce does separate, try whisking in a tablespoon of warm milk off the heat—this often brings it back together. Using low-fat cheese can also cause separation, so stick with full-fat varieties for the creamiest results.
Q: Can I use frozen cauliflower instead of fresh?
A: Yes, frozen cauliflower works in a pinch! Use about 24 ounces of frozen florets. There’s no need to blanch them—just thaw completely and squeeze out all excess moisture using paper towels or a clean kitchen towel before combining with the cheese sauce. Keep in mind that frozen cauliflower has a slightly softer texture and releases more water, so drying it thoroughly is crucial.
Q: How do I prevent my cauliflower bake from being watery?
A: Watery casserole comes from excess moisture in the cauliflower. Make sure to thoroughly drain the blanched cauliflower and pat it completely dry before adding the cheese sauce. Don’t overblanch the cauliflower—it should still be slightly firm. Also, avoid covering the dish while baking (unless the top is browning too quickly), as trapped steam adds moisture rather than letting it evaporate.
Q: What can I substitute for all-purpose flour to make this gluten-free?
A: For a gluten-free version, use a 1:1 gluten-free flour blend in the same amount as all-purpose flour. Alternatively, use cornstarch (but only 1½ tablespoons instead of 3 tablespoons flour, since cornstarch is a stronger thickener). Another option is to use a beurre manié (equal parts softened butter and gluten-free flour mixed together) whisked into the hot milk.
Q: Can I reduce the cheese to make this healthier?
A: Definitely! You can reduce the cheese by up to one-third and still have a delicious dish, though the sauce will be less rich. Use 2% milk instead of whole milk, and consider adding nutritional yeast for extra cheesy flavor without the calories. Greek yogurt can replace some of the cheese for added protein and tanginess—stir in ½ cup after removing the sauce from heat.
Q: My topping didn’t get golden and crispy. What went wrong?
A: This usually means the oven wasn’t hot enough, the dish was covered too long, or there wasn’t enough cheese on top. Make sure your oven is fully preheated to 375°F. Bake uncovered for the entire time unless the top is browning too quickly. For extra-golden results, turn on the broiler for the last 2-3 minutes, watching carefully. Make sure you’ve reserved enough cheese for the topping—don’t skimp!
Q: How can I add more protein to make this a complete meal?
A: There are many easy ways to boost the protein! Stir in cooked, diced chicken or ham. Add cooked bacon or pancetta crumbles. Mix in cooked ground beef or turkey seasoned with garlic and herbs. For vegetarian protein, add white beans or chickpeas. You could even top individual servings with a fried or poached egg for a breakfast-style meal.
Conclusion
There you have it—the ultimate guide to creating a showstopping Cheesy Cauliflower Bake that will have everyone coming back for seconds! This recipe proves that healthy eating doesn’t have to be boring or bland. By transforming humble cauliflower into a creamy, cheesy masterpiece, you’re creating a dish that’s both comforting and nutritious—a rare combination that your whole family will love.
Whether you’re looking for the perfect side dish for Sunday dinner, need a make-ahead option for your holiday table, or simply want to get more vegetables into your family’s diet without complaints, this cheesy cauliflower bake delivers on all fronts. The rich, velvety cheese sauce combined with tender cauliflower and that irresistible golden-brown top creates a dish that’s satisfying, impressive, and surprisingly simple to prepare.
Don’t forget to experiment with the variations and tips I’ve shared—this recipe is wonderfully adaptable to your taste preferences and dietary needs. Add bacon for extra indulgence, incorporate broccoli for more veggies, or lighten it up with reduced-fat options. However you make it, this cauliflower bake is destined to become a regular feature in your recipe rotation.
I’d absolutely love to hear how your Cheesy Cauliflower Bake turns out! Leave a comment below sharing your results, any creative variations you tried, or photos of your beautiful finished dish. And if you loved this recipe, please give it a five-star rating and share it with friends and family who would enjoy it too. Don’t forget to pin this recipe to your Pinterest boards so you can easily find it again when you need a reliable, crowd-pleasing side dish!
Happy cooking, and here’s to making vegetables absolutely irresistible! 🧀🥦