
There’s something absolutely magical about a perfectly fried chicken sandwich – that golden, crispy exterior giving way to juicy, tender chicken, all nestled between soft, buttery buns with just the right fixings. This homemade buttermilk fried chicken sandwich recipe brings restaurant-quality flavor right to your kitchen, and honestly? It might just be better than anything you’d pay $15 for at your local chicken spot.
This isn’t just any fried chicken sandwich. We’re talking about chicken breast that’s been lovingly marinated in tangy buttermilk, creating the most tender, flavorful meat you’ve ever experienced. The secret is in the double-dredge technique that creates an extra-crispy coating that stays crunchy even after you’ve added all your favorite toppings. Whether you’re planning a casual weeknight dinner, weekend lunch with friends, or game day feast, this buttermilk fried chicken sandwich is guaranteed to become your new obsession.
Perfect for family dinners, summer cookouts, Sunday lunch, or those times when you’re craving comfort food that hits all the right notes, this recipe delivers big flavor with straightforward techniques that any home cook can master.
History / Background
The fried chicken sandwich has deep roots in American culinary tradition, though its exact origin is delightfully debated. While fried chicken itself has been a staple in Southern cooking since the 18th century – with techniques brought by Scottish immigrants and perfected by enslaved African cooks who added their own seasoning traditions – the chicken sandwich as we know it today has a more recent history.
The modern fried chicken sandwich boom really took off in the American South, where buttermilk-brined fried chicken had already been perfected over generations. Buttermilk, originally a byproduct of butter-making, became a crucial ingredient in Southern kitchens not just for its tangy flavor, but for its tenderizing properties. The lactic acid in buttermilk breaks down proteins in the chicken, resulting in incredibly tender meat, while the thick consistency helps the seasoned flour coating stick beautifully.
The sandwich format itself gained massive popularity in the mid-20th century as fast-casual dining took off, but it wasn’t until the 2010s that we saw the “chicken sandwich wars” – a cultural phenomenon where restaurants competed to create the ultimate crispy chicken sandwich. This sparked a renaissance in homemade versions, with home cooks across America perfecting their own signature spins on this beloved classic.
What makes the buttermilk fried chicken sandwich so special is how it combines several Southern cooking traditions: the buttermilk marinade technique, the art of perfectly seasoned fried chicken, and the simplicity of serving it on a soft bun with classic pickles. It’s comfort food that tells a story of American culinary evolution, regional pride, and the universal love of crispy, juicy, perfectly seasoned chicken.
Why You’ll Love This Recipe
This buttermilk fried chicken sandwich recipe is about to become your new weekend staple, and here’s why: it takes all the complexity out of making restaurant-quality fried chicken at home while delivering incredible flavor and that addictive crunch we all crave. The buttermilk marinade does most of the work for you, tenderizing the chicken while you go about your day, and the frying process is surprisingly straightforward once you know the tricks.
Here’s what makes this recipe a total winner:
- Restaurant-quality results at home – Save money and get even better flavor than takeout
- Incredible texture contrast – Super crispy exterior with juicy, tender chicken inside
- Buttermilk magic – The overnight marinade guarantees tender, flavorful chicken every single time
- Customizable toppings – Make it classic with pickles and mayo, or go wild with your favorite sauces and toppings
- Crowd-pleaser guarantee – Kids, adults, picky eaters – everyone loves a good fried chicken sandwich
- Budget-friendly – Chicken breasts are affordable, and you probably have most ingredients already
- Impressive but doable – Looks and tastes fancy, but the technique is totally manageable for home cooks
- Make-ahead friendly – Marinate the night before and fry when you’re ready
- Perfect for gatherings – Scale up easily to feed a crowd at parties or cookouts
The best part? Once you master this recipe, you’ll never need to wait in line at a chicken restaurant again. You’ll have the confidence and know-how to whip up craveable fried chicken sandwiches whenever the mood strikes.
Ingredient Notes
Let’s talk about what goes into making these incredible sandwiches, because quality ingredients really do make a difference:
Chicken Breasts – Boneless, skinless chicken breasts are the star here. Look for pieces that are similar in size for even cooking. If they’re thick, you’ll want to pound them to an even thickness (about ¾ inch) so they cook uniformly. You can substitute chicken thighs if you prefer dark meat – they’re even more forgiving and stay juicy.
Buttermilk – This is the secret weapon! The tangy, acidic buttermilk tenderizes the chicken while adding flavor. Don’t skip this or substitute regular milk – the acidity is crucial. If you absolutely must substitute, you can make “quick buttermilk” by adding 1 tablespoon of lemon juice or vinegar to 1 cup of regular milk and letting it sit for 5 minutes.
All-Purpose Flour – Creates that crispy coating we’re after. Some recipes use self-rising flour, but all-purpose gives you more control over the final texture.
Seasonings – We’re using a blend of paprika, garlic powder, onion powder, cayenne pepper, salt, and black pepper. The paprika adds color and mild flavor, while cayenne brings a subtle heat (adjust to your spice preference). These seasonings go in both the buttermilk marinade and the flour coating for maximum flavor.
Eggs – Help the flour coating stick to the chicken and create that extra-crispy texture.
Vegetable Oil – For frying. You need an oil with a high smoke point like vegetable, canola, or peanut oil. Avoid olive oil – it can’t handle the high heat.
Hamburger Buns – Brioche buns are absolutely perfect here because they’re soft, slightly sweet, and buttery. You can also use potato buns or classic sesame seed buns. Toast them lightly with butter for extra deliciousness.
Pickles – Classic dill pickle chips are traditional and provide that perfect tangy crunch. Bread and butter pickles work too if you like a sweeter profile.
Mayo – Regular mayo is perfect, but feel free to use your favorite spicy mayo, garlic aioli, or comeback sauce.
Lettuce and Tomato – Optional but classic. Iceberg lettuce provides crunch, while tomato adds freshness.
Equipment Needed
Having the right tools makes this recipe so much easier and ensures better results. Here’s what you’ll need:
- Large mixing bowls – One for the buttermilk marinade and one for the seasoned flour
- Meat mallet or rolling pin – For pounding chicken to even thickness
- Gallon-sized zip-top bags – Perfect for marinating the chicken (or use a large bowl with plastic wrap)
- Shallow dishes – For setting up your dredging station (egg wash and flour)
- Deep, heavy-bottomed pot or Dutch oven – For frying. Cast iron works beautifully because it holds heat well
- Cooking thermometer – Essential for monitoring oil temperature (candy thermometer or instant-read)
- Tongs – For safely handling chicken while frying
- Wire cooling rack set over a baking sheet – For draining fried chicken (way better than paper towels)
- Paper towels – For patting chicken dry before coating
- Measuring cups and spoons – For precise seasoning
- Whisk or fork – For beating eggs
- Large skillet or griddle – For toasting buns (optional but recommended)

Buttermilk Fried Chicken Sandwich Recipe
- Total Time: 40 minutes (active time)
- Yield: 4 sandwiches 1x
- Diet: Gluten Free
Description
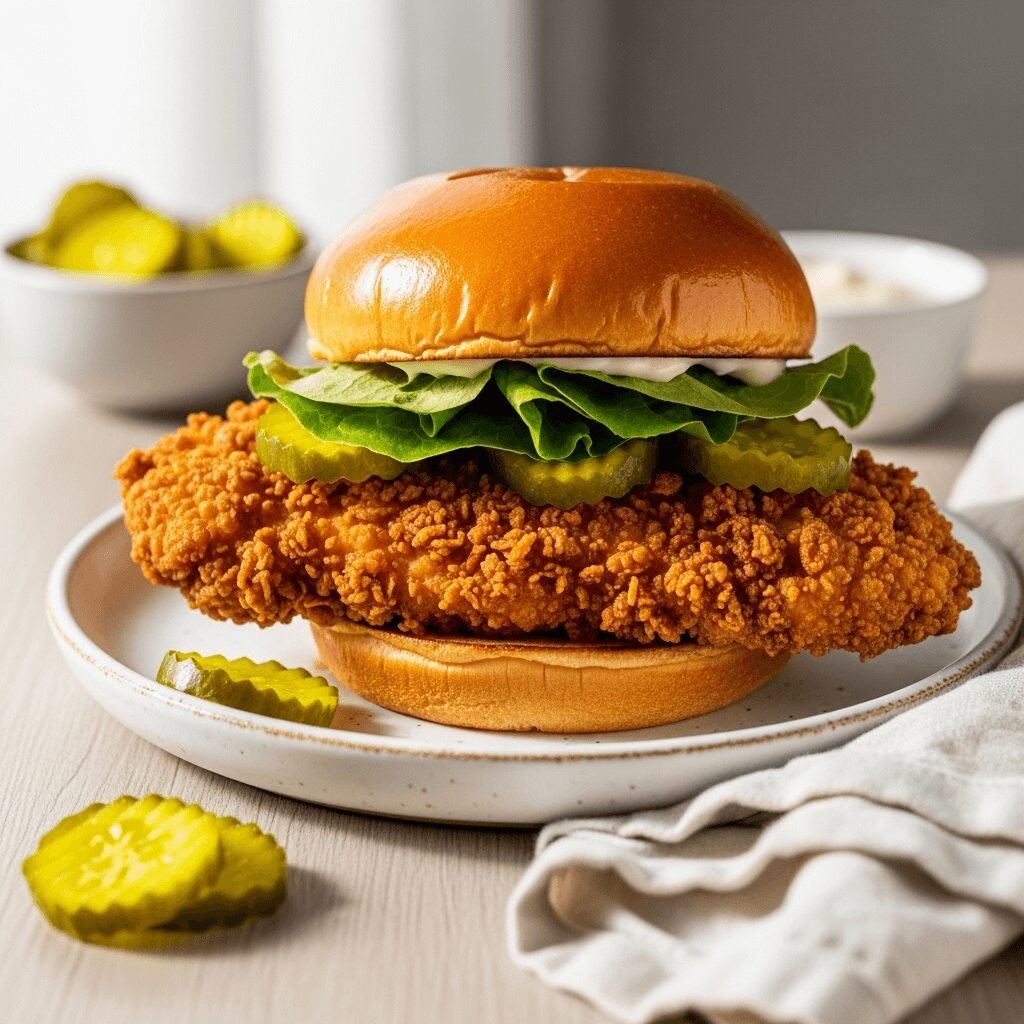
The ultimate crispy buttermilk fried chicken sandwich with juicy, tender chicken, a perfectly seasoned crunchy coating, and all your favorite toppings. This homemade version rivals any restaurant and is easier to make than you think!
Ingredients
For the Chicken Marinade:
- 4 boneless, skinless chicken breasts (about 6-8 oz each)
- 2 cups buttermilk
- 1 tablespoon hot sauce (like Frank’s RedHot)
- 2 teaspoons salt
- 1 teaspoon black pepper
- 1 teaspoon paprika
- 1 teaspoon garlic powder
- ½ teaspoon cayenne pepper
For the Coating:
- 2 cups all-purpose flour
- 1 tablespoon paprika
- 2 teaspoons garlic powder
- 2 teaspoons onion powder
- 1½ teaspoons salt
- 1 teaspoon black pepper
- 1 teaspoon cayenne pepper (adjust for heat preference)
- ½ teaspoon dried thyme
For the Egg Wash:
- 2 large eggs
- ¼ cup buttermilk
For Frying:
- Vegetable oil or peanut oil (about 4-6 cups, enough for 2 inches in pot)
For Assembly:
- 4 brioche hamburger buns
- 2 tablespoons butter (for toasting buns)
- Mayonnaise
- Dill pickle chips
- Lettuce leaves
- Tomato slices (optional)
- Extra hot sauce (optional)
Instructions
Step 1: Prepare the Chicken
Pound chicken breasts to an even ¾-inch thickness using a meat mallet. This ensures they cook evenly and stay juicy. If your breasts are very large, you can slice them in half horizontally to create thinner cutlets.
Step 2: Make the Buttermilk Marinade
In a large bowl or gallon-sized zip-top bag, combine buttermilk, hot sauce, salt, black pepper, paprika, garlic powder, and cayenne pepper. Whisk until well combined. Add the chicken breasts, making sure they’re completely submerged. Cover or seal and refrigerate for at least 4 hours, but preferably overnight (up to 24 hours). The longer it marinates, the more tender and flavorful it becomes.
Step 3: Set Up Your Dredging Station
When you’re ready to cook, set up three shallow dishes: In the first dish, whisk together eggs and ¼ cup buttermilk. In the second dish, combine flour, paprika, garlic powder, onion powder, salt, black pepper, cayenne pepper, and dried thyme. Mix the seasoned flour thoroughly with a fork.
Step 4: Coat the Chicken
Remove chicken from buttermilk marinade, letting excess drip off but keeping it slightly wet. Dredge each piece in the seasoned flour, pressing firmly to coat completely. Dip into the egg wash, letting excess drip off. Return to the flour mixture and press firmly again, making sure every surface is well coated. This double-dredge creates extra crunch. Place coated chicken on a wire rack and let sit for 10 minutes – this helps the coating stick better during frying.
Step 5: Heat the Oil
In a heavy-bottomed pot or Dutch oven, heat 2 inches of oil to 350°F. Use a cooking thermometer to monitor the temperature – this is crucial for perfectly fried chicken. Too hot and the outside burns before the inside cooks; too cool and you get greasy, soggy chicken.
Step 6: Fry the Chicken
Carefully lower 1-2 pieces of chicken into the hot oil (don’t overcrowd the pot). Fry for 6-8 minutes, flipping halfway through, until the coating is deep golden brown and the internal temperature reaches 165°F. The chicken should float and the coating should be crispy and deeply golden. Adjust heat as needed to maintain oil temperature around 325-350°F.
Step 7: Drain and Rest
Remove fried chicken to a wire rack set over a baking sheet. Season immediately with a tiny pinch of salt while still hot. Let rest for 5 minutes before assembling sandwiches – this allows the juices to redistribute.
Step 8: Toast the Buns
While chicken rests, butter the cut sides of your buns and toast them in a skillet over medium heat until golden, about 2 minutes.
Step 9: Assemble Your Sandwiches
Spread mayo on both sides of each toasted bun. On the bottom bun, place lettuce, then the fried chicken breast. Top with pickle chips, tomato slices if using, and any additional sauce. Add the top bun and serve immediately.
Notes
Step 1: Prepare the Chicken
Pound chicken breasts to an even ¾-inch thickness using a meat mallet. This ensures they cook evenly and stay juicy. If your breasts are very large, you can slice them in half horizontally to create thinner cutlets.
Step 2: Make the Buttermilk Marinade
In a large bowl or gallon-sized zip-top bag, combine buttermilk, hot sauce, salt, black pepper, paprika, garlic powder, and cayenne pepper. Whisk until well combined. Add the chicken breasts, making sure they’re completely submerged. Cover or seal and refrigerate for at least 4 hours, but preferably overnight (up to 24 hours). The longer it marinates, the more tender and flavorful it becomes.
Step 3: Set Up Your Dredging Station
When you’re ready to cook, set up three shallow dishes: In the first dish, whisk together eggs and ¼ cup buttermilk. In the second dish, combine flour, paprika, garlic powder, onion powder, salt, black pepper, cayenne pepper, and dried thyme. Mix the seasoned flour thoroughly with a fork.
Step 4: Coat the Chicken
Remove chicken from buttermilk marinade, letting excess drip off but keeping it slightly wet. Dredge each piece in the seasoned flour, pressing firmly to coat completely. Dip into the egg wash, letting excess drip off. Return to the flour mixture and press firmly again, making sure every surface is well coated. This double-dredge creates extra crunch. Place coated chicken on a wire rack and let sit for 10 minutes – this helps the coating stick better during frying.
Step 5: Heat the Oil
In a heavy-bottomed pot or Dutch oven, heat 2 inches of oil to 350°F. Use a cooking thermometer to monitor the temperature – this is crucial for perfectly fried chicken. Too hot and the outside burns before the inside cooks; too cool and you get greasy, soggy chicken.
Step 6: Fry the Chicken
Carefully lower 1-2 pieces of chicken into the hot oil (don’t overcrowd the pot). Fry for 6-8 minutes, flipping halfway through, until the coating is deep golden brown and the internal temperature reaches 165°F. The chicken should float and the coating should be crispy and deeply golden. Adjust heat as needed to maintain oil temperature around 325-350°F.
Step 7: Drain and Rest
Remove fried chicken to a wire rack set over a baking sheet. Season immediately with a tiny pinch of salt while still hot. Let rest for 5 minutes before assembling sandwiches – this allows the juices to redistribute.
Step 8: Toast the Buns
While chicken rests, butter the cut sides of your buns and toast them in a skillet over medium heat until golden, about 2 minutes.
Step 9: Assemble Your Sandwiches
Spread mayo on both sides of each toasted bun. On the bottom bun, place lettuce, then the fried chicken breast. Top with pickle chips, tomato slices if using, and any additional sauce. Add the top bun and serve immediately.
- Prep Time: 20 minutes (plus 4-24 hours marinating time)
- Cook Time: 20 minutes
- Category: Dinner, Lunch, Main Course
- Method: Frying, Stovetop
- Cuisine: American, Southern
Nutrition
- Serving Size: 1 sandwich
- Calories: 680
- Sugar: 8g
- Sodium: 1450mg
- Fat: 32g
- Saturated Fat: 8g
- Unsaturated Fat: 22g
- Trans Fat: 0g
- Carbohydrates: 58g
- Fiber: 3g
- Protein: 42g
- Cholesterol: 165mg
Note: Nutrition facts are approximate and will vary based on specific ingredients used and portion sizes.
Tips & Variations
Spicy Chicken Sandwich: Add extra cayenne to both the marinade and coating. Make a spicy mayo by mixing mayo with hot sauce, cayenne, and a pinch of cayenne. Some hot honey drizzled on top takes it to the next level!
Nashville Hot Chicken Style: After frying, brush the chicken with a mixture of cayenne pepper, brown sugar, garlic powder, and oil from the frying pan. The sweet-spicy coating is addictive.
Healthier Baked Version: While it won’t be quite as crispy, you can bake the coated chicken at 425°F on a wire rack for 25-30 minutes, flipping once and spraying with cooking spray.
Gluten-Free: Use your favorite gluten-free flour blend in place of all-purpose flour. Rice flour or a gluten-free baking mix works well.
Different Proteins: This technique works beautifully with chicken thighs, pork chops, or even fish fillets. Adjust cooking time accordingly.
Buttermilk Ranch Topping: Mix mayo with buttermilk ranch seasoning for an extra tangy, herby sauce.
Add Cheese: A slice of pepper jack, cheddar, or American cheese takes this sandwich to new heights.
Coleslaw Topping: Skip the lettuce and tomato and top with creamy coleslaw for added crunch and tang – very traditional in the South.
Honey Butter Buns: Mix softened butter with honey before toasting the buns for a sweet-savory contrast.
Waffle Bun: Use toasted waffles instead of buns for a chicken and waffles twist!
Pro Chef Tips
Brine Temperature Matters: Make sure your buttermilk marinade is cold when you add the chicken. A cold marinade keeps the chicken in the safe temperature zone and allows for longer marinating time.
The Dry-Wet-Dry Method: Professional cooks always do a flour-egg-flour dredge because it creates multiple layers of coating that fry up extra crispy and stay attached better.
Control Your Oil Temperature: Invest in a good thermometer and maintain consistent heat. The oil temperature will drop when you add chicken – let it come back to 350°F before adding the next piece.
Salt in Layers: Season at every step – in the marinade, in the flour, and with a light sprinkle right after frying. This creates depth of flavor.
Let Coating Set: That 10-minute rest after coating allows the flour to hydrate and stick better to the chicken, preventing it from falling off during frying.
Choose the Right Oil: Peanut oil gives the best flavor and has a high smoke point, but vegetable or canola work great too. Avoid olive oil – it smokes at too low a temperature.
The Bubble Test: When you put chicken in the oil, you should see active bubbling around it. If there’s no bubbling, the oil isn’t hot enough yet.
Don’t Overcrowd: Fry only 1-2 pieces at a time. Overcrowding drops the oil temperature too much and leads to greasy, soggy chicken.
Toast Buns Properly: Buttering and toasting buns isn’t optional – it creates a barrier that prevents them from getting soggy from the sauce and creates amazing flavor.
Rest Before Serving: That 5-minute rest after frying allows the carryover cooking to finish and the juices to redistribute. Your chicken will be juicier and the coating will set better.
Common Mistakes to Avoid
Skipping the Marinade Time: Rushing the buttermilk soak is the biggest mistake home cooks make. Give it at least 4 hours, but overnight is ideal. The acid needs time to work its tenderizing magic. If you’re really in a pinch, even 2 hours is better than nothing, but the texture won’t be quite as tender.
Wrong Oil Temperature: Frying at incorrect temperatures is recipe disaster. Too hot (over 375°F) and your coating burns before the chicken cooks through. Too cool (under 325°F) and the chicken absorbs oil and becomes greasy. Use a thermometer – guessing doesn’t work. And remember, the temperature drops when you add chicken, so be patient between batches.
Making Chicken Too Thick: If your chicken breasts are thick and uneven, the thin parts overcook while the thick parts are still raw. Always pound to an even thickness (about ¾ inch) or slice large breasts in half horizontally. Consistent thickness = consistent cooking.
Not Drying the Chicken Properly: After removing chicken from the marinade, let excess drip off but don’t rinse it. However, if there are big globs of buttermilk, gently shake them off. Too much liquid prevents the coating from sticking properly.
Overcrowding the Pot: When you add too many pieces at once, the oil temperature plummets and never recovers. This leads to greasy, pale, sad chicken. Fry in batches of 1-2 pieces, even if it takes longer. Good things come to those who wait!
Using the Wrong Pot: A shallow skillet doesn’t have enough depth for proper frying. Use a deep pot or Dutch oven with at least 3-4 inches of depth. This prevents oil overflow and maintains more stable temperature.
Cutting Into Chicken Too Early: The second that crispy chicken is done, we’re tempted to cut into it to check. Don’t! Use a thermometer to check doneness (165°F internal temperature), and then let it rest for 5 minutes. Cutting too soon releases all those precious juices and your chicken will be dry.
Storage & Meal Prep
Storing Leftovers: Store leftover fried chicken separately from the buns and toppings. Place cooled chicken in an airtight container with paper towels on the bottom to absorb moisture. Refrigerate for up to 3-4 days. Never store assembled sandwiches – they’ll become a soggy mess.
Reheating for Best Results: The oven is your best friend for reheating fried chicken and maintaining crispiness. Preheat your oven to 375°F, place chicken on a wire rack over a baking sheet, and heat for 10-15 minutes until warmed through and crispy. Avoid the microwave – it turns the coating soggy and rubbery.
Storing Marinated Chicken: Raw chicken in buttermilk marinade can be refrigerated for up to 24 hours before frying. Beyond that, the texture starts to get mushy. Don’t freeze chicken in the marinade – it affects the texture negatively.
Storing Components Separately: If meal prepping, store your seasoned flour mixture in an airtight container at room temperature for up to 1 week. The buttermilk marinade can be made a day ahead and stored in the fridge.
Make-Ahead & Freezer Notes
Can You Make It Ahead? Absolutely! Here’s the best strategy: Marinate the chicken overnight, then coat and fry it the day you plan to serve. The fried chicken holds up well in the fridge for 2-3 days and reheats beautifully. Alternatively, you can prep the marinade and seasoned flour up to 2 days ahead.
Freezing Fried Chicken: Yes, you can freeze fully cooked fried chicken! Let it cool completely, then place pieces in a single layer on a baking sheet and freeze until solid (about 2 hours). Transfer to freezer bags, removing as much air as possible. Freeze for up to 3 months. Don’t freeze assembled sandwiches – only the chicken.
Freezing Marinated Raw Chicken: While you can freeze chicken in marinade, the texture after thawing and frying isn’t quite as good. If you must do this, use freezer bags, remove all air, and freeze flat for up to 2 months. Thaw overnight in the fridge before proceeding with the coating and frying.
Reheating from Frozen: For frozen fried chicken, you can reheat directly from frozen. Preheat oven to 375°F, place frozen chicken on a wire rack, and bake for 20-25 minutes until heated through and crispy. You can also thaw overnight in the fridge first, which reduces reheating time to about 12-15 minutes.
Make-Ahead Assembly Strategy: If you’re serving these for a party, fry the chicken a few hours ahead and keep it warm in a 200°F oven on a wire rack. Toast the buns right before serving and set up a DIY sandwich bar with all the fixings so guests can build their own.
Serving Suggestions
A great fried chicken sandwich deserves equally delicious sides and accompaniments. Here’s what pairs beautifully:
Classic Sides:
- Crispy french fries or sweet potato fries
- Creamy coleslaw (vinegar-based or mayo-based)
- Mac and cheese
- Baked beans
- Potato salad
- Corn on the cob
Lighter Options:
- Simple green salad with ranch dressing
- Grilled vegetables
- Cucumber tomato salad
- Fresh fruit salad
- Pickled vegetables
Drinks:
- Sweet tea (absolutely traditional!)
- Lemonade
- Ice-cold beer (a crisp lager or pilsner)
- Vanilla milkshake
- Iced coffee
Make It a Meal: Serve your sandwiches with crispy waffle fries and comeback sauce for dipping, a refreshing vinegar-based coleslaw to cut through the richness, and ice-cold sweet tea for the ultimate Southern comfort meal. For a party spread, set up a toppings bar with different sauces (ranch, spicy mayo, honey mustard, BBQ sauce), various pickles (dill, bread and butter, spicy), cheese slices, lettuce, tomatoes, and bacon so everyone can customize their perfect sandwich.
FAQs Section
Q: Can I make this recipe without buttermilk?
A: While real buttermilk is highly recommended for the best flavor and tenderizing effect, you can make a substitute in a pinch. Mix 1 cup of whole milk with 1 tablespoon of white vinegar or lemon juice and let it sit for 5 minutes before using. The acidity helps tenderize the chicken, though it won’t be quite as tangy as real buttermilk. For the egg wash, you can just use milk.
Q: How do I know when the chicken is done?
A: The most reliable method is using an instant-read thermometer – the internal temperature should reach 165°F. Visually, the coating should be deep golden brown, the chicken should float in the oil, and when you cut into it (after cooking, not during), the juices should run clear with no pink meat. Cooking time is typically 6-8 minutes for ¾-inch thick pieces.
Q: Why is my coating falling off during frying?
A: This usually happens for a few reasons: the chicken was too wet when you coated it (let excess marinade drip off), you didn’t press the coating firmly enough, you skipped the 10-minute rest after coating, or your oil temperature was too low. Make sure to do the double-dredge (flour-egg-flour) and let the coated chicken sit before frying. The oil should be at 350°F when you add the chicken.
Q: Can I use chicken thighs instead of breasts?
A: Absolutely! Chicken thighs are actually more forgiving because they have more fat and stay juicier. You can use boneless, skinless thighs and follow the same marinade and coating process. The cooking time might be slightly longer (8-10 minutes) depending on thickness, so always check the internal temperature to be sure they reach 165°F.
Q: Can I bake these instead of frying?
A: Yes, though they won’t be quite as crispy. After coating the chicken, place it on a wire rack set over a baking sheet. Spray generously with cooking spray and bake at 425°F for 25-30 minutes, flipping halfway through and spraying again. The coating will be crispy but different from the deep-fried crunch. An air fryer also works great at 400°F for 15-18 minutes, flipping halfway.
Q: How long can I marinate the chicken?
A: Minimum 4 hours, but overnight (8-24 hours) is ideal for maximum tenderness and flavor. Don’t go beyond 24 hours, as the acid in the buttermilk can start to make the chicken texture mushy. Sweet spot: 12-18 hours.
Q: What’s the best oil for frying?
A: Peanut oil is top choice for flavor and high smoke point. Vegetable oil and canola oil are excellent alternatives and more neutral in flavor. Avoid olive oil (too low smoke point), coconut oil (strong flavor), and butter (will burn). You need an oil that can handle 350-375°F without smoking.
Q: My chicken is brown on the outside but raw inside. What happened?
A: Your oil was too hot! When oil exceeds 375°F, the coating browns too quickly before the chicken cooks through. Use a thermometer and keep oil between 325-350°F. Also, if your chicken is too thick (over 1 inch), it won’t cook through in time. Always pound to an even ¾-inch thickness.
Conclusion
There you have it – everything you need to make the most incredible, crispy, juicy buttermilk fried chicken sandwiches right in your own kitchen! While the marinating time requires a bit of planning, the actual cooking process is totally doable and so worth it. That first bite into golden, crunchy coating giving way to impossibly tender, flavorful chicken is pure magic.
The beauty of this recipe is that once you master the basic technique, you can customize it endlessly. Make it spicy, add your favorite sauces, try different toppings – there’s no wrong way to enjoy a perfectly fried chicken sandwich. And honestly, once your family and friends taste these, you’ll be getting requests to make them again and again.
So grab that buttermilk, get those chicken breasts marinating, and get ready to create something absolutely delicious. Your kitchen is about to smell amazing, and your taste buds are in for a serious treat. Don’t forget to snap a photo of your beautiful sandwich creation and share it with your friends!
Ready to make the best fried chicken sandwich of your life? Pin this recipe, gather your ingredients, and let’s get cooking! Have you made fried chicken sandwiches before? Drop a comment below and let me know your favorite toppings – I’d love to hear from you! Happy frying! 🍗✨