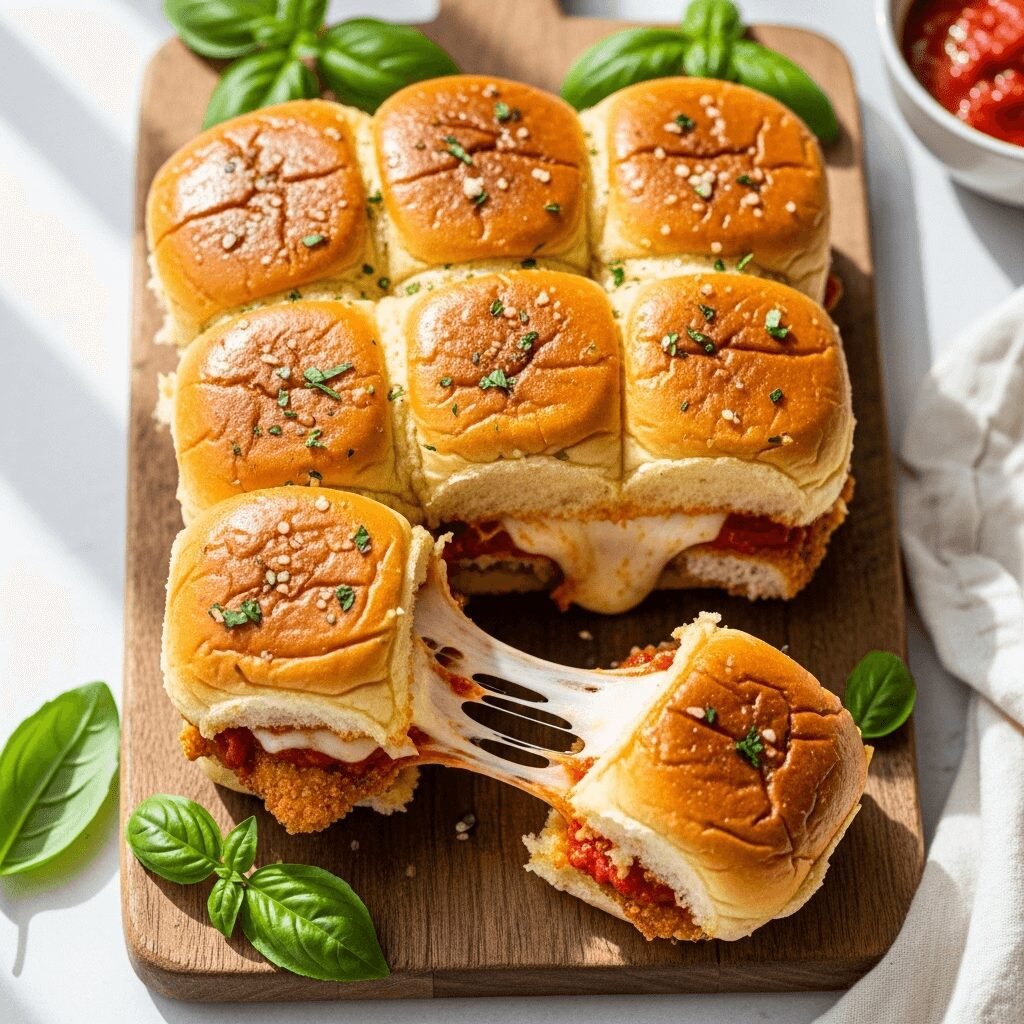

There’s something absolutely magical about biting into a warm, crispy chicken slider topped with melted mozzarella, tangy marinara sauce, and fresh basil. These Crispy Chicken Parmesan Sliders are the perfect fusion of comfort food and convenient finger food, making them ideal for game day parties, casual family dinners, or even a fun weeknight meal that everyone will devour.
What makes these sliders truly special is how they take the beloved Italian-American classic—Chicken Parmesan—and transform it into a hand-held, crowd-pleasing appetizer that’s easier to make than the traditional version. You get all the crispy, cheesy, saucy goodness of chicken parm without the need for individual plating or fussy preparation. Whether you’re hosting a Super Bowl party, planning a casual get-together with friends, or simply looking for a dinner that’ll make your family smile, these sliders deliver on every level.
The best part? These sliders are incredibly versatile. You can make them ahead of time, customize them to your family’s taste preferences, and even turn them into a meal prep staple. They’re budget-friendly, kid-approved, and absolutely delicious served fresh from the oven when the cheese is still bubbling and golden brown.
History / Background
Chicken Parmesan, or “Chicken Parmigiana” as it’s known in Italian-American cuisine, has a rich history that dates back to the early 20th century when Italian immigrants brought their culinary traditions to America. Interestingly, while many assume this dish originated in Italy, it’s actually an Italian-American creation inspired by Melanzane alla Parmigiana (Eggplant Parmesan), a traditional Southern Italian dish from regions like Sicily and Campania.
When Italian immigrants settled in the United States, particularly in the Northeast, they adapted their traditional recipes to incorporate ingredients that were more readily available and affordable in America—namely, chicken. Breaded, fried cutlets topped with tomato sauce and cheese became a staple in Italian-American restaurants and home kitchens throughout the 1950s and 1960s.
The slider concept itself is distinctly American, with roots tracing back to White Castle’s small hamburgers in the 1920s. The term “slider” was popularized to describe these small, easy-to-eat sandwiches that could “slide” down easily—perfect for serving at parties or enjoying as a quick bite.
Our Crispy Chicken Parmesan Sliders recipe beautifully marries these two American food traditions: the hearty, comforting Italian-American chicken parm with the convenient, shareable format of sliders. This modern interpretation has become increasingly popular on Pinterest and food blogs over the past decade, as home cooks look for ways to serve restaurant-quality appetizers that work for both casual weeknight dinners and entertaining guests.
Why You’ll Love This Recipe
These Crispy Chicken Parmesan Sliders are about to become your new favorite recipe, and here’s why: they’re incredibly easy to make, absolutely delicious, and perfect for feeding a crowd without spending hours in the kitchen. The combination of crispy breaded chicken, gooey melted cheese, and tangy marinara sauce nestled in soft slider buns creates an irresistible flavor and texture experience that appeals to both kids and adults alike.
Here’s what makes this recipe a winner:
- Family-Friendly Appeal – Even the pickiest eaters love these sliders because they’re familiar, comforting, and fun to eat
- Budget-Conscious – Uses affordable ingredients like chicken tenders, store-bought marinara, and slider buns to feed a crowd without breaking the bank
- Time-Saving – Ready in under 45 minutes from start to finish, making it perfect for busy weeknights
- Crowd-Pleaser – Ideal for parties, game days, potlucks, or any gathering where you need shareable finger food
- Customizable – Easy to adapt with different cheeses, sauce variations, or spice levels to suit your preferences
- Make-Ahead Friendly – Can be assembled in advance and baked just before serving
- Kid-Approved – The slider format makes it less intimidating for children, and they love the handheld convenience
- Restaurant-Quality at Home – Delivers that crispy, cheesy satisfaction of restaurant chicken parm without the hefty price tag
Ingredient Notes
Understanding your ingredients is key to creating the perfect Crispy Chicken Parmesan Sliders. Let’s break down what makes this recipe work and how you can substitute ingredients based on what’s available in your kitchen.
Chicken Tenders or Chicken Breasts – Chicken tenders are ideal because they’re already the perfect size for sliders and cook evenly. If using chicken breasts, you’ll want to slice them horizontally into thinner cutlets or pound them to an even thickness. For a shortcut, frozen breaded chicken tenders work beautifully, though you’ll sacrifice some of that homemade crispy texture.
Slider Buns – Hawaiian sweet rolls are the gold standard for sliders because their slight sweetness perfectly complements the savory chicken and tangy sauce. However, regular dinner rolls, potato rolls, or even brioche slider buns work wonderfully. Avoid buns that are too crusty, as they can be difficult to bite through.
Marinara Sauce – A good-quality jarred marinara sauce saves time without sacrificing flavor. Look for brands with simple ingredients and no added sugar if possible. You can also use homemade marinara, pizza sauce, or even a spicy arrabbiata sauce for variation.
Mozzarella Cheese – Fresh mozzarella gives you that beautiful cheese pull, but pre-shredded mozzarella is more convenient and melts just as well. For extra flavor, consider mixing in some shredded provolone or adding a sprinkle of Parmesan on top.
Panko Breadcrumbs – These Japanese-style breadcrumbs create an incredibly crispy coating. Regular Italian breadcrumbs work too, but panko delivers that restaurant-quality crunch. For a gluten-free version, use gluten-free panko or crushed cornflakes.
Italian Seasoning – This herb blend typically contains oregano, basil, thyme, and rosemary. If you don’t have it, make your own by combining these dried herbs, or simply use dried oregano and basil.
Fresh Basil – While optional, fresh basil adds a bright, authentic Italian touch that elevates the entire dish. Dried basil can substitute in a pinch, but fresh is always better for garnishing.
Garlic Butter – The secret weapon for flavor! Brushing the tops of the buns with garlic butter before baking creates a golden, flavorful crust. Simply mix melted butter with minced garlic or garlic powder.
Equipment Needed
Having the right tools makes this recipe come together smoothly and ensures perfect results every time. Here’s what you’ll need:
- 9×13-inch Baking Dish – For assembling and baking the sliders together
- Large Skillet or Frying Pan – For pan-frying the breaded chicken to crispy perfection
- Shallow Bowls or Plates – For your breading station (flour, egg wash, breadcrumbs)
- Meat Thermometer – To ensure chicken reaches a safe internal temperature of 165°F
- Sharp Serrated Knife – For slicing the slider buns while keeping them connected
- Pastry Brush – For applying the garlic butter to the buns
- Measuring Cups and Spoons – For accurate measurements
- Tongs – For safely flipping chicken while frying
- Paper Towels – For draining excess oil from fried chicken
- Aluminum Foil – For covering the sliders while baking to prevent over-browning
- Cutting Board – For slicing chicken and preparing ingredients
- Small Mixing Bowl – For preparing the garlic butter mixture

Crispy Chicken Parmesan Sliders Recipe
- Total Time: 45 minutes
- Yield: 12 sliders 1x
- Diet: Vegetarian
Description
These Crispy Chicken Parmesan Sliders combine golden, breaded chicken tenders with melted mozzarella cheese and tangy marinara sauce, all nestled in soft Hawaiian rolls and brushed with garlic butter. Perfect for game day, parties, or an easy weeknight dinner that the whole family will love!
Ingredients
For the Chicken:
- 1 pound chicken tenders (about 8-10 pieces)
- ½ cup all-purpose flour
- 2 large eggs, beaten
- 1½ cups panko breadcrumbs
- ½ cup grated Parmesan cheese
- 1 tablespoon Italian seasoning
- 1 teaspoon garlic powder
- ½ teaspoon salt
- ¼ teaspoon black pepper
- Vegetable oil for frying (about ½ cup)
For Assembly:
- 12 Hawaiian sweet slider rolls (one package)
- 1½ cups marinara sauce
- 2 cups shredded mozzarella cheese
- ¼ cup grated Parmesan cheese
- Fresh basil leaves for garnish (optional)
For the Garlic Butter Topping:
- 4 tablespoons butter, melted
- 2 cloves garlic, minced (or 1 teaspoon garlic powder)
- 1 teaspoon Italian seasoning
- 2 tablespoons grated Parmesan cheese
Instructions
Step 1: Prepare Your Breading Station
Set up three shallow bowls or plates. In the first, add the flour. In the second, beat the eggs until well combined. In the third, mix together the panko breadcrumbs, ½ cup grated Parmesan, Italian seasoning, garlic powder, salt, and pepper.
Step 2: Bread the Chicken
Pat the chicken tenders dry with paper towels. Working with one piece at a time, coat each chicken tender in flour, shaking off excess. Dip into the beaten eggs, allowing excess to drip off. Finally, press into the breadcrumb mixture, coating completely on all sides. Place breaded chicken on a clean plate.
Step 3: Fry the Chicken
Heat about ¼ inch of vegetable oil in a large skillet over medium-high heat. Once the oil is hot (test with a small pinch of breadcrumbs—it should sizzle immediately), carefully add the chicken tenders. Don’t overcrowd the pan; work in batches if necessary. Fry for 3-4 minutes per side until golden brown and crispy. The internal temperature should reach 165°F. Transfer to a paper towel-lined plate to drain excess oil.
Step 4: Prepare the Buns
Preheat your oven to 350°F. Without separating the rolls, slice the entire block of slider buns in half horizontally, creating a top and bottom layer. Place the bottom half in a greased 9×13-inch baking dish.
Step 5: Assemble the Sliders
Spread about ½ cup of marinara sauce over the bottom layer of buns. Place the crispy chicken tenders on top, arranging them to cover the buns (you may need to cut some pieces to fit). Spoon the remaining marinara sauce over the chicken. Sprinkle the shredded mozzarella cheese evenly over everything, followed by the ¼ cup grated Parmesan. Place the top half of the buns over the cheese.
Step 6: Make the Garlic Butter
In a small bowl, combine the melted butter, minced garlic, Italian seasoning, and 2 tablespoons Parmesan cheese. Brush this mixture generously over the tops of the slider buns.
Step 7: Bake
Cover the baking dish with aluminum foil and bake for 15 minutes. Remove the foil and continue baking for an additional 5-7 minutes, or until the cheese is melted and bubbly and the tops of the buns are golden brown.
Step 8: Serve
Remove from the oven and let cool for 2-3 minutes. Garnish with fresh basil leaves if desired. Use a sharp knife to cut through the sliders along the original roll separations. Serve immediately while hot and gooey!
Notes
- For extra crispy chicken, you can double-bread by dipping again in egg and breadcrumbs after the first coating.
- If the buns are browning too quickly, tent with foil during the final minutes of baking.
- These sliders are best served immediately but can be kept warm in a low oven (200°F) for up to 30 minutes.
- Leftover sliders can be reheated in the oven at 350°F for 10 minutes for best results.
- For a spicier version, add red pepper flakes to the marinara sauce or use a spicy arrabbiata sauce.
- Prep Time: 20 minutes
- Cook Time: 25 minutes
- Category: Appetizer, Dinner
- Method: Frying, Baking
- Cuisine: Italian-American
Nutrition
- Serving Size: 1 slider Servings Per Recipe: 12
- Calories: 285
- Sugar: 6g
- Sodium: 520mg
- Fat: 12g
- Saturated Fat: 5g
- Unsaturated Fat: 6g
- Trans Fat: 0g
- Carbohydrates: 28g
- Fiber: 2g
- Protein: 18g
- Cholesterol: 75mg
Nutrition information is approximate and may vary based on specific ingredients used.
Tips & Variations
Spicy Kick: Add ½ teaspoon cayenne pepper to your breadcrumb mixture, or use a spicy marinara sauce. Top with sliced jalapeños before adding the cheese for an extra punch.
Healthier Option: Bake the breaded chicken tenders instead of frying. Place them on a wire rack over a baking sheet and spray with cooking oil. Bake at 425°F for 15-18 minutes, flipping halfway through. While not quite as crispy as fried, they’re still delicious and lower in fat.
Vegetarian Version: Substitute the chicken with breaded eggplant slices or use store-bought meatless chicken tenders. Follow the same assembly process.
Different Cheeses: Mix things up with provolone, fontina, or even a sharp white cheddar. A combination of mozzarella and provolone gives an authentic Italian deli flavor.
Sauce Variations: Try pesto instead of marinara for a Chicken Pesto Parmesan Slider, or use vodka sauce for a creamier, more indulgent version.
Loaded Sliders: Add pepperoni slices, sautéed mushrooms, or roasted red peppers along with the chicken for a more complex flavor profile.
Buffalo Chicken Parmesan: Toss the fried chicken in buffalo sauce before assembling, and add a drizzle of ranch dressing for a tangy twist.
Pro Chef Tips
Temperature Control is Key: When frying, maintain your oil temperature between 350-375°F. If it’s too hot, the breadcrumbs will burn before the chicken cooks through. Too cool, and your chicken will absorb excess oil and become soggy.
The Secret to Extra Crispy Coating: Let your breaded chicken rest on a wire rack for 10 minutes before frying. This allows the coating to set and adhere better, resulting in a crispier crust that won’t fall off during cooking.
Don’t Skip the Garlic Butter: That final brushing of garlic butter isn’t just for flavor—it creates a barrier that prevents the tops of the buns from getting soggy from the steam while adding incredible flavor and that golden-brown finish.
Cheese Distribution Matters: Make sure to spread your cheese all the way to the edges of the sliders. Cheese acts as a “glue” and helps hold everything together when you cut and serve.
Let It Rest: After baking, let the sliders sit for 2-3 minutes before cutting. This allows the cheese to set slightly, making them much easier to cut cleanly and less messy to eat.
Layer Smart: When adding the marinara sauce, don’t oversaturate. Too much sauce will make the bottom buns soggy. About 1½ cups total is the sweet spot for flavor without sogginess.
Common Mistakes to Avoid
Overcrowding the Pan While Frying: This drops the oil temperature significantly, resulting in greasy, soggy chicken instead of crispy golden pieces. Always fry in batches with space between each tender, even if it takes longer.
Separating the Slider Buns: Keep them connected as one piece! This is what makes sliders so easy to prepare and serve. Trying to assemble individual sliders is time-consuming and messy.
Using Cold Chicken: If your chicken is cold from the refrigerator, it won’t cook evenly and will lower your oil temperature. Let chicken sit at room temperature for 15 minutes before breading and frying.
Skipping the Foil When Baking: Covering the sliders for the first part of baking ensures the cheese melts completely and the chicken stays moist. Without it, the tops may brown before everything is heated through.
Not Draining Fried Chicken Properly: Always let fried chicken drain on paper towels, not directly on a plate. This removes excess oil and keeps the coating crispy instead of greasy.
Storage & Meal Prep
Refrigerator Storage: Store leftover sliders in an airtight container in the refrigerator for up to 3 days. To prevent sogginess, you can place a paper towel in the container to absorb excess moisture.
Reheating for Best Results: The microwave will make these sliders soggy, so avoid it if possible. Instead, reheat in a 350°F oven for 10-12 minutes until warmed through and the cheese is melty again. For crispier tops, broil for the last 1-2 minutes.
Meal Prep Tips: You can bread the chicken tenders up to 24 hours in advance. Store them on a plate or tray covered with plastic wrap in the refrigerator. This actually helps the coating adhere better! Fry just before assembling your sliders.
Keeping Leftovers Fresh: If you know you’ll have leftovers, consider keeping some components separate. Store extra fried chicken separately from assembled sliders, then reheat and assemble fresh sliders when ready to eat.
Make-Ahead & Freezer Notes
Preparing in Advance: You can fully assemble these sliders (through Step 6, before baking) up to 4 hours ahead of time. Cover tightly with plastic wrap and refrigerate. When ready to serve, remove from the refrigerator, let sit for 10 minutes, then bake as directed, adding 3-5 extra minutes to the covered baking time.
Freezing Assembled Sliders: Fully assembled but unbaked sliders can be frozen for up to 2 months. Wrap the entire baking dish tightly in plastic wrap, then aluminum foil. To bake from frozen, do not thaw. Cover with foil and bake at 350°F for 35-40 minutes, then uncover and bake 5-7 minutes more until golden.
Freezing Fried Chicken: For maximum flexibility, freeze the fried chicken tenders separately. After frying and cooling completely, arrange on a baking sheet and freeze until solid, then transfer to a freezer bag. They’ll keep for up to 3 months and can be reheated in a 375°F oven for 12-15 minutes before assembling sliders.
Best Reheating Method for Frozen Sliders: The oven is your friend here. Bake straight from frozen, covered with foil, at 350°F for about 30-35 minutes. Remove foil and bake an additional 5-10 minutes until the cheese is bubbly and the tops are golden brown.
Serving Suggestions
These Crispy Chicken Parmesan Sliders are substantial enough to serve as a main course, but they also work beautifully as an appetizer or party food. Here are some delicious sides and accompaniments to round out your meal:
Perfect Side Dishes:
- Caesar salad with crispy romaine and garlic croutons
- Garlic parmesan fries or sweet potato fries
- Italian pasta salad with cherry tomatoes and mozzarella
- Roasted vegetables like zucchini, bell peppers, and red onions
- Creamy coleslaw for a cool, crunchy contrast
- Caprese salad with fresh tomatoes, mozzarella, and basil
Great Dipping Sauces:
- Extra marinara sauce on the side for dunking
- Ranch dressing (especially good with the spicy variation)
- Garlic aioli or pesto mayo
- Balsamic glaze drizzled over the top
Beverage Pairings:
- Italian sodas or sparkling lemonade for a refreshing non-alcoholic option
- Iced tea with lemon
- For adults: a light Italian red wine like Chianti or Pinot Grigio
- Beer options: light lagers or wheat beers complement the richness
Complete Party Menu Ideas:
- Game Day Spread: Serve these sliders alongside buffalo wings, loaded nachos, and veggie sticks with ranch
- Italian Night: Pair with antipasto platter, bruschetta, and tiramisu for dessert
- Casual Dinner Party: Serve with Caesar salad, garlic bread, and a simple fruit platter
FAQs Section
Q: Can I use frozen chicken tenders?
A: Absolutely! Frozen breaded chicken tenders work great and save time. Just cook according to package directions, then assemble the sliders. You can even use pre-cooked grilled chicken strips in a pinch, though you’ll miss out on that crispy fried texture.
Q: Why are my slider buns getting soggy?
A: This usually happens from too much sauce or not enough cheese as a barrier. Use a moderate amount of marinara (about 1½ cups total), and make sure to spread cheese all the way to the edges. The garlic butter on top also creates a protective barrier. Baking covered first helps the cheese melt without the tops getting soggy.
Q: Can I make these sliders gluten-free?
A: Yes! Use gluten-free flour, gluten-free panko breadcrumbs (or crushed gluten-free cornflakes), and gluten-free slider buns. Everything else in the recipe is naturally gluten-free. The texture will be very similar to the regular version.
Q: How do I keep the chicken coating from falling off?
A: Make sure your chicken is completely dry before breading, press the breadcrumbs firmly onto the chicken, and let the breaded chicken rest for 10 minutes before frying. Also ensure your oil is hot enough (350-375°F) before adding the chicken—this creates an immediate seal.
Q: Can I make these in an air fryer?
A: You can air fry the breaded chicken at 400°F for 10-12 minutes, flipping halfway through, until golden and cooked through. Then assemble the sliders and bake as directed. The chicken won’t be quite as crispy as pan-fried, but it’s a healthier option that still tastes great.
Q: What if I don’t have Hawaiian rolls?
A: Regular dinner rolls, potato rolls, or brioche slider buns all work wonderfully. Even small sub rolls can work if you adjust the assembly. The slight sweetness of Hawaiian rolls is ideal, but any soft roll will be delicious.
Q: How do I know when the chicken is fully cooked?
A: Use a meat thermometer to check that the internal temperature reaches 165°F. The chicken should be golden brown on the outside and the juices should run clear. If you’re unsure, it’s better to cut one open to check than to serve undercooked chicken.
Conclusion
These Crispy Chicken Parmesan Sliders are everything you want in a crowd-pleasing recipe: they’re easy to make, incredibly delicious, and absolutely perfect for bringing people together around the table. Whether you’re feeding your family on a busy weeknight, hosting friends for game day, or planning your next potluck contribution, these sliders deliver restaurant-quality flavor in a fun, handheld format that everyone will love.
The beauty of this recipe is in its flexibility—you can customize it to your family’s preferences, make it ahead for stress-free entertaining, and even turn it into a healthier version without sacrificing that comforting, cheesy goodness. Plus, with ingredients you probably already have in your kitchen and a preparation time of under an hour, these sliders prove that impressive food doesn’t have to be complicated.
I’d love to hear how your Crispy Chicken Parmesan Sliders turn out! Did you try any of the variations? What did your family think? Drop a comment below and let me know, and don’t forget to rate this recipe if you loved it. And please, please share this recipe on Pinterest—your followers will thank you when they discover their new favorite slider recipe! Happy cooking, friends! 🍗🧀

