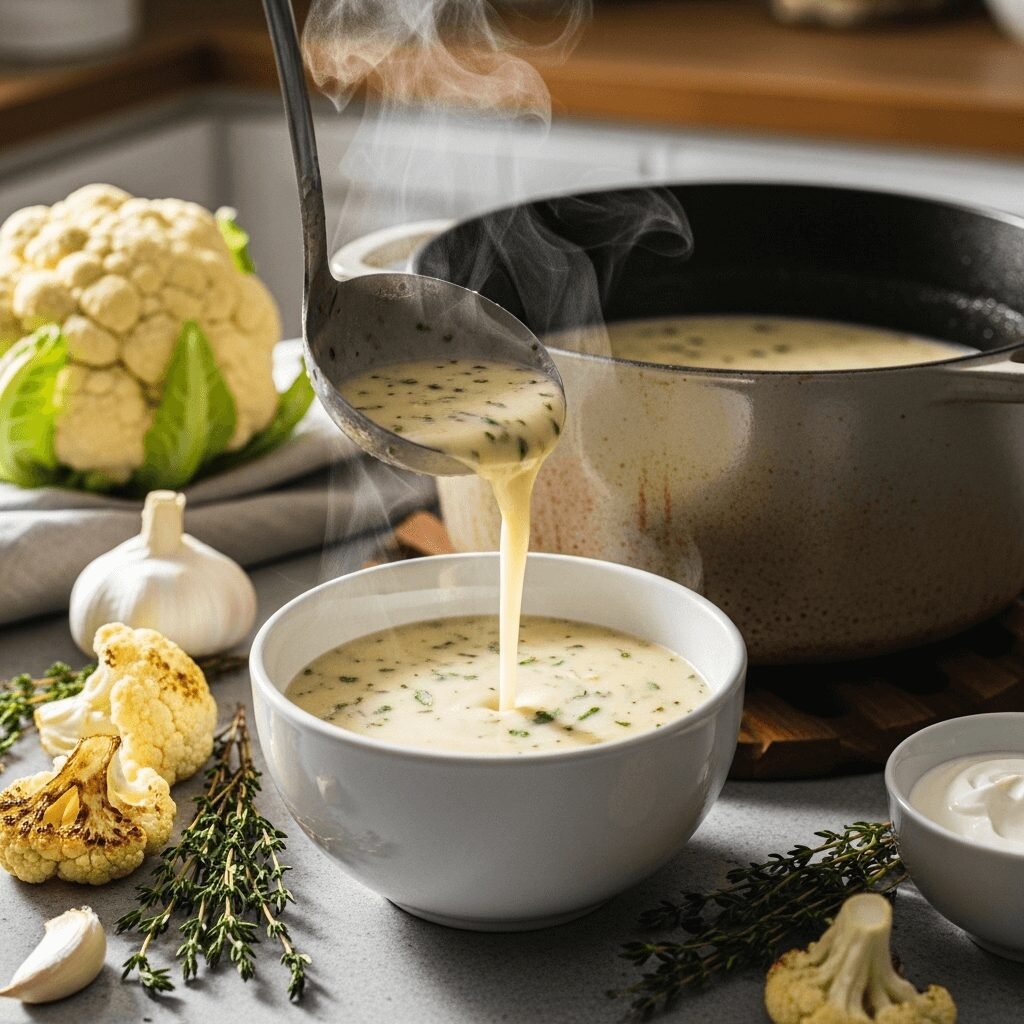

There’s something absolutely magical about a bowl of creamy roasted cauliflower soup on a chilly evening. This isn’t just any ordinary soup – it’s a velvety, luxurious bowl of comfort that transforms humble cauliflower into something extraordinary. The secret? Roasting the cauliflower first to develop deep, caramelized flavors that you simply can’t achieve with boiling alone.
This creamy cauliflower soup recipe is perfect for weeknight dinners, elegant lunch gatherings, or meal prep Sundays. It’s naturally gluten-free, can easily be made vegan, and tastes like it came from a fancy restaurant kitchen. Whether you’re serving it as a starter for Thanksgiving dinner or enjoying it as a cozy lunch with crusty bread, this roasted cauliflower soup will quickly become your go-to comfort food. The best part? It comes together in about 45 minutes with mostly hands-off cooking time, making it ideal for busy home cooks who still want something special on the table.
History / Background
Cauliflower soup has been a staple in European cuisine for centuries, particularly in French and British cooking traditions. The French “potage chou-fleur” was a classic preparation served in households across France, while British cooks often prepared cauliflower cheese soup as a warming winter dish. However, the technique of roasting cauliflower before turning it into soup is a more modern innovation that gained popularity in the early 2000s as chefs began exploring ways to maximize vegetable flavors.
The roasting method draws inspiration from Middle Eastern and Mediterranean cooking techniques, where vegetables are often charred or roasted to bring out their natural sweetness and add complexity. As the farm-to-table movement grew and cauliflower became trendy (remember cauliflower rice and cauliflower pizza crust?), chefs started experimenting with this versatile vegetable in new ways. Roasted cauliflower soup emerged as a restaurant favorite that home cooks quickly adopted.
Today, this creamy roasted cauliflower soup represents the perfect marriage of traditional European soup-making techniques and modern flavor development. It’s become especially popular in health-conscious cooking circles because cauliflower is nutrient-dense, low in calories, and naturally creamy when pureed – meaning you can create an indulgent texture without loads of heavy cream. This recipe honors both the classic soup tradition and contemporary cooking methods that prioritize deep, developed flavors.
Why You’ll Love This Recipe
This roasted cauliflower soup recipe is about to become your new favorite for so many reasons. The roasting process transforms ordinary cauliflower into something with incredible depth – nutty, slightly sweet, and wonderfully caramelized. When you blend it into soup, you get a silky-smooth texture that feels indulgent without being heavy.
Here’s why this recipe is a winner:
- Simple ingredients – You probably have most of what you need in your pantry already
- Naturally healthy – Packed with vitamins, fiber, and antioxidants while being low in calories
- Flexible dietary options – Easily adaptable for vegan, dairy-free, keto, or paleo diets
- Make-ahead friendly – Actually tastes better the next day as flavors meld together
- Budget-friendly – Cauliflower is affordable year-round, making this an economical meal
- Impressive presentation – Looks and tastes restaurant-quality with minimal effort
- Kid-approved – The creamy texture and mild flavor appeal even to picky eaters
- Perfect for meal prep – Freezes beautifully and reheats like a dream
- Versatile serving options – Works as an appetizer, main course, or side dish
- Minimal cleanup – Just one baking sheet and one pot to wash
Ingredient Notes
Let me walk you through what makes this soup so special and why each ingredient matters:
Cauliflower – The star of the show! Choose a firm, white head with tight florets and bright green leaves. Fresh cauliflower is ideal, but frozen florets work in a pinch (just thaw and pat dry first). The roasting brings out natural sugars and creates a nutty, complex flavor.
Olive Oil – Used for roasting the cauliflower. It helps achieve that beautiful golden-brown caramelization. You can substitute with avocado oil or melted coconut oil if preferred.
Garlic – Adds aromatic depth and complexity. Roasting whole cloves alongside the cauliflower mellows the sharpness and creates a sweet, buttery flavor. Don’t skip this!
Onion – Provides a savory foundation. Yellow or white onions work best. For a milder flavor, try shallots.
Vegetable or Chicken Broth – The liquid base that brings everything together. Use low-sodium broth so you can control the salt level. Vegetable broth keeps it vegan.
Heavy Cream or Coconut Milk – Creates that luxurious, silky texture. Heavy cream is traditional, but full-fat coconut milk is an excellent dairy-free alternative that adds subtle sweetness.
Butter – Used to sauté the onions and add richness. Substitute with olive oil or vegan butter for dairy-free diets.
Fresh Thyme – Adds an earthy, slightly floral note that complements cauliflower beautifully. Dried thyme works too (use 1 teaspoon).
Salt and Black Pepper – Essential for bringing out all the flavors. Season generously throughout cooking.
Optional Toppings – Crispy bacon bits, toasted pumpkin seeds, fresh chives, croutons, or a drizzle of truffle oil take this soup from great to extraordinary.
Equipment Needed
You don’t need any fancy gadgets to make this delicious soup. Here’s what you’ll use:
- Large baking sheet – For roasting the cauliflower (line it with parchment paper for easy cleanup)
- Large pot or Dutch oven – For cooking the soup (4-6 quart capacity)
- Immersion blender – The easiest way to puree soup right in the pot (or use a regular blender)
- Sharp knife and cutting board – For chopping cauliflower and vegetables
- Measuring cups and spoons – For accurate measurements
- Wooden spoon or spatula – For stirring and sautéing
- Ladle – For serving
- Fine-mesh strainer (optional) – If you want an ultra-silky texture

Creamy Roasted Cauliflower Soup Recipe
- Total Time: 1 hour 5 minutes
- Yield: 6 servings 1x
- Diet: Vegetarian
Description
This creamy roasted cauliflower soup is velvety smooth, incredibly flavorful, and surprisingly easy to make. Roasting the cauliflower first develops deep, nutty, caramelized flavors that transform this simple vegetable into an elegant, restaurant-quality soup. Perfect for cozy dinners or impressive entertaining!
Ingredients
For the Roasted Cauliflower:
- 1 large head cauliflower (about 2 pounds), cut into florets
- 3 tablespoons olive oil
- 6 cloves garlic, unpeeled
- 1 teaspoon salt
- ½ teaspoon black pepper
For the Soup:
- 2 tablespoons butter (or olive oil for vegan)
- 1 medium yellow onion, diced
- 4 cups vegetable or chicken broth (low-sodium)
- 1 cup heavy cream (or full-fat coconut milk for dairy-free)
- 2 sprigs fresh thyme (or 1 teaspoon dried thyme)
- 1 bay leaf
- Salt and black pepper to taste
- Pinch of nutmeg (optional, but recommended)
For Garnish (optional):
- Crispy bacon bits
- Toasted pumpkin seeds
- Fresh chives or parsley, chopped
- Drizzle of olive oil or truffle oil
- Croutons
Instructions
Step 1: Roast the Cauliflower
Preheat your oven to 425°F (220°C). Line a large baking sheet with parchment paper. Spread the cauliflower florets in a single layer on the prepared baking sheet. Nestle the unpeeled garlic cloves among the florets. Drizzle with olive oil and season with salt and pepper. Toss everything together with your hands to coat evenly. Roast for 35-40 minutes, tossing halfway through, until the cauliflower is deeply golden brown and tender with crispy edges. The caramelization is key to developing flavor, so don’t rush this step!
Step 2: Sauté the Aromatics
While the cauliflower roasts, heat butter in a large pot or Dutch oven over medium heat. Add the diced onion and cook for 6-8 minutes, stirring occasionally, until soft and translucent. Don’t let them brown – you want them sweet and tender.
Step 3: Combine and Simmer
Once the cauliflower is roasted, squeeze the roasted garlic cloves out of their skins (they’ll be soft and caramelized). Add the roasted cauliflower and garlic to the pot with the onions. Pour in the broth, add the thyme sprigs and bay leaf. Bring to a boil, then reduce heat and simmer for 10-15 minutes to let the flavors meld together.
Step 4: Blend Until Silky Smooth
Remove the thyme sprigs and bay leaf. Using an immersion blender, puree the soup directly in the pot until completely smooth and creamy. If using a regular blender, work in batches (never fill more than halfway) and hold the lid down with a kitchen towel to prevent hot soup from exploding. Blend until silky smooth. For an ultra-velvety texture, strain the soup through a fine-mesh strainer back into the pot.
Step 5: Add Cream and Season
Stir in the heavy cream (or coconut milk) and return the soup to low heat. Taste and adjust seasoning with additional salt, pepper, and a pinch of nutmeg if desired. Let it warm through for 2-3 minutes, but don’t let it boil after adding cream.
Step 6: Serve and Garnish
Ladle the soup into bowls and garnish with your favorite toppings. A drizzle of good olive oil, some crispy bacon, toasted seeds, or fresh herbs take this over the top. Serve immediately with crusty bread or your favorite crackers.
Notes
- For extra depth of flavor: Add ½ teaspoon smoked paprika or curry powder to the roasting cauliflower.
- Make it richer: Stir in 2 tablespoons of cream cheese or mascarpone when adding the cream.
- Vegan version: Use olive oil instead of butter and coconut milk instead of cream. Add nutritional yeast for a cheesy flavor without dairy.
- Thinner consistency: Add more broth until you reach desired thickness.
- Thicker consistency: Use less broth or add a peeled, diced potato when simmering (it will thicken when blended).
- Prep Time: 15 minutes
- Cook Time: 50 minutes
- Category: Soup
- Method: Roasting, Stovetop
- Cuisine: American, French-inspired
Nutrition
- Serving Size: 1⅓ cups (about 350g)
- Calories: 245
- Sugar: 6g
- Sodium: 685mg
- Fat: 19g
- Saturated Fat: 8g
- Unsaturated Fat: 10g
- Trans Fat: 0g
- Carbohydrates: 15g
- Fiber: 4g
- Protein: 6g
- Cholesterol: 40mg
Nutrition information is an estimate and will vary based on exact ingredients used and portion sizes.
Tips & Variations
Flavor Variations:
- Curried Cauliflower Soup: Add 1-2 tablespoons curry powder and ½ teaspoon cumin to the roasting cauliflower. Finish with a squeeze of lime juice.
- Cheesy Cauliflower Soup: Stir in 1 cup shredded sharp cheddar cheese after blending for a cauliflower cheese soup.
- Spicy Version: Add red pepper flakes or a diced jalapeño when sautéing the onions.
- Herb-Infused: Try rosemary instead of thyme, or add a handful of fresh sage leaves when simmering.
Dietary Adaptations:
- Keto-Friendly: This recipe is already low-carb! Just ensure your broth doesn’t contain added sugars.
- Whole30 Compliant: Use coconut milk and omit any sweeteners or dairy.
- Lower Calorie: Use milk instead of cream (adds about 1 tablespoon of cornstarch to maintain body).
Texture Modifications:
- Chunky Style: Reserve some roasted cauliflower florets before blending and stir them back in for texture.
- Extra Silky: Pass the blended soup through a fine-mesh strainer for restaurant-quality smoothness.
Pro Chef Tips
Tip #1: Don’t Overcrowd the Pan
When roasting cauliflower, spread the florets in a single layer with space between them. Overcrowding creates steam instead of roasting, and you’ll miss out on that crucial caramelization that makes this soup special. Use two baking sheets if needed.
Tip #2: Season in Layers
Salt the cauliflower before roasting, season the onions while sautéing, and taste again after blending. This layered seasoning approach builds depth and ensures every element is properly flavored.
Tip #3: Control Your Heat When Blending
Let the soup cool for 5 minutes before blending in a traditional blender. Hot liquids expand when blended and can cause dangerous eruptions. Always start on low speed and gradually increase, holding the lid firmly with a towel.
Tip #4: Save Some Roasted Cauliflower
Before blending, reserve a handful of the prettiest roasted florets to use as garnish. They add visual appeal and a lovely textural contrast to the smooth soup.
Tip #5: Use the Right Cream Temperature
Bring cream to room temperature before adding it to hot soup to prevent curdling. If your cream is cold from the fridge, temper it by whisking in a ladle of hot soup first, then add it to the pot.
Tip #6: Finish with Acidity
A squeeze of fresh lemon juice or a splash of white wine vinegar just before serving brightens all the flavors and cuts through the richness. Start with a teaspoon and adjust to taste.
Common Mistakes to Avoid
Mistake #1: Under-roasting the Cauliflower
Pale, barely-browned cauliflower won’t give you the deep, nutty flavor that makes this soup special. Be patient and let those florets get really golden and caramelized. Don’t be afraid of dark brown edges – that’s where the flavor is!
Mistake #2: Adding Cream Too Early
Never add cream before blending or while the soup is at a rolling boil. High heat can cause dairy cream to curdle and separate. Always add it at the end on low heat.
Mistake #3: Not Using Enough Liquid
Cauliflower is very absorbent. If your soup is too thick, it becomes more like mashed cauliflower than soup. Start with the recommended amount of broth and add more as needed to achieve a velvety, pourable consistency.
Mistake #4: Skipping the Roasted Garlic
Those roasted garlic cloves add incredible sweetness and depth. Raw garlic would be too harsh. Take the extra 30 seconds to toss whole cloves in with the cauliflower – you’ll taste the difference.
Mistake #5: Over-Salting Too Early
As the soup reduces and flavors concentrate, saltiness intensifies. Season lightly at first and adjust at the end. Remember, you can always add more salt, but you can’t take it away. If you accidentally over-salt, add a peeled, diced potato and simmer for 10 minutes – it will absorb excess salt.
Storage & Meal Prep
Refrigerator Storage:
Let the soup cool completely, then transfer to airtight containers. Store in the refrigerator for up to 5 days. The flavors actually improve after a day as they have time to meld together.
Reheating Instructions:
Reheat gently on the stovetop over medium-low heat, stirring occasionally. Avoid boiling, especially if your soup contains cream, as high heat can cause it to separate. You may need to add a splash of broth or water to thin it out, as it thickens when cold. Microwave reheating works too – heat in 1-minute intervals, stirring between, until warmed through.
Portion Control:
Divide cooled soup into individual serving containers for easy grab-and-go lunches throughout the week. This is perfect for meal prep Sundays!
Shelf Life:
Fresh soup lasts 5 days refrigerated. If you notice any sour smell or changes in texture, discard it. When in doubt, throw it out.
Make-Ahead & Freezer Notes
Make-Ahead Instructions:
This soup is ideal for advance preparation! You can make it completely up to 3 days ahead. Store it in the refrigerator and reheat when ready to serve. Some cooks even prefer it the next day when the flavors have fully developed.
Partial Make-Ahead:
Roast the cauliflower up to 2 days in advance and store it in an airtight container in the fridge. When ready to make soup, start from the sautéing step and proceed with the recipe. This cuts your active cooking time in half!
Freezer-Friendly:
Yes! This soup freezes beautifully for up to 3 months. Here’s the best method: Let the soup cool completely. Leave out the cream if possible (add it when reheating instead). Transfer to freezer-safe containers or heavy-duty freezer bags, leaving 1 inch of space at the top for expansion. Label with the date and contents. Freeze flat for easy stacking.
Thawing and Reheating from Frozen:
Thaw overnight in the refrigerator for best results. If you’re in a hurry, you can reheat directly from frozen – just transfer to a pot, add a splash of broth, and heat gently over low heat, stirring frequently until thawed and warm. Once heated through, stir in fresh cream if you left it out before freezing. The texture remains beautifully creamy!
Freezing Note:
Cream-based soups can sometimes separate slightly after freezing. Simply whisk vigorously while reheating, or give it a quick buzz with an immersion blender to restore the smooth texture.
Serving Suggestions
This creamy roasted cauliflower soup is versatile and pairs beautifully with so many dishes. Here are my favorite ways to serve it:
Bread Pairings:
Serve with crusty artisan bread, garlic bread, warm sourdough, buttery dinner rolls, or cheesy focaccia for dipping. There’s nothing better than dunking good bread into this silky soup!
As an Elegant Starter:
Serve in small portions as a first course before roasted chicken, grilled steak, pan-seared salmon, or herb-crusted pork tenderloin. Garnish with microgreens and a drizzle of herb oil for an upscale presentation.
Main Course Combinations:
Pair with a fresh arugula salad with lemon vinaigrette, grilled cheese sandwich, chicken Caesar salad wrap, or roasted vegetable platter for a complete lunch or light dinner.
Holiday Table:
This soup makes a stunning addition to Thanksgiving, Christmas, or Easter menus. Serve it as a starter in small cups or elegant bowls to impress your guests.
Side Dishes:
Round out the meal with crispy Brussels sprouts, roasted root vegetables, quinoa pilaf, or a simple mixed green salad.
Beverage Pairings:
This soup pairs wonderfully with a crisp white wine like Chardonnay or Sauvignon Blanc, sparkling water with lemon, hot herbal tea, or even a light beer.
Make It a Meal:
Top the soup with crumbled bacon, toasted bread cubes, and shredded cheese to transform it from a side dish into a satisfying main course.
FAQs Section
Q: Can I use frozen cauliflower instead of fresh?
A: Yes! Frozen cauliflower florets work well in this recipe. Thaw them completely and pat very dry with paper towels before roasting. Frozen cauliflower contains more moisture, so it may take a few extra minutes to achieve good caramelization. Spread them out well on the baking sheet to ensure they roast rather than steam.
Q: My soup is too thin. How can I thicken it?
A: There are several ways to thicken your cauliflower soup. The easiest is to simmer it uncovered for 10-15 minutes to reduce the liquid. You can also blend in a peeled, boiled potato or add a cornstarch slurry (1 tablespoon cornstarch mixed with 2 tablespoons cold water). For a richer option, stir in cream cheese or more heavy cream. Remember that the soup will thicken as it cools, so don’t make it too thick while hot.
Q: Can I make this soup in a slow cooker or Instant Pot?
A: While the roasting step is crucial for flavor, you can adapt this recipe. For a slow cooker: Roast the cauliflower as directed, then transfer to the slow cooker with remaining ingredients (except cream). Cook on low for 3-4 hours, blend, then stir in cream. For Instant Pot: Roast cauliflower first, then use sauté mode for onions, add broth and cauliflower, pressure cook on high for 5 minutes, natural release, blend, then stir in cream.
Q: Why does my soup taste bland?
A: The most common reason is under-seasoning. Taste as you go and don’t be shy with salt – cauliflower needs generous seasoning. Also ensure you roasted the cauliflower long enough to develop caramelization. Other flavor boosters include: roasted garlic, a pinch of nutmeg, a squeeze of lemon juice, white wine added when sautéing onions, or a Parmesan rind simmered in the soup.
Q: Is this soup keto-friendly?
A: Yes! This roasted cauliflower soup is naturally low in carbohydrates and fits perfectly into a keto diet. One serving contains approximately 15g of carbs with 4g of fiber, giving you 11g net carbs. Just make sure your broth doesn’t contain added sugars, and you’re good to go.
Q: Can I make this dairy-free?
A: Absolutely! Use olive oil instead of butter for sautéing the onions, and substitute full-fat coconut milk or cashew cream for the heavy cream. The coconut milk adds a subtle sweetness that complements the roasted cauliflower beautifully. For cashew cream, blend 1 cup raw cashews with ¾ cup water until silky smooth.
Q: How do I prevent my soup from curdling?
A: Curdling happens when dairy is exposed to high heat or acidic ingredients. To prevent this: add cream at the end when the heat is low, bring cream to room temperature first, never let the soup boil after adding cream, and temper the cream by whisking in a little hot soup before adding it all. If your soup does curdle, try blending it again with an immersion blender to smooth it out.
Conclusion
There you have it – a restaurant-worthy creamy roasted cauliflower soup that’s surprisingly simple to make at home! The magic is in the roasting, which transforms ordinary cauliflower into something with incredible depth and complexity. This soup is proof that you don’t need fancy ingredients or complicated techniques to create something truly special in your kitchen.
Whether you’re meal prepping for the week, looking for a cozy weeknight dinner, or planning an elegant starter for your next dinner party, this roasted cauliflower soup delivers every time. It’s nourishing, satisfying, and adaptable to so many dietary preferences – there’s really something for everyone here.
I’d love to hear how your soup turns out! Did you try any of the variations? What toppings did you use? Drop a comment below and let me know. And if you loved this recipe, please consider pinning it to your favorite Pinterest board so you can find it again (and help other home cooks discover it too). Don’t forget to share a photo on social media and tag me – I always love seeing your beautiful creations!
Happy cooking, and here’s to many cozy bowls of delicious soup in your future! 🥣✨

