
There’s something absolutely magical about biting into a perfectly crispy chicken tender that’s been glazed with a luscious honey butter sauce. These honey butter chicken tenders are the ultimate comfort food that brings together everything we love: crunchy coating, juicy chicken, and that irresistible sweet-and-savory glaze that makes your taste buds sing.
This recipe is perfect for busy weeknights when you need dinner on the table fast, game day gatherings where finger foods reign supreme, or even as a special treat for picky eaters who can’t resist the combination of honey and butter. What makes this dish so popular is its universal appeal—kids absolutely adore them, adults can’t stop reaching for just one more, and they’re surprisingly easy to make at home without any deep-frying required.
Whether you’re serving them as a main course with your favorite sides, packing them in lunch boxes, or setting them out as party appetizers, these crispy honey butter chicken tenders deliver restaurant-quality flavor right from your own kitchen. The best part? You probably already have most of the ingredients in your pantry!
History / Background
Chicken tenders, also known as chicken fingers or chicken strips, have become an iconic part of American comfort food culture since they first appeared on restaurant menus in the 1950s and 1960s. The actual “tenderloin” is a specific cut of chicken—the small strip of meat attached to the underside of the chicken breast—though most commercial tenders are made from breast meat cut into strips.
The evolution of chicken tenders mirrors America’s love affair with convenient, kid-friendly foods during the post-war era. As families became busier and fast-food culture exploded, breaded and fried chicken strips became a staple on children’s menus across the country. The Manchester, New Hampshire restaurant “The Puritan Backroom” claims to have invented chicken tenders in 1974, though the concept of breaded chicken strips existed in various forms long before that.
The honey butter twist on classic chicken tenders is a more recent innovation, likely inspired by the Southern tradition of serving fried chicken with honey and the popularity of honey butter as a spread for biscuits and cornbread. This sweet-and-savory combination has roots in soul food cooking, where balancing flavors—sweet with salty, rich with tangy—is an art form passed down through generations.
Today’s honey butter chicken tenders represent the best of American home cooking: taking a beloved classic and elevating it with simple, flavorful ingredients that transform an everyday meal into something special. The trend has been amplified by social media, where food bloggers and home cooks share their versions, making this recipe a Pinterest favorite and a viral sensation on platforms like TikTok and Instagram.
Why You’ll Love This Recipe
These crispy honey butter chicken tenders are about to become your new weeknight hero and party MVP! Imagine perfectly golden chicken with a satisfying crunch, each piece generously coated in a buttery honey glaze that creates the perfect balance of sweet and savory. This isn’t just another chicken tender recipe—it’s the one you’ll make again and again because it checks every single box for what makes a recipe truly great.
- Ready in Under 30 Minutes: From prep to plate, you can have dinner ready faster than ordering takeout
- Budget-Friendly: Uses affordable chicken breast and pantry staples to feed a crowd without breaking the bank
- Kid-Approved Winner: Even the pickiest eaters will devour these sweet and savory tenders
- No Deep Fryer Needed: Achieve that perfect crispy coating using just your oven or stovetop
- Customizable: Easily adjust the sweetness, add heat, or modify the coating to suit your preferences
- Make-Ahead Friendly: Prep the chicken in advance and cook when ready, perfect for meal planning
- Crowd-Pleaser: Works beautifully for family dinners, game day parties, and potlucks
- Restaurant-Quality at Home: Get that crispy, glazed perfection without paying restaurant prices
- Versatile Serving Options: Serve as a main dish, appetizer, or even in wraps and salads
Ingredient Notes
Chicken Breast: The star of the show! You’ll want boneless, skinless chicken breasts cut into strips. Fresh chicken works best, but you can use thawed frozen chicken—just make sure it’s completely dry before breading. For even cooking, try to cut strips that are similar in size (about 1-inch wide and 3-4 inches long). You can also use chicken tenderloins if you prefer, which are already the perfect size and shape.
All-Purpose Flour: Creates the base layer that helps the egg wash stick and provides structure for the crispy coating. For a gluten-free version, substitute with a 1:1 gluten-free flour blend or rice flour.
Eggs: Acts as the binding agent that helps the breadcrumb coating adhere to the chicken. Make sure eggs are at room temperature for better coating consistency. You can substitute with buttermilk for extra tang and tenderness.
Breadcrumbs: Panko breadcrumbs are the secret to achieving that restaurant-quality crunch! They’re lighter and crispier than regular breadcrumbs. Regular breadcrumbs work too, but panko gives you that extra-crispy texture. For a gluten-free option, use gluten-free panko or crushed cornflakes.
Seasonings: Garlic powder, onion powder, paprika, salt, and black pepper create a flavorful coating that’s not bland or one-dimensional. Smoked paprika adds a subtle depth, while a pinch of cayenne can add gentle heat if desired.
Honey: The sweet component of your glaze! Use pure honey for the best flavor—wildflower, clover, or orange blossom varieties all work beautifully. If honey is too thick, gently warm it before mixing with butter. You can substitute with maple syrup or agave nectar, though the flavor will be different.
Butter: Unsalted butter is preferred so you can control the salt level, but salted butter works if that’s what you have (just reduce the added salt). The butter should be melted and warm when mixed with honey for the smoothest glaze. For a dairy-free version, use plant-based butter or ghee.
Oil for Cooking: If pan-frying, use a neutral oil with a high smoke point like vegetable, canola, or avocado oil. Olive oil works for oven-baking but isn’t ideal for high-heat frying.
Equipment Needed
- Three Shallow Bowls or Dishes: For your breading station (flour, egg wash, breadcrumbs)
- Large Skillet or Frying Pan: If pan-frying, use a heavy-bottomed skillet for even heat distribution
- Baking Sheet: If oven-baking, use a rimmed baking sheet lined with parchment paper or a wire rack
- Tongs: For flipping chicken tenders without piercing them
- Meat Thermometer: Ensures chicken reaches the safe internal temperature of 165°F
- Small Saucepan: For melting butter and warming honey for the glaze
- Whisk or Fork: For beating eggs and mixing the honey butter glaze
- Sharp Knife and Cutting Board: For cutting chicken into uniform strips
- Measuring Cups and Spoons: For accurate ingredient measurements
- Paper Towels: For patting chicken dry and draining excess oil
- Wire Cooling Rack (Optional): Keeps fried tenders crispy by allowing air circulation

Honey Butter Chicken Tenders Recipe
- Total Time: 27 minutes
- Yield: 4-6 servings (about 16-18 tenders) 1x
- Diet: Gluten Free
Description
Crispy, golden chicken tenders coated in a sweet and buttery honey glaze that’s absolutely irresistible. Perfect for weeknight dinners, parties, or anytime you’re craving comfort food with a gourmet twist!
Ingredients
For the Chicken Tenders:
- 2 pounds boneless, skinless chicken breasts, cut into 1-inch strips
- 1 cup all-purpose flour
- 2 large eggs
- 2 tablespoons milk
- 2 cups panko breadcrumbs
- 1 teaspoon garlic powder
- 1 teaspoon onion powder
- 1 teaspoon paprika
- 1 teaspoon salt
- ½ teaspoon black pepper
- ¼ teaspoon cayenne pepper (optional)
- Vegetable oil for frying (if pan-frying)
- Cooking spray (if baking)
For the Honey Butter Glaze:
- 6 tablespoons unsalted butter
- ⅓ cup honey
- Pinch of salt
Instructions
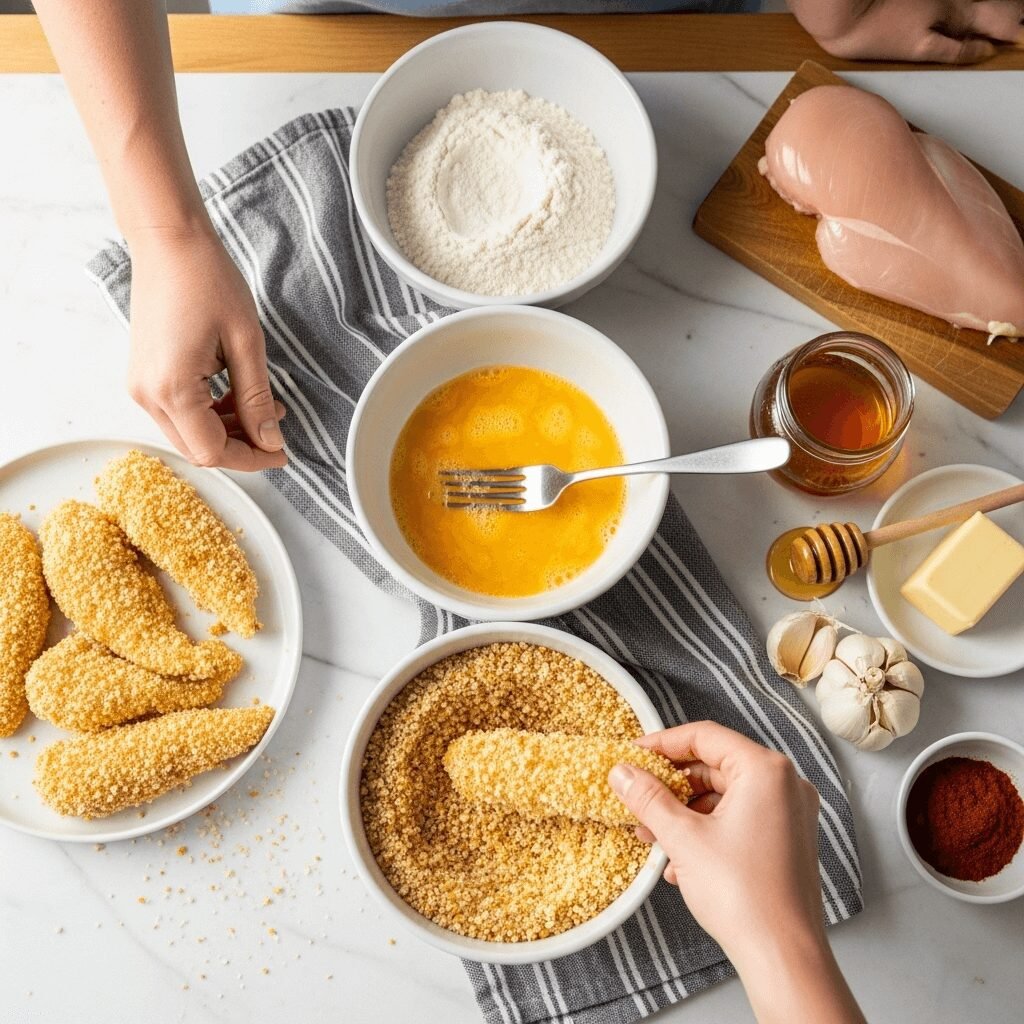
- Prepare the Chicken: Pat chicken strips completely dry with paper towels. This is crucial for getting the breading to stick properly. Season lightly with salt and pepper.
- Set Up Breading Station: Place flour in the first shallow bowl. In the second bowl, whisk together eggs and milk until well combined. In the third bowl, combine panko breadcrumbs, garlic powder, onion powder, paprika, salt, black pepper, and cayenne (if using). Mix the breadcrumb mixture thoroughly.
- Bread the Chicken: Working with one strip at a time, coat the chicken in flour and shake off excess. Dip into the egg mixture, letting excess drip off. Finally, press into the breadcrumb mixture, coating all sides and pressing gently so the crumbs adhere. Place breaded tenders on a clean plate or baking sheet.
- Cook the Tenders (Pan-Frying Method): Heat ½ inch of oil in a large skillet over medium-high heat until it reaches 350°F. Carefully add chicken tenders in batches without overcrowding (work in 2-3 batches). Fry for 3-4 minutes per side until golden brown and crispy. Internal temperature should reach 165°F. Transfer to a wire rack or paper towel-lined plate.
- Cook the Tenders (Oven-Baking Method): Preheat oven to 425°F. Place breaded tenders on a baking sheet lined with parchment paper or a wire rack. Spray generously with cooking spray. Bake for 10-12 minutes, flip, spray again, and bake for another 8-10 minutes until golden brown and cooked through (165°F internal temperature).
- Make the Honey Butter Glaze: While chicken cooks, melt butter in a small saucepan over low heat. Remove from heat and whisk in honey and a pinch of salt until smooth and well combined. Keep warm.
- Glaze the Tenders: Transfer hot, cooked chicken tenders to a large mixing bowl. Pour the warm honey butter glaze over the tenders and toss gently until each piece is thoroughly coated.
- Serve Immediately: Arrange glazed tenders on a serving platter and drizzle any remaining glaze over the top. Serve hot with your favorite dipping sauces and sides.
Notes
- For extra-crispy tenders, let breaded chicken rest for 10 minutes before cooking. This helps the coating set.
- Don’t skip patting the chicken dry—moisture prevents proper breading adhesion.
- Maintain oil temperature at 350°F for pan-frying. Too hot and the outside burns before the inside cooks; too cool and they’ll be greasy.
- The honey butter glaze should be warm when tossing with tenders for even coating.
- For meal prep, bread the chicken and refrigerate up to 24 hours before cooking.
- Reheat leftovers in a 375°F oven for 10 minutes to restore crispiness.
- Prep Time: 15 minutes
- Cook Time: 12 minutes
- Category: Dinner
- Method: Pan-Frying or Baking
- Cuisine: American
Nutrition
- Serving Size: 3-4 tenders
- Calories: 420
- Sugar: 15g
- Sodium: 580mg
- Fat: 18g
- Saturated Fat: 7g
- Unsaturated Fat: 9g
- Trans Fat: 0g
- Carbohydrates: 38g
- Fiber: 1g
- Protein: 32g
- Cholesterol: 145mg
Honey: The sweet component of your glaze! Use pure honey for the best flavor—wildflower, clover, or orange blossom varieties all work beautifully. If honey is too thick, gently warm it before mixing with butter. You can substitute with maple syrup or agave nectar, though the flavor will be different.
Butter: Unsalted butter is preferred so you can control the salt level, but salted butter works if that’s what you have (just reduce the added salt). The butter should be melted and warm when mixed with honey for the smoothest glaze. For a dairy-free version, use plant-based butter or ghee.
Oil for Cooking: If pan-frying, use a neutral oil with a high smoke point like vegetable, canola, or avocado oil. Olive oil works for oven-baking but isn’t ideal for high-heat frying.
Equipment Needed
- Three Shallow Bowls or Dishes: For your breading station (flour, egg wash, breadcrumbs)
- Large Skillet or Frying Pan: If pan-frying, use a heavy-bottomed skillet for even heat distribution
- Baking Sheet: If oven-baking, use a rimmed baking sheet lined with parchment paper or a wire rack
- Tongs: For flipping chicken tenders without piercing them
- Meat Thermometer: Ensures chicken reaches the safe internal temperature of 165°F
- Small Saucepan: For melting butter and warming honey for the glaze
- Whisk or Fork: For beating eggs and mixing the honey butter glaze
- Sharp Knife and Cutting Board: For cutting chicken into uniform strips
- Measuring Cups and Spoons: For accurate ingredient measurements
- Paper Towels: For patting chicken dry and draining excess oil
- Wire Cooling Rack (Optional): Keeps fried tenders crispy by allowing air circulation
📋 Recipe Card
Prep Time: 15 minutes
Cook Time: 12 minutes
Total Time: 27 minutes
Yield: 4-6 servings (about 16-18 tenders)
Category: Dinner
Method: Pan-Frying or Baking
Cuisine: American
Diet: Can be made Gluten-Free
Description: Crispy, golden chicken tenders coated in a sweet and buttery honey glaze that’s absolutely irresistible. Perfect for weeknight dinners, parties, or anytime you’re craving comfort food with a gourmet twist!
Ingredients
For the Chicken Tenders:
- 2 pounds boneless, skinless chicken breasts, cut into 1-inch strips
- 1 cup all-purpose flour
- 2 large eggs
- 2 tablespoons milk
- 2 cups panko breadcrumbs
- 1 teaspoon garlic powder
- 1 teaspoon onion powder
- 1 teaspoon paprika
- 1 teaspoon salt
- ½ teaspoon black pepper
- ¼ teaspoon cayenne pepper (optional)
- Vegetable oil for frying (if pan-frying)
- Cooking spray (if baking)
For the Honey Butter Glaze:
- 6 tablespoons unsalted butter
- ⅓ cup honey
- Pinch of salt
Instructions
- Prepare the Chicken: Pat chicken strips completely dry with paper towels. This is crucial for getting the breading to stick properly. Season lightly with salt and pepper.
- Set Up Breading Station: Place flour in the first shallow bowl. In the second bowl, whisk together eggs and milk until well combined. In the third bowl, combine panko breadcrumbs, garlic powder, onion powder, paprika, salt, black pepper, and cayenne (if using). Mix the breadcrumb mixture thoroughly.
- Bread the Chicken: Working with one strip at a time, coat the chicken in flour and shake off excess. Dip into the egg mixture, letting excess drip off. Finally, press into the breadcrumb mixture, coating all sides and pressing gently so the crumbs adhere. Place breaded tenders on a clean plate or baking sheet.
- Cook the Tenders (Pan-Frying Method): Heat ½ inch of oil in a large skillet over medium-high heat until it reaches 350°F. Carefully add chicken tenders in batches without overcrowding (work in 2-3 batches). Fry for 3-4 minutes per side until golden brown and crispy. Internal temperature should reach 165°F. Transfer to a wire rack or paper towel-lined plate.
- Cook the Tenders (Oven-Baking Method): Preheat oven to 425°F. Place breaded tenders on a baking sheet lined with parchment paper or a wire rack. Spray generously with cooking spray. Bake for 10-12 minutes, flip, spray again, and bake for another 8-10 minutes until golden brown and cooked through (165°F internal temperature).
- Make the Honey Butter Glaze: While chicken cooks, melt butter in a small saucepan over low heat. Remove from heat and whisk in honey and a pinch of salt until smooth and well combined. Keep warm.
- Glaze the Tenders: Transfer hot, cooked chicken tenders to a large mixing bowl. Pour the warm honey butter glaze over the tenders and toss gently until each piece is thoroughly coated.
- Serve Immediately: Arrange glazed tenders on a serving platter and drizzle any remaining glaze over the top. Serve hot with your favorite dipping sauces and sides.
Notes
- For extra-crispy tenders, let breaded chicken rest for 10 minutes before cooking. This helps the coating set.
- Don’t skip patting the chicken dry—moisture prevents proper breading adhesion.
- Maintain oil temperature at 350°F for pan-frying. Too hot and the outside burns before the inside cooks; too cool and they’ll be greasy.
- The honey butter glaze should be warm when tossing with tenders for even coating.
- For meal prep, bread the chicken and refrigerate up to 24 hours before cooking.
- Reheat leftovers in a 375°F oven for 10 minutes to restore crispiness.
Nutrition Facts
Serving Size: 3-4 tenders
Calories: 420
Sugar: 15g
Sodium: 580mg
Fat: 18g
Saturated Fat: 7g
Unsaturated Fat: 9g
Trans Fat: 0g
Carbohydrates: 38g
Fiber: 1g
Protein: 32g
Cholesterol: 145mg
Tips & Variations
Spicy Honey Butter Tenders: Add 1-2 teaspoons of hot sauce or sriracha to the honey butter glaze, or increase cayenne pepper in the breadcrumb mixture to ½ teaspoon for a spicy kick that balances beautifully with the sweet honey.
Asian-Inspired Version: Mix 1 tablespoon soy sauce and 1 teaspoon sesame oil into the honey butter glaze. Sprinkle with sesame seeds and chopped green onions before serving. Serve with sweet chili sauce for dipping.
Herb-Crusted Tenders: Add 1 teaspoon dried Italian herbs (basil, oregano, thyme) to the breadcrumb mixture for an herbaceous twist. Fresh herbs like rosemary or thyme work beautifully in the honey butter glaze too.
Lighter Baked Version: Use olive oil spray and bake on a wire rack for maximum crispiness with less oil. You can also use an air fryer at 400°F for 10-12 minutes, flipping halfway through.
Maple Butter Glaze: Substitute honey with pure maple syrup for a different flavor profile that’s equally delicious. Add a pinch of cinnamon for a warm, cozy taste.
Extra-Crispy Coating: Mix ½ cup crushed cornflakes with the panko breadcrumbs for an even crunchier texture that stays crispy longer.
Coconut Honey Chicken: Replace ½ cup of panko with sweetened shredded coconut for tropical flair. The coconut pairs beautifully with the honey butter glaze.
Buttermilk Marinated: For extra tender chicken, soak strips in buttermilk for 2-4 hours before breading. This Southern technique makes the chicken incredibly juicy.
Pro Chef Tips
Butterfly Your Chicken for Even Cooking: If your chicken breasts are thick, butterfly them first before cutting into strips. This ensures all pieces are uniform in thickness, which means they’ll cook at the same rate and you won’t end up with some pieces overcooked while others are undercooked.
Double-Dip for Restaurant Thickness: For an extra-thick, crunchy coating like you’d get at your favorite restaurant, go through the breading process twice. After the first complete coating, dip back into the egg wash and breadcrumbs one more time. This creates an incredibly crispy exterior.
Rest Your Breaded Chicken: After breading, let the tenders rest on a wire rack for 10-15 minutes before cooking. This allows the coating to set and adhere better, resulting in less coating falling off during cooking and a crisper final product.
Control Your Oil Temperature: Invest in a kitchen thermometer and maintain your oil at 350°F. This is the sweet spot for crispy, non-greasy fried chicken. If the oil is too hot, the outside burns before the inside cooks. Too cool, and the chicken absorbs excess oil and becomes soggy.
Toast Your Breadcrumbs: For next-level crispiness, toast your panko breadcrumbs in a dry skillet for 3-4 minutes before using them in your breading station. This pre-toasting removes moisture and creates an even crunchier coating.
Glaze While Hot: Always toss your chicken tenders in the honey butter glaze while they’re still piping hot. The heat helps the glaze become fluid and coat every nook and cranny. If you wait until they cool, the glaze won’t distribute as evenly.
Add a Secret Ingredient: Mix 1 tablespoon of cornstarch into your flour mixture. This creates an ultra-crispy coating that stays crunchy even after glazing. Professional chefs use this trick to achieve that shatteringly crisp texture.
Don’t Crowd the Pan: Whether frying or baking, give each tender space to breathe. Overcrowding causes steam to build up, which makes the coating soggy instead of crispy. Work in batches if necessary—patience pays off with perfectly crispy tenders.
Common Mistakes to Avoid
Skipping the Dry-Off Step: One of the biggest mistakes is not patting the chicken completely dry before breading. Even a little moisture will create a barrier that prevents the flour from sticking properly, causing your beautiful coating to fall off during cooking. Use paper towels and really get that chicken dry!
Using Cold Chicken: Cooking chicken straight from the refrigerator leads to uneven cooking—the outside might look done while the inside is still raw. Let your chicken sit at room temperature for 15-20 minutes before breading and cooking. This ensures even cooking throughout and helps you avoid dry, overcooked exteriors or undercooked centers.
Making the Glaze Too Early: If you make your honey butter glaze too far in advance, it will solidify as it cools, making it impossible to coat your tenders evenly. Prepare the glaze while your chicken is cooking, or gently rewarm it before tossing with the hot tenders.
Flipping Too Often: When pan-frying, resist the urge to constantly flip and move your chicken around. Let each side cook undisturbed for 3-4 minutes to develop that golden crust. Constant flipping prevents proper browning and can cause the coating to fall off.
Adding Too Much Glaze: While it’s tempting to drench your tenders in that delicious honey butter, too much glaze will make the crispy coating soggy. Use just enough to coat each piece with a glossy sheen—about 2-3 tablespoons per pound of chicken. You can always serve extra glaze on the side for dipping!
Storage & Meal Prep
Refrigerator Storage: Store leftover honey butter chicken tenders in an airtight container in the refrigerator for up to 3-4 days. To maintain the best texture, place a paper towel in the container to absorb any excess moisture. Keep the tenders in a single layer if possible, or separate layers with parchment paper.
Reheating for Crispiness: The key to bringing back that crispy texture is using your oven, not the microwave. Preheat your oven to 375°F, place tenders on a wire rack set over a baking sheet, and heat for 10-12 minutes until warmed through and crispy again. You can also use an air fryer at 350°F for 5-7 minutes for quick reheating with great results.
Meal Prep Success: These chicken tenders are fantastic for meal prep! Cook a double batch on Sunday and portion them into individual containers with your favorite sides. They make perfect grab-and-go lunches throughout the week. Just reheat in the oven or air fryer before eating.
Storing Glaze Separately: If meal prepping, store the honey butter glaze separately in a small container and add it fresh when reheating. This prevents the coating from getting soggy during storage and keeps the tenders crispy.
Packed Lunch Tips: For school or work lunches, pack the tenders separately from wet items like dipping sauces or vegetables. Include the honey butter glaze in a small container on the side. The tenders are also delicious served cold or at room temperature, making them perfect for lunchboxes.
Make-Ahead & Freezer Notes
Breading in Advance: You can bread the chicken tenders up to 24 hours in advance. Place breaded tenders on a parchment-lined baking sheet in a single layer, cover tightly with plastic wrap, and refrigerate. When ready to cook, let them sit at room temperature for 10 minutes before frying or baking. This is a huge time-saver for busy weeknights or when hosting!
Freezing Breaded Uncooked Tenders: For ultimate convenience, freeze breaded uncooked tenders for up to 3 months. Arrange them in a single layer on a baking sheet and freeze until solid (about 2 hours), then transfer to freezer bags. This prevents them from sticking together. Cook from frozen by adding 5-7 minutes to the cooking time.
Freezing Cooked Tenders: Fully cooked tenders freeze beautifully for up to 2-3 months. Let them cool completely, then arrange in a single layer on a baking sheet and freeze until solid. Transfer to freezer-safe bags or containers, separating layers with parchment paper. Don’t glaze tenders before freezing—add the honey butter after reheating for the best texture.
Best Thawing Method: For frozen breaded uncooked tenders, you can cook directly from frozen (just add extra cooking time), or thaw overnight in the refrigerator. For cooked frozen tenders, thaw in the refrigerator overnight for even reheating.
Reheating Frozen Cooked Tenders: Preheat oven to 375°F and place frozen cooked tenders on a wire rack. Bake for 20-25 minutes until heated through and crispy. Make the honey butter glaze fresh and toss the hot tenders in it just before serving.
Freezing the Glaze: You can also freeze the honey butter glaze in ice cube trays for individual portions. Pop out a cube and melt it when you’re ready to serve. This is perfect for when you’re reheating just a few tenders at a time.
Serving Suggestions
Classic Comfort Sides: Pair your honey butter chicken tenders with creamy mashed potatoes, buttery corn on the cob, or homemade mac and cheese for the ultimate comfort food dinner. Add some honey butter dinner rolls on the side to soak up that delicious glaze!
Fresh and Light Options: Balance the richness of these tenders with a crisp garden salad, coleslaw, or cucumber tomato salad. A tangy vinaigrette cuts through the sweetness beautifully. Roasted or grilled vegetables like asparagus, green beans, or Brussels sprouts add color and nutrition to your plate.
Southern-Style Spread: Go full Southern comfort by serving with biscuits, collard greens, sweet potato fries, and a side of honey butter for dipping those biscuits. Don’t forget the sweet tea!
Game Day Platter: Turn these into the star of your appetizer spread. Arrange tenders on a platter with various dipping sauces: ranch dressing, blue cheese dip, honey mustard, BBQ sauce, or sriracha mayo. Add celery and carrot sticks, potato wedges, and mozzarella sticks for the ultimate game day spread.
Kid-Friendly Dinner: Serve with their favorite sides like french fries, tater tots, apple slices, and baby carrots with ranch. This combination is guaranteed to make little ones happy! You can even cut the tenders into nugget-size pieces for younger kids.
Salad Topper: Slice these tenders and place them on top of a hearty salad with mixed greens, cherry tomatoes, avocado, shredded cheese, and bacon bits. The honey butter glaze serves as part of your dressing!
Sandwich or Wrap: Use these tenders to make incredible sandwiches or wraps. Place on toasted brioche buns with lettuce, tomato, and pickles, or wrap them in a flour tortilla with ranch, lettuce, and cheese for a delicious lunch option.
Beverage Pairings: Serve with ice-cold lemonade, sweet tea, or your favorite soda for a casual dinner. For adults, a crisp white wine like Riesling or Sauvignon Blanc, or a light beer pairs wonderfully with the sweet and savory flavors.
FAQs Section
Can I use chicken thighs instead of chicken breasts? Absolutely! Chicken thighs are actually more flavorful and stay juicier than breasts. Cut boneless, skinless thighs into strips just like you would chicken breasts. Keep in mind that dark meat takes slightly longer to cook, so add 2-3 extra minutes to your cooking time and always check that the internal temperature reaches 165°F.
How do I keep the breading from falling off? The key is making sure your chicken is completely dry before breading and following the proper breading sequence without skipping steps. Pat the chicken dry with paper towels, then coat thoroughly in flour (shake off excess), dip in egg wash (let excess drip off), and press firmly into breadcrumbs. Let the breaded chicken rest for 10-15 minutes before cooking—this allows the coating to set and creates a better bond.
Can I make these in an air fryer? Yes! Air fryers work wonderfully for this recipe. Preheat your air fryer to 400°F, spray the basket with cooking spray, and arrange tenders in a single layer without touching. Spray the tops with cooking spray and air fry for 10-12 minutes, flipping halfway through. You may need to work in batches depending on your air fryer size. The result is crispy tenders with even less oil!
What if I don’t have panko breadcrumbs? Regular breadcrumbs work fine, though panko creates a crispier texture. You can also use crushed cornflakes, crushed crackers (Ritz or saltines), or even crushed potato chips for a unique twist. Gluten-free options include gluten-free panko, almond flour mixed with grated parmesan, or crushed gluten-free cornflakes.
Why is my coating soggy after adding the glaze? This usually happens when the glaze is too cool or you’re using too much of it. Make sure your honey butter glaze is warm and fluid when tossing with the hot tenders. Use just enough to coat them lightly—about 2-3 tablespoons per pound of chicken. Toss quickly and serve immediately for the crispiest results. If you’re making these ahead, store the glaze separately and add it just before serving.
How do I know when the chicken is fully cooked? The safest way is to use an instant-read meat thermometer. Insert it into the thickest part of a tender—it should read 165°F. Visually, the chicken should be golden brown on the outside with no pink remaining inside, and the juices should run clear when pierced. If you’re unsure, cut into the thickest tender to check—it’s better to be safe!
Can I make these dairy-free? Yes! Simply substitute the butter in the glaze with your favorite plant-based butter or coconut oil. The flavor will be slightly different, but still delicious. Make sure to use a plant-based butter that melts well and has good flavor. For the egg wash, you can use a dairy-free milk alternative, though regular eggs aren’t dairy, so the egg wash is already dairy-free.
Conclusion
There you have it—the ultimate honey butter chicken tenders that are crispy, juicy, and coated in that irresistible sweet glaze we all crave! This recipe proves that you don’t need a restaurant kitchen or fancy equipment to create something absolutely delicious. With just a handful of simple ingredients and easy techniques, you can bring restaurant-quality chicken tenders right to your dinner table any night of the week.
Whether you’re feeding hungry kids after soccer practice, hosting friends for game day, or just treating yourself to some serious comfort food, these honey butter chicken tenders deliver every single time. The best part? They’re endlessly customizable, so you can make them your own with different spices, glazes, or cooking methods.
I’d love to hear how your tenders turn out! Drop a comment below with your favorite way to serve them, any creative variations you tried, or just to let me know you made them. And please, if you loved this recipe as much as my family does, share it on Pinterest so other home cooks can discover it too. Don’t forget to save this recipe to your boards for easy access whenever that chicken tender craving hits!
Happy cooking, friends! Here’s to crispy, golden, honey-glazed perfection!

