
If you’re looking for a quick weeknight dinner that tastes like it came straight from a fancy seafood restaurant, this Garlic Parmesan Crusted Tilapia is about to become your new go-to recipe! This dish features tender, flaky tilapia fillets topped with a buttery, golden-brown crust made from garlic, Parmesan cheese, and herbs. The best part? It’s ready in just 20 minutes from start to finish, making it perfect for busy families who don’t want to sacrifice flavor for convenience.
This garlic parmesan tilapia recipe is incredibly versatile – serve it for a casual Tuesday dinner with roasted vegetables, dress it up for date night with a side of creamy risotto, or even make it part of your meal prep rotation. The crispy, cheesy topping creates an irresistible texture contrast with the mild, tender fish underneath, and the aromatic garlic adds that restaurant-quality touch that’ll have everyone asking for seconds. Whether you’re a seafood lover or someone who’s just dipping their toes into cooking fish at home, this foolproof recipe will have you feeling like a professional chef in your own kitchen.
History / Background
Tilapia has a fascinating history that stretches back thousands of years. This freshwater fish was one of the first species to be farmed, with ancient Egyptians cultivating tilapia in the Nile River as far back as 2500 BCE. In fact, tilapia appears in Egyptian hieroglyphics and is sometimes referred to as “St. Peter’s fish” in biblical references, though this name is also associated with other species from the Sea of Galilee.
The modern popularity of tilapia in American cuisine is a relatively recent phenomenon. In the 1990s and early 2000s, tilapia farming expanded dramatically, making this mild, affordable fish widely available in U.S. grocery stores. Its gentle flavor profile and firm texture made it particularly appealing to American home cooks who might have been intimidated by stronger-tasting fish or worried about bones and preparation challenges.
The garlic parmesan crust technique itself is a beautiful example of American home cooking innovation. While Parmesan cheese hails from Italy and garlic has been used in Mediterranean cooking for centuries, the combination of creating a crispy, cheesy crust on mild fish is very much an American steakhouse and casual dining innovation. Restaurants like Red Lobster and local seafood establishments popularized this preparation method in the 1980s and 90s, and home cooks quickly adapted these restaurant techniques for their own kitchens.
This particular preparation method gained massive traction on Pinterest and food blogs in the 2010s, as home cooks discovered they could recreate that restaurant-quality crispy, golden crust without deep frying or complicated techniques. The garlic parmesan crusted fish became a symbol of accessible elegance – a dish that looks and tastes impressive but doesn’t require culinary school training or hours in the kitchen.
Why You’ll Love This Recipe
This Garlic Parmesan Crusted Tilapia is everything you want in a weeknight dinner – it’s impressive enough for company but simple enough for a Tuesday night. The crispy, golden crust provides incredible texture and flavor without any of the mess or calories that come with deep frying. Plus, the mild flavor of tilapia means even picky eaters (including kids who usually turn their noses up at fish) will often give this one a try.
Here’s why this recipe is a total winner:
- Lightning fast – From fridge to table in just 20 minutes, making it perfect for busy weeknights when you need dinner done quickly
- Budget-friendly – Tilapia is one of the most affordable fish options, and the other ingredients are simple pantry staples
- Minimal cleanup – Just one baking dish and a small bowl for mixing, meaning you won’t spend your evening scrubbing pots and pans
- Foolproof for beginners – If you can mix ingredients in a bowl and spread them on fish, you can make this recipe successfully
- Naturally low-carb and keto-friendly – Perfect for those watching their carb intake without sacrificing flavor
- Kid-approved – The mild fish and cheesy topping make this a hit even with little ones who claim they don’t like seafood
- Looks restaurant-fancy – That golden-brown crust makes for gorgeous presentation when you’re trying to impress guests or your family
- Customizable – Easy to adjust the seasonings, add heat, or modify based on dietary needs and taste preferences
Ingredient Notes
Let’s talk about what makes this garlic parmesan crusted tilapia so incredibly delicious. Each ingredient plays an important role in creating that perfect crispy, flavorful crust.
Tilapia fillets – The star of the show! Look for fresh or properly thawed frozen fillets that are about 4-6 ounces each. Fresh tilapia should smell clean and ocean-like, never fishy or ammonia-scented. If you can’t find tilapia, cod, haddock, mahi-mahi, or flounder work beautifully with this preparation method.
Parmesan cheese – Use freshly grated Parmesan for the best flavor and texture. The pre-grated stuff in the green can works in a pinch, but fresh Parmigiano-Reggiano or a good quality domestic Parmesan will give you a much better crust and richer flavor. Pecorino Romano can be substituted if you prefer a sharper, saltier taste.
Butter – Creates that rich, golden crust and helps all the seasonings stick to the fish. I prefer unsalted butter so you can control the salt level, but salted butter works fine – just reduce the added salt accordingly. For a dairy-free version, use olive oil or melted ghee.
Fresh garlic – Absolutely essential for that aromatic punch! Fresh minced garlic is far superior to jarred or powdered garlic in this recipe. Plan on 3-4 large cloves for maximum flavor impact.
Mayonnaise – This might seem like an odd addition, but mayo is the secret weapon that helps the crust adhere to the fish and stay moist during baking. It also adds subtle tang and richness. Greek yogurt or sour cream can substitute if needed.
Panko breadcrumbs – These Japanese-style breadcrumbs create a lighter, crispier crust than regular breadcrumbs. If you need a gluten-free version, use gluten-free panko or crushed pork rinds for a keto-friendly option. You can also make your own by pulsing day-old bread in a food processor.
Paprika – Adds beautiful color and a subtle sweet pepper flavor without heat. Smoked paprika gives an extra layer of complexity if you have it on hand.
Italian seasoning – A blend of dried herbs (typically basil, oregano, thyme, and rosemary) that adds wonderful depth. Feel free to use individual dried herbs if you prefer.
Lemon – Fresh lemon juice brightens all the flavors and cuts through the richness. The zest can be added to the crust mixture for even more citrusy zing.
Equipment Needed
You won’t need any fancy kitchen gadgets for this recipe – just basic tools you probably already have:
- Baking sheet or casserole dish (9×13 inch works perfectly) – A rimmed baking sheet lined with parchment paper or a glass/ceramic baking dish
- Small mixing bowl – For combining the crust ingredients
- Measuring cups and spoons – For accurate ingredient proportions
- Garlic press or sharp knife – For mincing the garlic finely
- Box grater or microplane – If grating your own Parmesan cheese
- Spoon or small spatula – For spreading the crust mixture on the fish
- Paper towels – For patting the fish dry before adding the topping
- Instant-read thermometer (optional but helpful) – To ensure your fish is perfectly cooked to 145°F
- Oven mitts – Because safety first!

Garlic Parmesan Crusted Tilapia Recipe
- Total Time: 20-22 minutes
- Yield: 4 servings 1x
- Diet: Gluten Free
Description
This Garlic Parmesan Crusted Tilapia features tender, flaky fish topped with a crispy, golden-brown crust made from butter, Parmesan cheese, garlic, and herbs. Ready in just 20 minutes, it’s an easy weeknight dinner that tastes like restaurant-quality seafood!
Ingredients
For the fish:
- 4 tilapia fillets (4-6 oz each, about 1.5 lbs total)
- 1/2 teaspoon salt
- 1/4 teaspoon black pepper
- Cooking spray or olive oil for greasing the pan
For the Garlic Parmesan Crust:
- 1/2 cup freshly grated Parmesan cheese
- 1/4 cup panko breadcrumbs
- 3 tablespoons butter, melted
- 2 tablespoons mayonnaise
- 4 cloves garlic, minced (about 1 tablespoon)
- 1 teaspoon Italian seasoning
- 1/2 teaspoon paprika
- 1/4 teaspoon salt
- 1/4 teaspoon black pepper
- 2 tablespoons fresh lemon juice
- Fresh parsley, chopped (for garnish)
- Lemon wedges (for serving)
Instructions
- Preheat and prepare: Preheat your oven to 400°F (200°C). Line a baking sheet with parchment paper or lightly grease a 9×13-inch baking dish with cooking spray or olive oil.
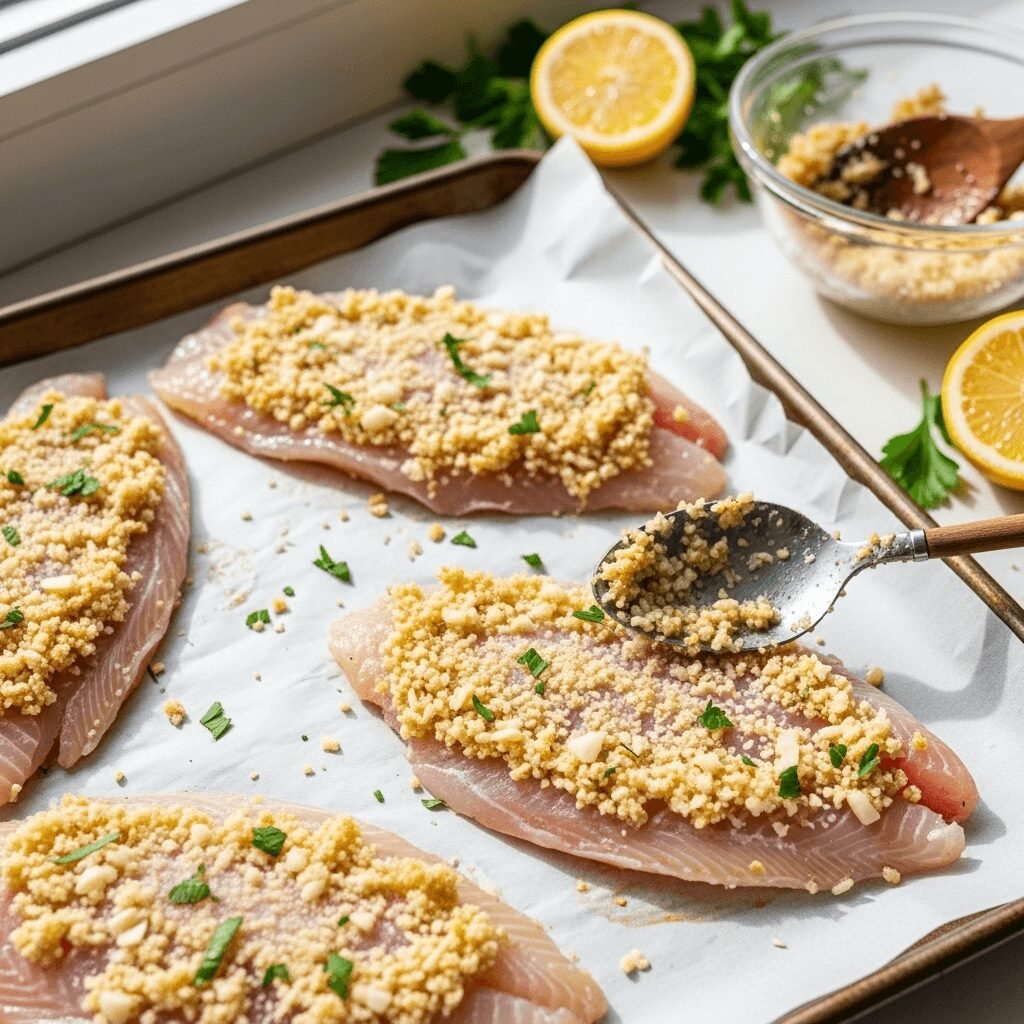
- Prepare the fish: Pat the tilapia fillets completely dry with paper towels – this is crucial for getting a crispy crust! Arrange the fillets on the prepared baking sheet, leaving a little space between each one. Season both sides lightly with salt and pepper, then drizzle with fresh lemon juice.
- Make the crust mixture: In a small mixing bowl, combine the grated Parmesan cheese, panko breadcrumbs, melted butter, mayonnaise, minced garlic, Italian seasoning, paprika, salt, and pepper. Stir everything together until you have a thick, paste-like mixture that holds together when pressed.
- Apply the crust: Divide the Parmesan mixture evenly among the four fillets. Using the back of a spoon or a small spatula, spread the mixture over the top of each fillet, creating an even layer that covers the entire surface. Press down gently so it adheres well to the fish.
- Bake to perfection: Place the baking sheet in the preheated oven and bake for 10-12 minutes, or until the fish flakes easily with a fork and the crust is golden brown and crispy. The internal temperature should reach 145°F when measured with an instant-read thermometer at the thickest part of the fillet.
- Optional broil step: For an extra-crispy, golden crust, turn on the broiler for the last 1-2 minutes of cooking. Watch carefully to prevent burning – the crust can go from golden to burnt very quickly under the broiler!
- Serve immediately: Remove from the oven and let rest for 2-3 minutes. Garnish with freshly chopped parsley and serve with lemon wedges on the side for squeezing over the top. Enjoy your restaurant-quality tilapia!
Notes
- Don’t skip drying the fish! Excess moisture prevents the crust from adhering properly and getting crispy.
- Fillet thickness matters: If your fillets are particularly thick (over 1 inch), you may need to add 2-3 minutes to the cooking time.
- Watch the broiler: If using the broiler to finish, don’t walk away! The crust can burn in seconds.
- Make it gluten-free: Simply substitute regular panko with gluten-free panko breadcrumbs or crushed gluten-free crackers.
- Fresh vs. frozen fish: Both work great! Just make sure frozen fillets are completely thawed and thoroughly dried before adding the topping.
- Leftover crust mixture: If you have extra topping, save it in an airtight container in the fridge for up to 3 days. It’s delicious on chicken, pork chops, or other fish!
- Prep Time: 10 minutes
- Cook Time: 10-12 minutes
- Category: Dinner
- Method: Baking
- Cuisine: American
Nutrition
- Serving Size: Don't skip drying the fish! Excess moisture prevents the crust from adhering properly and getting crispy. Fillet thickness matters: If your fillets are particularly thick (over 1 inch), you may need to add 2-3 minutes to the cooking time. Watch the broiler: If using the broiler to finish, don't walk away! The crust can burn in seconds. Make it gluten-free: Simply substitute regular panko with gluten-free panko breadcrumbs or crushed gluten-free crackers. Fresh vs. frozen fish: Both work great! Just make sure frozen fillets are completely thawed and thoroughly dried before adding the topping. Leftover crust mixture: If you have extra topping, save it in an airtight container in the fridge for up to 3 days. It's delicious on chicken, pork chops, or other fish!
- Calories: 285 kcal
- Sugar: 1g
- Sodium: 625mg
- Fat: 14g
- Saturated Fat: 7g
- Unsaturated Fat: 6g
- Trans Fat: 0g
- Carbohydrates: 8g
- Fiber: 1g
- Protein: 32g
- Cholesterol: 95mg
Nutritional information is approximate and will vary based on exact ingredients used and portion sizes.
Tips & Variations
One of the best things about this garlic parmesan tilapia recipe is how easily you can customize it to suit your taste preferences or what you have on hand in your kitchen!
Spicy Kick: Add 1/4 to 1/2 teaspoon of red pepper flakes to the crust mixture, or sprinkle some cayenne pepper for heat. You could also mix in some hot sauce with the mayonnaise for a more even heat distribution throughout the crust.
Extra Cheesy: Mix in some shredded mozzarella or white cheddar cheese along with the Parmesan for an even more decadent, gooey topping. Use about 1/4 cup of the additional cheese.
Lemon Herb Variation: Add 1 tablespoon of fresh lemon zest to the crust mixture and substitute fresh herbs like dill, thyme, or basil for the Italian seasoning. This creates a brighter, more Mediterranean flavor profile.
Lighter Version: Replace the mayonnaise with plain Greek yogurt or reduced-fat sour cream. You can also use less butter (2 tablespoons instead of 3) and increase the breadcrumbs slightly to compensate for the texture.
Cajun Style: Swap out the Italian seasoning and paprika for 1-2 teaspoons of Cajun or Creole seasoning. This gives the dish a New Orleans-inspired flair with more complex spices.
Asian-Inspired Twist: Replace the Italian seasoning with sesame seeds, add a teaspoon of soy sauce to the mixture, and use panko exclusively for the crust. Garnish with sliced green onions instead of parsley.
Different Fish Options: This crust works beautifully on cod, haddock, mahi-mahi, snapper, halibut, or even salmon. Just adjust cooking times based on the thickness of your fillets.
Crispy Skin Option: If you find tilapia with the skin on, you can place it skin-side down and the crust will get extra crispy from the rendered fat.
Pro Chef Tips
Want to take your garlic parmesan crusted tilapia from good to absolutely spectacular? Here are some professional techniques that’ll elevate your dish:
Room temperature matters: Take your fish out of the refrigerator 15-20 minutes before cooking. Cold fish straight from the fridge can cook unevenly, with the outside overdone before the inside is properly cooked through.
The mayo trick: Spreading a very thin layer of mayonnaise directly on the fish before adding the crust mixture creates an extra barrier that helps keep the fish incredibly moist while ensuring the topping sticks perfectly.
Toast your panko first: For an even crunchier crust, toast your panko breadcrumbs in a dry skillet over medium heat for 2-3 minutes until lightly golden before mixing them with the other crust ingredients. This extra step creates maximum crispiness.
Don’t overcrowd the pan: Leave at least an inch between fillets on your baking sheet. Crowding traps steam, which can make your crust soggy instead of crispy. If needed, use two baking sheets.
The finger test: To check if your fish is done without cutting into it, press gently on the thickest part with your finger. If it feels firm and springs back slightly, it’s cooked perfectly. If it still feels soft and mushy, give it another minute or two.
Compound butter upgrade: Make a garlic herb butter separately and place a small pat on top of each fillet right when it comes out of the oven. It’ll melt beautifully and add an extra layer of richness and flavor.
Score thick fillets: If you have particularly thick pieces of tilapia (over 1 inch), make a few shallow diagonal cuts in the top before adding the crust. This helps heat penetrate more evenly and prevents the crust from burning before the inside is cooked.
The resting rule: Let your fish rest for 2-3 minutes after removing from the oven. This allows the juices to redistribute throughout the fillet, keeping it moist and flavorful when you cut into it.
Common Mistakes to Avoid
Even though this recipe is beginner-friendly, there are a few pitfalls that can prevent you from achieving that perfect, crispy-crusted tilapia. Here’s what to watch out for:
Mistake #1: Using wet fish – This is the number one reason for soggy, sad crusts! Always pat your tilapia completely dry with paper towels before seasoning and adding the topping. Any surface moisture will steam during cooking and prevent proper browning.
Mistake #2: Overcooking the fish – Tilapia is a delicate fish that can go from perfectly flaky to dry and rubbery in just a minute or two. Start checking for doneness at the 10-minute mark, and remember that fish continues cooking slightly after you remove it from the oven due to residual heat.
Mistake #3: Using cold butter – The butter needs to be melted and warm when you mix it with the other ingredients. Cold or solidified butter won’t combine properly with the cheese and breadcrumbs, resulting in a clumpy, uneven topping that doesn’t spread well.
Mistake #4: Skipping the parchment paper or greasing – Without a non-stick surface, your beautiful fish will stick to the pan, and that gorgeous crust will tear when you try to serve it. Always line your baking sheet or grease your dish well!
Mistake #5: Making the crust mixture too far in advance – The breadcrumbs will absorb moisture from the other ingredients if the mixture sits for too long, making it pasty instead of crumbly. Mix your topping right before you’re ready to put it on the fish for the best texture.
Mistake #6: Using too high of a temperature – While you might think higher heat equals crispier crust, temperatures above 400°F often burn the top before the fish cooks through. Stick with 400°F for the perfect balance, and use the broiler only if needed at the very end.
Storage & Meal Prep
If you’re lucky enough to have leftovers (though they tend to disappear quickly in my house!), here’s how to store and reheat your garlic parmesan tilapia:
Refrigerator Storage: Let the cooked fish cool to room temperature, then transfer to an airtight container. Properly stored, it will keep in the refrigerator for up to 3 days. For best results, place a paper towel in the container to absorb any excess moisture that could make the crust soggy.
Reheating Methods: The trick to reheating is maintaining that crispy crust! The oven or toaster oven works best – preheat to 350°F, place the fish on a baking sheet, and heat for 8-10 minutes until warmed through. You can also use an air fryer at 350°F for 5-6 minutes for incredibly crispy results. Avoid the microwave if possible, as it will make the crust soft and rubbery.
Meal Prep Tips: This recipe works wonderfully for meal prep! You can prepare the crust mixture in advance and store it separately in the fridge for up to 3 days. When you’re ready to cook, simply top your fresh fish fillets and bake. Alternatively, you can fully prepare the fish with the topping applied (but unbaked), cover tightly with plastic wrap, and refrigerate for up to 24 hours before baking.
Portioning for Individuals: If you’re meal prepping for individual servings throughout the week, store each fillet in its own container with your choice of vegetables or sides. This makes grabbing a healthy lunch or quick dinner incredibly easy.
Make-Ahead & Freezer Notes
Planning ahead? Here’s everything you need to know about preparing this dish in advance:
Make-Ahead Instructions: You can prepare the entire dish up to the point of baking, then cover tightly with plastic wrap or aluminum foil and refrigerate for up to 24 hours. When you’re ready to cook, remove from the refrigerator, let sit at room temperature for 10 minutes, then bake as directed. You may need to add 2-3 extra minutes to the cooking time since the fish will be cold.
Freezing Uncooked Fish: For the best texture, freeze the fish with the crust already applied. Place the topped fillets on a parchment-lined baking sheet and freeze until solid (about 2 hours), then transfer to a freezer-safe container or bag, separating layers with parchment paper. This prevents the crust from getting smashed. Properly stored, they’ll keep for up to 2 months.
Cooking from Frozen: You can bake directly from frozen! Just add 5-7 minutes to the cooking time and check frequently. The crust may brown before the fish is cooked through, so you might need to tent loosely with foil partway through cooking.
Freezing Cooked Fish: While possible, I don’t recommend freezing cooked tilapia with this crust – the texture becomes mushy when thawed and reheated. If you must freeze leftovers, they’ll keep for up to 1 month, but expect the crust to lose most of its crispiness.
Best Reheating Method from Frozen: If you’ve frozen cooked fish, your best bet is reheating it straight from frozen in a 375°F oven for 15-20 minutes. This helps drive off excess moisture and recrisp the coating as much as possible.
Serving Suggestions
This garlic parmesan crusted tilapia is delicious on its own, but serving it with complementary sides turns it into a complete, restaurant-worthy meal! Here are my favorite accompaniments:
Classic Side Dishes:
- Roasted vegetables – Try asparagus, Brussels sprouts, broccoli, or green beans tossed with olive oil, salt, and pepper
- Garlic mashed potatoes – Creamy, buttery mashed potatoes are perfect for soaking up any pan juices
- Rice pilaf – A light, fluffy rice pilaf with herbs complements the fish without overwhelming it
- Steamed quinoa or couscous – Both are healthy, quick-cooking grain options that round out the meal
Fresh & Light Options:
- Caesar salad – The garlicky dressing echoes the flavors in the fish crust beautifully
- Mixed green salad – Keep it simple with spring greens, cherry tomatoes, cucumber, and a lemon vinaigrette
- Caprese salad – Fresh mozzarella, tomatoes, and basil with balsamic glaze add Italian flair
- Cucumber tomato salad – A refreshing, crunchy contrast to the rich fish
Starchy Sides:
- Lemon herb orzo – This tiny pasta is elegant and soaks up flavors wonderfully
- Creamy polenta – Smooth, buttery polenta is a luxurious base for the fish
- Roasted baby potatoes – Crispy on the outside, fluffy inside, seasoned with herbs and garlic
- Garlic bread – Because you can never have too much garlic! Perfect for mopping up any butter from the fish
Vegetable Sides:
- Sautéed spinach with garlic – Quick, easy, and the garlic ties everything together
- Grilled zucchini and summer squash – Light and healthy with beautiful grill marks
- Roasted cherry tomatoes – They burst in your mouth with sweet, tangy flavor
- Steamed broccoli with lemon – Classic and nutritious
Wine Pairings: A crisp white wine pairs beautifully with this dish. Try a Pinot Grigio, Sauvignon Blanc, or unoaked Chardonnay. The acidity cuts through the butter and cheese while complementing the delicate fish.
Sauce Options: While the crust provides plenty of flavor, some people love an extra sauce on the side. Try tartar sauce, lemon butter sauce, dill cream sauce, or even a simple squeeze of fresh lemon juice.
FAQs Section
Q: Can I use frozen tilapia for this recipe? A: Absolutely! Frozen tilapia works perfectly for this dish. Just make sure to thaw it completely in the refrigerator (usually takes 8-12 hours or overnight), then pat it extremely dry with paper towels before applying the crust. Excess moisture is the enemy of a crispy topping, so don’t rush the thawing and drying process!
Q: What can I substitute for tilapia if I can’t find it? A: So many options! Cod, haddock, flounder, sole, mahi-mahi, and snapper all work wonderfully with this garlic parmesan crust. Even salmon or trout can be prepared this way, though they have a stronger flavor than tilapia. Choose any firm white fish fillet that’s similar in thickness for best results. Just keep in mind that thicker fish may need a couple extra minutes of cooking time.
Q: My crust didn’t get crispy – what went wrong? A: The most common culprits are: 1) The fish wasn’t dried properly before adding the topping, 2) The oven temperature wasn’t hot enough, 3) The fillets were crowded too close together, trapping steam, or 4) The crust mixture was too wet (too much butter or mayo). Make sure you’re using the measurements exactly as written and that your oven has fully preheated. If needed, finish under the broiler for 1-2 minutes for extra crispiness!
Q: Is this recipe keto-friendly or low-carb? A: Yes! Each serving has only 8g of carbohydrates, making it great for low-carb diets. For strict keto, you can make it even lower by substituting the panko breadcrumbs with crushed pork rinds or almond flour. The pork rind version is especially delicious and gives you that same crispy texture with almost zero carbs!
Q: Can I make this recipe dairy-free? A: You can, with a few modifications! Replace the Parmesan cheese with nutritional yeast (which has a similar cheesy, nutty flavor), use olive oil or melted dairy-free butter instead of regular butter, and substitute the mayonnaise with vegan mayo. The texture will be slightly different, but it’ll still be delicious!
Q: How do I know when the fish is done cooking? A: Perfectly cooked tilapia should be opaque throughout and flake easily when gently pressed with a fork. The internal temperature should reach 145°F when measured at the thickest part with an instant-read thermometer. Visually, the fish should no longer be translucent or glossy-looking in the center. When you gently press on it with your finger, it should feel firm but still slightly springy, not mushy.
Q: Can I grill this tilapia instead of baking it? A: While the crust is designed for oven-baking, you can adapt it for the grill! Use a grill basket or place a piece of aluminum foil on the grates, grease it well, and arrange your topped fillets on it. Grill over medium-high indirect heat with the lid closed for 8-10 minutes. The crust won’t get quite as crispy, but it’ll still be delicious with a subtle smoky flavor!
Conclusion
There you have it – everything you need to create absolutely perfect Garlic Parmesan Crusted Tilapia right in your own kitchen! This recipe proves that you don’t need fancy techniques or hard-to-find ingredients to create a dish that’s both impressive and incredibly delicious. The combination of tender, flaky fish with that crispy, golden, cheesy topping is simply irresistible, and the fact that it comes together in just 20 minutes makes it a true weeknight hero.
Whether you’re cooking for your family, hosting friends, or just treating yourself to a special dinner, this garlic parmesan tilapia delivers on every level. It’s healthy, budget-friendly, and versatile enough to customize to your preferences. Plus, once you master this technique, you can apply that amazing crust to so many other proteins – chicken breasts, pork chops, shrimp, or other types of fish.
I’d love to hear how your Garlic Parmesan Crusted Tilapia turns out! Did you add your own twist? Serve it with an amazing side dish? Snap a photo and share it on Pinterest using the hashtags below – I always love seeing your creations! And if you loved this recipe, please leave a comment and let me know. Your feedback helps other home cooks discover these delicious recipes!
Now grab those tilapia fillets and get cooking – a restaurant-quality dinner is just 20 minutes away!

