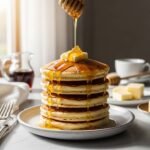
Imagine waking up to a stack of golden, fluffy pancakes drizzled with sweet, melted honey butter that soaks into every tender layer. These Sweet Honey Butter Pancakes are the ultimate breakfast comfort food that transforms an ordinary morning into something truly special.
This recipe delivers pancakes that are impossibly light and fluffy on the inside with perfectly golden edges, topped with a heavenly honey butter that melts into a sweet, creamy glaze. They’re perfect for lazy weekend brunches, special occasion breakfasts like Mother’s Day or birthdays, holiday mornings with family, or anytime you want to treat yourself and your loved ones to something extraordinary.
What makes these pancakes stand out is the combination of a foolproof batter that creates those picture-perfect fluffy stacks, paired with homemade honey butter that takes just minutes to whip together. The honey butter is the secret weapon here – it’s sweet but not overwhelming, buttery and rich, with that distinctive floral honey flavor that makes every bite absolutely divine.
Whether you’re serving these to kids who will devour them in seconds, impressing brunch guests, or simply indulging in a cozy breakfast-for-dinner moment, these Sweet Honey Butter Pancakes will quickly become your go-to recipe. They’re everything pancakes should be: simple, delicious, and absolutely irresistible.
History / Background
Pancakes are one of the oldest prepared foods in human history, with evidence of pancake-like foods dating back to ancient Greece and Rome. However, the fluffy American-style pancake we know and love today has a distinctly different origin story that’s tied to the evolution of American breakfast culture.
The transformation of pancakes in America began in the 19th century with several key innovations. Before the 1850s, pancakes were dense, flat cakes similar to crepes. The game-changer came with the commercial availability of baking powder and baking soda, which allowed home cooks to create lighter, fluffier pancakes without relying on yeast fermentation or beaten egg whites alone.
By the early 1900s, fluffy pancakes had become a breakfast staple in American homes and diners. The iconic image of a tall stack of golden pancakes with butter and syrup became synonymous with the American breakfast tradition. Pancake houses began popping up across the country, and brands like Aunt Jemima (now Pearl Milling Company) and Bisquick made pancake preparation even more accessible with their ready-made mixes.
The honey butter component has roots in Southern cooking traditions, where honey was often more readily available than refined sugar in rural areas. Southern cooks discovered that whipping softened butter with honey created a spreadable, sweet topping that was perfect for biscuits, cornbread, and yes, pancakes. This tradition spread throughout the United States, becoming particularly popular in Texas and other Southern states.
The combination of fluffy American pancakes with honey butter represents the evolution of American comfort food – taking a simple, ancient food and elevating it with accessible ingredients and techniques that create something special. Today, honey butter pancakes are beloved in breakfast restaurants across America, from small-town diners to upscale brunch spots, and have become a favorite homemade breakfast for families who want to create special morning memories.
Why You’ll Love This Recipe
These Sweet Honey Butter Pancakes are about to become your new favorite weekend breakfast tradition, and once you taste them, you’ll understand why they’re worth waking up early for.
Here’s what makes this recipe absolutely incredible:
- Unbelievably Fluffy – These pancakes rise tall and stay light and airy, never dense or rubbery, thanks to the perfect balance of leavening agents
- Quick and Easy – Ready in just 25 minutes from start to finish, with simple ingredients you probably already have in your pantry
- Kid-Approved – Children absolutely love these sweet, fluffy pancakes, making breakfast time much easier for parents
- Budget-Friendly – Costs just a few dollars to make a batch that feeds the whole family, much cheaper than going out for brunch
- Make-Ahead Friendly – The batter can be prepped the night before, and the honey butter keeps for weeks in the fridge
- Customizable – Easily adapt with mix-ins like blueberries, chocolate chips, or bananas to suit everyone’s preferences
- Impressive but Simple – Looks and tastes like a fancy brunch restaurant dish but requires only basic cooking skills
- Perfect Every Time – This foolproof recipe delivers consistent results, even for beginner cooks
- Freezer-Friendly – Make a big batch and freeze extras for quick weekday breakfasts that reheat beautifully
- Crowd-Pleaser – Everyone from toddlers to grandparents will ask for seconds of these sweet, buttery pancakes
Ingredient Notes
Let’s break down what makes these pancakes so special. Each ingredient serves a specific purpose in creating that perfect fluffy texture and sweet honey flavor.
All-Purpose Flour – The foundation of your pancakes. All-purpose flour provides the right amount of structure without making the pancakes tough. You can substitute with 1:1 gluten-free flour blend if needed, though the texture will be slightly different.
Baking Powder – This is the key to fluffy pancakes! Make sure your baking powder is fresh (less than 6 months old) for maximum lift. Old baking powder won’t create those beautiful air pockets.
Baking Soda – Works alongside the baking powder and reacts with the buttermilk to create extra fluffiness and a tender crumb.
Sugar – Just enough sweetness in the batter to complement the honey butter without making the pancakes overly sweet. Granulated white sugar works best.
Salt – Essential for balancing flavors and enhancing the sweetness. Never skip the salt!
Buttermilk – The secret ingredient that makes these pancakes incredibly tender and adds a subtle tang. The acidity also activates the baking soda for extra rise. If you don’t have buttermilk, make your own by adding 1 tablespoon of lemon juice or vinegar to 1 cup of regular milk and letting it sit for 5 minutes.
Eggs – Provide structure, richness, and help bind everything together. Room temperature eggs incorporate more easily into the batter.
Melted Butter – Adds flavor and richness while keeping the pancakes moist. Make sure it’s melted but not hot, or it will cook the eggs in the batter.
Vanilla Extract – Enhances all the other flavors and adds warmth and depth to the pancakes.
For the Honey Butter:
Unsalted Butter – Must be softened to room temperature so it whips properly. Unsalted allows you to control the salt level.
Honey – Use good quality honey for the best flavor. Clover honey is mild and sweet, while wildflower honey has more complex notes.
Salt – Just a pinch balances the sweetness and makes the honey flavor pop.
Vanilla Extract – Adds an extra layer of flavor that makes the honey butter taste even more special.
Equipment Needed
You don’t need any fancy equipment to make perfect pancakes – just these basic kitchen tools:
- Large mixing bowl – For combining the dry ingredients
- Medium mixing bowl – For whisking together the wet ingredients
- Whisk – For mixing the batter and whipping the honey butter
- Measuring cups and spoons – For accurate measurements
- Griddle or large non-stick skillet – A griddle is ideal because you can cook multiple pancakes at once, but a 10-12 inch skillet works great too
- Ladle or 1/4 cup measuring cup – For portioning the batter consistently
- Spatula – A wide, thin spatula makes flipping easier
- Small mixing bowl – For making the honey butter
- Electric mixer or whisk – For whipping the honey butter until fluffy (a fork works in a pinch)
- Cooling rack – Optional but helpful for keeping pancakes warm in the oven without getting soggy
-
Print

Fluffy Sweet Honey Butter Pancakes – The Best Breakfast Recipe Ever!
- Total Time: 25 minutes
- Yield: 12 pancakes (4-6 servings) 1x
- Diet: Vegetarian
Description
These Sweet Honey Butter Pancakes are impossibly fluffy, golden, and topped with the most delicious homemade honey butter. Perfect for weekend breakfasts, special occasions, or anytime you’re craving the ultimate comfort food breakfast!
Ingredients
ScaleFor the Pancakes:
- 2 cups all-purpose flour
- 2 tablespoons granulated sugar
- 2 teaspoons baking powder
- 1 teaspoon baking soda
- 1/2 teaspoon salt
- 2 cups buttermilk, room temperature
- 2 large eggs, room temperature
- 1/4 cup unsalted butter, melted and slightly cooled
- 1 teaspoon vanilla extract
- Butter or oil for cooking
For the Honey Butter:
- 1/2 cup (1 stick) unsalted butter, softened to room temperature
- 1/4 cup honey
- 1/4 teaspoon vanilla extract
- Pinch of salt
Instructions
Make the Honey Butter:
- Whip the Butter: In a small bowl, use an electric mixer or whisk to beat the softened butter for 2-3 minutes until it’s light and fluffy. This incorporates air and makes it spreadable.
- Add Honey and Flavorings: Add the honey, vanilla extract, and a pinch of salt. Beat on medium speed for another 2-3 minutes until everything is well combined and the mixture is smooth and creamy. The honey butter should be light in color and have a whipped consistency. Set aside at room temperature while you make the pancakes, or refrigerate if making ahead.
Make the Pancakes:
- Combine Dry Ingredients: In a large mixing bowl, whisk together the flour, sugar, baking powder, baking soda, and salt until evenly combined. Make a well in the center.
- Mix Wet Ingredients: In a separate medium bowl, whisk together the buttermilk, eggs, melted butter, and vanilla extract until smooth and well combined.
- Combine Wet and Dry: Pour the wet ingredients into the well in the dry ingredients. Gently fold together with a spatula or whisk until just combined. The batter should be slightly lumpy – do not overmix! A few small lumps are perfectly fine and will result in fluffier pancakes. Let the batter rest for 5 minutes while you heat your griddle.
- Heat the Griddle: Preheat a griddle or large non-stick skillet over medium heat (about 350°F if your griddle has a temperature setting). Lightly grease with butter or a small amount of oil. Test the temperature by dropping a tiny bit of batter on the surface – it should sizzle gently.
- Cook the Pancakes: Using a 1/4 cup measure or ladle, pour batter onto the hot griddle, spacing pancakes about 2 inches apart. Cook for 2-3 minutes until bubbles form on the surface and the edges look set and slightly dry. You’ll see the bubbles pop and leave little holes – this is the perfect time to flip.
- Flip and Finish: Carefully flip each pancake with a spatula and cook for another 1-2 minutes on the second side until golden brown. The pancake should spring back when gently pressed. Transfer to a plate or keep warm in a 200°F oven on a cooling rack while you cook the remaining batter.
- Serve with Honey Butter: Stack the warm pancakes on plates and top each stack with a generous dollop of honey butter. The heat from the pancakes will melt the honey butter into a sweet, buttery glaze. Serve immediately with extra honey butter on the side and your favorite toppings.
Notes
- Don’t Overmix: The number one rule for fluffy pancakes is to not overmix the batter. Stir just until the dry ingredients are moistened. Lumps are good!
- Temperature Matters: Ingredients at room temperature mix more easily and create a better texture. Take your eggs and buttermilk out of the fridge 30 minutes before starting.
- Test Your Heat: If pancakes brown too quickly on the outside but are raw inside, your heat is too high. If they take forever to brown, increase the heat slightly.
- Honey Butter Variations: Try adding a pinch of cinnamon, a little lemon zest, or even a touch of maple syrup to your honey butter for different flavor profiles.
- Keep Pancakes Warm: Place finished pancakes on a cooling rack set over a baking sheet in a 200°F oven. This keeps them warm without getting soggy.
- Prep Time: 10 minutes
- Cook Time: 15 minutes
- Category: Breakfast, Brunch
- Method: Stovetop/Griddle
- Cuisine: American
Nutrition
- Serving Size: 3 pancakes with 2 tablespoons honey butter
- Calories: 485
- Sugar: 22g
- Sodium: 580mg
- Fat: 22g
- Saturated Fat: 13g
- Unsaturated Fat: 8g
- Trans Fat: 0g
- Carbohydrates: 62g
- Fiber: 2g
- Protein: 11g
- Cholesterol: 125mg
-
Nutrition information is approximate and calculated for 3 pancakes with honey butter. Actual values may vary based on specific brands and measurements used.
Tips & Variations
Blueberry Honey Butter Pancakes:
Gently fold 1 cup of fresh or frozen blueberries into the batter just before cooking. The berries will burst and create beautiful purple swirls. Add a touch of lemon zest to the honey butter for a complementary citrus note.Chocolate Chip Pancakes:
Stir in 1/2 cup of mini chocolate chips to the batter, or place a few chips on each pancake right after pouring it on the griddle. Kids go absolutely crazy for these!Banana Pancakes:
Mash one ripe banana and mix it into the wet ingredients, or slice a banana thinly and place slices on each pancake right after pouring. The banana adds natural sweetness and makes them extra moist.Whole Wheat Version:
Substitute half of the all-purpose flour with whole wheat flour for added fiber and nutrition. You may need to add an extra tablespoon or two of buttermilk as whole wheat absorbs more liquid.Cinnamon Sugar Pancakes:
Add 1 teaspoon of ground cinnamon to the dry ingredients and increase the sugar to 3 tablespoons. Mix cinnamon into the honey butter as well for a cozy, warm flavor.Lighter Version:
Use low-fat buttermilk and reduce the butter in the batter to 2 tablespoons. The pancakes will still be fluffy but with fewer calories.Vegan Adaptation:
Replace buttermilk with non-dairy milk mixed with vinegar, use flax eggs (1 tablespoon ground flaxseed + 3 tablespoons water per egg), and substitute vegan butter. For the honey butter, use vegan butter and maple syrup instead of honey.Protein Pancakes:
Add 1/4 cup of protein powder to the dry ingredients and reduce flour by 1/4 cup. You may need to add extra buttermilk to maintain the right consistency.Pro Chef Tips
Tip #1: Rest Your Batter
Letting the batter rest for 5-10 minutes allows the flour to fully hydrate and the gluten to relax, resulting in more tender pancakes. The baking powder also starts working during this time, creating extra fluffiness.Tip #2: The Bubble Test is Everything
Don’t flip your pancakes too early! Wait until you see bubbles forming across the entire surface and the edges look set. When those bubbles pop and leave little holes that don’t fill back in, that’s your signal to flip. This ensures the middle is cooked through.Tip #3: Butter Your Griddle Strategically
Too much butter on the griddle creates greasy pancakes with uneven browning. Use just a light coating – I like to use a paper towel to spread a thin layer. Re-butter lightly between batches.Tip #4: Perfect Consistency Check
Your batter should pour smoothly but not run like water. It should be thicker than crepe batter but thinner than cookie dough – think of a thick milkshake consistency. If it’s too thick, add buttermilk one tablespoon at a time.Tip #5: Don’t Press Down
Resist the urge to press down on pancakes with your spatula while they cook. This squeezes out all those beautiful air pockets you worked so hard to create, resulting in flat, dense pancakes.Tip #6: Room Temperature Honey Butter
For the best spreadable, melt-in-your-mouth honey butter, make sure your butter is truly softened to room temperature (not microwaved soft). Cold butter won’t whip properly, and melted butter will separate from the honey.Common Mistakes to Avoid
Overmixing the Batter:
This is the biggest pancake mistake! When you overmix, you develop too much gluten, which makes pancakes tough and chewy instead of light and fluffy. Mix just until you can’t see dry flour anymore – lumps are completely fine and will cook out.Cooking at the Wrong Temperature:
If your heat is too high, pancakes will burn on the outside before cooking through. Too low, and they’ll be pale, dense, and take forever to cook. Medium heat (around 350°F) is the sweet spot. The first pancake is always a test – adjust temperature as needed.Flipping Too Soon or Too Often:
Only flip once! Flipping too early means raw batter runs out, and flipping multiple times makes pancakes dense. Wait for those bubbles to appear and pop before flipping, then cook the second side until golden.Using Old Leavening Agents:
Baking powder and baking soda lose their effectiveness over time. If your pancakes aren’t rising properly, check the expiration dates. Test baking powder by dropping a spoonful in hot water – it should fizz vigorously.Crowding the Pan:
Leave at least 2 inches between pancakes so you have room to flip them easily. Crowding makes them steam instead of developing that nice golden crust, and flipping becomes a nightmare.Storage & Meal Prep
Refrigerator Storage:
Store leftover pancakes in an airtight container or zip-top bag with parchment paper between layers to prevent sticking. They’ll keep in the refrigerator for up to 5 days. The honey butter can be stored in a sealed container in the fridge for up to 2 weeks. Bring it to room temperature before serving for the best spreadable texture.Reheating Pancakes:
For best results, reheat refrigerated pancakes in the toaster or toaster oven until warmed through and slightly crispy on the edges (about 2-3 minutes). You can also microwave them for 20-30 seconds per pancake, though they won’t be as crispy. For reheating multiple pancakes, warm them in a 350°F oven for 5-7 minutes.Keeping Pancakes Fresh:
If you’re serving pancakes to a crowd and need to keep batches warm, place them on a cooling rack set on a baking sheet in a 200°F oven. The cooling rack prevents them from getting soggy on the bottom. Don’t stack them directly on a plate or they’ll steam and become gummy.Honey Butter Storage:
The honey butter stays soft and spreadable at room temperature for up to 3 days if your kitchen isn’t too warm. For longer storage, keep it refrigerated and simply bring to room temperature 30 minutes before serving, or microwave for 10-15 seconds to soften.Make-Ahead & Freezer Notes
Make-Ahead Batter:
You can mix the dry ingredients up to 1 week in advance and store in an airtight container. The night before you want pancakes, mix the wet and dry ingredients together and store the batter in the refrigerator overnight. Give it a gentle stir before cooking (but don’t overmix). The pancakes will be extra fluffy because the baking powder has extra time to work!Make-Ahead Honey Butter:
The honey butter can be made up to 2 weeks in advance and refrigerated. You can even shape it into a log using plastic wrap, chill until firm, and slice rounds to top your pancakes. This looks beautiful for special occasion breakfasts!Freezing Pancakes:
These pancakes freeze beautifully! Let them cool completely on a wire rack, then place in a single layer on a baking sheet and freeze for 1 hour until solid. Transfer to a freezer-safe bag with parchment paper between layers. They’ll keep for up to 3 months. This is perfect for meal prep – make a double batch on Sunday and have quick breakfasts all week!Reheating Frozen Pancakes:
Pop frozen pancakes directly into the toaster (my favorite method – they come out crispy on the edges and fluffy inside). You can also microwave them for 45-60 seconds, or reheat in a 350°F oven for 8-10 minutes. No need to thaw first.Freezing Honey Butter:
Honey butter freezes well for up to 3 months. Form it into a log, wrap tightly in plastic wrap and foil, and freeze. Slice off rounds as needed, or thaw overnight in the refrigerator. Whip it again briefly before serving to restore the fluffy texture.Serving Suggestions
While these Sweet Honey Butter Pancakes are absolutely delicious on their own, here are some ways to make breakfast even more special:
Classic Breakfast Sides:
Crispy Bacon or Turkey Bacon – The salty, savory crunch is the perfect contrast to sweet, fluffy pancakes. Cook it extra crispy!
Breakfast Sausage Links or Patties – Whether you prefer pork, turkey, or vegetarian sausage, the savory element balances the sweetness beautifully.
Scrambled Eggs – Fluffy scrambled eggs add protein and make the breakfast more filling. Try them with a little cream cheese folded in for extra richness.
Fresh Fruit Salad – A colorful mix of berries, melon, grapes, and citrus adds freshness and helps balance the richness of the honey butter.
Yogurt Parfait – Layer Greek yogurt with granola and berries for a lighter side that adds protein and crunch.
Hash Browns or Home Fries – Crispy potatoes make the breakfast feel complete and hearty.
Additional Toppings:
Pure Maple Syrup – While the honey butter is amazing, some people love adding warm maple syrup on top as well for extra sweetness.
Fresh Berries – Strawberries, blueberries, raspberries, or blackberries add color, freshness, and natural sweetness.
Whipped Cream – A dollop of fresh whipped cream makes these feel like a special occasion breakfast or dessert.
Toasted Pecans or Walnuts – Chopped nuts add a wonderful crunch and nutty flavor that pairs beautifully with honey.
Banana Slices – Fresh banana slices are a classic pancake topping that kids especially love.
Beverage Pairings:
Fresh Orange Juice – The bright citrus cuts through the richness perfectly.
Hot Coffee – A necessity for many! The bitter notes complement the sweet pancakes.
Cold Milk – Especially popular with kids, and perfect for dunking bacon!
Hot Chocolate – For a truly indulgent breakfast or breakfast-for-dinner situation.
FAQs Section
Can I make these pancakes without buttermilk?
Yes! Make your own buttermilk substitute by adding 2 tablespoons of white vinegar or lemon juice to 2 cups of regular milk. Stir and let sit for 5 minutes until it curdles slightly. This creates the same acidity that reacts with the baking soda for fluffy pancakes. You can also use plain yogurt thinned with milk to reach buttermilk consistency.Why are my pancakes flat and not fluffy?
This usually happens for a few reasons: overmixing the batter (which deflates air bubbles), using expired baking powder or baking soda, or not letting the batter rest before cooking. Make sure your leavening agents are fresh (test baking powder by dropping it in hot water – it should fizz vigorously), mix the batter just until combined, and let it rest for 5 minutes before cooking.Can I substitute regular milk for buttermilk?
While buttermilk gives the best results with superior flavor and texture, you can use regular milk in a pinch. However, you’ll need to adjust the recipe: reduce the baking soda to 1/4 teaspoon and increase the baking powder to 3 teaspoons. The pancakes won’t be quite as tangy or fluffy, but they’ll still be delicious.How do I know when to flip the pancakes?
Watch for three signs: bubbles forming across the entire surface of the pancake, those bubbles popping and leaving holes that don’t fill back in, and the edges looking set and slightly dry. This usually takes 2-3 minutes on the first side. If you flip too early, raw batter will spill out.Can I make the honey butter with salted butter?
You can, but the honey butter will taste saltier. If using salted butter, skip the pinch of salt in the recipe or it might be too salty. Unsalted butter gives you better control over the flavor and is generally preferred for baking and sweet applications.What’s the best way to keep pancakes warm for a crowd?
Preheat your oven to 200°F and place a wire cooling rack on a baking sheet. As pancakes come off the griddle, place them on the rack in a single layer (not stacked). This keeps them warm for up to 30 minutes without getting soggy. The wire rack allows air circulation so the bottoms stay crispy.Can I use honey in the pancake batter instead of sugar?
Yes! Replace the 2 tablespoons of sugar with 3 tablespoons of honey, and reduce the buttermilk by 1 tablespoon to compensate for the extra liquid. The pancakes will have a subtle honey flavor and may brown slightly faster, so watch them carefully while cooking.Conclusion
These Sweet Honey Butter Pancakes are proof that the best things in life don’t have to be complicated. With simple ingredients, straightforward techniques, and a little love, you can create a breakfast that’s so delicious, so comforting, and so memorable that it becomes a family tradition.
Whether you’re making these for a special weekend brunch, a holiday breakfast, or just because it’s Tuesday and you deserve something wonderful, these fluffy pancakes topped with homemade honey butter will make everyone at your table smile. There’s something magical about gathering around a stack of golden pancakes, watching the honey butter melt and pool in all the nooks and crannies, and enjoying each sweet, fluffy bite together.
The beauty of this recipe is that it’s foolproof enough for beginners but impressive enough to serve to guests. Once you master the basics, you can customize them endlessly with different mix-ins, flavors, and toppings to keep breakfast exciting week after week.
I can’t wait to hear how your Sweet Honey Butter Pancakes turn out! Did you add any special mix-ins? Did your family devour them as quickly as mine does? Take a photo of your beautiful stack and share it on Pinterest so other breakfast lovers can discover this recipe. Leave a comment below and let me know what you think – your feedback makes my day and helps other home cooks know what to expect.
If you loved this recipe, please save it to your favorite Pinterest breakfast board so you can make it again and again. Here’s to many more delicious mornings filled with fluffy pancakes, sweet honey butter, and the people you love!